
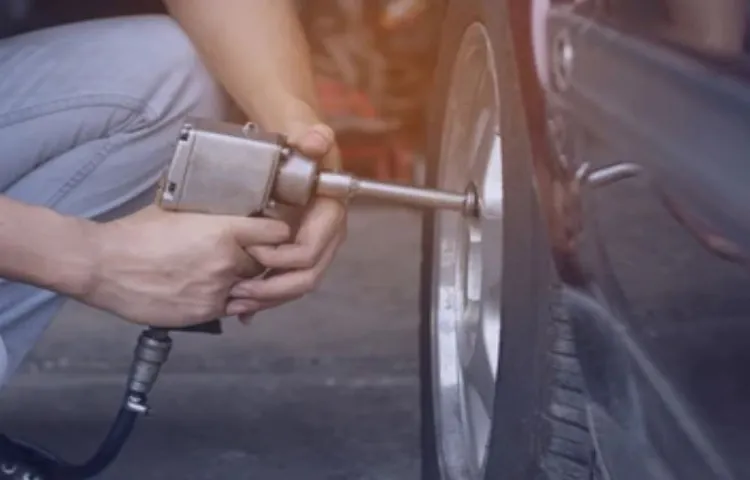
Replacing a flat tire can be a daunting task, especially if you have never done it before. With various tools and components involved, it can be challenging to know where to start and what needs to be done. However, removing a tire after lug nuts is actually a relatively straightforward process.
By following a few simple steps, you can remove the flat tire quickly and ensure that your vehicle is back on the road safely and efficiently. In this step-by-step guide, we will walk you through the process of removing a tire after lug nuts, providing you with confidence should you ever find yourself with a flat tire and no professional help in sight.
Table of Contents
What You Need
Are you having trouble getting a tire off after removing the lug nuts? It can be frustrating and time-consuming trying to figure out how to get the tire off once those nuts are taken off. The key is to remember that the tire is stuck on the hub and may require a bit of effort to remove. One trick is to gently kick the tire on the opposite side of the hub to loosen it up.
You can also use a rubber mallet or a piece of wood to hit the tire from behind. Another tip is to apply some lubricant or penetrating oil to the hub and lug bolts to help loosen any rust or debris. However, be cautious not to get any lubrication on the brake rotor or pads as it may affect their performance.
With persistence and a bit of elbow grease, you should be able to successfully remove the tire and move onto your next repair or maintenance task.
Basic Tools
If you’re getting into DIY projects, there are some basic tools that you’ll need to have on hand. First and foremost, a hammer is a must-have for any home improvement project. A screwdriver set is also important, as it will allow you to tighten and loosen both screws and bolts.
A saw is necessary for cutting wood, and a measuring tape will help you accurately measure the dimensions of your project. Pliers are also useful for gripping and bending materials, while a level is essential for ensuring that your project doesn’t end up lopsided. Lastly, a power drill is a versatile tool that can be used for everything from attaching hardware to drilling holes.
By having these basic tools on hand, you’ll be able to tackle a wide range of DIY projects. So, whether you’re hanging shelves or building a garden bed, having these tools will make your DIY projects a breeze!
Safety Equipment
When it comes to using safety equipment, it’s always better to be safe than sorry. Accidents can happen at any time, but with the right gear, you can minimize the risks. To ensure your safety, there are several items you should have on hand.
First and foremost, a sturdy hard hat is essential for any job that involves working at heights or near heavy machinery. A high-visibility vest is also crucial so that you can be easily seen by others working on-site. Protective eyewear, such as safety goggles or glasses, can shield your eyes from harmful chemicals, dust, and flying debris.
Gloves are necessary for jobs that involve handling sharp objects or chemicals that could irritate your skin. Lastly, a respiratory mask can protect you from breathing in hazardous fumes or particles. Remember, investing in proper safety equipment is an investment in your health and well-being.
So, be sure to equip yourself with the right gear for every job.
Loosening the Lug Nuts
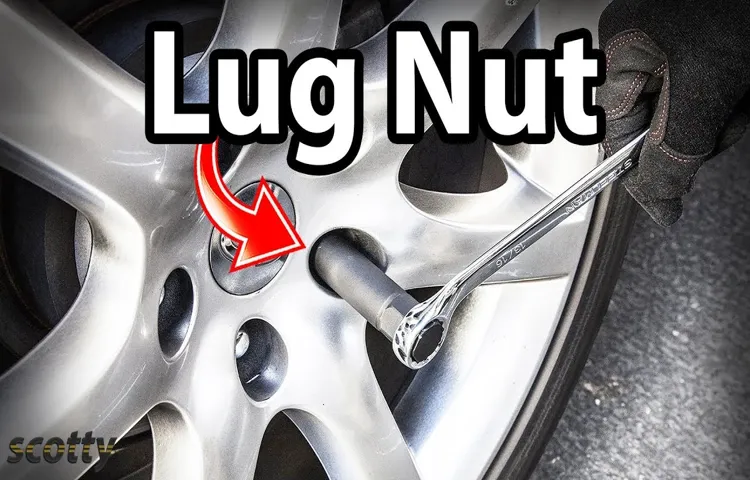
If you’re having trouble getting a tire off after removing the lug nuts, don’t fret – there are a few simple steps you can take to loosen it up. First and foremost, make sure the car is in park and the emergency brake is engaged. Then, using a lug wrench, try turning the lug nuts counterclockwise.
If they’re too tight, you can try using a breaker bar for more leverage. Still having trouble? Applying some penetrating oil around the lugs can help loosen things up. Let it sit for a few minutes before attempting to remove the tire again.
It’s also important to make sure you’re applying pressure using the right technique. Instead of standing straight up, try pushing down on the wrench with your foot while standing to one side of the tire. This will allow you to apply more force without risking injury.
With these tips, you should be able to get your tire off in no time – just be sure to tighten the lug nuts properly when putting it back on.
Finding the Proper Jacking Point
When it comes to changing a tire, one of the most important steps is finding the proper jacking point for your vehicle. This will ensure that the car is lifted safely and securely, without risking damage to any important components. The jacking point can typically be found in the owner’s manual or on a sticker located somewhere in the car.
Once you’ve located the jacking point, you’ll need to position the jack correctly and begin jacking up the car. But before you do that, it’s important to loosen the lug nuts on the tire that needs to be changed. This can be done using a lug wrench or a socket wrench, and it’s important to remember to turn the wrench counterclockwise to loosen the nuts.
By doing this before jacking up the car, you’ll save yourself some time and effort later on, as it will be much easier to remove the nuts once the car is lifted off the ground. So before you begin changing your tire, make sure you locate the proper jacking point and loosen the lug nuts – these steps will help ensure a safe and efficient tire change.
Jacking Up the Car
Jacking up a car can be quite a daunting task, especially if you’re not familiar with it. However, with a few tips, you can quickly get through the process. The first thing you need to know is how to loosen the lug nuts.
To begin with, park your car on a level and solid surface, loosen the lug nuts on the wheels that you intend to jack up. This step should be done before jacking up your car as it requires the weight of your car. You can use a lug wrench to loosen the lug nuts.
Always remember to turn the wrench in a counter-clockwise direction to loosen the nuts. Do not remove them entirely, just loosen them. Keep in mind that if the lug nuts are too tight, you may need to use more force or leverage.
For example, you can use your foot to apply extra pressure on the wrench for more leverage. Once you’re done loosening the lug nuts, you can now proceed to jack up your car.
Removing the Hubcap or Wheel Cover
When it comes to removing a hubcap or wheel cover, the first step is to loosen the lug nuts. These nuts keep the wheel securely attached to the car, so it’s important to loosen them carefully to avoid any accidents. To loosen the lug nuts, you’ll need a lug wrench that fits the nuts snugly.
Make sure the car is on a flat and stable surface and use the lug wrench to turn each nut counterclockwise. You may need to use some force to break the nuts loose, especially if they’ve been tightened too much or haven’t been removed in a while. It’s important to only loosen the nuts at this stage and not fully remove them yet.
Once the nuts are loose, you can move on to the next step in removing the hubcap or wheel cover.
Breaking the Lug Nuts Loosely
Loosening the lug nuts on your car’s wheels is an essential step before changing a flat tire. However, if you’ve ever been stuck on the side of the road struggling to remove a stubborn lug nut, you’ll appreciate the importance of breaking them loose beforehand. To do this, use a lug wrench or a breaker bar and apply pressure in a counterclockwise direction.
It’s best to start with the lug nut furthest from you and work your way around in a star pattern. By loosening them slightly first, you’ll make it much easier to remove them completely when it’s time to change the tire. Remember not to unscrew them completely until the car is raised and secure, as this can cause the wheel to spin.
So, take the time to break the lug nuts loose properly, and you’ll save yourself a lot of hassle on the side of the road.
Removing the Tire
Getting the tire off after removing lug nuts can be a bit of a challenge if you’re not sure what you’re doing. The first step is to loosen the lug nuts while the tire is still on the ground. Once they’re loose, use a jack to lift the vehicle and remove the lug nuts completely.
After this, slide the tire off the wheel hub and wiggle it gently if it’s stuck. If it still won’t budge, you can use a rubber mallet to tap it free. Finally, inspect the tire and wheel hub for any damage or wear before installing a new tire.
Remember to always use caution when removing tires, and if you’re unsure of how to do it yourself, seek out professional assistance. With a little practice, you’ll be able to get your tires off with ease. So, get that tire off after lug nuts and get back on the road safely!
Lifting the Vehicle
Lifting the vehicle is a task that needs caution and precision. Before removing a tire, it is crucial to lift the vehicle with a floor jack in a safe and secure manner. Failing to do so can result in serious injury or even death.
When lifting the vehicle, it’s essential to locate the proper jack points specified in the user manual. These jack points are designed to bear the weight of the vehicle and provide balance while lifting. It’s essential to place the jack on stable and level ground and ensure that the vehicle is in park or neutral with the emergency brake engaged.
Once the vehicle is lifted, it’s crucial to use jack stands to keep the vehicle secured at the proper height. At this point, it’s safe to remove the tire using the appropriate tools, such as a lug wrench and jack stand. It’s crucial to keep in mind that safety is key when performing any maintenance tasks on a vehicle.
Removing the Lug Nuts Completely
Removing the tire is an essential part of changing a flat or damaged tire. Once you have loosened the lug nuts, it’s time to proceed with the actual removal of the tire. First, you want to make sure that the vehicle is raised and stabilized properly.
Then, use a tire iron to completely remove the lug nuts from the wheel. Be sure to keep the lug nuts in a safe place, so you don’t lose them. After the lug nuts are removed, you’ll be able to pull the wheel off of the hub.
It may require some force, but it should come off without too much effort. If you’re struggling, try giving the wheel a few gentle kicks or wiggles to help loosen it from the hub. Once the wheel is removed, you can then inspect the tire for damage and proceed with either repairing or replacing it.
With the tire now removed, you’re one step closer to getting back to driving safely on the road.
Taking Off the Tire Carefully
When it comes to removing a tire, you need to take your time and be careful to avoid any damage or injury. First, loosen the lug nuts on the wheel while it’s still on the ground. Then, use a jack to lift the car and remove the lug nuts and wheel.
With the wheel off, you can start removing the tire. Be sure to use a lever or tool designed for tire removal, as using the wrong tool can cause damage. Gently work your way around the tire, prying it off the rim until it comes off completely.
Remember to check the inside of the tire and rim for any damage or debris before putting on a new tire. Removing a tire can be a simple process if done carefully and correctly.
Final Steps
When trying to remove a tire after taking off the lug nuts, there are a few final steps that need to be taken. First, make sure the vehicle is securely supported with a jack stand. Then, use a rubber mallet or a piece of wood to tap around the edge of the tire to loosen any rust or debris that might be holding it in place.
Next, gently grab the tire and wiggle it back and forth to further loosen any resistance. If the tire still won’t budge, you can try using a tire iron or a pry bar to gently nudge it away from the hub. Be sure to apply pressure evenly and avoid damaging any of the surrounding parts.
Once the tire is free, lift it off and replace it with a new one or take it in for repairs. Remember to always use caution and common sense when working on your vehicle to avoid injury or damage. With a little patience and persistence, you’ll be back on the road in no time!
Checking the Tire Condition
After checking the tire pressure and ensuring that they are rotated regularly, the final step in maintaining your tires is to check their overall condition. You should inspect the tread for signs of wear, uneven wear, and any foreign objects that may have lodged in the tire. Look for cuts or bulges in the sidewall that can lead to a blowout or other damage.
If you notice any of these issues, it’s essential to get your tire checked by a professional as soon as possible. Remember, your tires are the only thing between you and the road, so keeping them in excellent condition is critical for your safety and the safety of others on the road.
Replacing the Tire
Now that you’ve successfully jacked up your car and removed the flat tire, it’s time to put on the new one. First, align the rim with the tire valve and slide it onto the hub. Ensure that all the bolts are in their respective openings in the rim before tightening them using your lug wrench.
Tighten each bolt gradually and in a staggered sequence to ensure that the tire goes on evenly and securely. Then, lower your car carefully back to the ground and double-check each nut’s tightness. Finally, inspect the replaced tire to make sure it’s correctly centered on the hub and that the lug nuts are securely fastened and in place.
Congratulations! You’ve successfully replaced your car’s tire and are now ready to take on the road once again.
Tightening the Lug Nuts
After changing a tire, the next important step is to tighten the lug nuts. Trying to drive without tightening the lug nuts can be dangerous and lead to steering problems. To tighten the lug nuts, you need to place the lug wrench on the nut and turn it clockwise until it is tight.
Don’t over-tighten it as this could damage the threads or snap the stud. A good rule of thumb is to tighten each lug nut to half of the required torque specification, then go back and tighten each one to the full torque. This ensures that each nut is tightened evenly and securely.
Once you’ve tightened all the lug nuts, double-check each one to ensure they are tight enough. It’s crucial to do this final step correctly, as a loose tire could cause a car accident.
Lowering the Car
Now that you’ve gone through the process of ensuring that your car is level, it’s time to start with the final steps in lowering your car. The most essential step is to adjust the suspension. It’s best to take your car to a professional mechanic who can do this for you, as failing to do it right can result in problems ranging from a bumpy ride to accidents on the road.
Once the suspension is in order, you need to adjust the alignment of the wheels. This is critical, as lowering the car can alter the car’s caster and camber angles, which affects how your car handles. Lastly, you need to test drive your car once these adjustments are completed to ensure that everything is working smoothly.
Remember to take caution when driving, as the lowered car will be closer to the ground and will require extra attention when going over bumps and potholes. With these final steps completed, you’ll finally have the lowered car of your dreams.
Double-Checking the Lug Nuts
Double-checking the lug nuts on your vehicle is one of the final steps in ensuring your wheels are properly secured. This step is crucial in maintaining safety and preventing any accidents caused by loose tires. It is essential to perform this check after replacing your tires or carrying out any repairs that involve removing the wheels.
Once your vehicle is back on all four wheels, use a torque wrench to tighten the lug nuts according to the manufacturer’s specifications. After tightening, it is important to recheck the lug nuts’ tightness using a torque wrench or a lug wrench. The recommended torque setting can be found in your vehicle manual or on the manufacturer’s website.
This step will ensure that the lug nuts are snug and secure, giving you peace of mind when you hit the road. Remember that safety should always come first!
Conclusion
Well, it seems like we’ve come full circle from the frustration of not being able to get our tire off after removing the lug nuts. But fear not, my friends, for the solution is simpler than you might think. By using some good old-fashioned elbow grease, a bit of patience, and some leverage from a trusty jack, you’ll have that tire off in no time.
And remember, if all else fails, there’s always a friendly mechanic just a phone call away. So, don’t be a lug nut yourself, get that tire off and hit the road with confidence.”
FAQs
What tools do I need to get a tire off after lug nuts?
To get a tire off after lug nuts, you will need a lug wrench, a jack, and a wheel chock.
How do I use a lug wrench to get a tire off?
First, make sure your car is in park with the parking brake on. Then, use the lug wrench to loosen each lug nut by turning it counterclockwise. Once all the nuts are loose, use the jack to lift the car off the ground.
How do I use a jack to lift my car?
Place the jack under a sturdy point on your car’s frame, usually indicated by a notch or reinforced area. Use the jack’s crank handle to slowly lift the car off the ground. Once you have lifted the car high enough, you can remove the lug nuts and pull the tire off.
What should I do if my lug nuts won’t budge?
If your lug nuts are stuck and won’t loosen, try using a penetrating oil like PB Blaster to help loosen them. You can also try hitting the wrench with a rubber mallet to help break them loose.
How do I put a new tire on after removing the old one?
After removing the old tire, carefully place the new tire onto the hub and hand-tighten the lug nuts to hold it in place. Lower the car back to the ground and use the lug wrench to tighten the nuts in a star pattern, making sure they are all snugly in place.
How tight should my lug nuts be?
Lug nuts should be tightened to a specific torque setting, which can be found in your car’s owner’s manual. Over-tightening can warp your rotors, while under-tightening can cause the tire to wobble or even detach from the car.
What is a wheel chock, and why do I need one?
A wheel chock is a wedge-shaped block placed behind one of the car’s wheels when it is jacked up, preventing it from accidentally rolling forward or backward. Using a wheel chock ensures your car stays in place while you work on changing the tire.