
If you’ve ever seen a motorcycle or car in action, you may have noticed that their tires seem to sparkle and glitter. However, did you know that you too can have sparkling tires? Beading tires with fire is the new trend that will make your vehicle stand out from the crowd. But what is “beading” you ask? It’s the process of adding fine glass beads to your tire walls, which give off a fiery and beautiful glow when exposed to light.
And the best part? It’s easy to do yourself! In this step-by-step guide, we’ll walk you through the process of beading your tires with fire, so you can enjoy a unique and breathtaking addition to your vehicle.
Table of Contents
Introduction
Are you looking to give your car an edge? Beading your tires with fire is a fantastic way to do just that. Not only does it provide a unique look, but it also improves traction in wet conditions. It might sound intimidating, but the process is actually quite simple.
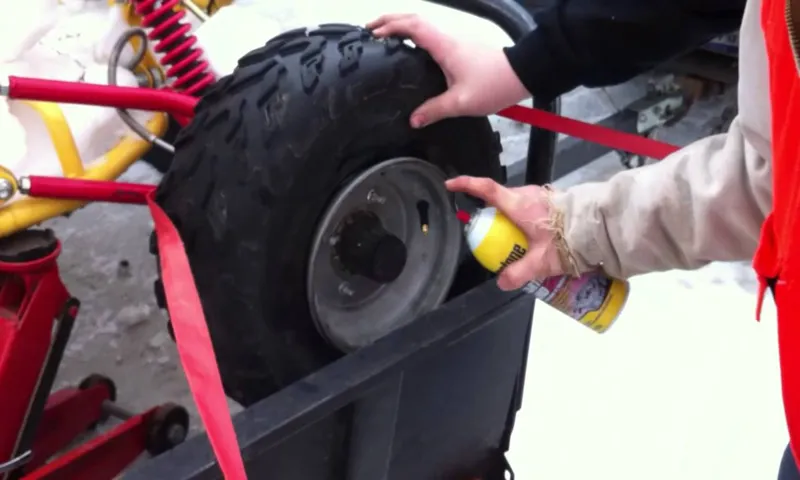
First, you’ll need to gather your materials, which include a propane torch, tire bead sealer, and some patience. Next, remove the tire from your vehicle and deflate it completely. Apply the tire bead sealer to the inside of the tire where the bead will be, and allow it to dry.
From there, use the propane torch to heat the tire’s bead area until it starts to bubble and melt slightly. Then, quickly spray the area with water to cool it down and effectively seal it. Repeat this step for the entire bead area, and you’ll have a set of tires that are ready to take on any road condition.
Don’t be afraid to try this out – it’s a simple yet effective way to upgrade your ride!
What is beading a tire with fire? Why do it?
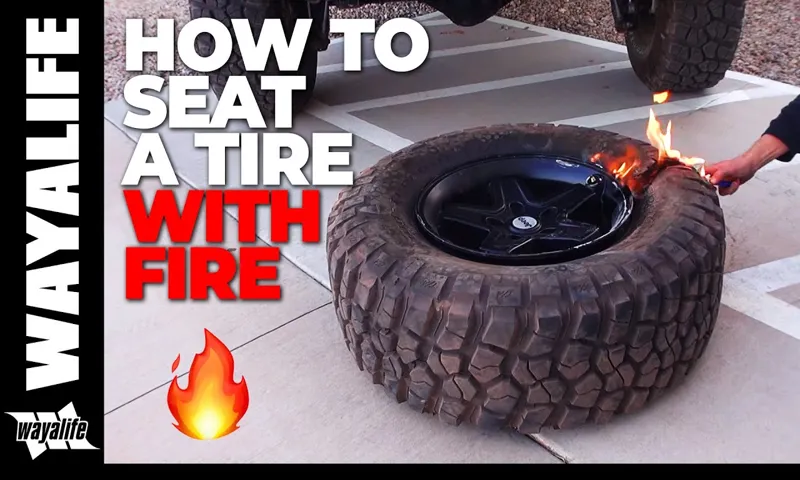
Beading a tire with fire is a practice that involves heating the sidewall of a tire with a blowtorch to create a beaded pattern on the tire’s surface. This practice is commonly associated with the world of off-road racing, where it is used to increase the tires’ traction on loose terrain like gravel, sand, or mud. The process of beading a tire with fire involves applying heat to the outer layer of the tire, which causes the rubber to melt and form small beads or bumps.
These beads are then cooled and hardened, creating a rougher texture on the surface of the tire that provides better grip on uneven surfaces. While beading a tire with fire may seem like a simple process, it requires skill and practice to do correctly, as overheating the tire can cause it to weaken and become more susceptible to punctures or blowouts. Nevertheless, when done correctly, beading a tire with fire can provide a significant performance boost for off-road vehicles, especially when tackling challenging terrains.
Safety First: Precautions to Take
Bead a tire using fire is a process that requires caution and proper safety measures. Before beginning the process, always ensure you have a fire extinguisher nearby and a clear workspace with no flammable materials around. Be sure to wear protective gloves and goggles as the fire can reach high temperatures and cause serious harm.
Begin by removing the tire from the rim and then cleaning the bead thoroughly. Next, it’s time to ignite the fire using a flammable fluid such as gasoline, kerosene, or alcohol. Place the tire on the fire and allow it to heat up.
It is important not to rush this process as it can cause the tire to inflate or burst. Once the bead is heated up, carefully position the tire on the rim and use a tire iron to push the bead back into place. Repeat this process for the other side of the tire.
Remember to always prioritize safety over speed when learning how to bead a tire with fire.
Protective gear: heat-resistant gloves, goggles, fire extinguisher
Protective gear is an essential part of any fire safety plan. When dealing with high temperatures and potential flames, it’s crucial to have the right equipment on hand to protect yourself from harm. Heat-resistant gloves are one such item that can make all the difference in preventing burns and other injuries.
Goggles are another important piece of protective gear, as they shield your eyes from flying debris and potentially harmful chemicals. Finally, having a fire extinguisher nearby can help you quickly put out a small fire before it has a chance to grow into something more dangerous. By taking these precautions and outfitting yourself with the proper protective gear, you’ll be better equipped to handle any fire-related emergency with confidence and ease.
Remember, safety always comes first, so be sure to prioritize it in everything you do.
Choosing a well-ventilated area: outdoors/non-flammable area
When it comes to using chemicals or equipment that produce fumes, it’s important to take safety precautions to protect yourself and those around you. One essential precaution is to choose a well-ventilated area, ideally outdoors or in a non-flammable area. This ensures that any fumes or vapors are quickly and effectively dispersed, reducing the risk of respiratory problems or fire hazards.
Even if you’re working with a relatively harmless substance, good ventilation is still critical to avoid inhaling too much of it and potentially getting sick. So, before you start any project involving chemicals or equipment that produce fumes, take a moment to assess your workspace and make sure that it’s safe and well-ventilated. By doing so, you’ll not only protect yourself but also those around you, creating a safer and more productive working environment.
Preparation: cleaning the tire, removing flammable materials
When it comes to changing a tire, safety should always be your top priority. Before you start changing your tire, you need to make sure that your vehicle is in a safe location, away from fast-moving traffic. Additionally, you need to take some precautions to ensure that there is no danger of fire or other accidents.
Start by cleaning the tire and removing any flammable materials around it, such as leaves, twigs, and paper. This will reduce the risk of fire if a spark is accidentally generated during the tire change. Use a rag or a towel to clean the tire, and make sure that there are no sharp objects that could puncture your spare tire.
Be sure to wear protective gloves to protect your hands from any hazards. By taking these simple steps, you can ensure that you stay safe while changing your tire, and that you don’t expose yourself to any unnecessary risks. Safety first, always!
Ready, Set, Fire!
If you’re an off-road enthusiast, you know that beads play a crucial role in keeping your tires hooked up to your rims. Beading a tire with fire might sound like a dangerous circus trick, but it’s actually a simple and effective method for getting your tires road-ready. First, you’ll need a source of heat, like a propane torch or a blowtorch, and a spray bottle filled with water.
Then, you’ll need to lubricate the tire bead and the rim with a soapy solution. Next, heat up the bead evenly for a few seconds, rotating the tire as you go. Once the bead becomes pliable, spray it with water to cool it down quickly and force it to seat onto the rim.
Repeat the process on the other side of the tire, and you’re good to go! Remember to take safety precautions and wear protective gear when working with fire. With a little patience and practice, you’ll be on your way to beading tires with fire like a seasoned pro.
Materials needed: propane torch, duct tape, wire, bead sealer
Are you ready to fire up your next DIY project? Well, you’ll need a propane torch, duct tape, wire, and bead sealer to get started. With these essential materials on hand, you can create some fantastic things from scratch. However, before diving into your project, be sure to take all necessary safety precautions.
Propane torches are incredibly useful and versatile, but they can also be dangerous if not handled properly. Always wear protective gear, work in a well-ventilated space, and have a fire extinguisher nearby in case of emergencies. Once you’re all set up and ready to go, use the duct tape to secure your materials in place, and the wire to hold them together.
The bead sealer provides a durable and waterproof seal, perfect for a range of applications. With these materials and a bit of creativity, you can create anything from a metal sculpture to a leak-proof gas tank. Just remember to take things slow and steady, and most importantly, have fun!
Procedure: heating the tire, applying sealer, reinforcing the bead with wires, cooling the tire
If you want to make sure your tire lasts a long time, one of the best things you can do is reinforce the bead. And how do you do that? By heating the tire, applying sealer, and then reinforcing the bead with wire. It might sound complicated, but it’s actually a straightforward procedure that anyone can do with a bit of know-how.
First, the tire needs to be heated so that it becomes more pliable. Once it’s hot, a special sealer is applied to the bead area to ensure a strong bond. And finally, wires are carefully inserted into the bead to reinforce it further.
The whole tire is then allowed to cool down, and voila! You have a tire that’s much less likely to experience blowouts or other types of failures. The best part is that this method can be used on just about any tire, whether it’s a car, truck, or motorcycle tire. So why not give it a try and see how much longer your tires last?
Testing the Bead
So, you’ve decided to give bead-a-tire-with-fire a try. You’ve followed all the steps and finally got to the point where you need to test the bead. This is an important step that ensures the bead is tight and that the tire won’t blowout.
First, you need to let the tire cool down for 10-15 minutes. Then, you need to check if the bead is even. This means that the distance from the rim to the tire bead should be the same all around the tire.
Use a ruler or tape measure to check and adjust as needed. After that, you should inflate the tire and check the bead again. If the bead has any gaps or doesn’t sit flush against the rim, you’ll need to apply more heat.
Keep in mind that it’s important not to overheat the bead, as this can make it brittle and more susceptible to punctures. With a little patience and practice, you’ll soon be an expert at bead-a-tire-with-fire.
Inflating the tire, checking for leaks and anomalies
When it comes to testing the bead of your tire, there are a few things you should keep in mind. The bead is the part of the tire that sits on the rim, providing a secure fit. One crucial aspect is to ensure that the bead is correctly seated on the rim.
You can check this by looking at the tire’s sidewall to make sure that the bead is even. If it’s not, deflate the tire and try seating the bead correctly again. The next step is to inflate the tire to the appropriate level and check for any leaks or anomalies.
You can do this by spraying a soapy solution on the tire and looking for bubbles. If you find any, it may be a sign of a leak. As an analogy, you can think of the bead as the foundation of a building.
Just as a building needs a solid foundation, your tire also needs a proper bead to provide a stable and secure fit. By testing the bead, you can ensure that your tire is in good condition and ready to hit the road.
Conclusion
Well, folks, it may sound insane, but beading a tire with fire is surprisingly effective! By heating up the tire, you can actually get the bead to expand and lock onto the rim perfectly, ensuring a solid seal. Of course, be sure to take all necessary safety precautions and use fire wisely. But with a little heat and a lot of patience, you’ll be rolling smoothly down the road in no time.
So if you’re looking to up your tire game, why not try “beading with fire”? Just don’t forget your marshmallows for roasting!”
Maintenance tips for beaded tires, summary of benefits, final thoughts
Testing the Bead When it comes to beaded tires, testing the bead of the tire is crucial to ensure your safety on the road. The bead is the part of the tire that sits on the rim and creates a seal, keeping the tire inflated. To test the bead, start by removing the tire from the rim and cleaning both the bead and rim.
Then, inspect the bead for any damage or distortion that could compromise its ability to create a good seal. Next, use a bead seating tool, available from your local auto parts store, to press the tire onto the rim and create a seal. Finally, inflate the tire to the recommended pressure and spray a solution of soapy water around the bead to check for any leaks.
In addition to ensuring your safety on the road, properly testing the bead of your beaded tires can also prevent premature wear and tear on your tires, saving you money in the long run.
FAQs
What is tire beading?
Tire beading is the process of securely sealing the tire to the rims to prevent air leakage.
Why is beading a tire with fire necessary?
Beading a tire with fire is necessary because it helps to create a seal between the tire and the rim, ensuring the tire stays in place while driving.
How do you prepare a tire for beading with fire?
To prepare a tire for beading with fire, first, ensure the rim is clean and free of any dirt or debris. Next, apply a small amount of bead sealer to the rim surface.
What tools do you need to bead a tire with fire?
To bead a tire with fire, you will need an air compressor, a propane torch, and a bead sealer.
Can you bead a tire with fire without a bead sealer?
It is not recommended to bead a tire with fire without a bead sealer as this can result in air leakage and uneven tire wear.
Is it safe to bead a tire with fire?
Beading a tire with fire is safe as long as the proper precautions are taken, such as wearing fire-resistant gloves and eye protection.
What is the process for beading a tire with fire?
The process for beading a tire with fire involves applying bead sealer to the rim surface, inflating the tire, and then heating the bead of the tire with a propane torch until it expands and creates a seal with the rim.