
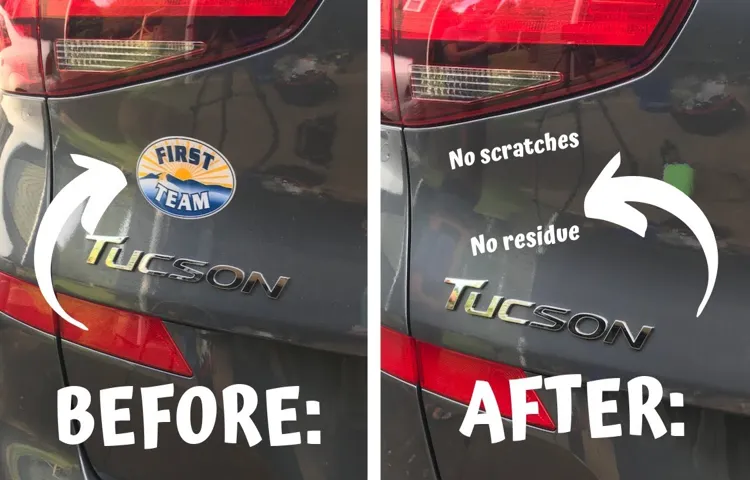
Have you recently purchased a car from a dealership and noticed an unattractive sticker ruining the clean aesthetic of your new ride? If so, you’re not alone. Many new car owners are frustrated with dealership stickers and want to know the best way to remove them without damaging their vehicle. Luckily, removing dealership stickers from your car is a relatively easy process that can be done with a few household items.
In this blog, we will provide you with step-by-step instructions to get that sticker off your car in no time. But before we get into the “how-to,” let’s discuss why dealership stickers are even put on cars in the first place. These stickers serve as a form of advertising for the dealership, allowing them to get their name and logo out to the public.
While they may be beneficial for the dealership, they can be a nuisance for car owners who want to keep their car looking pristine without any unwanted stickers. We understand that your car is more than just a vehicle, it’s an extension of yourself. The last thing you want is for an unsightly dealership sticker to ruin the image of your car.
That’s why we’ve put together this guide to help you remove dealership stickers and restore the appearance of your car to its former glory. So grab some supplies and let’s get to work!
Table of Contents
Gather the necessary tools
Taking off dealership stickers from your car can be quite a task if you don’t have the right tools at your disposal. To make the process less daunting, you’ll need some essential items. Firstly, you’ll need latex gloves so that you don’t end up with sticky residue all over your hands.
Next, a scraper tool, preferably a plastic one, which can get under the edges of the sticker without damaging the car’s paint. You’ll also need adhesive remover, which can help loosen the glue of the sticker and make it easier to remove. Lastly, a microfiber cloth to wipe away any remaining residue or dust.
Having these tools will enable you to take off dealership stickers from your car without leaving marks or residue on your car’s surface, allowing you to give your vehicle a fresh look.
What you’ll need
Before you start any DIY project, you’ll need to gather the necessary tools. For this particular project, you’ll need a few things to get started. Firstly, you’ll need measuring tape to measure out the dimensions for your project.
A saw is necessary to cut the pieces of wood to the required length. If you’re inexperienced in cutting wood, a jigsaw may be a better option. You’ll also need sandpaper to smooth out any rough edges on the wood.
A drill will come in handy for creating holes in the wood for screws. Screws will be necessary to hold the piece together once assembled. You’ll also need wood glue to keep the joints strong.
Although not necessary, a level will come in handy when assembling the project to ensure that it is straight. With these tools, you’ll be well-equipped to tackle your DIY project and turn your vision into a reality.
Protect your car paint
Protecting your car’s paint is essential in maintaining its aesthetic appeal and resale value. Gathering the necessary tools to do so is the first step. Firstly, invest in a high-quality car cover that fits your vehicle’s make and model.
This protects your car from UV rays, extreme weather conditions, and debris that may scratch the paint. Secondly, purchase a microfiber towel and a gentle car shampoo to wash your car regularly, removing all dirt and grime from the surface without damaging the paint. Finally, consider buying a wax or sealant that provides an extra layer of protection against environmental damage.
By carefully choosing your tools, you can safeguard your car’s paint and keep it looking as good as new. So, when it comes to your car’s exterior, don’t skimp on the protection it deserves.
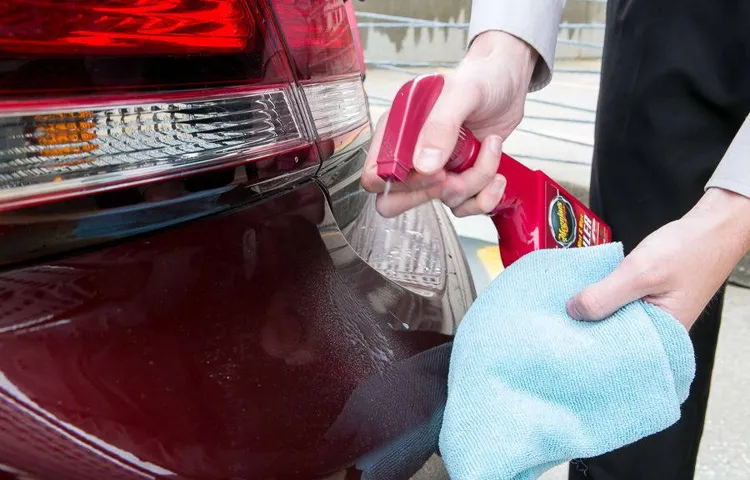
Peel off the sticker and adhesive
Have you ever bought a car with a dealership sticker on it that you just couldn’t wait to peel off? Well, you’re not alone. Removing the sticker and adhesive can be a tricky and time-consuming process, but with a few simple steps, you can do it yourself easily. Firstly, start by heating the sticker and adhesive with a hairdryer or heat gun for a few minutes.
This will soften the adhesive and make it easier to peel off. Use a plastic scraper or credit card to gently lift the corner of the sticker, being careful not to scratch the paint. Once you have a small area lifted, pull the sticker slowly and try to keep it at a 90-degree angle to the paint surface.
Apply more heat and/or adhesive remover as necessary to loosen stubborn adhesive. Once the sticker is removed, use a cloth and adhesive remover to clean any remaining adhesive. With a little patience and elbow grease, you can have your car looking shiny and new again in no time.
So, go ahead, peel off that sticker and hit the open road!
Remove the sticker
Removing stickers and their adhesive can be a daunting task, but it’s actually quite simple and easy to do. First off, locate the edge of the sticker and gently lift it away from the surface it is attached to. If the sticker is stubborn, you can use a plastic scraper or even a credit card to loosen it up.
Once you have a corner lifted, gradually peel the sticker off in one smooth motion. If there is any remaining adhesive, you can use rubbing alcohol or a commercial adhesive remover to help break it down and remove it. Remember to always test these solutions on a small, inconspicuous area first to avoid any damage.
With a bit of patience and persistence, you can remove stickers and their adhesive without any hassle or frustration.
Peel off the adhesive with your fingers
When it comes to removing stickers, getting rid of the adhesive can be just as tricky. However, there’s a simple technique you can use to peel off the sticky residue with your fingers. First, make sure the sticker itself is completely removed.
If there are any remaining chunks, use a scraper or your fingernail to gently scrape them off. Next, take your index finger and press it against the adhesive. Slowly and steadily, roll your finger back and forth while pulling the adhesive in the opposite direction.
The stickiness should start to come off in little balls or bits, almost like erasing pencil marks. Depending on how much adhesive there is, you may need to repeat this process several times. But with a little patience and persistence, you can eliminate all traces of the sticker and leave the surface looking clean and smooth.
So next time you’re faced with a pesky sticker, remember this simple trick to get rid of both the sticker and its adhesive residue.
Use household items to remove the adhesive
If you’re looking to take that dealership sticker off your car but don’t want to spend money on specialized products, you can easily use household items to get the job done. One effective method is to use a hair dryer to warm up the sticker, making it easier to peel off. You can also use a plastic card, like a credit card, to help scrape off the adhesive.
Another option is to use rubbing alcohol or vinegar to dissolve the adhesive, and then wipe it away with a cloth. Remember to be gentle and patient when removing the sticker, as forcibly ripping it off can damage the paint on your car. By using these simple household items, you can take that dealership sticker off your car in no time.
Heat the adhesive with a hairdryer
When you have an annoying adhesive stain on your favorite shirt or another piece of clothing, don’t panic. You don’t need to run to the store to buy expensive adhesive removers. Instead, use household items you already have on hand to get rid of the stain.
One of the most effective methods for removing stubborn adhesive is to use a hairdryer. Simply switch on the dryer and aim it at the adhesive stain for a few minutes, until the glue starts to melt. Then, carefully scrape off the adhesive with a plastic knife or spoon, being careful not to damage the fabric.
This technique works well on a variety of materials, including cotton, polyester, and denim. By using this simple technique, you can avoid spending a fortune on professional stain removers and get rid of that pesky adhesive stain in no time.
Use a credit card to scrape off the adhesive
Adhesive removal can be quite a hassle, especially when you’re dealing with stubborn residue that won’t come off. Thankfully, there are household items that can help make the process a lot easier. One of them is a credit card.
Yes, you read that right. A credit card can actually scrape off adhesive, especially when it’s in a hardened state. All you need to do is hold the credit card at an angle against the glue and gently scrape it off.
It’s a simple and easy solution that works wonders. Just be sure to use a credit card that you don’t mind damaging in case the adhesive is too tough. Remember, don’t throw out household items that can be used for quick fixes like this one.
Re-use and re-purpose whenever possible.
Rubbing alcohol or vinegar solution
If you’ve ever struggled with removing adhesive residue, you know how frustrating it can be. Luckily, you don’t have to spend money on expensive adhesive removers. You can use household items such as rubbing alcohol or vinegar solution.
The acetic acid in vinegar helps to break down the glue, making it easier to remove. Simply mix equal parts of water and vinegar in a spray bottle and apply it to the affected area. Let it sit for a few minutes before wiping it away.
Alternatively, rubbing alcohol can also be used. It works by dissolving the adhesive, making it easy to wipe away. Apply the rubbing alcohol to the affected area and let it sit for a few minutes before wiping it away.
Just be sure to test a small area first to make sure it doesn’t damage the surface. With these simple household items, removing adhesive residue has never been easier.
Final steps
Taking dealership stickers off cars can be a bit of a nuisance, but with the right steps, it can be made easy. Firstly, you should find a suitable location to remove the sticker as a flat surface will make the process easier. Then, get a hairdryer and plug it in nearby.
Hold the nozzle about 2 inches from the sticker and gently heat the area for around 30 seconds. Next, gently begin to peel the edges of the sticker off using your fingers or a plastic scraper. Be sure to do this slowly to avoid any damage to the car’s paint.
If you encounter any stubborn residue, use rubbing alcohol or a specialized adhesive remover to clean the area. Finally, clean the spot with car soap and water, rinse it off, and dry it with a soft cloth. Once it’s completely dry, your vehicle will be looking like new with the dealership stickers removed, and there won’t be any leftover residue.
Wash your car
In the final steps of washing your car, it’s crucial to pay attention to the details that can make all the difference. First, make sure you give your car a thorough rinse to remove any suds or dirt still lingering on the surface. Then, dry your car with a soft microfiber towel, starting at the top and working your way down.
Don’t forget to clean your wheels and tires with a separate brush and cleaner, as they can accumulate brake dust and debris over time. Finally, apply a wax or sealant to protect your car’s paint and give it a glossy shine. Not only will your car look great, but regular washing and maintenance can also help extend its lifespan.
Plus, who doesn’t love cruising around in a squeaky-clean ride? So next time you’re due for a wash, remember these final steps to take your car cleaning game to the next level!
Apply a coat of wax
After you’ve completed the previous steps, it’s time to apply a coat of wax to your vehicle. Waxing is crucial for protecting your car’s paint job from the elements and giving it a shiny finish. There are several types of wax to choose from, including synthetic and natural options.
Synthetic wax lasts longer, while natural wax provides a deeper shine. Begin by washing and drying your car thoroughly, and then apply the wax in circular motions using a clean microfiber cloth. Be sure to cover the entire surface of the vehicle, including the corners and edges.
Once you’ve applied the wax, let it dry completely before removing any residue with a clean towel. Your car should now have a beautiful shine that will last for weeks. Remember to reapply wax every few months to keep your car looking like new.
Conclusion
Removing a dealership sticker from your car is a small task, but it requires big finesse. It’s like taking off a band-aid – you want to do it quickly but painlessly. With the proper tools (like a hairdryer and some rubbing alcohol), you’ll be able to effortlessly peel off that dealership label and reveal the sleek beauty of your car.
It’s not rocket science, but it’s certainly an art. So go ahead, put on your art smock, and get to work – your car (and your ego) will thank you for it.”
FAQs
What is the best way to remove a dealership sticker from a car?
The best way to remove a dealership sticker from a car is to use a hairdryer or heat gun to soften the adhesive, then peel off the sticker slowly and carefully. You can also use rubbing alcohol or Goo Gone to help remove any excess adhesive.
Will removing a dealership sticker damage my car’s paint job?
If done correctly, removing a dealership sticker should not damage your car’s paint job. However, using harsh chemicals or scraping too hard could potentially cause damage. It’s important to be gentle and use the right tools and techniques.
How long does it take to remove a dealership sticker from a car?
The time it takes to remove a dealership sticker from a car can vary depending on factors such as the size of the sticker, the strength of the adhesive, and the tools used. In general, it can take anywhere from a few minutes to an hour or more.
Can I remove a dealership sticker myself or should I hire a professional?
You can remove a dealership sticker yourself with the right tools and techniques. However, if you are hesitant or unsure about the process, you may want to consider hiring a professional to avoid any potential damage to your car.
What are some common mistakes to avoid when removing a dealership sticker from a car?
Some common mistakes to avoid when removing a dealership sticker from a car include using a sharp object to scrape the sticker, using harsh chemicals that can damage the paint, and not being patient while removing the sticker.
What should I do if there is residue left behind after removing the dealership sticker?
If there is residue left behind after removing the dealership sticker, you can use rubbing alcohol or Goo Gone to help remove it. Be sure to follow the instructions on the product and use a soft cloth to avoid scratching the paint.
Can I reuse a dealership sticker on another car?
It is not recommended to reuse a dealership sticker on another car as it may not adhere properly and could potentially damage the paint job. It’s better to purchase a new sticker if needed.