
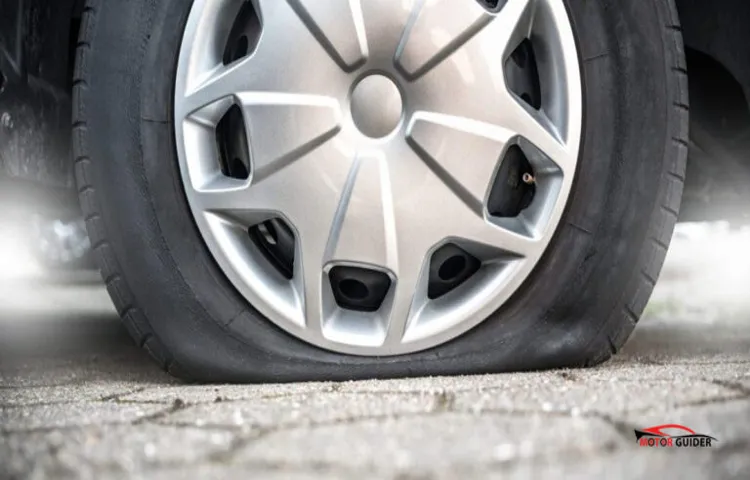
Have you ever noticed your tire losing air slowly over time? It can be frustrating and even dangerous when the pressure gets too low. Luckily, fixing a slow leak in your tire is a fairly simple process that can save you time, money, and prevent a potential blowout on the road. In this blog, we’ll cover the steps to identify and repair a slow leak in your tire, so you can get back on the road with confidence.
Think of it like putting a band-aid on a cut- a small fix now can prevent a bigger problem down the road. So, let’s dive in and learn how to fix that leak!
Table of Contents
Identify the Problem
If you’ve noticed that your tire keeps losing air, you may be dealing with a slow leak that needs to be addressed. The first step in fixing a slow leak in a tire is to identify the source of the problem. Start by visually examining the tire for any visible punctures or cracks.
If you can’t find any obvious signs of damage, try listening for the sound of air escaping from the tire. To do this, inflate the tire to the recommended pressure and then use a soapy water solution to check for any bubbles, indicating where the air is escaping. Once you’ve located the source of the slow leak, you can begin to explore your options for fixing the problem.
From DIY patch kits to professional repairs, there are several solutions available depending on the severity of the damage. By taking the time to properly identify the problem, you can take the necessary steps to fix your slow-leaking tire and get back on the road safely.
Check the Air Pressure
When it comes to maintaining your vehicle, checking the air pressure of your tires should be at the top of your to-do list. Low air pressure can lead to a host of problems, including decreased fuel efficiency and uneven tire wear. The first step in identifying the problem is to check your vehicle manual or the inside of the driver’s side door for the recommended tire pressure.
Once you have that information, use a tire gauge to measure the pressure of each tire, making sure to check when the tires are cold. If the pressure is below the recommended level, add air until it reaches the appropriate level. If you notice that your tire pressure keeps dropping, it could be a sign of a puncture or leak.
In this case, it’s important to take your vehicle to a mechanic for a thorough inspection. Remember, keeping up with your tire pressure not only enhances your driving experience but also ensures your safety on the road.
Inspect the Tire for Damage
When it comes to inspecting your tires for damage, it’s important to know what to look for. First of all, check for any cuts, punctures, or other signs of physical damage. If you see anything that looks like it might be a problem, take note of it.
Next, examine the tread wear on each tire. If the tread looks worn or uneven, it may be time to replace the tire. Additionally, keep an eye out for any bulges or blisters on the sidewall, which can indicate that the tire is weak and may be about to fail.
By identifying these problems early on, you can prevent potentially dangerous situations on the road. Remember, a little bit of preventative maintenance can go a long way in keeping you and your passengers safe on your next road trip.
Locate the Leak
If you’re experiencing a slow leak in your tire, the first step is to locate the source of the issue. Start by visually inspecting the tire and checking for any visible punctures or damage. If you don’t see anything obvious, you can use a tire pressure gauge to measure the PSI in each tire.
If one tire is consistently lower than the others, it’s likely that’s where the leak is coming from. Another option is to spray a mixture of soap and water onto the tire and watch for bubbles, which will identify the area where air is escaping. Once you’ve located the leak, you can determine whether it’s something you can fix yourself or if you need to take it to a professional.
Remember, leaving a slow leak unaddressed can lead to bigger problems down the line, so it’s always best to take care of it sooner rather than later.
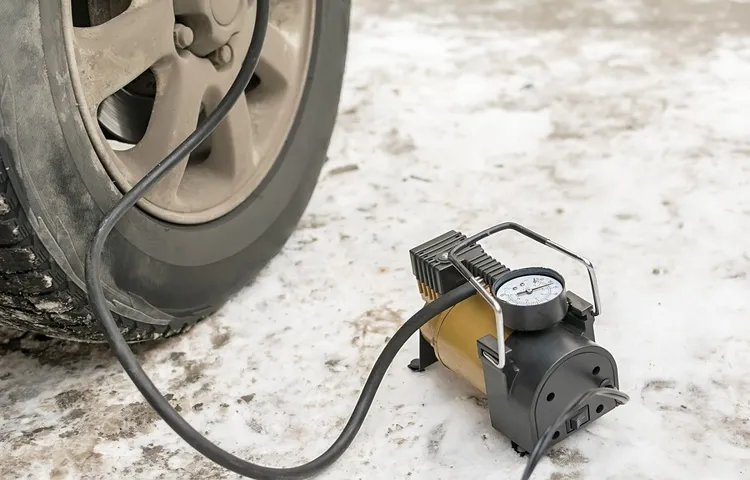
Fill the Tire with Air
If you notice that your tire is losing air, it’s important to locate the leak before you attempt to fill it. There are a few ways to locate a tire leak, but the easiest method is to look for a visible puncture or damage to the tire. This may include small nails or screws that have penetrated the tire or cuts from sharp objects.
If you can’t find an obvious puncture, you may need to use a tire pressure gauge to check the tire’s pressure. If the tire pressure drops over time, it’s likely that there is a leak. Once you have located the leak, you can then proceed to fill the tire with air.
Using either a portable air compressor or a gas station air pump, fill the tire to the recommended pressure level. It’s important to avoid overinflating the tire, as this can cause the tire to burst. By locating the leak first, you can ensure that the tire is filled with the appropriate amount of air to get you back on the road safely.
Apply Soapy Water to the Tire
When you first notice your tire is low on air or flat, it’s time to roll up your sleeves and find the leak. The first step is to apply soapy water to the tire. This simple solution will bubble up in the areas where air is escaping.
Use a spray bottle or a bucket and sponge to cover the surface of the tire with the soap mixture. Be sure to use enough liquid to create sudsy bubbles. As you apply the soapy water, keep an eye out for any areas where bubbles form.
These areas indicate a leak and should be the focus of your attention. Once you have located the leak, mark it with a piece of chalk or tape so you can easily find it again later. With this method, you can quickly and easily find out where your tire is losing air and take action to fix the problem and get back on the road.
So, if you notice low tire pressure, grab some soapy water and get to work!
Look for Bubbles
“Look for Bubbles” We have all experienced a burst pipe or a leaking faucet at some point, and the results can be disastrous. One way to prevent further damage is to locate the leak as soon as possible. One method is to look for bubbles.
The water-filled pipe will release air bubbles at the site of the leak, making it easy to spot. Additionally, bubbles can also indicate a problem with your plumbing system and should not be ignored. So, what should you do if you find bubbles? First, turn off the main water supply to stop the water flow.
Then, locate the source of the bubbles and try to determine the cause of the leak. It could be a loose pipe connection or a damaged joint. Once you have identified the problem, you can either fix it yourself if you have the necessary skills, or call a professional plumber to do it for you.
It is crucial to address a leak as soon as possible to prevent costly water damage and mold growth. Remember, even a small leak can escalate into a bigger problem if left unattended. So, the next time you see bubbles, don’t ignore them – they could be signaling a plumbing emergency.
Repair the Leak
If you have a slow leak in your tire, don’t panic! This is a common issue that can typically be fixed easily. First, locate the source of the leak by inspecting the tire. Look for any visible punctures or objects embedded in the tire.
If you can’t find any obvious damage, fill the tire with air and spray a solution of soap and water onto the tire. If you see bubbles forming, this indicates a leak at that spot. Once the source is identified, remove any debris from the area and plug the hole with a tire plug kit.
This can be done by inserting the plug into the hole and trimming it to size with a utility knife. Finish by inflating the tire to the appropriate pressure and rechecking for leaks with the soap and water solution. With these steps, you can fix a slow leak in your tire and avoid having to replace it prematurely.
Remove the Object Causing the Leak
When dealing with leaks, it’s important to get to the root of the problem as soon as possible. One of the first steps you should take is to pinpoint the object that is causing the leak. Whether it be a damaged pipe or a faulty seal, identifying the source of the leak is crucial in ensuring that the repair process is effective.
Once you have located the object causing the leak, you should repair or replace it immediately. Simply patching up the area around the leak will only provide a temporary fix and will likely result in further damage later on. Instead, focus on repairing the leak from its source so that you can prevent any future leaks from occurring.
Whether you tackle the repair yourself or call in a professional, it’s important to take care of the leak as soon as possible to prevent any further damage to your property. By doing so, you’ll be able to save money in the long run and ensure that your home or business is protected against leaks.
Clean the Surface
When it comes to fixing a leak, the first step is to clean the surface around the problem area. This might seem like a simple and obvious step, but it is crucial for ensuring that the repair is effective and long-lasting. Dirt, debris, and other contaminants can get in the way of any sealant or adhesive you apply, preventing it from adhering properly to the surface.
So, use a suitable cleaning solution and a brush to remove any dirt, grease, or rust from the surface and make sure it is completely dry before moving on to the next step. By taking the time to clean the surface, you can ensure that the repair will be smooth and effective, preventing any further damage to your property.
Apply Patch to the Hole
Once you’ve identified the source of the leak, it’s time to fix it. The first step is to apply a patch to the hole. Start by cleaning the area around the leak with a suitable cleaner or solvent.
Once the area is clean, use a putty knife to apply a generous layer of patching compound. Smooth out the patch with the putty knife, making sure to work the compound into any crevices or gaps around the hole. Allow the patch to dry completely before moving on to the next step.
It’s important to note that the patching compound you choose should be appropriate for the material you are repairing. For example, a rubber patch would be the ideal choice for repairing a leak in a rubber roof. By applying a proper patch, you can prevent further damage and ensure that your repair is a lasting one.
Prevent Future Leaks
If you’ve ever experienced a slow leak in one of your tires, you probably know just how frustrating it can be. Not only is it a safety risk to drive on a tire with low pressure, but it can also lead to potential damage to your vehicle’s rims and suspension system. To prevent future leaks, it’s essential to identify the root cause of the issue.
One of the most common reasons for slow leaks is from a punctured tire or damaged valve stem. Regularly inspecting your tires for any visible signs of wear or tear can help catch these issues before they become bigger problems. Additionally, ensuring proper tire pressure and avoiding driving on excessively rough roads can also prevent future slow leaks from occurring.
By taking preventative measures, you can save yourself the headache and potential danger of dealing with a slow leak in the future.
Regularly Check Tire Pressure
Regularly checking tire pressure is an important step in preventing future leaks. When tires are underinflated, they are more vulnerable to damage, leading to punctures and leaks. By ensuring your tires are properly inflated, you can help them last longer and save money on costly repairs.
But how often should you check your tire pressure? It’s recommended to check at least once a month, as well as before and after long road trips. You can check your tire pressure using a tire pressure gauge, which can be purchased at most automotive stores for a low cost. Taking the time to regularly check your tire pressure may seem like a hassle, but it’s well worth the effort in the long run.
Not only will it prevent future leaks, but it can also help improve your vehicle’s handling and fuel efficiency. So be sure to add tire pressure checks to your regular car maintenance routine!
Avoid Driving Over Debris
Driving over debris on the road is a common cause of tire damage and punctures. But did you know it can also lead to leaks in your vehicle’s oil and transmission systems? It’s essential to avoid driving over debris, even at low speeds, to prevent future leaks that can be costly to repair. A small rock or piece of metal can easily become wedged in your undercarriage, causing damage to vulnerable parts.
It’s best to keep a safe distance from other vehicles and stay alert for any debris on the road. Prevention is key when it comes to keeping your vehicle in good working order, and avoiding driving over debris is one simple way to achieve that. By taking these steps, you can protect your car’s vital systems and save yourself from unwanted repairs.
Replace Damaged Tires
Replacing damaged tires on your vehicle is important for maintaining safety on the road, but it can also play a significant role in preventing future leaks. Over time, small punctures or cracks can develop in a tire’s sidewalls or treads, which can lead to slow air leaks that are difficult to detect. These leaks can cause your tire pressure to drop, which puts additional strain on the tire and increases the risk of a blowout.
By replacing damaged tires before they have a chance to develop leaks, you can ensure that your vehicle is operating at peak performance and reduce the risk of a tire failure while driving. Plus, a new set of tires can improve your vehicle’s handling and fuel efficiency, which can save you money in the long run. Don’t wait until it’s too late – if you notice your tires are damaged, make sure to get them replaced as soon as possible to prevent future leaks and keep yourself and your passengers safe on the road.
Conclusion
In conclusion, fixing a slow leak in a tire is not rocket science! You just need to keep a keen eye out for any signs of wear and tear on your tires, and then be prepared to act quickly when you spot a leak. With a little patience, some basic tools, and a can-do attitude, you can have your tires back up and running smoothly in no time, keeping you on the road and out of the garage. So, go ahead and fix that slow leak and hit the road with confidence – life is too short to let a flat tire slow you down!”
FAQs
What are the common causes of a slow tire leak?
The common causes of a slow tire leak are punctures, valve stem issues, damaged wheels, and damaged tire beads.
How can I locate the source of a slow tire leak?
To locate the source of a slow tire leak, you can use a solution of soapy water and spray it on the tire. The air bubbles will emerge from the puncture area and will indicate the source of the leak.
How do I fix a slow tire leak?
The most common fix for a slow tire leak is to patch the puncture hole with a tire patch kit. If the valve stem is the cause of the leak, replacing it will solve the issue.
Can a slow tire leak be dangerous to drive on?
Yes, driving on a tire with a slow leak can be dangerous, as it can lead to a blowout or a sudden loss of tire pressure, which can be hazardous while driving.
How often should I check my tire pressure to prevent slow leaks?
It is recommended to check your tire pressure once a month and before long road trips to prevent slow leaks and other tire issues.
Is it safe to drive on a tire that has been patched for a slow leak?
Yes, it is safe to drive on a tire that has been properly patched for a slow leak, as long as the patch is in good condition and the tire is properly inflated.
Can a slow tire leak be prevented?
Yes, you can prevent a slow tire leak by regularly checking your tire pressure, avoiding road hazards, and replacing your tires when they become worn out or damaged.