
Got a flat tire? Don’t panic! Fixing it with a tire plug kit is easier than you might think. With just a few tools and this step-by-step guide, you can get back on the road in no time. First things first, make sure you’re in a safe location and turn on your hazard lights.
Then, assess the damage. Is the puncture too large or in a dangerous spot? If so, you may need to replace the tire instead. Assuming the puncture is plug-able, grab your tire plug kit.
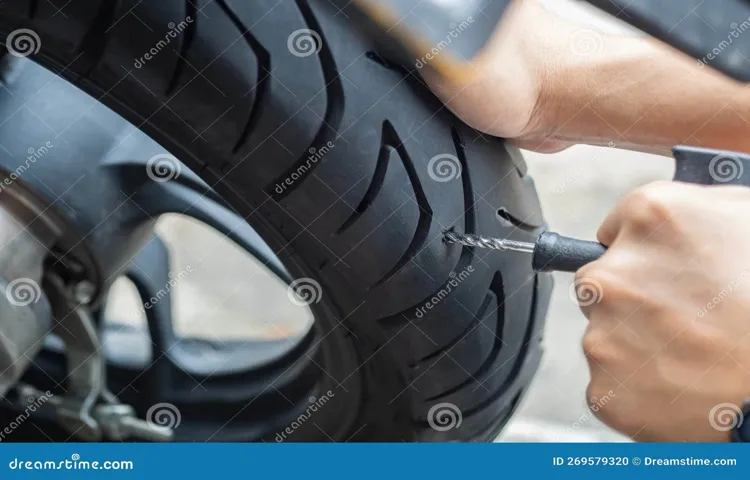
These kits typically include a rasp tool to clean the puncture, a plug insertion tool, and rubber plugs. Next, use the rasp tool to clean the puncture hole. Insert it and twist it around to remove any debris or sharp edges.
Now it’s time to insert the rubber plug. Thread it onto the plug insertion tool and lubricate it with a bit of rubber cement or tire sealant. Then, carefully insert it into the puncture until only a small bit of the plug is sticking out.
Finally, use a pair of pliers to pull out the insertion tool in a quick, swift motion. This will leave the plug intact in the puncture, sealing the hole. Check the tire to make sure the plug is fully seated and no air is leaking.
If everything looks good, you’re all set! But remember, this is only a temporary fix. It’s important to have your tire inspected and repaired by a professional as soon as possible. Using a tire plug kit is a simple and cost-effective way to repair a flat tire.
Table of Contents
What is a tire plug kit?
If you find yourself with a flat tire, a tire plug kit can be a life-saver. Essentially, a tire plug kit acts as a temporary fix for small punctures in your tire until you can get it repaired or replaced. Learning how to use a tire plug kit is relatively simple, and can save you time and money.
First, locate the puncture in the tire and remove any debris from the hole using pliers or a pair of tweezers. Then, use the reamer tool from the kit to rough up the inside of the hole before threading the plug through the eye of the needle tool and inserting it into the hole. Once the plug is in place, pull the needle tool out, leaving the plug in the hole.
Finally, trim the excess plug with scissors to ensure a smooth surface. Though tire plug kits can be effective, it is important to note that they should be used as a temporary solution and should not replace a proper repair or replacement of the tire.
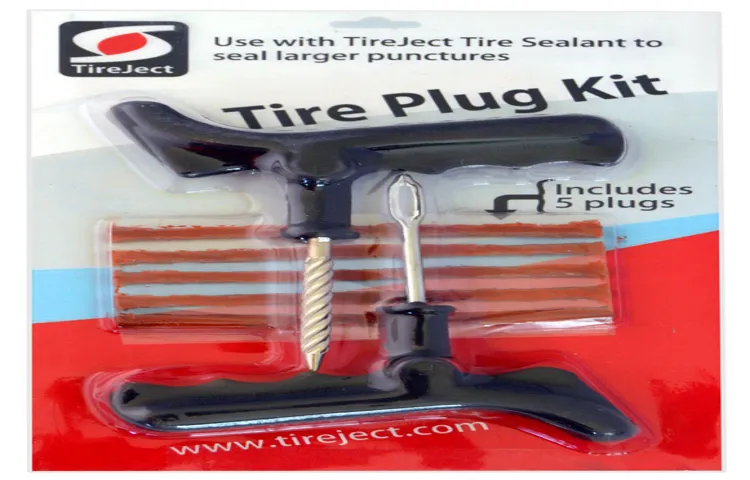
Explanation of tire plug kit components
A tire plug kit is an essential tool for any driver who wants to avoid the hassle and expense of a tire replacement. It consists of a few key components that can help you fix a punctured tire on the spot. The kit typically comes with a spiral probe tool, a needle tool, rubber cement, and tire plugs.
The spiral probe tool is used to locate the puncture hole in the tire, while the needle tool is used to clean out the hole and make it ready to receive the plug. Then, the rubber cement is applied to the plug, and the plug is inserted into the hole using the spiral probe tool. The plug expands to fill the hole and provides a temporary seal until you can get the tire patched or replaced.
With the right knowledge and proper use of a tire plug kit, you can save time, money, and hassle by fixing your punctured tire yourself.
When to use a tire plug kit?
If you encounter a small puncture in your tire and it needs to be repaired, a tire plug kit can be used to fix the issue. A tire plug kit is a quick and easy solution to repair punctures without having to replace the entire tire. Before using the kit, it is important to make sure that the puncture is not too big or too close to the sidewall of the tire, as these types of damages require a professional repair.
To use the kit, you will need to locate the puncture and clean the area around it with a solution from the kit. Then, insert the plug into the puncture using the needles provided in the kit and trim any excess plug hanging out from the surface. The plug will fill the hole and create an airtight seal, allowing you to continue driving without any further issues.
However, it is important to remember that a tire plug is only a temporary solution, and the tire should be professionally repaired or replaced as soon as possible for long-term safety. By following these simple steps, you can easily use a tire plug kit to fix a punctured tire and get back on the road with ease.
Types of tire punctures that can be repaired with a tire plug kit
Tire plug kits are essential tools for any car owner because, at some point, you may experience a flat tire. Before using a tire plug kit, it’s critical to know what types of tire punctures it can repair. Generally, tire plug kits are suitable for punctures caused by nails, screws, or other small objects with a diameter of up to ¼ inch.
On the other hand, punctures caused by sharp objects exceeding ¼ inch in diameter, sidewall damage or damage caused by driving with a flat tire should not be repaired with a tire plug kit. Installing a plug in those cases can be dangerous and may lead to tire failure while driving, resulting in a severe accident. In conclusion, knowing when to use a tire plug kit depends on the type of puncture your tire has.
Always assess the damage and ensure that it is safe to use a tire plug kit before attempting to repair a flat tire.
Preparation
If you need to fix a punctured tire on the go, a tire plug kit can be a lifesaver. Before starting the repair process, make sure you have all the necessary tools at hand – including the tire plug kit itself, a tire pressure gauge, and pliers or needle-nose pliers. Begin by locating the puncture and removing any objects that may still be stuck in the tire.
Use the tire pressure gauge to check the tire’s pressure – if it’s too low, inflate it to the recommended level before proceeding with the repair. Next, insert the reaming tool from the tire plug kit into the puncture hole to clear out any debris and roughen the edges of the hole. Now, take a tire plug strip from the kit and thread it through the eye of the plug insertion tool, making sure to lubricate it with some rubber cement first.
Insert the tool and plug into the puncture hole, leaving about half an inch of the strip sticking out. Use pliers to pull the tool out and trim off the excess plug strip with a knife or scissors. Finally, check the tire’s pressure once again and inflate it to the correct level.
With a little practice, using a tire plug kit can be an easy and effective way to repair a punctured tire.
Gather necessary tools and materials
When it comes to starting a new project, gathering the necessary tools and materials is crucial for success. Whether you’re planning to build a piece of furniture or work on a DIY home renovation, adequate preparation is key. The first step is to identify the tools and materials you’ll need for the task ahead.
This might involve researching different options to ensure that you have the best quality tools and materials for the job. It’s also essential to make sure you have everything you need before starting, so you don’t have to run to the store mid-project and risk losing momentum. By taking the time to gather the necessary tools and materials, you’ll not only save time and effort but also increase your chances of completing the project to your satisfaction.
So, get organized, make a list of what you need, and gather all the tools and materials required before beginning your next project.
Locate puncture and remove object
Before you can locate and remove an object causing a puncture in your tire, you need to prepare the necessary tools and equipment. Firstly, ensure you have a tire jack, lug wrench, and spare tire. Before jacking up the vehicle, loosen the lug nuts with the lug wrench.
This step is crucial as it can be challenging to loosen the bolts while the tire is off the ground. Once you have the vehicle safely elevated, carefully remove the tire and inspect the puncture site. It’s vital to remove the object causing the tire puncture, whether it’s a nail, a piece of glass, or any foreign body.
Depending on the size of the puncture, you might need to use a pair of pliers or a screwdriver to help you remove it. Always keep in mind your safety and the stability of the vehicle while performing this task. With the object removed, inspect the inside of the tire for any further damage and continue with the necessary repairs.
By preparing the right tools and being cautious in your approach, you can locate and remove the object causing your tire puncture promptly.
Inserting the plug
If you’ve experienced a flat tire while driving and don’t have a spare, a tire plug kit can be a lifesaver. The process of inserting the plug may seem daunting, but it’s actually straightforward. Here’s how to use a tire plug kit: First, locate the puncture hole and remove any debris.
Thread the insertion tool with the rubber plug and apply some lubricant. Insert the tool into the hole, ensuring it goes all the way through the tire. Withdraw the tool, leaving the rubber plug inside the tire.
Finally, trim any excess material sticking out of the hole and inflate the tire. It’s important to note that a tire plug is a temporary fix, so be sure to get the tire patched or replaced as soon as possible. By following these simple steps, you’ll be back on the road quickly and safely.
Prepare the tire plug
After finding the puncture in your tire, you need to prepare the tire plug before inserting it. The plug should be clean and free of dirt or debris to ensure a proper seal. Using the reaming tool included in the tire repair kit, clean the puncture hole and make it slightly larger than the plug.
Next, thread the plug through the eye of the insertion tool and apply a small amount of rubber cement to the plug. This will help the plug adhere to the inside of the puncture hole. Slowly and firmly insert the plug into the hole until only about 1/4 inch of the plug is visible outside the tire.
Pull the insertion tool out quickly and firmly, leaving the plug inside the tire. Give the plug a couple of minutes to set and then check the tire pressure to make sure it is at the correct level. With the successful insertion of the tire plug, you can now drive away with confidence, knowing your tire puncture is properly addressed.
Insert the tire plug into the puncture
When it comes to fixing a punctured tire, inserting a tire plug is a crucial step. This process involves inserting a rubber plug into the puncture to seal the hole and prevent air from escaping. Before starting, it’s important to ensure the puncture is clean and dry.
Take the tire plug and thread it through the eye of the insertion tool. Then, apply a small amount of lubricant to the plug and insertion tool to make it easier to insert. Push the insertion tool into the puncture, and as you pull it back out, the plug should stay inside the hole, sealing the puncture.
Trim any excess plug material, and inflate the tire to the recommended pressure. With the plug securely in place, you can rest assured that your tire is safe and ready to hit the road again. Remember to always carry a tire repair kit with you, as punctures can happen at any time and in any location.
So, the next time you find yourself with a flat tire, don’t panic – just grab your tire plug kit and get to work!
Verify the repair
After using a tire plug kit to repair a punctured tire, it’s important to verify that the repair was successful and that the tire is safe to use. Start by inflating the tire to the correct pressure and inspecting it for any leaks. If the tire holds its pressure and there are no visible leaks, take the car for a short drive to test the repair on the road.
Pay attention to any vibrations or unusual noises coming from the tire, as these could indicate that the repair wasn’t done properly. Additionally, it’s recommended to have a professional mechanic inspect the tire as soon as possible to ensure that it’s safe for extended use. Regularly checking the repaired tire for leaks and ensuring that it’s holding pressure will give you peace of mind that your vehicle is safe to drive on the road.
So, if you need to patch up a tire with a tire plug kit, make sure to perform thorough checks before hitting the road again.
Check for air leaks
When it comes to repairing air conditioning units, checking for air leaks is an essential part of ensuring that the repair is successful. Even the smallest air leaks can cause the system to lose efficiency and cause problems in the long run. One way to verify the repair is by performing an airflow test to ensure proper air distribution throughout the ductwork.
This test can detect any leaks in the system and help prevent future problems. Additionally, it’s important to check the refrigerant levels and make sure they are at optimal levels to prevent any future issues. By taking the time to check for air leaks and perform an airflow test, you can ensure that your air conditioning unit stays in top-notch condition and runs smoothly for years to come.
Remember, catching small problems early can prevent big problems down the road.
Drive your vehicle for a short distance to verify the repair
After completing a repair on your vehicle, it’s important to verify that the issue has been fully resolved before hitting the road. While it may be tempting to assume that everything is in working order, taking the time to drive your vehicle for a short distance after a repair can be crucial in identifying any lingering issues. This can not only help keep you safe on the road but it can also save you money in the long run by addressing any latent issues before they become more serious problems.
When taking your vehicle for a test drive, pay close attention to how it handles and performs. Take note of any strange noises, vibrations, or smells that weren’t present before the repair. Test all the functions of the repaired system to ensure they are working properly.
Pay particular attention to the handling and braking of your vehicle as these are crucial for ensuring your safety on the road. It’s also important to keep in mind that some repairs may require additional adjustments after the initial repair. This could include things like a brake adjustment or wheel alignment.
Therefore, don’t hesitate to bring your vehicle back to the repair shop if you notice any issues. Overall, verifying a repair before hitting the road is a crucial step in ensuring your safety and maintaining the overall health of your vehicle. It may take only a few minutes to test drive your car, but can potentially save you from costly and dangerous issues down the road.
So take the time to check your repairs before hitting the gas and confidently enjoy your newly repaired vehicle.
Conclusion
In conclusion, using a tire plug kit is a handy skill to have in case of emergency. It’s like being your own personal superhero with the power to save your tire and wallet from a puncture attack. Remember, the key is to stay calm, follow the instructions, and plug away.
With a little practice, you’ll be plugging tires like a pro in no time. Don’t be a victim of a flat tire, be the superhero of the road with your trusty tire plug kit!”
FAQs
What is a tire plug kit?
A tire plug kit is a set of tools that are used to repair small punctures in a tire.
How do I know if I need a tire plug kit?
You may need a tire plug kit if you have a small puncture in your tire that is causing it to deflate slowly.
Can I use a tire plug kit on any type of tire?
No, tire plug kits should only be used on tubeless tires and should not be used on sidewalls or near the tread.
What tools do I need to use a tire plug kit?
Typically, a tire plug kit will include a reamer tool to clean the puncture hole, a plug insertion tool, and tire plugs.
Is it safe to drive on a tire that has been repaired with a plug?
Yes, as long as the repair has been done properly and the puncture hole is small and in the tread.
How long does it take to repair a tire with a plug kit?
It typically takes around 10-15 minutes to repair a tire with a plug kit.
Can I use a tire plug kit if I have never repaired a tire before?
Yes, tire plug kits are designed to be easy to use and typically come with instructions. However, if you are unsure, it is recommended to seek professional assistance.