
Are you in need of replacing your tires but don’t have access to a tire-changing machine? No need to worry, as there are alternative ways to put tires on rims without using a machine. While a tire-changing machine is the quickest and easiest way to change your tires, it can be expensive and may not be readily available where you live. In this blog, we’ll discuss some DIY methods that can help you change your tires at home without the use of a machine.
Whether you’re a seasoned mechanic or a first-time tire changer, we’ve got you covered with step-by-step instructions and tips to help you change your tires with ease. So buckle up and get ready to learn how to put tires on rims without a machine.
Table of Contents
Tools You Will Need
If you need to change your tire, there’s no need to worry if you don’t have a machine to do it for you. All you need are a few simple tools to get the job done. You’ll need a tire lever, lubricant, and a lot of elbow grease.
The tire lever will help you pry the tire off the rim, and the lubricant will help you slide the tire back on. Don’t forget to have a spare tire on hand as well. It’s always a good idea to make sure your spare tire is in good condition and properly inflated before going on a long trip.
Once you have all these tools, you’ll be ready to put on your new tire without the help of a machine. It may take a little more time and effort, but it’s a simple process that anyone can do with the right tools and a little patience.
Jack and Jack Stands
If you’re planning to do any kind of work on your car, you’ll need to have a good set of tools on hand. One of the most important pieces of equipment you’ll need are a jack and jack stands. These tools allow you to safely lift your car off the ground and keep it supported while you work underneath it.
To use a jack and jack stands, you’ll need to have both pieces of equipment on hand. A hydraulic jack is the most common type of jack used for car work, but a mechanical screw jack can also work in a pinch. Jack stands come in different weight capacities, so make sure to choose the right ones for your car.
When using a jack and jack stands, it’s important to follow the proper safety procedures. First, make sure your car is parked on a level surface and put the transmission in park or gear. Then, use the jack to lift the car off the ground and place the jack stands under the car’s support points.
Make sure the car is stable before crawling underneath. By using a jack and jack stands, you can avoid the dangers of working underneath an unsupported car. These tools allow you to work safely and with confidence, knowing that your car is securely supported.
So make sure to add a good set of jacks and jack stands to your tool kit to keep your car maintenance work both safe and efficient.
Lubricant Soap
When it comes to making lubricant soap, there are a few tools that you will need to have on hand. Firstly, a reliable kitchen scale is essential to accurately measure out your ingredients. Next, you will need a heat-safe mixing bowl and a saucepan or double boiler for melting your ingredients.
A wooden spoon or silicone spatula is ideal for stirring the mixture as it melts and combines. You may also want to invest in a soap mold or use a lined loaf pan to shape and set your finished product. Additionally, it can be helpful to have a thermometer to ensure that the soap mixture reaches the correct temperature for best results.
By having these tools at the ready, you can create a high-quality lubricant soap that is both effective and easy to make.
Rubber Mallet
A rubber mallet is a tool that you’ll need for any DIY project that involves woodwork. The main advantage of using a rubber mallet is that it won’t leave any marks on the surface you’re working on. Unlike a regular hammer, which you may be tempted to use, a rubber mallet is highly effective when it comes to tapping things into place or adjusting them.
Their soft but durable rubber heads help distribute force evenly, making your work more precise and less prone to damage. When choosing a rubber mallet, it’s important to consider the size and weight that will suit your needs. A larger mallet with a heavier head will deliver more force, while a smaller one will provide a more precise tap.
Whether you’re working on a small project or a larger one, a rubber mallet is a valuable tool that should be added to your toolbox.
Valve Core Tool
When it comes to maintaining your bike, having the right tools at your disposal can make all the difference. One tool that every cyclist should have in their toolkit is a valve core tool. This small, compact tool is designed to remove and replace the valve core in your bike’s tires.
It may seem like a minor task, but having a valve core tool on hand can save you time and frustration when you need to add or remove air from your tires. Plus, it’s an affordable investment that can pay dividends in the long run. So, if you don’t already have a valve core tool in your toolkit, it’s definitely worth considering adding to your collection of bike maintenance tools.
Preparing the Rim and Tire
If you’re wondering how to put a tire on a rim without a machine, the first step is to prepare both the rim and tire. Start by cleaning the rim thoroughly with soap and water. Next, inspect the rim for any damage or wear that could affect the tire’s performance.
Check the tire for any punctures, tears, or other damage as well. Then, lubricate the rim with a tire mounting lubricant to make it easier to slip the tire on. Place the tire onto the prepared work surface with the inside facing up and insert a valve stem into the valve hole on the rim.
Line the tire up with the rim, making sure the valve stem is in the correct position. Then, use a tire lever to pry the tire over the rim until it’s fully seated. Work your way around the tire, using the lever to push the tire bead over the rim until it’s mounted completely.
Once the tire is mounted, check the position of the valve stem, and inflate the tire to the appropriate pressure. With a bit of patience and elbow grease, you can easily mount a tire on a rim without a machine.
Place the Rim on a Flat Surface
When preparing to install a new tire on a rim, it’s important to start by placing the rim on a flat surface. This simple step is often overlooked but it can greatly impact the installation process. Placing the rim on an uneven surface can cause the tire to sit unevenly on the rim, leading to balancing issues and potential damage to both the tire and the rim.
So, take a few moments to ensure that the surface you’re working on is completely flat before proceeding. Once the rim is in position, you can move on to the next step in the installation process with confidence, knowing that your tire will be installed correctly and safely. Remember, taking the time to properly prepare your rim and tire for installation can save you time, money, and frustration down the road.
Happy tire changing!
Clean the Rim and Tire Bead Area
When it comes to changing a tire, one of the most critical steps is properly preparing the rim and tire. One of the crucial aspects of this preparation is cleaning the rim and tire bead area. The rim and tire bead area is the section where the tire sits on the rim and is held in place by the bead.
Cleaning this area ensures that there is no dirt, debris, or rust that could prevent the tire from properly sealing against the rim. To clean the rim and tire bead area, start by removing any excess dirt and debris with a brush or cloth. Then, inspect the area for any rust or corrosion.
If there is any rust, use a wire brush or sandpaper to remove it before wiping the area clean. By properly cleaning the rim and tire bead area, you can ensure a smooth and safe tire change.
Lubricate the Tire Bead Area
When preparing to change a tire, one important step is to lubricate the tire bead area. This allows the tire to easily slide onto the rim without causing damage or compromising the safety of your vehicle. To do this, you’ll need to first clean the rim thoroughly to remove any dirt or debris.
Then, apply a generous amount of lubricant to the bead area of the tire. This can be done with a special tire lubricant or with soap and water. Be sure to evenly distribute the lubricant around the entire circumference of the tire.
Once the lubricant is applied, you’re ready to mount the tire onto the rim. This step is crucial to ensuring a smooth and successful tire change, so don’t skip it! By taking the time to properly lubricate the tire bead area, you’ll save both time and money in the long run. So, why not give it a try during your next tire change?
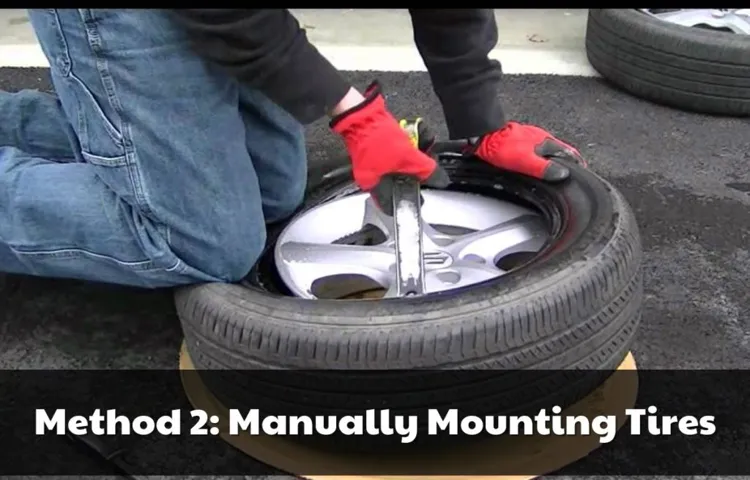
Mounting the Tire on the Rim
Mounting a tire on a rim can seem daunting, but it is possible to do it without a machine with a few careful steps. First, make sure the tire is well lubricated to help it slide onto the rim. Use soapy water or tire mounting lubricant to ensure it moves easily.
Next, place one side of the tire onto the rim, making sure the bead is fitted into the groove. Push down firmly on the opposite side of the tire, working your way around the rim in small sections until the entire tire is mounted. Use caution not to pinch the inner tube while mounting the tire.
It may take some elbow grease, but with a little patience, you can easily mount a tire onto a rim without a machine. Remember to double-check the tire is securely mounted before inflating it.
Position the Tire on the Rim
When it comes to mounting a tire on a rim, positioning is crucial. First, ensure that the tire is facing in the correct direction for the type of terrain it will be used on – directional tires have arrows indicating the correct orientation. Then, carefully place the rim on a mounting machine or use clamps to secure it in place.
Next, apply lubricant to the bead of the tire if needed and insert it onto the rim starting at the valve stem. Use a tire lever or machine to work the rest of the tire onto the rim, being careful not to damage the tire or the rim. Once the tire is fully mounted on the rim, be sure to check for any wrinkles or bulges in the sidewall that could indicate an improper installation.
Properly positioning the tire on the rim ensures a safe and smooth ride, no matter where the road takes you.
Push the Bead onto the Rim by Hand
When it comes to mounting a tire onto a rim, there are a few steps you need to follow. One of the most critical steps is pushing the bead onto the rim by hand. This can be a bit tricky, but with patience and practice, it becomes easier.
Start by lubricating the bead and rim with a soapy solution, which will make it easier for the bead to slide onto the rim. Then, use your hands or a tire iron to push the bead onto the rim. Make sure to work your way around the tire evenly so that the bead is evenly seated on the rim.
Once the bead is on the rim, inflate the tire to the recommended pressure and double-check that the bead is seated correctly. Properly mounting the tire on the rim is crucial for your safety on the road, so take your time and make sure you do it right.
Use the Rubber Mallet Carefully
When it comes to mounting a tire on a rim, using a rubber mallet may be necessary, but it is important to use it carefully. While the rubber mallet can help to secure the tire in place, too much force or improper usage can lead to damage. The first step in using a rubber mallet is to ensure that the tire is properly aligned on the rim.
It is also essential to use a rubber mallet with a soft, non-damaging head, as a hard head can damage the rim or cause dents in the tire. Another important thing to keep in mind is to hit the rubber mallet with the correct amount of force. Too much force can cause the tire to become unbalanced or to come off the rim, while too little force may not secure the tire in place.
The best approach is to tap the rubber mallet gently and gradually until the tire is snug on the rim. Remember, mounting a tire can be a tricky and labor-intensive task. But taking your time, being patient, and taking care when using a rubber mallet can help to ensure that the process goes smoothly and without any issues.
By using the right technique and appropriate force, you can avoid any unnecessary damage to your tire or rim and be on your way to a safe and hassle-free ride.
Finishing the Job
Putting a tire on a rim without a machine might seem daunting at first, but it’s entirely possible with a few simple steps. With a bit of elbow grease and patience, you can have your tire mounted in no time. First, lubricate the rim with dish soap or tire mounting lubricant to make the fitting process smoother.
Then, place one side of the tire onto the rim and work your way around, pushing the tire bead into the rim. Use a tire lever to pull the remaining bead over the rim until it snaps into place. Be sure to inflate the tire to the recommended pressure before using it.
It’s essential to remember that this process requires a lot of effort, so take breaks when necessary to avoid exhaustion. With enough determination, even the most inexperience person can put a tire on a rim without a machine.
Reinstall the Valve Core
After you have filled your tire with new air, it is important to reinstall the valve core to complete the job. The valve core sits inside the valve stem and helps regulate air flow in and out of the tire. To reinstall the valve core, simply screw it back into place using a valve core tool.
Make sure it is tightened all the way to prevent air from leaking out. It’s that simple! Remember, properly maintaining your tires is crucial for your safety on the road. Taking the extra time to ensure your valve cores are installed correctly will go a long way in preventing tire-related accidents.
So, next time you fill up your tire, don’t forget to reinstall the valve core!
Inflate the Tire and Check for Leaks
Inflating the tire and checking for leaks is the final step to finishing the job of changing a tire. After installing the spare tire, it’s essential to inflate it to the recommended pressure. The correct air pressure can be found in your car’s manual or on a sticker located on the driver’s side door jamb.
Ensure that you don’t overinflate the tire because it can cause a blowout. Once inflated to the recommended pressure, you can check for any leaks by spraying soapy water on the tire’s surface. If you notice any bubbles, it indicates that there is a leak.
If this happens, try tightening the valve stem or calling for professional help if necessary. Checking for leaks is an important step that ensures the driving safety of your vehicle. So the next time you change a tire, don’t forget to inflate it to the correct pressure and check for leaks to finish the job.
Put the Wheel Back on Your Vehicle
When it comes to fixing a vehicle that has lost a wheel, it’s crucial to make sure the job is fully finished before hitting the road again. Not only is it dangerous to drive with a missing wheel, but it can also cause damage to other parts of the vehicle. After replacing the wheel, it’s important to tighten the lug nuts correctly to ensure the wheel stays securely in place.
Double-checking the torque on the lug nuts can be done with a torque wrench, which ensures the nuts are tightened to the specified level. After tightening, it’s recommended to drive a short distance and then recheck the torque to ensure the nuts have not become loose. It’s better to take these extra steps to make sure the wheel is secure and safe to drive on than to risk another mishap on the road.
So next time you put the wheel back on your vehicle, don’t rush to hit the gas pedal until the job is fully finished and the wheel is securely in place.
Conclusion
In conclusion, putting a tire on a rim without a machine may seem like a daunting task, but with a little patience and elbow grease, it’s completely possible. Just remember to take your time, use some lubricant, and don’t be afraid to ask for help if you need it. And who knows, you might even impress your friends with your newfound tire-mounting skills.
So go ahead and give it a try, because nothing beats the feeling of accomplishing something on your own. Happy mounting!”
FAQs
What are the tools needed to put a tire on a rim without a machine?
To put a tire on a rim without a machine, you will need a tire lever, a valve tool, and a mallet.
What is the process to put a tire on a rim without a machine?
The process to put a tire on a rim without a machine involves removing the old tire, cleaning the rim, lubricating the rim and tire bead, inserting the valve stem, mounting the tire onto the rim, and inflating the tire.
Can any tire be put on a rim without a machine?
Almost any tire can be put on a rim without a machine as long as it is the correct size and is not severely damaged.
Can you balance a tire on a rim without a machine?
It is possible to balance a tire on a rim without a machine using a bubble balancer or a DIY method, but it may not be as accurate as using a professional machine.
What are some common mistakes to avoid when putting a tire on a rim without a machine?
Some common mistakes to avoid when putting a tire on a rim without a machine include not lubricating the bead or rim, not seating the tire properly, and not inflating the tire to the recommended pressure.
Is it safe to put a tire on a rim without a machine?
As long as the tire and rim are not damaged, and the tire is mounted properly, it is safe to put a tire on a rim without a machine. However, it is recommended to have a professional do the job if you are unsure about the process or lack the necessary tools.
How long does it take to put a tire on a rim without a machine?
Putting a tire on a rim without a machine can vary in time depending on the experience level of the person doing the job and the condition of the tire and rim. It can take anywhere from 30 minutes to a few hours to complete.