
If you’re someone who uses a tractor frequently, you’re well aware of the challenges you face when driving through slippery or uneven terrain. One of the best solutions to maintain traction and stability in such conditions is to install tractor tire chains. These chains can help prevent your tractor from slipping and sliding, allowing you to maneuver through even the most challenging surfaces with ease and safety.
Installing tractor tire chains might seem intimidating for first-timers, but with a few tips and tricks, it can be a straightforward process. In this blog, we’ll be discussing the step-by-step guide on how to install tractor tire chains without any hassle. We’ll cover everything, from what tools you’ll need to how to properly secure the chains onto your tractor’s tires.
Whether you’re a farmer, a landscaper, or simply someone who enjoys using a tractor for DIY projects, understanding how to install tire chains can be essential to your everyday work. From enhancing safety to boosting overall productivity, the benefits of using tractor tire chains are undeniable. So, let’s dive in and discover how to install them quickly and efficiently!
Prepare Your Tractor
If you’re going to be using your tractor in snowy or icy conditions, it’s a good idea to install tire chains to ensure maximum traction. The first step in installing tractor tire chains is to prepare your tractor. Start by turning off the engine and jacking up one wheel at a time.
With the help of an assistant, place the tire chain on the tire so that the cross chains run perpendicular to the direction of rotation. Tighten the tensioners to ensure a snug fit and repeat the process on the other wheels. It’s important to check the chains periodically to ensure they remain tight and in position while in use.
Overall, installing tire chains on your tractor is a simple and effective way to increase traction and reduce the chances of getting stuck in slippery conditions.
Check Tire Size
One important step in preparing your tractor for work is to check the tire size. Different types of tractors require different sizes of tires, and having the wrong size can negatively impact the tractor’s performance. The first step is to check the owner’s manual to determine the recommended tire size for your specific tractor model.
From there, inspect the tires to ensure they match the recommended size and that they are worn evenly. If the tires are not the correct size or are worn unevenly, it may be necessary to replace them. Investing in the right tire size will ensure your tractor runs smoothly and efficiently, saving you time and money in the long run.
Choose the Right Chains
When it comes to preparing your tractor for winter, one essential step is choosing the right chains. Chains are necessary to provide traction on slippery surfaces, ensuring you can still use your tractor regardless of the weather conditions outside. However, not all chains are created equal.
You need to ensure you select the right chains for your tractor’s tires. Look for chains that are specifically designed for your tire size and have the appropriate weight rating. Additionally, consider the type of terrain you’ll be driving on and choose chains with the appropriate tread depth and pattern to provide the best grip possible.
By selecting the right chains, you can ensure your tractor is ready to tackle any winter weather that comes your way and keep you safe while you work.
Lay Out Chains on a Flat Surface
When it comes to using your tractor to prepare your land for work, laying out chains on a flat surface is an essential step that must be taken. First and foremost, you’ll need to make sure that your tractor is ready for the job – ensuring that it has a suitable weight and power to operate the chains effectively. Once you’ve got the right setup, it’s time to prepare the chains themselves by laying them out flat on the ground.
This will help to make sure that they are ready for use and that you can easily access them when the time comes. It also helps to reduce the risk of tangles or other issues that can arise when working with chains that have not been properly prepared. By taking the time to lay your chains out on a flat surface, you’ll be able to streamline your work process and get the job done with greater efficiency, helping you to achieve your goals in less time and with less hassle.
So don’t skip this important step if you want to get the most out of your tractor and your land!
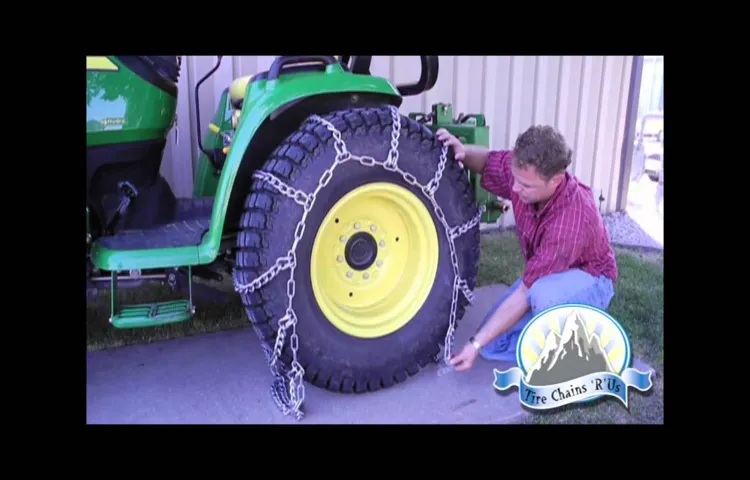
Install the Chains
If you need to drive your tractor on snowy or muddy terrain, you might want to consider installing tire chains to increase traction. Although it may seem intimidating at first, the process of installing tractor tire chains is actually quite straightforward. The first step is to clean the tires so that the chains can be installed more easily.
Next, start by putting the chain over the tire and connecting it at the back. Then, simply roll the tractor forward until the chain has covered the entire surface of the tire. Secure the chains by connecting each link until they are tight and snug.
Finally, test drive the tractor to ensure the chains are secure and functioning properly. With a bit of practice, you should be able to install tractor tire chains with ease, making it much easier to navigate slippery terrain.
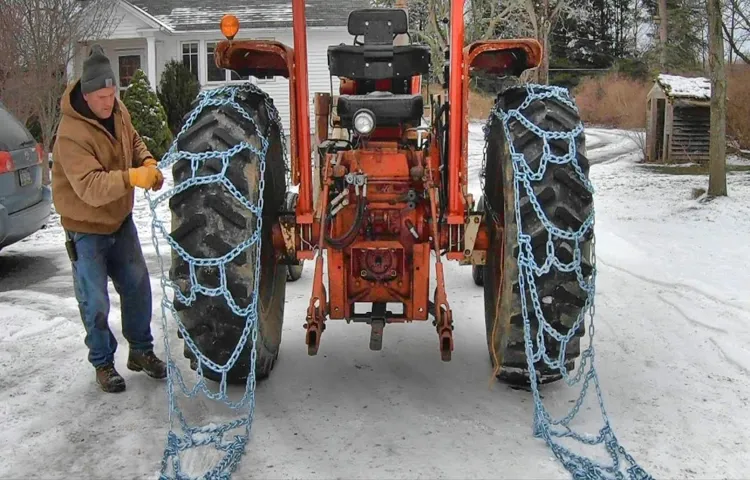
Slide Chains Over Tires
Slide Chains Over Tires If you want to travel in areas with icy or muddy roads, you must have chains to get enough traction and safety for your vehicle. Installing slide chains over the tire helps to minimize traction loss which is usual in such conditions. The procedure of installing the chains is pretty simple.
First, you need to lay the chains flat beside the tire, then pass the chains over the tire and ensure the chains are equally distributed. Once you have the chains in place, you are now ready to move ahead through the tough terrain without sliding around or getting bogged down. Remember, before hitting the road, check the chains thoroughly to ensure they are well-fitted and secure, this will ensure they don’t come off while driving.
With proper use and installation, your chains will serve you an extended period without needing repairs or replacement. Travel safe!
Connect the Chains
Once you have purchased your Connect the Chains kit, it’s time to start the installation process. Installing the chains might seem daunting, but with the right tools and a little bit of patience, it’s a straightforward process. First, start by ensuring that your bike is on a level surface.
Once you’ve done this, locate the quick-release skewers on your bike’s wheels and remove them. Then, feed the chains through the spokes and thread them through the skewers. Once you’ve done this, you can reattach the skewers and adjust the chains to the desired tightness.
It’s important to make sure that they are not too tight, as this can cause damage to your bike. With the chains installed and adjusted, you’re now ready to hit the road and take your ride to the next level!
Tighten the Chains
Installing chains on your vehicle is an excellent way to improve traction and safety in snowy or icy conditions. However, it’s essential to tighten the chains properly to ensure they remain secure while driving. Before installing the chains, it’s vital to read the manufacturer’s instructions and determine the correct size for your tires.
Once you’ve installed the chains, drive a short distance and check them to make sure they’re tight. If they’re loose, stop and tighten them before continuing your journey. Remember, loose chains can cause damage to your vehicle and can be dangerous to you and other drivers on the road.
So, make sure your chains are tightly fitted, and you’re ready to tackle the snowy roads with confidence.
Test the Chains
If you’re looking to test the chains on your vehicle, it’s important to first install them correctly. The process can vary slightly depending on the type of chains you have, but generally, you’ll want to start by laying the chains out flat on the ground and untangling any knots or twists. Then, place the chains over the tire and secure them by fastening the hooks or clasps.
Make sure to double-check that the chains are fitting snugly and securely before driving. Once you’re on the road, take it slow and test the chains on a less-busy road or empty parking lot before venturing out onto busier streets. By following these steps, you can ensure that your chains are properly installed and ready to help you tackle harsh winter driving conditions with confidence.
Tips and Precautions
Installing tire chains on your tractor can help provide better traction on slippery surfaces, but it is important to take the necessary precautions to avoid accidents. The first step is to ensure that you have the appropriate size of chains that are designed to fit your tractor’s tires. It is also essential to lay the chains on a flat surface to ensure there are no twists or tangles before installing them on the tires.
When installing the chains, always wear gloves to protect your hands from the sharp edges. Start by draping the chains over the tire and connecting them on the inner side. Then, adjust the chains to ensure a snug fit on the tire, avoiding any gaps or slack that could cause the chains to come off.
Finally, test the tractor to ensure that the chains are secure and that the tractor is operating safely. Following these tips and precautions will help ensure that your tractor tire chains are properly installed, allowing you to work with better traction on slippery surfaces and increase safety.
Practice Installing Chains Beforehand
Installing snow chains can be a daunting task, especially for those who haven’t done it before. One way to overcome this is to practice installing the chains beforehand. You don’t want to be caught in a snowstorm trying to figure out how to put on your chains.
Find a clear and level area to practice, and make sure you have all the necessary tools and instructions. Take your time, and don’t be afraid to ask for help if needed. It’s also important to inspect and adjust your chains regularly as they can easily loosen or slip while driving.
Remember, safety comes first, and taking the extra time to be prepared can prevent accidents and provide peace of mind during your winter travel.
Avoid Driving on Bare Pavement with Chains On
When it comes to driving with chains on your tires, there are a few important things to keep in mind. One of the most crucial tips is to avoid driving on bare pavement whenever possible. Chains are designed to provide extra traction on icy or snowy roads, but they can quickly wear down on dry pavement.
If you drive on bare pavement with chains on, you risk damaging both the chains and the road surface. This can be dangerous for you as well as other drivers on the road. To avoid this problem, it’s essential to remove your chains as soon as you reach a clear section of road.
This might mean stopping to take off your chains at the entrance to a parking lot, for example. You should also be prepared to adjust your driving speed and style when you have chains on. Take turns and curves more slowly than usual, and be prepared to brake earlier than usual when you come to a stop.
Remember that chains can only do so much to improve your traction on the road, and they won’t be able to compensate for reckless driving. Overall, driving with chains on can be a great way to stay safe on icy or snowy roads. However, you need to make sure that you’re using them properly and taking the necessary precautions.
By avoiding bare pavement, adjusting your driving style, and knowing when to remove your chains, you can stay safe and protect both your car and the road surface.
Remove Chains When No Longer Needed
When you’re no longer in need of chains, it’s important to remove them properly. This isn’t just a safety concern, but also a matter of taking good care of your equipment. For example, if you leave chains on your vehicle long after they serve a purpose, you risk rusting, warping, and other forms of damage that can affect the chains’ overall performance and lifespan.
Therefore, it’s best to remove chains as soon as you no longer need them. Here are a few tips and precautions to keep in mind: Make sure your vehicle is parked on level ground before you start removing chains.
This will help prevent accidents caused by unstable loading or uneven footing. Wear appropriate personal protective gear, such as gloves or safety glasses, to protect yourself from any sharp edges or sudden movements.
Always follow the manufacturer’s instructions when removing chains to ensure proper disassembly and reassembly.
Check the chains for any signs of wear and tear or damage before storing them away. If you notice any issues, don’t hesitate to replace the chains as soon as possible.
Keep your chains clean and well-lubricated when they’re not in use to extend their life and prevent rusting. By following these tips and precautions, you can ensure proper care and maintenance of your chains, ensuring they will be ready to use when you need them again. Don’t forget, always prioritize safety when handling chains to prevent accidents or injuries.
Regularly Inspect Chains for Damage or Wear
When it comes to maintaining your bike’s safety, one important aspect that you should always keep in mind is chain inspection. Chains are one of the most crucial components of your bike, and any damage or wear can lead to significant problems later on. To prevent any mishaps, it’s important to regularly inspect your chains for signs of damage or wear.
Start by checking the chain for any visible signs of wear, such as rust or damage to the chain link surfaces. You can also measure the length of the chain and compare it to the manufacturer’s recommendations to ensure it’s not stretching beyond its limit. Additionally, keep an eye out for any tight or loose spots throughout the chain.
If you do notice any issues with your chain, it’s best to get it replaced or repaired as soon as possible to avoid any serious accidents on the road. By keeping a close eye on your chain and ensuring it’s in good condition, you can ride your bike with peace of mind.
Conclusion
Now that you’ve learned how to install tractor tire chains, you’ll never have to worry about getting stuck in the muck or slipping on icy terrain. It’s a simple process that can make a big difference in your tractor’s performance, and with a little practice, you’ll be a pro in no time. So go forth and conquer any challenge nature throws your way, with the confidence that comes from having a securely and expertly installed pair of tire chains on your trusty tractor!”
FAQs
What are tractor tire chains used for?
Tractor tire chains are used to improve traction and provide greater stability in snowy or muddy conditions.
How do I determine the right size of tractor tire chains?
To determine the right size of tractor tire chains, measure the diameter of your tires and refer to the manufacturer’s sizing chart.
How do I install tractor tire chains?
To install tractor tire chains, position the chains over the tire and fasten them securely, making sure the chains are evenly distributed across the tire.
Are there different types of tractor tire chains available?
Yes, there are different types of tractor tire chains available, including twist link chains, ladder-style chains, and diamond-pattern chains.
Can tractor tire chains damage my tires?
Poorly fitted or improperly installed tractor tire chains can damage your tires, so it’s important to make sure they are installed correctly.
How can I maintain my tractor tire chains?
To maintain your tractor tire chains, regularly inspect them for damage or wear, clean them after use, and store them properly.
Do I need to remove my tractor tire chains after use?
Yes, it’s recommended to remove your tractor tire chains after use to prevent damage to the tires and extend the life of the chains.