

Hey there! Welcome to our blog, where we delve into the fascinating world of introductions. You may be wondering why we’re dedicating an entire post to this seemingly simple concept. Well, let’s think about it – introductions are everywhere in our daily lives.
From meeting new people to starting a new job, introductions play a crucial role in establishing connections and creating an initial impression. Think about the last time you met someone new. How did it feel when they introduced themselves? Did it spark your interest and make you want to get to know them better? Or did it fall flat and leave you feeling unenthused? Introductions are like the first few notes of a song or the opening lines of a book – they set the tone, capture attention, and pique curiosity.
They have the power to make or break a conversation, an article, or even a business pitch. It’s safe to say that introductions are a big deal. In this blog, we’ll be exploring the art of crafting captivating introductions.
We’ll dive into different techniques, strategies, and examples that can help you master the art of making a memorable first impression. Whether you’re a student writing an essay, a speaker delivering a presentation, or simply someone who wants to enhance their communication skills, this blog has got you covered. So, are you ready to learn how to create introductions that leave a lasting impact? Let’s get started!
Table of Contents
- 1 What is a power running board motor?
- 2 Signs of a faulty power running board motor
- 3 Step 1: Gather the necessary tools and equipment
- 4 Step 2: Disconnect the power running board motor
- 5 Step 3: Replace the power running board motor
- 6 Step 4: Reconnect the power running board motor
- 7 Step 5: Final checks and testing
- 8 Step 6: Clean up and reassembly
- 9 Enjoy the fully functional power running boards
- 10 Conclusion
- 11 FAQs
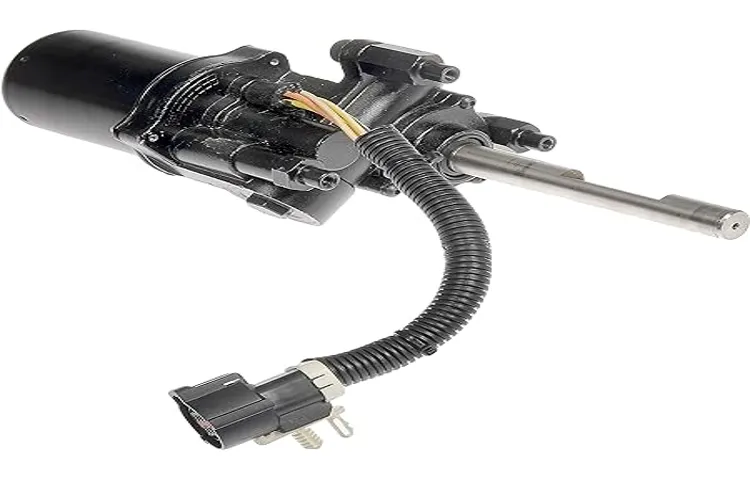
What is a power running board motor?
If you own a Lincoln vehicle with power running boards, you may encounter issues with the running board motor at some point. The power running board motor is responsible for operating the running boards, allowing them to extend and retract. However, over time, the motor can wear out or become damaged, requiring a replacement.
Fixing the power running board motor involves replacing the old motor with a new one. This process may vary depending on the specific model of your Lincoln vehicle. It’s always a good idea to consult your vehicle’s owner’s manual or seek professional help when attempting to fix or replace the power running board motor.
By ensuring your power running boards are in proper working condition, you can continue to enjoy the convenience and functionality they provide.
Signs of a faulty power running board motor
If you own a Lincoln vehicle with power running boards, it’s important to know the signs of a faulty power running board motor. One common sign is when the running boards don’t extend or retract properly. You may hear a clicking or grinding noise when you try to activate them.
Another sign is when the running boards get stuck in one position and won’t move at all. In some cases, the running boards may partially extend or retract before getting stuck. If you’re experiencing any of these issues, it’s likely that the power running board motor needs to be replaced.
To fix this, you’ll need to remove the old motor and install a new one. This can be a complicated process, so it’s best to consult a professional or follow a detailed guide to ensure the job is done correctly. By replacing the faulty power running board motor, you can restore proper functionality to your Lincoln’s running boards and enjoy their convenience and accessibility once again.
Are you having trouble with the power running board motor in your Lincoln? Don’t worry, you’re not alone. Power running boards are an excellent feature that adds convenience and style to your vehicle, but they can occasionally encounter issues. One common problem is the motor not working properly, causing the running boards to malfunction or not deploy at all.
However, with a few simple steps, you can easily fix the power running board motor and have your Lincoln back to its smooth and functional state in no time. In this blog, we’ll walk you through the necessary steps to troubleshoot and fix the motor on your Lincoln power running boards. So, let’s get started and get those running boards back in action!
Step 1: Gather the necessary tools and equipment
If you’re experiencing issues with your Lincoln power running board motor and need to replace it, don’t fret! With the right tools and a little bit of know-how, you’ll have your motor fixed in no time. The first step is to gather all the necessary tools and equipment for the job. You’ll need a socket set with various sizes, a wrench set, a pry bar, and a flathead screwdriver.
Additionally, having a rubber mallet and some lubricant on hand will make the process smoother. Once you have all your tools ready, you’ll be prepared to dive into fixing your Lincoln power running board motor and getting your vehicle back in top shape.
Tools required
In order to successfully complete any task or project, it is essential to have the right tools and equipment. This holds true for any DIY project, including installing a new floor. When it comes to gathering the necessary tools for a flooring installation project, there are a few key items that you will need.
First and foremost, you will need a measuring tape to accurately measure the space where the new flooring will be installed. This will ensure that you purchase the correct amount of flooring material. Additionally, you will need a utility knife or flooring cutter to cut the flooring to size.
A pry bar will come in handy for removing any existing baseboards or trim, and a hammer can be used to secure the new flooring in place. It is also advisable to have a carpenter’s square or a T-square to ensure that your cuts are straight and precise. Finally, you may need a rubber mallet or a flooring installation kit to help secure the flooring planks or tiles together.
By gathering these tools and equipment before starting your flooring installation project, you will be well-prepared and ready to tackle the task at hand.
Step 2: Disconnect the power running board motor
So you’re having trouble with your Lincoln power running board motor and need to replace it? No worries, I’ve got you covered with step-by-step instructions. The first step in this process is to disconnect the power running board motor. This is an important step, as it ensures your safety while working on the motor.
To do this, locate the power running board motor under the vehicle. It is typically found on the underside of the vehicle, near the running board. Once you’ve located the motor, you’ll need to disconnect the power supply.
Depending on your vehicle, this may involve disconnecting the battery or simply removing a fuse. Be sure to consult your vehicle’s manual for the specific steps to disconnect the power supply. Once the power supply is disconnected, you can proceed to the next step of replacing the motor.
Disconnecting the power source
disconnect, power source, running board motor
Removing the motor
Removing the power running board motor is an essential step in repairing or replacing your vehicle’s power running board. To begin this process, you will first need to disconnect the power running board motor. The motor is responsible for providing the necessary power to extend and retract the running board.
To disconnect it, locate the electrical connection near the motor and carefully unplug it. This might require some maneuvering and patience, as the connection can sometimes be hidden or hard to reach. Once the connection is disconnected, you can now move on to the next steps in removing the motor.
Step 3: Replace the power running board motor
If you’re experiencing issues with your Lincoln power running boards, a possible solution is to replace the power running board motor. This component is responsible for controlling the movement of the running boards, so if it’s malfunctioning or worn out, replacing it may be necessary. Here’s a step-by-step guide on how to fix your Lincoln power running board motor.
First, you’ll need to locate the power running board motor in your vehicle. In most cases, it’s located underneath the running boards or inside the wheel wells. Once you’ve located the motor, disconnect the negative terminal of your vehicle’s battery to ensure your safety during the replacement process.
Next, you’ll need to remove the old power running board motor. This can typically be done by disconnecting the electrical connectors and removing any mounting bolts or screws holding it in place. Be sure to keep track of any small components or hardware to avoid losing them during the removal process.
After removing the old motor, it’s time to install the new one. Begin by connecting any necessary electrical connectors to the replacement motor. Then, secure the motor in place by reattaching any mounting bolts or screws that were previously removed.
Once the new power running board motor is securely in place, it’s time to reconnect the negative terminal of your vehicle’s battery. This will restore power to the motor and allow you to test its functionality. Keep in mind that you may need to reset or reprogram the running board’s calibration to ensure proper operation.
In conclusion, replacing the power running board motor in your Lincoln can be a straightforward process if you follow these steps. By doing so, you can regain control over your running boards and enjoy their convenience and functionality once again.
Purchasing a new motor
power running board motor
Installing the new motor
installing new motor
Step 4: Reconnect the power running board motor
Are you having trouble with your Lincoln power running board motor? Don’t worry, we’ve got you covered with a step-by-step guide on how to fix it. Once you have your replacement motor ready, the next step is to reconnect it to your Lincoln vehicle. First, make sure that the vehicle is turned off and the key is removed from the ignition.
Locate the wiring harness and connector for the power running board motor. Carefully disconnect the connector, making sure not to damage any of the wires. Then, take the replacement motor and connect the wiring harness to it.
Make sure the connection is secure and all the wires are properly seated. Once everything is connected, double-check to ensure that there are no loose or exposed wires. Reconnecting the power running board motor is a crucial step in restoring your Lincoln’s functionality.
Reconnecting the power source
power running board motor
Testing the motor
reconnect the power running board motor Once you have successfully removed the power running board motor, it’s time to put it back in place and reconnect it. This step is crucial as it ensures that your running boards will function properly. Start by carefully aligning the motor with the mounting bracket, making sure that it fits snugly.
Once in place, secure the motor with the bolts or screws provided. Ensure that you tighten them properly, but be careful not to overtighten as it may damage the motor or the bracket. Next, you will need to reconnect the wiring harness to the motor.
This is typically done by inserting the connector into the corresponding socket and ensuring that it is securely connected. Take your time and double-check to make sure it is properly seated. Once the motor is securely mounted and the wiring is connected, it’s time to test it out.
Give the motor a quick test by activating the power running boards. If everything is connected correctly, the boards should extend and retract smoothly without any issues. If you encounter any problems during the testing phase, double-check your connections and make sure everything is secure.
It’s also a good idea to consult your vehicle’s manual or seek professional assistance if needed. By following these steps and properly reconnecting the power running board motor, you can ensure that your running boards are back in working order. It’s important to take your time and be diligent during this process to avoid any unnecessary complications.
Once the motor is tested and functioning properly, you can enjoy the convenience and functionality that power running boards provide.
Step 5: Final checks and testing
So, you’ve replaced the power running board motor on your Lincoln, and now it’s time for the final checks and testing. This is an important step to ensure that everything is functioning properly and that your power running board is working as it should. Start by double-checking all the connections and make sure they are secure.
Give the board a manual lift and lower it a few times to make sure it moves smoothly and without any obstructions. Next, test the power running board using the controls inside the vehicle. Make sure it extends and retracts fully, and that it responds to the controls as expected.
Additionally, listen for any unusual noises or vibrations that could indicate a problem. If everything seems to be in working order, take your Lincoln for a short drive and test the power running board in real-world conditions. Pay attention to any issues or inconsistencies and address them as soon as possible.
By conducting these final checks and testing, you can ensure that your Lincoln’s power running board motor replacement was successful and enjoy the convenience and functionality it provides.
Inspecting the power running boards
power running boards, final checks, testing Step 5: Final checks and testing After the installation of the power running boards, it is crucial to perform a series of final checks and testing to ensure that everything is working correctly. This step is essential because it allows you to address any issues or concerns before you hit the road. Firstly, take a moment to visually inspect the power running boards.
Check for any loose connections, damaged wires, or signs of wear and tear. Ensure that all the components are securely fastened and properly aligned. It is also a good idea to double-check the installation instructions provided by the manufacturer to ensure that you haven’t missed any steps.
Next, it’s time to test the functionality of the power running boards. Start by manually extending and retracting the boards using the control switch. Observe their movement and make sure they operate smoothly without any glitches or unusual sounds.
Test them multiple times to ensure consistent performance. Once you are satisfied with the manual operation, it’s time to test the automatic feature. This is an important safety check as it ensures that the power running boards function as intended when you open or close the vehicle’s doors.
With the engine running, open and close each door to see if the running boards extend and retract automatically. Pay close attention to any unexpected behavior or malfunctioning. Finally, take your vehicle for a test drive.
This will allow you to assess the overall performance of the power running boards while in motion. Pay attention to how they respond to different driving conditions, such as bumps, curves, and various speeds. Listen for any unusual noises or vibrations that may indicate a problem.
Testing the motor operation
motor operation, final checks, testing
Step 6: Clean up and reassembly
Now that you have successfully replaced the motor on your Lincoln power running board, it’s time to clean up and reassemble everything. This step is crucial to ensure that your running board functions properly and looks good as new. Start by cleaning any dirt or debris that may have accumulated during the installation process.
Use a soft cloth or brush to gently wipe away any dust or grime. Next, inspect all the connections and fittings to make sure they are secure and in good condition. If you notice any loose or damaged parts, replace them before moving forward.
Once everything is clean and secure, carefully reassemble the running board, following the manufacturer’s instructions. Make sure all the screws and bolts are tightened securely. Finally, test the running board to ensure it moves smoothly and without any issues.
With the new motor in place, your Lincoln power running board should be back to its original functionality.
Cleaning up the work area
After completing the repair or maintenance task on your work area, it’s important to clean up and reassemble everything properly. This step is often overlooked but is essential to maintain the efficiency and functionality of your workspace. Start by removing any debris or dust that may have accumulated during the process.
Use a brush or vacuum to clean off any sawdust, dirt, or other particles. It’s also a good idea to wipe down any surfaces with a damp cloth to ensure they are clean and free of any residue. Once the area is clean, begin reassembling any disassembled parts or tools.
Make sure to align everything properly and tighten any fasteners or screws as needed. This will ensure that your workspace is organized and ready for your next project. So take the time to clean up and reassemble your work area, and you’ll be ready to tackle your next task with efficiency and ease.
Reassembling the vehicle
vehicle assembly, clean up, reassembling the vehicle Step 6: Clean up and reassembly Once you have finished all the necessary repairs and replacements, it’s time to clean up and reassemble your vehicle. Start by giving the exterior a thorough wash and wax to remove any dirt or debris that may have accumulated during the repair process. Use a high-quality automotive soap and a soft sponge or microfiber cloth to avoid scratching the paint.
After the exterior is clean, move on to the interior. Vacuum the floors, seats, and upholstery to remove any dust, dirt, or debris. Pay attention to the hard-to-reach areas like under the seats and in between the seat cushions.
Once the interior is clean, wipe down all surfaces with a gentle cleaner to remove any stains or spills. Don’t forget to clean the windows inside and out for a sparkling finish. After the cleaning is complete, it’s time to start reassembling the vehicle.
Begin by reinstalling any parts or components that were removed during the repair process. This may include things like headlights, taillights, mirrors, or grille. Make sure to carefully follow the manufacturer’s instructions and use the appropriate tools to ensure a proper fit.
As you reassemble the vehicle, take the time to inspect each part for any signs of damage or wear. If you notice any issues, it’s best to address them now before moving forward. Next, move on to reconnecting any wiring or hoses that were disconnected.
This step is crucial to ensure that all electrical components and systems are functioning properly. Take your time and double-check each connection to make sure they are secure and properly aligned. It’s also a good idea to test each electrical component as you go to ensure that everything is working as it should.
Are you looking for a conclusion? Well, you’ve come to the right place! In this blog post, we will explore the importance of a strong conclusion and how to write one effectively. Whether you’re working on an essay, a research paper, or even a blog post, the conclusion is your final chance to leave a lasting impression on your reader. It’s like the bow on a beautifully wrapped gift, tying everything together and giving your piece a sense of closure.
So, let’s dive in and discover what makes a conclusion great and how to craft one that will leave your readers wanting more.
Enjoy the fully functional power running boards
Are you experiencing problems with your Lincoln power running boards? Don’t worry, we’re here to help! Power running boards are a convenient feature that enhance the functionality and appearance of your vehicle. However, they can sometimes encounter motor issues and require replacement. If you’re wondering how to fix a Lincoln power running board motor, we’ve got you covered.
The first step is to identify the motor that needs to be replaced. Once you’ve located it, you can disconnect the wiring harness and remove the old motor. Then, simply install the new motor and reconnect the wiring harness.
It’s that easy! With the new motor in place, you can once again enjoy the fully functional power running boards on your Lincoln. So why delay? Get your Lincoln running smoothly and effortlessly again with a motor replacement.
Conclusion
In conclusion, fixing the Lincoln power running board motor is as simple as swapping out the old motor for a new one, and doing it with a dash of wit and cleverness. Think of it as giving your Lincoln a boost of personality with a motor transplant. Just like a surgeon replacing a faulty organ, you too can perform this automotive operation and watch your running boards come back to life, ready to impress with their smooth functionality.
So have no fear, fellow Lincoln owners, for with a bit of mechanical know-how and a touch of humor, your power running board motor replacement will be a breeze. Remember, a little wit goes a long way in the world of automobile repair – after all, it’s not every day that you get to make your car laugh with delight as it showcases its shiny new motor. Happy FIXing!
FAQs
How do power running boards work in a Lincoln vehicle?
Power running boards in Lincoln vehicles utilize a motor that extends and retracts the running boards automatically when the doors are opened or closed.
What are the signs that indicate a faulty power running board motor in a Lincoln vehicle?
Some signs of a faulty power running board motor in a Lincoln vehicle include the running boards not extending or retracting properly, unusual noises coming from the motor, or the running boards getting stuck in one position.
How can I troubleshoot a power running board motor in a Lincoln vehicle?
To troubleshoot a power running board motor in a Lincoln vehicle, you can start by checking the fuse for the motor, making sure it hasn’t blown. Additionally, you can inspect the wiring connections for any loose or damaged wires, and test the motor’s functionality with a multimeter.
Can I replace a faulty power running board motor in a Lincoln vehicle myself?
Yes, it is possible to replace a faulty power running board motor in a Lincoln vehicle yourself. However, it may require some mechanical knowledge and tools. It is recommended to consult the vehicle’s manual or seek professional assistance if you’re not confident in your abilities.
Where can I find a replacement power running board motor for a Lincoln vehicle?
Replacement power running board motors for Lincoln vehicles can be found at auto parts stores, Lincoln dealerships, or online retailers specializing in auto parts. Make sure to select the correct motor model for your specific Lincoln vehicle.
How much does a power running board motor replacement for a Lincoln vehicle cost?
The cost of a power running board motor replacement for a Lincoln vehicle can vary depending on the model and year of the vehicle, as well as the supplier. On average, the cost can range from $200 to $500, which may or may not include labor charges if you choose to have it professionally installed.
Is there a warranty for replacement power running board motors for Lincoln vehicles?
The warranty for replacement power running board motors for Lincoln vehicles will depend on the manufacturer or supplier. It is advisable to check the warranty terms and conditions before making a purchase.