
Are you ready to hit the road with your trailer in tow? One of the most important steps in ensuring a smooth and safe towing experience is properly hooking up your Reese’s equalizer hitch. This handy device distributes the weight of your trailer across all four wheels of your tow vehicle, providing stability and reducing sway. In this step-by-step guide, we will walk you through the process of hooking up a Reese’s equalizer hitch.
We’ll cover everything from attaching the hitch to your vehicle, to adjusting the weight distribution, and making sure all the components are properly secured. So grab your toolbox and let’s get started on ensuring a stress-free towing adventure!
Table of Contents
Introduction
If you’re new to towing or just got yourself a Reese’s Equalizer Hitch, you might be wondering how to hook it up properly. Don’t worry, it’s not as complicated as it might seem! The Reese’s Equalizer Hitch is designed to distribute the weight of your trailer evenly across your towing vehicle, improving stability and control. To hook it up, start by attaching the shank to your trailer hitch receiver.
Then, position the hitch head on the shank and secure it using the provided bolts. Next, attach the weight distribution bars to the hitch head and make sure they are parallel to the ground. Finally, connect the chains from the bars to your towing vehicle’s frame and adjust the tension using the provided snap-up brackets.
It’s important to follow the manufacturer’s instructions and ensure that the hitch is properly installed and adjusted for your specific towing setup. With a little practice and patience, you’ll be confidently hitting the road in no time with your Reese’s Equalizer Hitch.
What is a Reese’s Equalizer Hitch?
Reese’s Equalizer Hitch is a popular towing accessory that provides a balanced and safer towing experience. If you’re new to towing or have struggled with trailer sway or bouncing in the past, then a Reese’s Equalizer Hitch could be the perfect solution for you. This hitch helps distribute the weight of the trailer more evenly across the towing vehicle, which can greatly reduce the problem of trailer sway.
It also helps to eliminate that uncomfortable bouncing feeling that can often occur when towing heavy loads. So, if you’re looking for a way to make your towing experience safer and more enjoyable, consider investing in a Reese’s Equalizer Hitch.
Why Use a Reese’s Equalizer Hitch?
Reese’s Equalizer Hitch is a fantastic tool for towing large loads with ease, but why exactly should you use one? Well, let me tell you! This revolutionary hitch not only provides superior weight distribution but also reduces sway while you’re on the road. It’s designed to level out your trailer, ensuring that all four wheels are firmly planted on the ground for maximum stability. This means a smoother ride for you and your passengers, while also minimizing wear and tear on your vehicle and trailer.
So whether you’re hauling a camper, a boat, or any other heavy load, the Reese’s Equalizer Hitch is your go-to solution. Trust me, you won’t regret it!
Importance of Proper Installation
proper installation, importance of proper installation, benefits of proper installation, installing properly. The importance of proper installation cannot be overstated when it comes to any project or task. Whether you are putting together a complex piece of furniture, installing a new appliance, or even constructing a building, making sure that everything is installed correctly is crucial.
Proper installation ensures that everything works as it should and reduces the risk of any issues or problems arising in the future. It not only saves you time and money but also guarantees your safety and the longevity of the product or structure. So, why is it so important to install things properly? Let’s find out.
Step 1: Gather the Required Tools and Equipment
So, you’ve got a Reese’s Equalizer hitch and you’re ready to hook it up to your trailer. Well, the first step is to gather all the tools and equipment you’ll need for the job. This will ensure a smooth and efficient installation process.
First and foremost, you’ll need the Reese’s Equalizer hitch itself. Make sure you have the correct model and size that is compatible with your trailer. You’ll also need a trailer ball mount, which attaches to your vehicle’s hitch receiver.
Check the weight rating of the ball mount and make sure it is appropriate for your trailer’s weight. Next, you’ll need a wrench or socket set to tighten the bolts and nuts securely. It’s also a good idea to have a torque wrench to ensure that you apply the correct amount of torque to the bolts.
This will help prevent any issues down the road. In addition to the tools, you’ll also need some other equipment. A jack and jack stands will come in handy for raising and supporting your trailer while you work.
Safety chains are a must-have for any towing setup, so make sure you have a pair that are rated for your trailer’s weight. Finally, don’t forget about safety equipment. It’s always a good idea to have gloves, safety glasses, and ear protection on hand to keep yourself safe during the installation process.
So, now that you have all the necessary tools and equipment, you’re ready to move on to the next step: attaching the Reese’s Equalizer hitch to your trailer. Stay tuned for the next installment of our series, where we’ll walk you through the installation process step by step. Happy towing!
Tools and Equipment Checklist
In order to successfully complete any project, it is essential to gather all the necessary tools and equipment beforehand. This step is crucial as it ensures that you have everything you need at hand and saves you the hassle of running back and forth to the store. So, what exactly do you need to gather? Well, it depends on the specific project you are working on, but some common tools and equipment that are often required include screwdrivers, pliers, a hammer, a measuring tape, a level, a power drill, and various types of wrenches.
You may also need specific tools or equipment based on the nature of the project, such as a paintbrush and roller for painting, or a pipe cutter for plumbing work. It is important to take inventory of what you already have and make a list of what you still need to purchase or borrow. By being prepared and having all the necessary tools and equipment on hand, you can tackle your project with confidence and efficiency.
Step 2: Prepare Your Vehicle and Trailer
So, you’ve decided to hit the road and go on an adventure with your trailer in tow. Now it’s time to hook up your Reese’s Equalizer Hitch and get everything ready for the journey ahead. The first step in this process is to prepare your vehicle and trailer.
Start by making sure your towing vehicle is equipped with a hitch receiver that is compatible with the Reese’s Equalizer Hitch. This is an important step because the hitch will be securely attached to this receiver. Next, check the weight ratings and capacities of both your towing vehicle and trailer to ensure they are compatible with each other.
You don’t want to overload your vehicle and risk damaging it or compromising your safety on the road. It’s also a good idea to inspect your trailer’s tires, brakes, lights, and any other components that may affect its overall performance. Make sure everything is in good working order before you hit the road.
Finally, double-check that all the necessary equipment, such as safety chains and electrical connections, are properly attached and secure. Taking the time to prepare your vehicle and trailer properly will ensure a safe and enjoyable towing experience with your Reese’s Equalizer Hitch.
Ensure Level Ground
In the second step of preparing your vehicle and trailer for towing, it’s important to ensure that the ground you park on is level. This might not seem like a big deal, but trust me, it can make a world of difference when it comes to the stability and handling of your trailer. When your trailer is parked on uneven ground, it can cause the weight to shift and throw off the balance of your vehicle.
This can lead to sway, instability, and even accidents on the road. So how do you ensure that the ground is level? Well, one option is to use a leveling kit or leveling blocks. These handy tools can be placed under the wheels of your trailer to even out the surface and provide a stable base.
Another option is to find a flat, level spot to park your vehicle and trailer. Look for parking lots, campgrounds, or other designated areas that are specifically designed for RVs and trailers. And always remember to use your vehicle’s parking brake when parking on any kind of incline or decline.
Trust me, taking the time to ensure level ground will go a long way in providing a safe and smooth towing experience.
Position the Trailer Coupler
trailer coupler, prepare vehicle and trailer
Measure and Adjust Trailer Height
vehicle and trailer preparation, measure and adjust trailer height, towing safety. Now that you have selected the correct tow vehicle and trailer for your needs, it’s time to prepare them for safe towing. One important step in this process is to measure and adjust the trailer height.
Why is this necessary? Well, if the trailer is not level with the tow vehicle, it can cause stability issues and even affect the performance of your brakes and tires. So, how do you go about measuring and adjusting the trailer height? First, you will need to gather a few tools: a tape measure, a level, and a jack. Start by parking the tow vehicle and trailer on a level surface.
This will ensure accurate measurements. Next, measure the height of the trailer hitch on the tow vehicle. Then, measure the height of the trailer coupler on the trailer.
Ideally, the trailer coupler should be at the same height or slightly higher than the trailer hitch. If it is lower, you will need to adjust the trailer height. To do this, use the jack to raise or lower the trailer until the coupler is at the desired height.
Check the levelness of the trailer using the level. Once the trailer is level and at the correct height, you can secure the coupler to the hitch using the appropriate hitch pin or lock. By taking the time to measure and adjust the trailer height, you are ensuring that your towing experience is safe and secure.
A level and properly aligned trailer will contribute to better handling and control on the road, reducing the risk of accidents or mishaps. So, don’t skip this step and make sure to double-check your measurements before hitting the road. Your safety and the safety of others on the road depend on it.
Inspect and Prep the Receiver Hitch
receiver hitch, vehicle and trailer, Inspect, Prep, Prepare, In order to have a smooth and safe towing experience, you need to ensure that your vehicle and trailer are properly prepared. One important aspect to pay attention to is the receiver hitch. This component is what connects your vehicle to the trailer, so it’s crucial to inspect and prep it before hitting the road.
Firstly, inspect the receiver hitch for any signs of damage or wear. Look for any cracks, rust, or loose bolts. If you notice any issues, it’s essential to address them before towing.
This can involve repairing or replacing parts of the receiver hitch to ensure its reliability. Once you’ve inspected the receiver hitch and made any necessary repairs, it’s time to prep it. Start by cleaning the hitch of any dirt or debris.
This will help ensure a proper connection between the vehicle and trailer. Use a brush or cloth to remove any grime or buildup. Next, you’ll want to lubricate the receiver hitch.
This will help reduce friction and allow for a smoother connection. Apply a layer of grease or lubricant to the opening of the hitch. Be sure to spread it evenly to ensure proper coverage.
Lastly, check the trailer’s coupler. This is the part that attaches to the receiver hitch. Make sure it is in good condition and securely fastened.
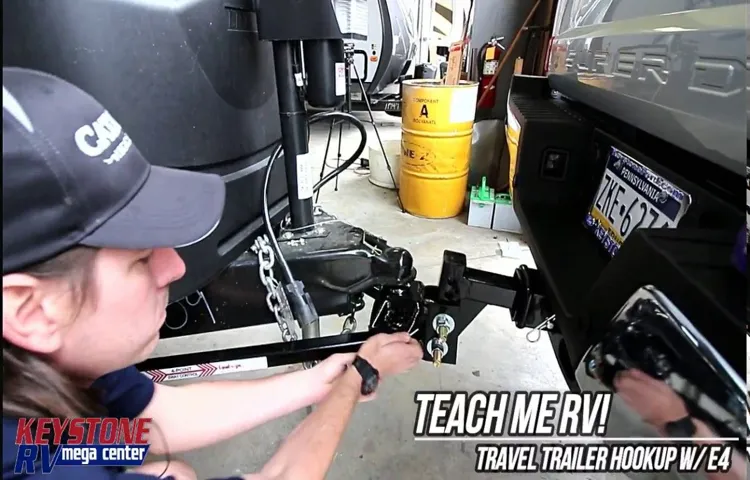
Step 3: Attach the Reese’s Equalizer Hitch
So, you’ve got yourself a Reese’s Equalizer Hitch, but now comes the fun part – actually attaching it to your vehicle! Don’t worry, it may seem a bit intimidating at first, but with a little bit of know-how, you’ll be on your way to towing your trailer smoothly and safely. The first thing you’ll want to do is ensure that your tow vehicle and trailer are on level ground. This will make it easier to attach the hitch and ensure that everything is aligned correctly.
Once you’re confident about the levelness of your setup, it’s time to get down to business. Start by lining up the hitch receiver on your tow vehicle with the ball mount platform on your trailer. Make sure that the hitch receiver is fully inserted into the ball mount platform, and that the locking mechanism is engaged.
This will ensure that your trailer stays securely attached to your vehicle. Next, you’ll want to attach the spring bars to the hitch head. The spring bars are a crucial component of the Reese’s Equalizer Hitch, as they help distribute the weight of the trailer evenly across your vehicle.
To attach the spring bars, simply slide them into the designated slots on either side of the hitch head, and secure them in place with the included pins. Once the spring bars are in place, it’s time to apply some tension. The Reese’s Equalizer Hitch features built-in sway control, which helps to minimize any side-to-side movement of your trailer while towing.
This is especially important when traveling at high speeds or in windy conditions. To apply tension to the spring bars, use the included wrench to turn the tension adjustment bolts. Lastly, take a moment to double-check that everything is secure.
Give the hitch a good shake to ensure that it’s properly attached, and make sure that the sway control is functioning correctly. If everything looks good, you’re ready to hit the road! Attaching a Reese’s Equalizer Hitch may seem like a daunting task at first, but with a little practice, it becomes second nature. Just remember to take your time, follow the manufacturer’s instructions, and always prioritize safety.
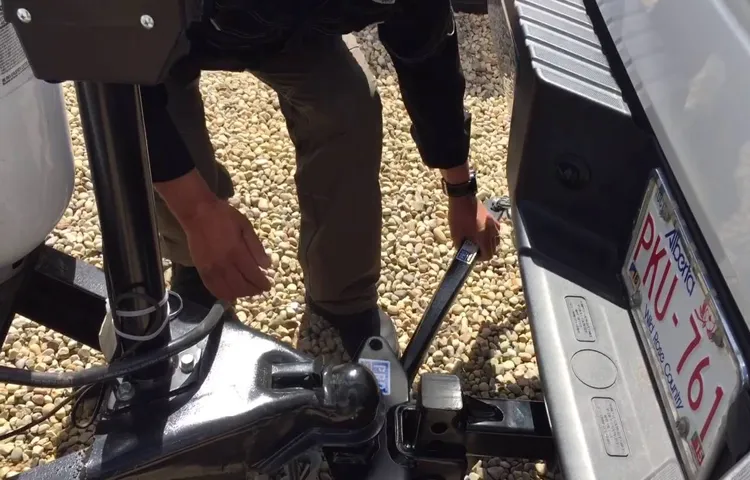
Attach the Hitch Ball
attach hitch ball, Reese’s equalizer hitch In step 3 of the process to hitch up your trailer, you’ll need to attach the hitch ball. This is an important step because the hitch ball is what connects your trailer to the trailer hitch on your vehicle. Without a secure attachment, your trailer could become detached while you’re driving, which can be extremely dangerous.
To attach the hitch ball, you’ll need to align it with the coupler on the trailer. The coupler is the part of the trailer that connects to the ball and locks in place. Make sure the coupler is open and ready to receive the hitch ball.
Then, carefully lower the trailer coupler onto the hitch ball, making sure the ball is securely nestled inside the coupler. Once the ball is inside the coupler, you’ll need to lock it in place. Most hitch balls have a locking mechanism that secures the ball to the coupler.
This might involve tightening a nut or using a locking pin. Follow the manufacturer’s instructions for your specific hitch ball to ensure a proper and secure attachment. After the hitch ball is attached, it’s important to check the connection to ensure it’s secure.
Give the trailer a gentle shake to make sure it doesn’t come loose. If everything feels tight and secure, you’re ready to move on to the next step. By attaching the hitch ball properly, you can ensure a safe and secure connection between your trailer and your vehicle.
This will give you peace of mind knowing that your trailer won’t become detached while you’re on the road. So take your time, follow the steps, and enjoy your journey with confidence knowing that your trailer is securely hitched up.
Install the Spring Bars
In the exciting process of installing the Reese’s Equalizer Hitch, step three involves attaching the spring bars. These essential components play a crucial role in distributing the weight evenly across the trailer and towing vehicle, providing a smoother and more stable ride. To install the spring bars, you’ll first want to make sure that they are properly adjusted to match the weight distribution requirements of your specific setup.
Once you’ve determined the correct tension, secure the spring bars to the hitch head, ensuring that they are properly aligned and locked into place. The spring bars should then be attached to the trailer’s frame using the appropriate attachments. It’s important to take your time with this step to ensure that the spring bars are securely fastened, as this will help to maximize the effectiveness of the Equalizer Hitch system.
With the spring bars properly installed, you’ll be well on your way to a safer and more enjoyable towing experience.
Secure the Chains
reese’s equalizer hitch, tow vehicle, trailer sway, weight distribution, secure the chains, towing experience In order to have a smooth and safe towing experience, it is important to secure the chains and attach the Reese’s Equalizer Hitch properly. This step is crucial in preventing trailer sway and ensuring weight distribution between the tow vehicle and the trailer. The Reese’s Equalizer Hitch is designed to evenly distribute the weight of the trailer to the axles of the tow vehicle, reducing the strain on the hitch and preventing trailer sway.
It acts as a bridge between the tow vehicle and the trailer, allowing for a more stable and controlled towing experience. By attaching the Reese’s Equalizer Hitch correctly and securing the chains tightly, you can have peace of mind knowing that your trailer is securely attached to your tow vehicle and you are ready for a safe journey. So, before hitting the road, make sure to follow this important step and enjoy a worry-free towing experience.
Connect the Weight Distribution Brackets
Reese’s Equalizer Hitch
Step 4: Adjust the Reese’s Equalizer Hitch
So you’ve got your Reese’s Equalizer Hitch all set up on your trailer, but now it’s time to make some adjustments to ensure a smooth and safe ride. Hooking up a Reese’s Equalizer Hitch may seem a bit daunting at first, but with a few simple steps, you’ll have it dialed in perfectly. First, start by positioning the trailer and hitch height so that they are level with one another.
This will ensure that weight is distributed evenly across all axles. Next, attach the spring bars to the trailer frame, making sure they are properly seated in the brackets. Then, use the weight distribution tool to determine how much tension needs to be applied to the hitch head.
This tool will measure the height of your trailer hitch and the hitch ball, allowing you to adjust the tension accordingly. Lastly, ensure that the tension is distributed evenly across all of the spring bars. This will help to prevent any unnecessary bouncing or swaying while on the road.
With just a few adjustments, your Reese’s Equalizer Hitch will provide you with a smooth and stable towing experience.
Set the Hitch Ball Height
Reese’s Equalizer Hitch, hitch ball height adjustment, towing setup, equalizer hitch system Setting the hitch ball height is an essential step in adjusting the Reese’s Equalizer Hitch for your towing setup. When towing a trailer, it’s crucial to have a level connection between the hitch ball on your towing vehicle and the coupler on the trailer. Getting the hitch ball height right ensures a safe and stable towing experience.
To begin, you’ll need to measure the height of your trailer’s coupler. This measurement should be taken when the trailer is on level ground. Once you have this measurement, you can then adjust the hitch ball height accordingly.
To adjust the hitch ball height, the Reese’s Equalizer Hitch provides different levels of adjustment. This allows you to fine-tune the height to match your specific trailer’s coupler height. First, locate the adjustment holes or slots on the hitch head assembly.
These holes or slots are usually labeled with height increment values. Choose the appropriate hole or slot based on the measurement you previously took for the coupler height. Next, using a wrench or socket, loosen the nut securing the hitch ball to the hitch head assembly.
This will allow you to move the hitch ball up or down within the adjustment holes or slots. Once the hitch ball is in the desired position, tighten the nut securely to lock it in place. It’s crucial to ensure that the hitch ball is firmly secured before towing, as any looseness can result in instability or improper weight distribution.
After adjusting the hitch ball height, it’s a good idea to double-check your work. Use a level or measuring tape to confirm that the trailer’s coupler is level with the hitch ball. You can also physically inspect the connection to ensure it is secure and free from any play or movement.
Adjust the Tension of the Spring Bars
Adjusting the tension of the spring bars is a crucial step in setting up a Reese’s equalizer hitch. The spring bars play a vital role in distributing the weight evenly between the tow vehicle and the trailer, ensuring a smooth and stable towing experience. To adjust the tension of the spring bars, begin by loosening the jacks on the hitch head.
This will allow the spring bars to move freely. Next, use a wrench to turn the square adjustment bolt located on the spring bars. Turning it clockwise will increase the tension, while turning it counterclockwise will decrease the tension.
It’s important to find the right balance, as too much tension can cause excessive stiffness, while too little tension can result in poor weight distribution. Once you’ve adjusted the tension to your liking, tighten the jacks on the hitch head to secure the spring bars in place. Remember to always check the manufacturer’s guidelines for the recommended tension settings for your specific equalizer hitch model.
With the proper tension in the spring bars, you can enjoy a safe and enjoyable towing experience.
Ensure Proper Weight Distribution
Reese’s Equalizer Hitch is a great tool for ensuring proper weight distribution when towing. This step is crucial for maintaining stability and control while on the road. By adjusting the hitch, you can distribute the weight evenly between your vehicle and trailer, preventing any imbalances that could lead to swaying or fishtailing.
Just like a seesaw, the weight needs to be evenly distributed for everything to function properly. With the Reese’s Equalizer Hitch, you have the ability to fine-tune the weight distribution to match the specifications of your specific towing setup. So, whether you’re hauling a heavy load or towing a lighter trailer, this hitch can be adjusted to ensure optimal weight distribution and a safer, more comfortable towing experience.
Step 5: Test and Inspect
So, you’ve successfully installed your Reese’s Equalizer Hitch and now it’s time to put it to the test! The first step is to ensure that all of the connections are secure. Double-check that the hitch ball is tightly fastened to the ball mount and that the ball mount is properly inserted into the hitch receiver on your vehicle. Next, connect the weight distribution bars to the hitch head and make sure they are properly locked into place.
Once everything is securely connected, it’s time to test the hitch. Start by parking on a level surface and lowering the trailer onto the hitch ball. Use the trailer jack to raise or lower the trailer so that it is level with the hitch ball.
Then, engage the trailer coupler by lowering it onto the hitch ball and locking it into place. Finally, attach the safety chains and the breakaway cable to ensure that the trailer is securely attached. Once everything is in place, take a few minutes to inspect the hitch and make sure that all connections are secure.
Check for any signs of wear or damage, such as loose bolts or rust, and make any necessary adjustments or repairs. By following these steps and taking the time to properly test and inspect your Reese’s Equalizer Hitch, you can ensure that it is ready to handle your towing needs safely and efficiently.
Perform a Test Drive
Step 5: Test and Inspect Now that you’ve done your research and narrowed down your options, it’s time for the exciting part – the test drive! This is your chance to get behind the wheel and see if the car you’ve been eyeing is the perfect fit for you. As you hop in, take a moment to adjust the seat and mirrors to your liking. Pay attention to how comfortable you are in the driver’s seat and if there’s enough legroom for you.
Is the steering wheel easy to grip? These are all important factors to consider as you’ll be spending a significant amount of time in this car if you decide to buy it. Once you’re on the road, test out the acceleration and braking. Does the car respond quickly and smoothly? Does it feel powerful enough for your driving needs? Take it for a spin on different types of roads, such as highways and city streets, to see how it handles in different conditions.
Pay attention to any unusual noises or vibrations that you might notice while driving. These could be signs of potential problems down the line. While you’re out and about, make sure to test out all the features and functions of the car.
Test the air conditioning and heating to make sure they’re working properly. Try out the audio system and check if the sound quality meets your standards. If the car has any advanced safety features, such as lane departure warning or blind-spot monitoring, test them out to see if they work effectively.
During your test drive, don’t be afraid to ask questions. The salesperson should be knowledgeable about the car and able to answer any concerns or uncertainties you may have. If you’re not sure about something, ask for clarification.
Remember, this is a big purchase, and you want to make sure you’re making the right choice. After the test drive, take a moment to inspect the car thoroughly. Check for any visible dents, scratches, or rust on the exterior.
Check for Proper Trailer Alignment
In the final step of testing and inspecting your trailer’s alignment, it’s crucial to check for proper trailer alignment. This ensures that your trailer is straight and properly aligned with your towing vehicle. Improper alignment can lead to issues such as uneven tire wear, decreased fuel efficiency, and poor handling.
To check for proper alignment, you’ll want to start by ensuring that your trailer is on a level surface. Then, you can use a straight edge, such as a long straight board or a measuring tape, to check the alignment of the trailer’s wheels. Place the straight edge against the outside edge of one of the trailer’s tires, and then measure the distance between the straight edge and the outside edge of the opposite tire.
Repeat this process on the other side of the trailer. If the measurements are the same, your trailer is properly aligned. If not, you may need to make adjustments to bring your trailer into proper alignment.
Taking the time to check and correct your trailer’s alignment will help ensure a safe and efficient towing experience.
Inspect for Secure Connection
inspect for secure connection, test and inspect secure connection In the digital age, online security is of paramount importance. We all need to ensure that our connections are secure and that our personal information is protected from potential threats. One crucial step in the process is to test and inspect for a secure connection.
This means checking if the connection you are using is encrypted and if the website you are visiting has an SSL certificate. An SSL (Secure Sockets Layer) certificate helps to establish a secure connection between the server and the client, encrypting any data that is transmitted. When you visit a website that has an SSL certificate, you will see a padlock icon in the address bar, indicating that the connection is secure.
To test and inspect for a secure connection, you can start by checking the URL of the website you are visiting. A secure website will have “https” at the beginning of the URL, instead of just “http.” The “s” in “https” stands for secure, and it signifies that the website has an SSL certificate.
You can also click on the padlock icon in the address bar to view more details about the certificate and verify that it is valid. Another way to inspect for a secure connection is to use online tools that can scan websites for vulnerabilities and security issues. These tools can check if the website has any outdated software or weak encryption algorithms that could be exploited by hackers.
They can also check for any suspicious or malicious code that may have been injected into the website. In addition to testing and inspecting for a secure connection, it is also essential to stay vigilant and be cautious when entering personal information online. Avoid entering sensitive data on websites that do not have a secure connection or do not have an SSL certificate.
Be wary of clicking on suspicious links or downloading files from unfamiliar sources. By taking these precautions and regularly inspecting for a secure connection, you can help ensure that your online activities remain safe and protected.
Conclusion
So, there you have it – the art of hooking up a Reese’s Equalizer Hitch is a true balancing act. Just like Reese’s famous tagline, it’s all about finding that perfect “Equal-i-zer” in weight distribution and sway control. With the right tools, a little bit of patience, and a whole lot of determination, you’ll have your trailer hitched up and ready to hit the road in no time.
And remember, the next time you enjoy a Reese’s peanut butter cup, you can proudly say that you know how to hook up a Reese’s Equalizer Hitch too. It’s the perfect combination of sweet satisfaction and towing prowess. Happy hitching!”
Importance of Double-Checking the Hitch Connection
hitch connection When it comes to towing, one of the most important steps is double-checking the hitch connection. This is something that should never be overlooked or rushed, as it can have serious consequences if not done correctly. In fact, it’s always a good idea to make it a habit to test and inspect the hitch connection before every trip.
So, what exactly does this step entail? Well, it’s pretty simple but extremely vital. First, you want to ensure that the hitch ball is securely attached to the trailer coupler. Give it a good tug to make sure it’s not loose and won’t come off during transportation.
Next, check the safety chains. Are they properly attached and crossed under the tongue of the trailer? They should be able to support the weight of the trailer in case the hitch fails. Don’t forget to also inspect the electrical connections.
Make sure they are clean and free of any dirt or corrosion. A secure and functioning electrical connection is necessary for the trailer’s lights, brakes, and turn signals to work properly. If there are any issues, fix them before heading out on the road.
To give yourself extra peace of mind, consider using a hitch lock. This simple device can add an extra layer of security to your hitch connection, preventing any unauthorized disconnections. It not only deters theft but also keeps the trailer firmly attached to your vehicle.
Remember, the hitch connection is the lifeline between your towing vehicle and the trailer. It’s what keeps everything together and ensures a safe journey. By taking the time to test and inspect it before every trip, you can greatly reduce the risk of any accidents or mishaps on the road.
Safe Towing Tips
“towing safety tips”
Final Thoughts
After going through the previous steps of the HVAC installation process, step 5 is where we finally test and inspect the system to ensure everything is functioning properly. This is a crucial step because it allows us to identify any potential issues or problems before they become major headaches down the road. During the testing phase, we will check all the components of the HVAC system, including the furnace, air conditioner, thermostat, and air ducts.
We will be looking for any signs of leaks, improper airflow, or strange noises. By thoroughly testing and inspecting the system, we can make any necessary adjustments or repairs to ensure that it is working efficiently and effectively. So, when it comes to HVAC installation, don’t forget to take the time to properly test and inspect your system to ensure optimal performance and peace of mind.
FAQs
How does a Reese’s equalizer hitch work?
A Reese’s equalizer hitch works by distributing the weight between the trailer and the towing vehicle, helping to create a more stable and balanced towing experience. It uses tensioned bars to transfer some of the trailer’s tongue weight to the front axle of the towing vehicle, improving control and reducing sway.
What are the benefits of using a Reese’s equalizer hitch?
Using a Reese’s equalizer hitch offers several benefits, including improved stability and control while towing, decreased sway and trailer fishtailing, reduced stress on the towing vehicle, and a smoother ride for both the driver and passengers.
How do I install a Reese’s equalizer hitch?
To install a Reese’s equalizer hitch, start by positioning the hitch head on the trailer tongue and securing it with the appropriate bolts. Next, attach the spring bars to the hitch head and adjust their tension using the built-in adjustment mechanism. Finally, secure the other end of the spring bars to the frame brackets on the towing vehicle.
What weight capacities are available for Reese’s equalizer hitches?
Reese’s offers a range of weight capacities for their equalizer hitches, typically ranging from 400 lbs to 14,000 lbs. It’s important to select a hitch with the appropriate weight capacity for your specific towing setup to ensure safe and effective weight distribution.
Are Reese’s equalizer hitches compatible with all types of trailers?
Reese’s equalizer hitches are compatible with most types of trailers, including travel trailers, utility trailers, and recreational vehicles. However, it’s always recommended to check the manufacturer’s specifications to ensure compatibility with your specific trailer and towing setup.
Can I use a Reese’s equalizer hitch on a short-bed truck?
Yes, Reese’s equalizer hitches can be used with short-bed trucks. However, it’s important to consider the turning radius and cab clearance when selecting a hitch and configuring the weight distribution setup to ensure safe and maneuverable towing.
Do I need to lubricate the Reese’s equalizer hitch?
Yes, it’s recommended to lubricate the contact points of the Reese’s equalizer hitch, such as the hitch head, spring bars, and friction points, to reduce friction and ensure smooth operation. Using a high-quality lubricant specifically designed for towing hitches will help prolong the lifespan and effectiveness of the hitch.