
So, you’ve decided to embark on a road trip or camping adventure and you’re looking for a way to maximize your vehicle’s storage space. Well, look no further than a hitch cargo carrier! This handy device allows you to transport bulky items like suitcases, camping gear, or even bikes without compromising space inside your vehicle. But how exactly do you install one? Don’t you worry – we’ve got you covered.
Installing a hitch cargo carrier may seem like a daunting task, but fear not! With a little patience and some basic tools, you’ll have it set up in no time. The first step is to ensure that you have a hitch receiver installed on your vehicle. This is the metal bar located at the rear of your vehicle that allows you to attach hitch accessories.
If you don’t have one, you can easily have one installed by a professional or purchase a hitch mounting kit and do it yourself. Once you have a hitch receiver in place, it’s time to choose the right hitch cargo carrier for your needs. There are various types available, such as platform carriers, basket carriers, or cargo boxes – each offering different pros and cons.
Consider factors like weight capacity, size, and ease of use when making your selection. Now that you have the perfect hitch cargo carrier in hand, it’s time to install it. Start by inserting the shank of the carrier into your hitch receiver.
Make sure it is aligned properly and then secure it with a hitch pin or lock. Double-check that it is securely fastened before moving on to the next step. Next, it’s time to load up your cargo onto the carrier.
Depending on the type of carrier you have, this process may vary. For platform carriers, simply place your items onto the platform and secure them with straps or bungee cords. For basket carriers, you may need to use a cargo net to keep your items in place.
Table of Contents
Introduction
So, you’ve decided to invest in a hitch cargo carrier for your vehicle. Great choice! These carriers can significantly increase the storage capacity of your car, allowing you to transport larger items without worrying about fitting them in the trunk. But now comes the question, how do you actually install a hitch cargo carrier? Well, fear not! Installing a hitch cargo carrier is a relatively straightforward process that can be done in just a few steps.
In this article, we will guide you through the installation process, providing you with all the information you need to get your hitch cargo carrier up and running in no time. So, let’s get started!
What is a Hitch Cargo Carrier?
hitch cargo carrier Introduction: If you’re a frequent traveler or enjoy going on road trips, you may know how valuable every inch of space is in a vehicle. Whether it’s packing camping gear, sports equipment, or extra luggage, finding room for everything can be a real challenge. That’s where a hitch cargo carrier comes in handy.
This simple but incredibly useful accessory attaches to the back of your vehicle, allowing you to transport additional items without taking up precious interior space. It’s like having a portable storage unit that goes wherever you go. So, if you’re tired of squeezing bags and boxes into your car or SUV, it’s time to consider investing in a hitch cargo carrier.
Why Install a Hitch Cargo Carrier?
hitch cargo carrier, cargo carrier, benefits of hitch cargo carrier, advantages of hitch cargo carrier
Preparation
If you’re looking to increase the storage capacity of your vehicle, a hitch cargo carrier is a great option. Installing a hitch cargo carrier can be a bit intimidating at first, but with a little preparation, it can be a simple and straightforward process. The first step is to gather all the necessary tools and materials.
This may include a hitch receiver, hitch pin, cargo carrier, wrench, and any additional hardware that may be specific to your vehicle. It’s also important to ensure that your vehicle’s hitch receiver is compatible with the cargo carrier you have chosen. Once you have everything you need, it’s time to get started.
Begin by sliding the cargo carrier into the hitch receiver, making sure it is aligned properly. Then, insert the hitch pin through the holes in the receiver and cargo carrier, securing it in place. Finally, use a wrench to tighten the hitch pin, ensuring that the carrier is stable and secure.
With these simple steps, you’ll be on your way to enjoying the additional storage space provided by your hitch cargo carrier.
Choosing the Right Hitch Cargo Carrier
preparation, choosing the right hitch cargo carrier
Gathering the Necessary Tools
Preparation is the key to success, and when it comes to any task or project, having the right tools is essential. The same goes for gathering the necessary tools for any endeavor, whether it’s cooking, gardening, or even learning a new skill. In order to be prepared, it’s important to take some time to think about what tools you will need and gather them together before starting.
Just like a chef needs a good set of knives and utensils, or a gardener needs a shovel and watering can, gathering the necessary tools for any task will make the process much smoother and more enjoyable. So, before getting started, take a moment to think about what tools you will need and make sure you have everything on hand. By doing so, you’ll set yourself up for success and be ready to tackle whatever comes your way.
So, whether it’s gathering ingredients for a recipe or gathering art supplies for a painting, preparation is key in ensuring a successful outcome.
Step-by-Step Installation
Are you looking to add some extra storage space to your vehicle? Installing a hitch cargo carrier can be a great solution! Not only does it provide a convenient way to transport larger items, but it also frees up space inside your vehicle. So, how do you go about installing a hitch cargo carrier? Let’s break it down step by step. First, you’ll need to gather all the necessary tools and equipment, including a hitch cargo carrier, a hitch receiver, and any additional mounting hardware that may be required.
Next, locate your vehicle’s hitch receiver and ensure that it is compatible with the hitch cargo carrier you have chosen. If needed, purchase a hitch receiver that is compatible with your vehicle. Once you have all the necessary equipment, it’s time to start the installation process.
Begin by attaching the hitch receiver to your vehicle’s hitch receiver. Make sure that it is securely fastened and level. Next, attach the hitch cargo carrier to the hitch receiver using the appropriate mounting hardware.
Again, be sure to tighten all screws and bolts securely. Once everything is in place, give the hitch cargo carrier a good shake to ensure that it is stable and secure. Finally, check that all lights and reflectors are properly attached and functioning.
And there you have it! With a few simple steps, you can have a hitch cargo carrier installed and ready to use. Now, you can transport all of your gear and belongings with ease, without sacrificing precious space inside your vehicle.
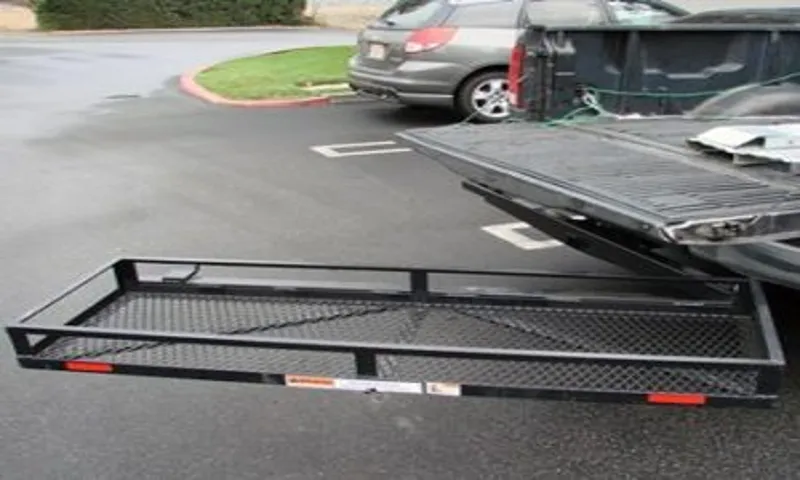
Step 1: Placing the Carrier on the Hitch
Installing a hitch-mounted carrier is a straightforward process that can greatly expand your vehicle’s storage capacity. Step 1 in this installation process involves placing the carrier on the hitch. To begin, make sure the carrier is in the folded position, making it easier to handle.
Lift the carrier and align it with the hitch receiver on your vehicle. Slowly lower the carrier onto the hitch, ensuring that the holes on the carrier match up with the hitch pin holes. Next, insert the hitch pin into the holes to secure the carrier in place.
Now you can start loading your gear onto the carrier, knowing that it is securely attached to your vehicle. With the carrier installed, you’ll be ready to hit the road with all your belongings safely stored and easily accessible.
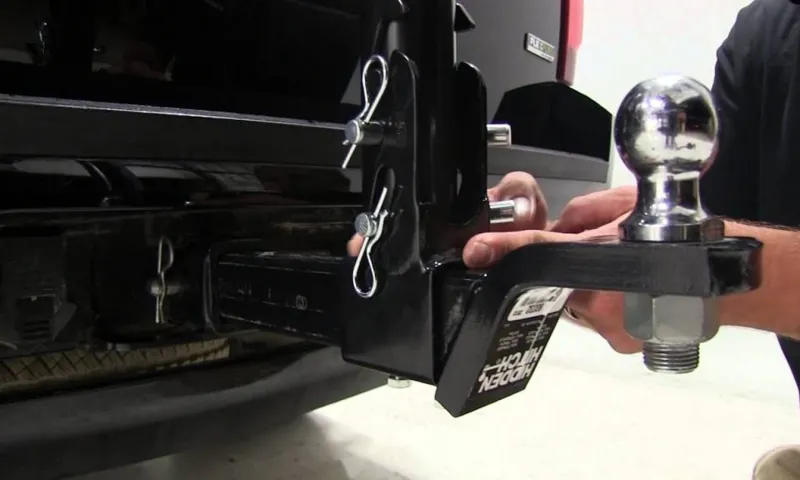
Step 2: Securing the Carrier to the Hitch
When it comes to securing your carrier to the hitch, it’s important to follow a step-by-step process to ensure a safe and secure installation. First, make sure that your carrier is properly aligned with the hitch. This may require some adjustments to ensure the carrier is positioned correctly.
Once it is aligned, use the provided hardware to attach the carrier to the hitch. This typically involves tightening bolts or screws to ensure a tight fit. It’s important to use the correct tools and follow the manufacturer’s instructions for this step.
Once the carrier is securely attached, give it a good shake to make sure it’s stable. If there is any movement, adjust the carrier or hardware as needed to ensure a secure fit. With the carrier properly secured to the hitch, you can now load your items and hit the road with confidence.
By following these steps, you can ensure a safe and secure trip with your carrier.
Step 3: Connecting the Carrier to the Vehicle
Installing a carrier on the roof of your vehicle can be a game-changer when it comes to transporting bulky items, such as luggage or sports equipment. Once you have chosen the right carrier for your needs and have assembled it, the next step is to connect it to your vehicle. This step is crucial for ensuring a secure and stable installation.
First, locate the roof rails or crossbars on your vehicle. These are the points where the carrier will be attached. Depending on the type of carrier you have, there may be specific mounting brackets or hardware that needs to be used.
Make sure to follow the manufacturer’s instructions for your specific carrier model. Once you have identified the proper attachment points and have the necessary hardware, position the carrier on top of the roof rails or crossbars. Align it properly and tighten the mounting bolts or straps to secure it in place.
Check that the carrier is tightly connected and does not move or shift when you give it a gentle tug. Remember, a secure connection is essential for safe and efficient transportation.
Safety Tips
If you’re planning a road trip and need some extra space for your luggage, installing a hitch cargo carrier can be a great solution. Not only does it provide additional storage, but it also allows you to free up space inside your vehicle for a more comfortable ride. To install a hitch cargo carrier safely, there are a few key steps to follow.
First, make sure your vehicle has a hitch receiver and that it is properly rated for the weight and size of the cargo carrier you plan to use. Next, carefully read and follow the manufacturer’s instructions for installing the carrier. This may involve attaching it to the hitch receiver and securing it with bolts or pins.
Once the carrier is securely attached, double-check that it is level and that all connections are tight. Finally, load your cargo onto the carrier, distributing the weight evenly and securing it with straps or bungee cords. It’s important to remember that the weight of the cargo shouldn’t exceed the weight limit specified for the carrier.
By following these steps and using common sense, you can safely install a hitch cargo carrier and enjoy a stress-free trip with all of your belongings securely stowed away.
Maintenance and Care
So, you’ve decided to travel and bring along some extra gear with you, but you’re not sure how to install a hitch cargo carrier. Don’t worry! It’s actually quite simple. First, make sure you have the right hitch size for your vehicle.
The most common sizes are 25-inch and 2-inch hitch receivers. Next, assemble the cargo carrier according to the instructions provided.
Once assembled, slide the carrier into the hitch receiver and secure it with the hitch pin. Make sure it’s tight and secure before loading any items onto the carrier. Finally, double-check that the carrier is level and not blocking any taillights or license plates.
And that’s it! You’re now ready to hit the road with all your extra gear safely and securely. Happy travels!
Cleaning the Hitch Cargo Carrier
hitch cargo carrier, cleaning, maintenance, care Keeping your hitch cargo carrier clean is an important part of its maintenance and care routine. Over time, dirt, debris, and grime can accumulate on the carrier, not only making it look dirty but also potentially causing damage. Cleaning your hitch cargo carrier doesn’t have to be a daunting task.
With a few simple steps, you can have it looking as good as new. First, you’ll want to start by removing any loose items or debris from the carrier. This includes any straps, tie-downs, or other accessories that may be attached.
Once everything is cleared off, you can begin the cleaning process. Using a mild detergent mixed with water, scrub the surface of the carrier with a soft-bristle brush or sponge. This will help to remove any dirt or stains that have built up.
It’s important to avoid using harsh chemicals or abrasive cleaners, as these can potentially damage the carrier’s finish. After scrubbing the surface, rinse off the carrier with a hose or bucket of clean water. This will help to wash away any remaining soap and ensure a thorough cleaning.
Once the carrier is clean, it’s important to thoroughly dry it before storing or using it again. This will help to prevent any moisture from causing rust or other damage. You can use a towel or allow it to air dry, depending on your preference.
In addition to regular cleaning, it’s also a good idea to inspect the carrier for any signs of damage or wear. Check for any loose or missing parts, as well as any rust or corrosion. Addressing any issues promptly can help to extend the life of your hitch cargo carrier.
Inspecting for Damage
When it comes to keeping your home in tip-top shape, regular maintenance and care are key. One important aspect of this is inspecting for damage on a regular basis. This means taking the time to visually inspect your home, both inside and out, for any signs of wear and tear or potential issues.
Look for things like cracks in the foundation, leaks in the roof, or damage to your windows and doors. By catching these issues early on, you can prevent them from becoming larger, more costly problems down the line. Think of it like going to the doctor for a check-up.
Just as your doctor can catch health issues before they worsen, inspecting for damage allows you to catch and address any home maintenance issues before they become major headaches. So grab a flashlight and take a walk around your home, looking for any signs of damage. It may seem like a small task now, but it can save you a lot of time, money, and stress in the long run.
Conclusion
And that, my friends, is how you install a hitch cargo carrier. With just a few steps and a little bit of elbow grease, you can transform your vehicle into a master of storage and organization. No longer will you have to cram your belongings into the backseat or trunk, as you now have the power of a hitch cargo carrier at your disposal.
You’ll be the envy of every road trip, with ample room for all of your essentials and more. So go forth, fellow adventurers, and conquer the open road with style and finesse. Just make sure to secure your cargo properly and obey all traffic laws, because a hitch cargo carrier is only as good as its installation.
Happy travels and may your journeys be filled with endless discoveries and unforgettable experiences. Carpe diem, my friends, carpe diem.”
FAQs
What is a hitch cargo carrier?
A hitch cargo carrier is an accessory that can be attached to the back of a vehicle using the hitch receiver, providing additional storage space for luggage, camping gear, or other bulky items during travel.
How do I install a hitch cargo carrier?
To install a hitch cargo carrier, first, ensure that your vehicle has a hitch receiver. Then, align the carrier with the receiver and insert the hitch pin. Make sure it is secure and locked in place. Finally, load your cargo onto the carrier, making sure it is evenly distributed and properly secured with straps or bungee cords.
What are the different types of hitch cargo carriers?
There are several types of hitch cargo carriers available, including:
1. Basket-style carriers: These have an open design with a metal frame and mesh bottom, allowing for easy loading and airflow.
2. Tray-style carriers: These have a solid platform with raised sides, providing better stability and containment for your cargo.
3. Folding carriers: These can be folded when not in use, allowing for easier storage and flexibility.
4. Hitch-mounted cargo boxes: These are enclosed storage containers that attach to the hitch receiver, providing protection for your belongings from weather and theft.
Can I install a hitch cargo carrier on any vehicle?
Hitch cargo carriers can be installed on most vehicles that have a hitch receiver. However, it is important to check the weight capacity of both your vehicle’s hitch and the carrier itself to ensure they are compatible. Additionally, some vehicles may require the use of a hitch extension or adapter to properly install the carrier.
How much weight can a hitch cargo carrier support?
The weight capacity of hitch cargo carriers varies depending on the specific model. It is crucial to check the manufacturer’s guidelines for your particular carrier to determine its maximum weight capacity. Exceeding the recommended weight limit can lead to damage to your vehicle or the carrier, and compromise safety.
Are there any safety precautions I should take when using a hitch cargo carrier?
Yes, when using a hitch cargo carrier, it is essential to:
– Load your cargo evenly and securely to prevent shifting during transit.
– Ensure the carrier is properly attached to the hitch receiver and locked in place.
– Regularly check the tightness of all fasteners and straps.
– Avoid overloading the carrier beyond its weight capacity.
– Be mindful of the added length and weight when driving, especially when making turns or backing up.
– Consider installing a cargo net or tarp to further protect your belongings from wind, rain, or debris.
Can I use a hitch cargo carrier with a trailer hitch?
In most cases, it is not recommended to use a hitch cargo carrier with a trailer hitch simultaneously. The weight and movement of the cargo on the carrier can have adverse effects on the towing capacity and stability of the trailer. It is safer to use either a hitch cargo carrier or a trailer, but not both simultaneously.