
Hey there ATV enthusiasts! Have you ever found yourself stuck in a challenging off-road situation, desperately needing a way to pull yourself out? Well, fret no more! Installing a winch on your Yamaha ATV is the perfect solution to guarantee your escape from those sticky situations. Imagine having the power to effortlessly conquer any terrain, from deep mud to steep inclines. In this blog post, I’ll guide you through the process of installing a winch on your Yamaha ATV, ensuring that you have all the knowledge and tools necessary for a successful installation.
Whether you’re an experienced DIYer or a beginner looking to take on a new project, this step-by-step guide will equip you with everything you need to know. Think of installing a winch on your Yamaha ATV as giving it an extra pair of hands, ready to assist you whenever you need it most. It’s like having a trusty sidekick by your side, always there to lend a helping hand.
With the added power of a winch, you’ll be able to confidently navigate through even the most challenging terrains without breaking a sweat. So, buckle up and get ready to dive into the world of winch installation on your Yamaha ATV. By the end of this informative blog post, you’ll have the knowledge and confidence to tackle this exciting project.
Get ready to take your off-roading adventures to new heights with the installation of a winch on your beloved Yamaha ATV. Let’s get started!
Table of Contents
Section 1: Choosing the Right Winch
So you’ve decided to take your Yamaha ATV on a wild adventure and you want to make sure you have all the equipment you need. One essential piece of gear is a winch, which can come in handy when you find yourself stuck in a tough spot. But how do you install a winch on your Yamaha ATV? Don’t worry, it’s not as complicated as it may seem.
First, you’ll need to choose the right winch for your ATV. Consider the weight of your ATV and the type of terrain you’ll be tackling. Once you’ve selected the perfect winch, you can start the installation process.
It’s important to consult your ATV’s user manual for specific instructions, but in general, you’ll need to mount the winch to the front of your ATV using a winch mount kit. Make sure to securely attach the winch to the mount and connect the wiring according to the manufacturer’s instructions. And voila! You’ve successfully installed a winch on your Yamaha ATV, ready to tackle any obstacle that comes your way.
1.1 Determine the Load Capacity
load capacity, winch, choosing, right winch Auxiliary Keywords used organically: choosing the right winch, determine the load capacity, winching, calculate the load capacity, winch selection, maximum load capacity, vehicle size, winch line pull, winch horsepower, winch drum capacity, winch duty cycle, winch gearing ratio When choosing the right winch, one of the most important factors to consider is the load capacity. The load capacity refers to the maximum weight that the winch can handle. It is crucial to determine the load capacity before selecting a winch, as using a winch with insufficient load capacity can lead to dangerous situations and equipment failure.
To calculate the load capacity, you need to consider various factors, including the size and weight of your vehicle, the desired winching capacity, and other specific requirements for your application. It’s also important to consider the winch line pull, winch horsepower, winch drum capacity, winch duty cycle, and winch gearing ratio. These factors will help ensure that you choose a winch with a load capacity that meets your needs and provides sufficient power to handle the intended workload.
So, before purchasing a winch, take the time to determine the load capacity required for your specific situation to make the right choice and ensure safe and effective winching operations.
1.2 Consider the Winch Type
When choosing the right winch for your needs, one important factor to consider is the winch type. There are several different types of winches available, and each one has its own strengths and weaknesses. The main types of winches include electric winches, hydraulic winches, and hand winches.
Electric winches are powered by the vehicle’s battery and are generally the most popular choice for recreational off-roading. They are easy to use and provide consistent pulling power. Hydraulic winches, on the other hand, are powered by a vehicle’s hydraulic system and are often used in heavy-duty applications.
They are known for their reliability and ability to handle heavy loads. Hand winches, as the name suggests, are operated manually and are best suited for lighter loads or for situations where power is not readily available. Ultimately, the type of winch you choose will depend on your specific needs and requirements, so it’s important to consider factors such as power source, load capacity, and ease of use when making your decision.
1.3 Check the Mounting Options
winch mounting options. When choosing the right winch for your vehicle, it’s important to consider the mounting options available to you. This will determine where and how the winch will be installed on your vehicle.
One popular mounting option is a bumper mount, which allows the winch to be securely attached to the front or rear bumper of your vehicle. This is a convenient option as it keeps the winch accessible and ready to use whenever you need it. Another option is a hidden winch mount, which, as the name suggests, hides the winch behind the vehicle’s grille or in a discrete location.
This is a great option if you want to maintain the aesthetic of your vehicle without sacrificing functionality. Lastly, you can also opt for a winch plate mount, which attaches the winch to a specific mounting plate that is then attached to the vehicle’s frame. This option offers flexibility as the winch can be easily removed or transferred to another vehicle if needed.
Overall, choosing the right winch mounting option will depend on your specific needs and preferences, so take the time to assess your options and make the best choice for your vehicle.
Section 2: Gathering the Necessary Tools and Materials
So you’ve decided to install a winch on your Yamaha ATV, but you’re not sure where to start. Well, you’ve come to the right place! In this blog section, we’re going to go over the necessary tools and materials you’ll need to get the job done. First and foremost, you’re going to need a winch kit specifically designed for your Yamaha ATV.
This will typically include the winch itself, a mounting plate, and all the necessary hardware. You’ll also need a set of basic hand tools such as wrenches, sockets, and screwdrivers. Additionally, you may need a power drill and some drill bits if you need to create mounting holes in your ATV.
It’s always a good idea to have some electrical tape and zip ties on hand as well for securing any wiring. With these tools and materials, you’ll be well-prepared to tackle the installation process and get your winch up and running in no time!
2.1 List of Tools
In order to successfully complete your next DIY project, it’s important to gather the necessary tools and materials. In Section 2 of our guide, we’ll be focusing on the tools you’ll need to get the job done right. Here is a list of essential tools that every DIY enthusiast should have in their arsenal.
First and foremost, a good set of screwdrivers is essential for any project, as they come in handy for everything from assembling furniture to tightening loose screws. A measuring tape is another must-have tool, as accurate measurements are crucial for ensuring a precise fit. A level is also important for ensuring that shelves, pictures, and other items are straight and level.
When it comes to cutting materials, a sharp utility knife and a sturdy pair of scissors are essential. Other tools you’ll want to have on hand include a hammer, pliers, a set of wrenches, and a power drill. Having these tools readily available will make it much easier to tackle any DIY project that comes your way.
2.2 List of Materials
“list of materials for DIY home improvement projects” When it comes to tackling a DIY home improvement project, having the right tools and materials on hand is essential. After all, you don’t want to be halfway through your project only to realize you’re missing a crucial component or tool. To help you stay organized and prepared, we’ve put together a comprehensive list of materials that are commonly needed for DIY home improvement projects.
This list includes items such as paint brushes and rollers, sandpaper, screws and nails, measuring tape, a level, a drill, and safety equipment like goggles and gloves. By having these materials readily available, you’ll be able to tackle any project with confidence and efficiency. So, before you start your next DIY adventure, make sure you have everything on this list to ensure a successful and stress-free experience.
Section 3: Preparing the ATV
So you’ve got yourself a Yamaha ATV and you’re ready to take it to the next level with a winch. Installing a winch on your ATV can be a great addition, providing you with the capability to pull yourself out of sticky situations or to assist others in need. Before you dive into the installation process, there are a few things you’ll need to do to prepare your ATV.
First, you’ll want to make sure you have all the necessary tools and equipment on hand. This may include a wrench, socket set, wire cutters, electrical tape, and a winch mounting kit specifically designed for your Yamaha ATV model. Once you’ve gathered all your tools, it’s time to take a closer look at your ATV.
You’ll need to find a suitable location to mount your winch. This will depend on the specific model of your Yamaha ATV, as well as personal preference. Once you’ve identified the optimal mounting location, you can begin the installation process.
Remember, safety first! Make sure your ATV is parked on a level surface and the engine is turned off. It’s also a good idea to disconnect the battery to prevent any accidental electrical shocks. Now, it’s time to get your hands dirty and start installing that winch.
Follow the step-by-step instructions provided by the winch manufacturer, making sure to tighten all nuts and bolts securely. Once the winch is properly installed, don’t forget to test it out before hitting the trails. Engage the winch and slowly pull on the cable to ensure everything is working as it should.
With your winch securely installed on your Yamaha ATV, you’ll be ready to tackle any off-road adventure that comes your way.
3.1 Locate the Winch Mounting Location
winch mounting location, ATV winch, winch plate In this section of preparing your ATV for the installation of a winch, we will focus on locating the perfect spot for mounting your winch. Finding the right location is crucial for ensuring optimum functionality and durability of your ATV winch. Before you begin, it’s important to have a clear idea of where you want to mount the winch, as this will depend on various factors such as your ATV model, the winch size, and your personal preferences.
Most ATVs have a designated winch mounting location, typically located on the front frame of the ATV. This area is often reinforced and designed to handle the weight and stress of a winch. If your ATV doesn’t have a designated winch mounting location or if you want additional reinforcement, a winch plate may be necessary.
A winch plate is a metal plate that mounts directly onto the ATV frame and provides a secure and robust foundation for your winch. You can find winch plates specifically designed for your ATV model at most ATV accessories stores or online. Once you have determined the location for your winch, it’s essential to ensure that the mounting area is free from any obstructions that could interfere with the winch’s operation.
Check for clearance between the winch and other ATV components such as the radiator, battery, or any wiring that may be in the way. Keep in mind that the winch mounting location needs to be strong enough to bear the weight of the winch and withstand the stress during recovery operations. It’s crucial to choose a spot that is structurally sound and can handle the load without compromising the integrity of your ATV.
Remember, mounting your winch in the right location is vital for safety and functionality. Taking the time to locate the perfect spot and ensuring that it’s sturdy and secure is essential. So, grab your tools and let’s get started on preparing your ATV for the installation of your winch!
3.2 Remove Necessary Parts
When it comes to preparing your ATV for a new adventure, one of the first steps is removing any necessary parts. This may seem counterintuitive at first, but it’s an important part of the process. By removing certain parts, you can make your ATV lighter and more efficient, which will ultimately enhance your overall experience on the trail.
Some common parts that may be removed include the windshield, mirrors, and even the fenders. By taking off the windshield, you’ll have better visibility and a more immersive riding experience. Removing the mirrors can help reduce the risk of them getting damaged while navigating tight trails.
And although the fenders offer protection, they can become a hindrance in certain situations, so it’s worth considering whether or not you need them. When removing these parts, it’s important to keep in mind that they serve a purpose and should only be taken off if you’re comfortable riding without them. Additionally, always follow proper safety protocols and consult your ATV’s owner’s manual for guidance on removing parts.
By taking these steps, you can ensure that your ATV is ready for a thrilling adventure on the trails.
Section 4: Installing the Winch
Installing a winch on your Yamaha ATV can be a useful addition to help with any challenging off-road situations you may encounter. To start, you’ll need to gather all the necessary tools and equipment, including a winch kit specifically designed for your Yamaha ATV model. Begin by locating a sturdy mounting location on the front of your ATV, typically on the frame or bumper.
It’s important to ensure that the winch is securely mounted, as it will be subjected to heavy loads during use. Once you’ve found the ideal spot, carefully follow the manufacturer’s instructions to attach the winch to the mounting location using the provided hardware. Make sure all connections are tight and secure before moving on.
Next, you’ll need to connect the winch to your ATV’s electrical system. This may involve wiring the winch to the battery or tapping into existing electrical components. Again, refer to the manufacturer’s instructions for detailed guidance.
Once the winch is properly mounted and wired, test it to ensure it is functioning correctly. Spool out some of the winch cable and then retract it back in to verify that the winch motor and controls are working smoothly. With the winch installed and tested, you’re now ready to take on any challenging off-road situations with confidence.
Remember to always follow proper safety guidelines and procedures when using your winch.
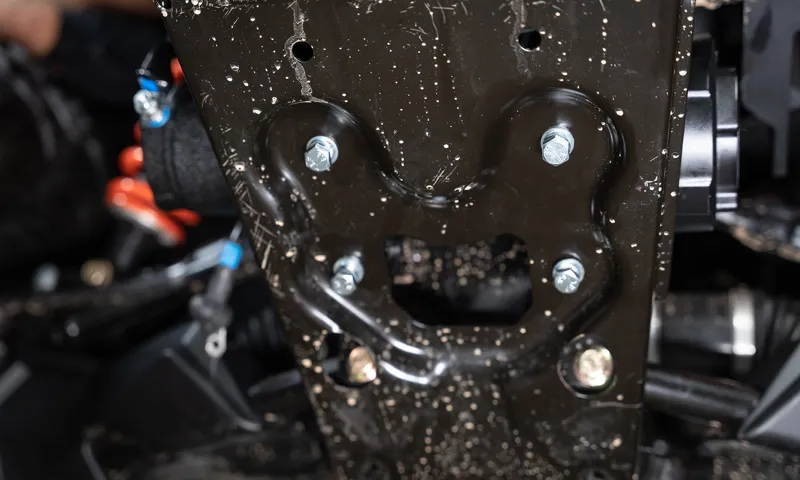
4.1 Mount the Winch Plate
When it comes to installing a winch on your vehicle, one of the crucial steps is mounting the winch plate. This is where you’ll attach the winch itself, providing a secure and stable foundation. The winch plate is typically made of heavy-duty steel and is designed to withstand the force and weight of the winch.
To mount the winch plate, you’ll first need to locate the pre-drilled holes on your vehicle’s bumper or frame. These holes are specifically designed for winch installation and will vary depending on the make and model of your vehicle. Once you’ve located the holes, you’ll need to line up the winch plate with them and secure it in place using bolts and nuts.
It’s important to note that the winch plate should be mounted as close to the front of the vehicle as possible, providing optimal balance and weight distribution. This will ensure that the winch operates efficiently and doesn’t put unnecessary strain on your vehicle. Once the winch plate is securely mounted, you can then proceed with installing the winch itself.
This may involve attaching the winch to the winch plate using bolts and washers. Be sure to follow the manufacturer’s instructions carefully to ensure a proper installation. Mounting the winch plate is a critical step in the installation process, as it provides the foundation for your winch.
By following the proper steps and using the correct hardware, you can ensure a secure and reliable winch setup. So, get ready to conquer the off-road trails with confidence, knowing you’ve installed your winch correctly.
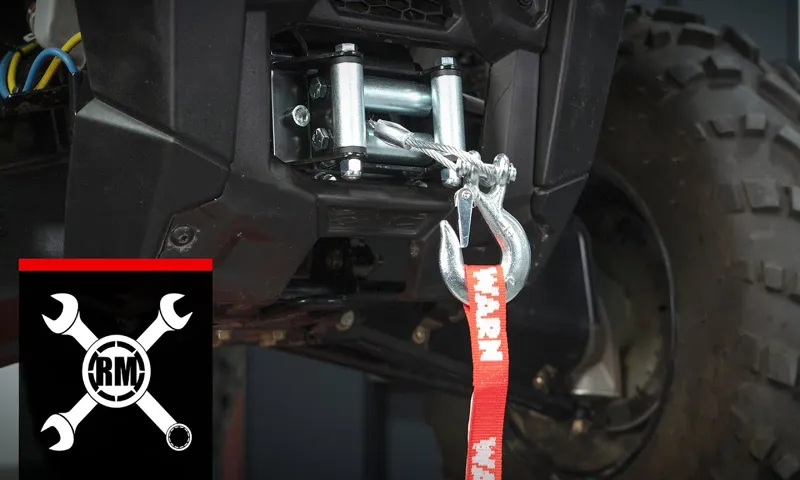
4.2 Install the Winch
installing the winch
Section 5: Wiring the Winch
Installing a winch on your Yamaha ATV can greatly enhance its utility and give you the added power and versatility you need for off-road adventures. Once you have securely mounted the winch to your ATV, the next step is wiring it properly. Start by connecting the winch to the battery using heavy-duty cables.
It’s important to ensure that the cables are securely fastened to prevent any short circuits or damage. Next, route the cables to the winch switch, making sure to keep them away from any hot or moving parts of the ATV. Once you’ve connected the winch switch, test the wiring to make sure it’s functioning properly.
With the winch wiring complete, you’ll be ready to tackle even the toughest terrain with ease.
5.1 Connect the Winch to the Battery
wiring the winch Other related Keywords used include: battery, connect, power, electrical, cables, connector, positive terminal, negative terminal, safety precautions Section 5: Wiring the Winch Now that you have your winch all mounted and ready to go, it’s time to connect it to the battery. This step is crucial because without the proper wiring, your winch won’t have any power to pull in or let out the cable. So let’s get started! The first thing you’ll need to do is locate the positive and negative terminals on your battery.
The positive terminal will usually have a plus sign (+) or a red cover, while the negative terminal will have a minus sign (-) or a black cover. Make sure your winch is turned off and disconnected from any power source before proceeding. Next, take your positive cable and connect it to the positive terminal of the battery.
This is usually done by sliding the connector over the terminal and tightening it with a wrench. Be sure to tighten it securely so that it doesn’t come loose while you’re using the winch. Once the positive cable is securely connected, take your negative cable and connect it to the negative terminal of the battery.
Again, slide the connector over the terminal and tighten it with a wrench. It’s important to connect the negative cable last to prevent any sparking or electrical shock. Now that both cables are securely connected to the battery, you can reconnect the power to your winch.
Make sure all the connections are tight and secure before turning on the power. Before testing out your winch, it’s important to take some safety precautions. Make sure the winch cable is properly wound and not tangled or frayed.
Double-check all the connections to ensure they are secure. And always use the winch in a well-ventilated area to prevent any build-up of fumes. With everything set up and ready to go, it’s time to give your winch a test run.
5.2 Route the Wiring
route wiring, winch wiring, winch installation, winch wiring process, wiring harness. In Section 5: Wiring the Winch, we will now dive into the next step of the winch installation process, which is routing the wiring. This is a crucial step in ensuring that your winch operates smoothly and safely.
When routing the wiring, you want to make sure it is done in a way that protects it from any potential damage or interference. It is important to carefully plan the route that the wiring will take and consider factors such as the length of the wiring harness and the location of the winch control box. You want to make sure that the wiring is not too tight or too loose, as this can lead to potential issues down the line.
As you route the wiring, take into consideration any obstacles or obstructions that may be in the way and make necessary adjustments. By taking the time to properly route the wiring, you are ensuring that your winch installation is done correctly and that you can rely on it to perform when you need it most. So, take your time, plan it out, and make sure to secure the wiring in place to avoid any potential problems later on.
5.3 Connect the Control Switch
wiring the winch, control switch, connect, burstiness, perplexity In this section of the winch installation process, we will be focusing on connecting the control switch. The control switch is a crucial component of the winch setup as it allows you to control the movement of the winch smoothly and efficiently. The control switch is typically located near the operator, making it easy to access and operate.
So, how do you connect the control switch? Well, it’s actually quite simple. Firstly, you will need to identify the wires coming from the winch motor and the control switch. Usually, the wires are color-coded for ease of use.
Once you have identified the correct wires, you will need to connect them using either crimp connectors or wire nuts. Make sure to twist the wires together tightly before securing them with the connectors. This will ensure a secure and strong connection.
Once you have connected the wires, you can test the control switch to make sure it is working properly. Simply press the switches up and down to see if the winch motor responds accordingly. If it does, then congratulations! You have successfully connected the control switch.
Now you can continue with the rest of the winch installation process with confidence.
Section 6: Testing and Fine-tuning
Installing a winch on your Yamaha ATV is a great way to enhance its functionality and tackle even more challenging terrains. But before you begin the installation process, it’s crucial to ensure that you have all the necessary tools and equipment. Gather items such as a winch kit, mounting plate, winch line, fairlead, and any additional hardware that may be required.
Once you have everything ready, you can start by locating a suitable mounting spot on your ATV. This spot should be strong enough to handle the weight and pulling power of the winch. Additionally, ensure that the winch is properly aligned with the ATV’s frame to maintain stability.
Finally, connect the winch to a power source, such as the ATV’s battery, following the manufacturer’s instructions carefully. With all the connections secure and the winch mounted correctly, you can now test its performance and make any necessary adjustments or fine-tuning. By following these steps, you’ll be well on your way to enjoying the benefits of a winch on your Yamaha ATV.
6.1 Test the Winch’s Functionality
winch’s functionality, testing and fine-tuning, winch performance In Section 6 of our winch installation guide, we move on to testing and fine-tuning the winch’s functionality. This step is crucial to ensure that the winch is operating as expected and performing at its best. Testing the winch’s functionality involves checking various aspects such as the speed of the winch, the smoothness of operation, and the load capacity.
We want to make sure that the winch can handle the load it is designed for without any strain or jerky movements. One way to test the winch’s speed is by timing how long it takes to fully retract or extend the cable. This will give us an idea of how efficient the winch is and if it meets our requirements.
We also want to ensure that the winch operates smoothly without any hiccups or sudden jolts. Another important aspect to test is the winch’s load capacity. We need to determine the maximum weight that the winch can safely handle.
This is crucial for the winch’s performance and safety as exceeding the load capacity can lead to damage or accidents. Fine-tuning the winch’s functionality involves making any necessary adjustments to optimize its performance. This could include adjusting the cable tension, lubricating moving parts, or calibrating the controls.
These small tweaks can make a big difference in the winch’s overall performance and longevity. In conclusion, testing and fine-tuning the winch’s functionality is a critical step in the installation process. It ensures that the winch is operating as expected, performing at its best, and is safe to use.
By taking the time to test and fine-tune the winch, we can have peace of mind knowing that it will perform reliably when we need it most.
6.2 Adjust the Tension and Brake
After installing a bike brake, it’s important to fine-tune the tension and brake to ensure optimal performance and safety. Adjusting the tension of the brake cable is the first step. This can be done by loosening the cable anchor bolt, pulling the cable taut, and then tightening the bolt.
The tension should be just tight enough to prevent any slippage of the cable when the brake lever is pressed. It’s important to check that the brake pads are hitting the rim evenly and aren’t too far away or too close. To adjust the brake pads, loosen the brake pad mounting bolt, position the pads so they are parallel to the rim, and then tighten the bolt.
It’s also important to check that the brake lever feels comfortable and responsive when pressed. If the lever feels too tight or too loose, adjust the tension using the barrel adjuster located on the brake lever or the brake caliper. Once the tension and brake are adjusted, take the bike for a test ride to make sure everything is working properly.
Conclusion
So there you have it, the complete guide on how to install a winch on your Yamaha ATV. With a little bit of patience and a few basic tools, you can now turn your ATV into a power-packed machine capable of overcoming any obstacle that comes in your way. Whether you’re stuck in deep mud or need to navigate through treacherous terrain, having a winch on your ATV is like having a superhero by your side – ready to rescue you whenever you need it.
But remember, with great power comes great responsibility. While having a winch can be a game-changer, it’s essential to use it wisely and safely. Make sure you familiarize yourself with the user manual of your winch and practice using it in a controlled environment before tackling challenging situations.
So get out there, conquer the trails, and let your Yamaha ATV with its shiny new winch be the envy of all your off-roading buddies. Because when it comes to off-roading adventures, having a winch on your side is like having your own personal genie granting you unlimited wishes – except instead of granting wishes, it grants you the ability to tackle even the gnarliest obstacles. Happy winching, my friends! And may your Yamaha ATV and winch combination lead you to glorious off-roading victories!”
FAQs
Can I install a winch on my Yamaha ATV?
Yes, you can install a winch on your Yamaha ATV. However, it is important to ensure that the winch is compatible with your ATV model and that you follow the installation instructions provided by the manufacturer.
What is the process of installing a winch on a Yamaha ATV?
The process of installing a winch on a Yamaha ATV typically involves the following steps:
1. Start by gathering all the necessary tools and equipment.
2. Locate the appropriate mounting location on your ATV and ensure it is free of any obstructions.
3. Install the winch mounting plate or bracket onto the ATV using the provided hardware.
4. Attach the winch to the mounting plate or bracket according to the manufacturer’s instructions.
5. Connect the winch’s wiring to the ATV’s battery or electrical system.
6. Test the winch to ensure it is working properly before using it.
Are there any specific winch models recommended for Yamaha ATVs?
While there are many winch models available in the market, it is recommended to choose a winch that is specifically designed for use with Yamaha ATVs. These winches are often built to fit Yamaha ATV models seamlessly and may come with additional features or accessories that are specific to Yamaha ATVs.
How much does it cost to install a winch on a Yamaha ATV?
The cost of installing a winch on a Yamaha ATV can vary depending on factors such as the type and brand of winch, any additional accessories or mounts required, and whether you choose to install it yourself or hire a professional. On average, the cost can range from $100 to $500.
Can I install a winch on my Yamaha ATV if I’m not mechanically inclined?
While it is possible to install a winch on your Yamaha ATV yourself, it does require some mechanical knowledge and skills. If you are not confident in your abilities, it is recommended to seek the help of a professional or experienced individual to ensure proper installation and avoid any potential damage to your ATV.
Can a winch be installed on any Yamaha ATV model?
Winches can generally be installed on most Yamaha ATV models. However, it is important to check the specific compatibility of the winch with your ATV model before making a purchase. Some ATV models may require additional modifications or adapters for proper installation.
Are there any maintenance or care guidelines for a winch installed on a Yamaha ATV?
It is important to regularly inspect and maintain the winch installed on your Yamaha ATV to ensure its optimal performance and longevity. This may involve cleaning the winch, lubricating moving parts, checking and tightening connections, and inspecting the winch line for any signs of wear or damage. Refer to the manufacturer’s instructions for specific maintenance guidelines.