
Hey there! Are you ready to upgrade your road trip game and make more space in your vehicle? Then you’ve come to the right place! Today, we’re going to dive into the world of hitch cargo carriers – a must-have accessory for anyone who loves to hit the road and explore. Imagine this: you and your friends are gearing up for an epic adventure. You’ve got everything packed and ready to go, but there’s just one problem – your car is packed to the brim and there’s barely enough room to squeeze in another water bottle.
Frustrating, right? Well, that’s where hitch cargo carriers come in to save the day. These handy devices attach to the back of your vehicle, securely holding all of your extra gear, luggage, and equipment. They provide much-needed extra space, giving you the freedom to bring along all the essentials without sacrificing comfort or safety.
Think of a hitch cargo carrier as the trunk of your car, but on steroids. It’s like having a portable storage unit that travels with you wherever you go. Whether you’re embarking on a cross-country road trip, going camping with the family, or simply need some extra room for your sports gear, a hitch cargo carrier is a game-changer.
Not only do these carriers give you more space, but they also ensure that your belongings are protected from the elements. No more worrying about rain-soaked clothes or a suitcase full of damp camping gear. With a hitch cargo carrier, everything stays dry and secure, allowing you to focus on enjoying the journey.
So, whether you’re a seasoned road warrior or a newbie to the world of adventure travel, hitch cargo carriers are definitely worth considering. Say goodbye to cramped car rides and hello to endless possibilities. Trust us, you’ll wonder how you ever lived without one.
Stay tuned as we delve deeper into the world of hitch cargo carriers, covering everything from different types and sizes to installation tips and essential accessories. Get ready to take your road trips to the next level with these game-changing devices. Adventure awaits!
Table of Contents
What is a Hitch Cargo Carrier?
If you’re looking to increase the storage capacity of your vehicle, a hitch cargo carrier can be a great solution. But what exactly is a hitch cargo carrier? Well, it’s an additional storage platform that attaches to the hitch receiver at the rear of your vehicle. It’s designed to hold and transport extra luggage, gear, or equipment that won’t fit inside your car or truck.
These carriers come in various sizes and styles, from lightweight baskets to heavy-duty boxes. They are easy to install and remove, making them a convenient option for road trips, camping adventures, or any situation where you need to bring along more stuff. So, how do you make a hitch cargo carrier? It’s actually quite simple! Firstly, you need to have a hitch receiver installed on your vehicle.
This is a metal tube that is mounted to the frame, usually at the rear, and it allows you to attach various accessories such as bike racks and cargo carriers. Once you have a hitch receiver, you can then purchase a hitch cargo carrier that is compatible with your vehicle’s hitch size and weight capacity. Most carriers come with a set of mounting hardware, so all you need to do is assemble the carrier, secure it to the hitch receiver with the provided bolts or pins, and you’re ready to go.
It’s important to follow the manufacturer’s instructions and make sure the carrier is properly secured before hitting the road. With a hitch cargo carrier, you can maximize the space in your vehicle and bring along everything you need for your next adventure. Whether you’re going on a cross-country road trip or simply need extra room for camping gear, a hitch cargo carrier is a practical and convenient solution.
So why not invest in one today and make your travels easier and more enjoyable?
Definition and Purpose of a Hitch Cargo Carrier
hitch cargo carrier, definition of a hitch cargo carrier, purpose of a hitch cargo carrier, benefits of using a hitch cargo carrier
Benefits of Using a Hitch Cargo Carrier
hitch cargo carrier, benefits, convenience, additional storage, road trips, vacations Are you tired of cramming all your belongings into your car during road trips or vacations? It’s time to consider using a hitch cargo carrier! A hitch cargo carrier is a handy attachment that fits onto the hitch of your vehicle, providing you with additional storage space. It’s like having an extra trunk for all your luggage, camping gear, or sports equipment. Imagine how much more convenient and comfortable your trips could be with all that extra room! No more squeezing in suitcases or trying to Tetris your way through the packing process.
With a hitch cargo carrier, everything fits neatly and securely in one place. It’s the ultimate solution for those with a lot to bring along on their adventures. So why not take the stress out of traveling and invest in a hitch cargo carrier? Your backseat passengers (and your sanity) will thank you!
Types of Hitch Cargo Carriers
If you’re looking to make a hitch cargo carrier, there are a few different types to consider. One option is a hitch-mounted cargo carrier, which is attached to the hitch receiver on the back of your vehicle. These carriers can be made from various materials such as aluminum or steel, and they come in different sizes and weight capacities to suit your needs.
Another type of hitch cargo carrier is a hitch cargo bag. This is essentially a large bag that attaches to the carrier and provides a waterproof storage space for your belongings. Lastly, there are hitch cargo boxes, which are similar to traditional rooftop cargo boxes but are mounted to the back of your vehicle instead.
These boxes offer additional protection for your items and can be locked for security. So whether you prefer a carrier, bag, or box, there are many ways to create your own hitch cargo carrier that suits your needs.
Different Sizes and Capacities
hitch cargo carriers Hitch cargo carriers come in different sizes and capacities to suit various needs. From small, compact carriers that can hold a few extra items to large, heavy-duty carriers designed for hauling larger objects, there is a hitch cargo carrier for every situation. The size of the carrier will largely depend on the available hitch space on your vehicle and your specific needs.
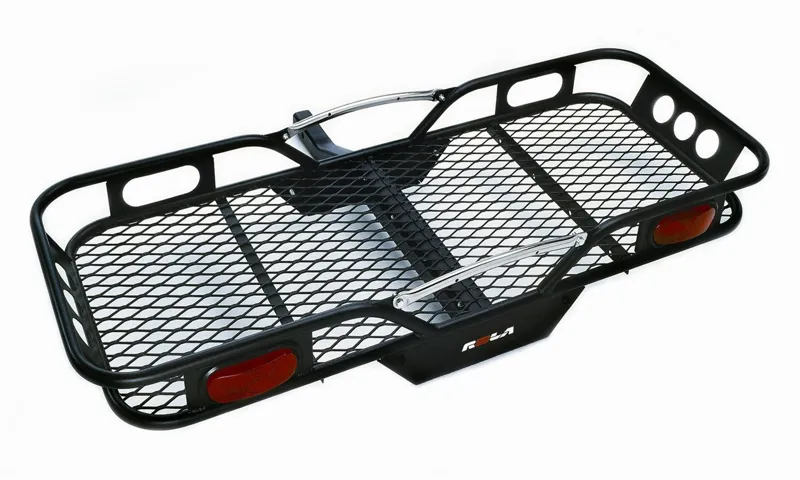
One type of hitch cargo carrier is the basket-style carrier. These carriers feature a metal frame with a mesh bottom, allowing for easy airflow and drainage. They are perfect for carrying bulky items such as camping gear, sports equipment, or even gardening supplies.
The mesh bottom also helps to keep your items secure and prevents them from shifting during transport. Another type of hitch cargo carrier is the cargo box. These carriers are more enclosed and are suitable for carrying items that need protection from the elements, such as luggage, tools, or electronics.
They often come with a lockable lid, providing added security and peace of mind. Cargo boxes also come in various sizes, allowing you to choose the one that best fits your needs. No matter the type of hitch cargo carrier you choose, it’s essential to make sure it is compatible with your vehicle’s hitch size and weight capacity.
Check the manufacturer’s guidelines and consult with a professional if needed. By selecting the right size and capacity, you can safely transport your belongings with ease. So, whether you need to transport camping equipment for a weekend getaway or extra luggage for a long trip, a hitch cargo carrier can be a convenient solution.
Materials Used
hitch cargo carriers When it comes to hitch cargo carriers, there are various types available on the market. One important factor to consider when choosing the right hitch cargo carrier is the material it is made of. The most common materials used for hitch cargo carriers are steel and aluminum.
Steel hitch cargo carriers are known for their strength and durability. They can handle heavy loads and are resistant to rust and corrosion. Steel carriers are often coated with a powder or paint finish, which adds an extra layer of protection against the elements.
However, steel carriers can be quite heavy, which may impact the overall weight of your vehicle. On the other hand, aluminum hitch cargo carriers are lightweight and resistant to rust and corrosion. They are easier to install and remove compared to steel carriers.
Aluminum carriers are often coated with a protective finish as well, ensuring long-lasting use. However, aluminum carriers may not be as strong as steel carriers and may not be able to handle extremely heavy loads. Overall, the choice between steel and aluminum hitch cargo carriers depends on your specific needs and preferences.
If you frequently carry heavy items or prioritize durability and strength, a steel carrier may be the best option for you. If you value lightweight and ease of use, an aluminum carrier may be more suitable. Ultimately, the material you choose should align with your intended use and the capabilities of your vehicle.
Features and Accessories
One of the most essential accessories for carrying extra luggage or equipment on your vehicle is a hitch cargo carrier. These carriers are designed to attach to the hitch at the rear of your vehicle and provide additional storage space. However, not all hitch cargo carriers are created equal, and there are different types to choose from depending on your needs.
One type of hitch cargo carrier is the basket-style carrier. These carriers feature a metal frame with a mesh or solid bottom, allowing you to securely transport a wide range of items. Another type is the enclosed cargo carrier, which provides a fully enclosed storage space that protects your belongings from the elements.
Lastly, there are also hitch cargo boxes, which are similar to roof cargo boxes but are designed to attach to the hitch instead. These boxes provide a convenient and secure way to transport your belongings. Overall, the type of hitch cargo carrier you choose will depend on your specific needs and preferences.
Whether you opt for a basket-style carrier, an enclosed carrier, or a cargo box, having a hitch cargo carrier can greatly expand your vehicle’s storage capacity and make your road trips or camping adventures much more enjoyable.
Choosing the Right Hitch Cargo Carrier
If you’re looking to add extra storage space to your vehicle, a hitch cargo carrier can be a great option. But with so many different styles and sizes available, how do you choose the right one for your needs? One way to make a hitch cargo carrier is to build it yourself. By following some simple steps, you can create a custom carrier that perfectly suits your needs.
First, you’ll need to gather the necessary materials, such as a metal tray or basket, hitch receiver, and hardware. Next, measure the dimensions of your vehicle and determine how much weight you need to carry. This will help you choose the appropriate size and capacity for your carrier.
Once you have everything you need, it’s time to assemble your hitch cargo carrier. Start by attaching the hitch receiver to your vehicle’s hitch. Then, secure the metal tray or basket to the receiver using the hardware provided.
Make sure everything is tightly secured to prevent any wobbling or movement while driving. Once your custom hitch cargo carrier is fully assembled, you’re ready to load it up and hit the road! Whether you’re going on a camping trip or just need some extra storage space for your next road trip, a hitch cargo carrier can be a game-changer.
Consideration Factors
hitch cargo carrier
Compatibility with Vehicle
hitch cargo carrier, compatibility, vehicle
Weight Capacity and Dimensions
Choosing the right hitch cargo carrier for your vehicle can make all the difference when it comes to transporting your belongings. One crucial consideration is the weight capacity of the carrier. It’s important to know how much weight the carrier can safely hold to prevent any damage to your vehicle or the items being transported.
Additionally, you’ll want to take note of the dimensions of the carrier to ensure it will fit properly on your vehicle’s hitch. This includes both the length and width of the carrier. By choosing a carrier with the right weight capacity and dimensions, you can have peace of mind knowing that your belongings will be secure during transport.
Budget and Brand
choosing the right hitch cargo carrier
Step-by-Step Guide to Making a Hitch Cargo Carrier
Have you ever found yourself in need of more storage space when traveling? Whether you’re going camping, road tripping, or simply need to transport some bulky items, a hitch cargo carrier can be a lifesaver. And the good news is, you can easily make one yourself! In this step-by-step guide, we’ll walk you through the process of creating your own hitch cargo carrier. First, you’ll need to gather some materials, including a sturdy crate or box, metal brackets, bolts, and a hitch receiver.
Once you have all your materials, you can begin the assembly process. Start by attaching the metal brackets to the bottom of the crate or box using the bolts. Make sure they are secure and will be able to handle the weight of your items.
Next, attach the hitch receiver to the back of your vehicle, following the manufacturer’s instructions. Once the receiver is securely in place, you can attach the crate or box to it using the metal brackets. Again, make sure everything is tightly secured before using your hitch cargo carrier.
Now, you’re ready to load up your items and hit the road! With your homemade hitch cargo carrier, you’ll have all the extra storage space you need for your next adventure.
Gathering Materials and Tools
Making a hitch cargo carrier is a great DIY project that can save you money and provide a customized solution for transporting cargo. But before you can get started, you’ll need to gather all the necessary materials and tools. The materials you’ll need will depend on the design and size of the hitch cargo carrier you want to build.
Common materials include metal tubing or angle iron for the frame, plywood or metal sheets for the platform, and bolts and screws for assembly. You may also want to consider adding features such as side rails or a cargo net for added security. In terms of tools, you’ll need a few basic items to get the job done.
A tape measure and level will help ensure accurate measurements and alignment, while a drill and drill bits will be essential for creating holes for the bolts and screws. A saw or angle grinder may be needed to cut the metal tubing or angle iron to the desired lengths. It’s also a good idea to gather some safety equipment before you begin, such as safety glasses, work gloves, and ear protection.
Safety should always be a top priority when working with power tools and metal materials. Once you have all the materials and tools in place, you can start following the step-by-step guide to making your hitch cargo carrier. Remember to take your time and double-check your measurements and cuts to ensure a sturdy and functional finished product.
Measuring and Cutting the Base
hitch cargo carrier, measuring and cutting the base, step-by-step guide
Building the Frame
hitch cargo carrier, build, frame, step-by-step guide Are you looking to increase storage space for your next road trip or outdoor adventure? Building a hitch cargo carrier can be a great solution! One of the first steps in creating your own hitch cargo carrier is constructing the frame. This frame will serve as the foundation for your carrier and will need to be sturdy enough to hold your belongings securely while on the road. To begin, gather the necessary materials such as square tubing, angle iron, bolts, and a welder.
Start by measuring and cutting the square tubing to the desired length for your carrier. Next, weld the square tubing together to create the base and sides of the frame. To add extra support, attach angle iron to the corners of the frame.
Ensure that everything is securely welded to prevent any movement or instability. Once the frame is complete, you can move on to the next step of building your hitch cargo carrier. Stay tuned for the next installment of our step-by-step guide!
Attaching the Sides and Front
In this step-by-step guide, we will discuss how to attach the sides and front of your homemade hitch cargo carrier. Once you have constructed the base and the back of the carrier, it’s time to complete the structure by adding the sides and front. First, gather the necessary materials for this step, including plywood boards, screws, a power drill, and measuring tape.
Start by measuring the width and height of the base of your carrier to determine the dimensions needed for the sides and front panels. Next, cut the plywood boards to the appropriate size using a saw. Make sure to wear safety goggles and take caution while cutting.
Once that is done, position the first side panel against the base and align it with the back panel. Use a power drill and screws to secure the side panel to the base. Repeat this process for the other side panel, ensuring both panels are securely attached.
Now, it’s time to attach the front panel. Position the front panel against the sides and base, making sure it aligns properly. Use your power drill and screws to secure the front panel to the sides and base, creating a tight and sturdy connection.
Once the sides and front panels are attached, take a step back and admire your progress. You now have a completed hitch cargo carrier structure! In the next steps of this guide, we will discuss how to finish and secure your carrier, so stay tuned.
Adding Reinforcements and Supports
hitch cargo carrier, reinforcements, supports, step-by-step guide, making If you’re looking to expand the storage capacity of your vehicle for your next road trip or outdoor adventure, a hitch cargo carrier may be just what you need. These carriers attach to the hitch receiver on the back of your vehicle, providing you with a convenient and secure way to transport extra gear or luggage. However, to ensure the carrier remains stable and secure during your travels, it’s important to add reinforcements and supports.
Here is a step-by-step guide on how to make a hitch cargo carrier with added reinforcements and supports. Step 1: Measure and cut the necessary materials. Start by measuring the dimensions of your hitch cargo carrier and determining the length and width of the reinforcements and supports you’ll need.
Then, using a saw or other appropriate cutting tool, cut the materials to the correct size. Step 2: Attach the supports to the carrier. Position the supports perpendicular to the bottom of the carrier and align them with the corners.
Use bolts, screws, or other appropriate fasteners to securely attach the supports to the carrier. Step 3: Reinforce the supports. To provide additional strength and stability, you can reinforce the supports by adding braces or brackets.
These can be attached using screws or bolts. Step 4: Secure the reinforcements to the vehicle. Depending on the design of your hitch cargo carrier, you may need to secure the reinforcements to the vehicle as well.
This can be done using straps, bungee cords, or other appropriate tie-downs. Step 5: Test the carrier for stability. Before using the hitch cargo carrier, it’s important to test it for stability.
Installing the Mounting Bracket
“Installing the Mounting Bracket” Installing the mounting bracket is an essential step in making a hitch cargo carrier. This bracket serves as the foundation for securing the carrier to your vehicle’s hitch. But don’t worry, it’s not as complicated as it may sound.
With a bit of guidance, you’ll have the bracket in place in no time. Firstly, make sure you have all the necessary tools and equipment at hand. This includes the mounting bracket itself, bolts, washers, and a wrench.
It’s always a good idea to gather everything before you begin to avoid any unnecessary trips to the hardware store. Start by locating the hitch receiver on your vehicle. This is typically a square-shaped opening at the rear, just below the bumper.
Clean any debris or dirt from the receiver to ensure a smooth installation. Next, carefully align the mounting holes of the bracket with the holes in the receiver. This may require some maneuvering, so take your time to get it right.
Once the holes are lined up, slide the bolts through the bracket and receiver. To secure the bracket, place a washer on the threaded end of each bolt. This will help distribute the load and prevent any damage to the bracket or receiver.
Then, tighten the nuts onto the bolts using a wrench. Make sure to tighten them securely, but be careful not to overtighten and risk stripping the threads. Once the mounting bracket is securely in place, give it a gentle shake to check for any loose connections.
Finishing touches
hitch cargo carrier, making a hitch cargo carrier So you’ve reached the final step of creating your own hitch cargo carrier! It’s time to put on those finishing touches and make sure your carrier is ready for any adventure. First, you’ll want to check the stability and security of your cargo carrier. Make sure all the bolts and nuts are tightened properly and that there are no loose parts.
Give it a good shake to see if anything wiggles or moves excessively. If everything seems sturdy, you’re on the right track. Next, take a look at the paint or finish of your hitch cargo carrier.
If you notice any scratches or chipped paint, now is the time to touch it up. You can use some spray paint or a brush to cover any imperfections and give your carrier a fresh look. This step not only makes your carrier look better but also helps protect it from rust and corrosion.
Once you’re satisfied with the appearance of your carrier, it’s time to think about the functionality. Consider adding some accessories that can make your hitch cargo carrier even more useful. For example, you can install reflectors or LED lights to increase visibility and safety on the road.
You can also add tie-down straps or a cargo net to secure your items and prevent them from shifting during transit. These little additions can make a big difference in the usability of your carrier. Lastly, don’t forget to give your hitch cargo carrier a test run before you hit the road.
Load it up with some weight to simulate your typical cargo and take it for a short drive. Pay attention to how it handles and if you notice any issues. This way, you can make any necessary adjustments or improvements before your next big trip.
Tips and Safety Precautions
If you’re looking for a convenient way to transport extra luggage or gear on your road trips, a hitch cargo carrier is a great option. But how do you go about making one yourself? Here are a few tips and safety precautions to keep in mind. First of all, you’ll need to gather the necessary materials.
This will typically include a sturdy metal platform, a hitch receiver, and straps or tie-downs to secure your cargo. You may also want to consider adding side rails or a cargo net for added security. Once you have all your materials, it’s important to carefully follow the manufacturer’s instructions for assembly.
Make sure all bolts and screws are tightened securely and that everything is properly aligned. This will ensure that your cargo carrier is stable and secure while on the road. When it comes to loading your hitch cargo carrier, one of the most important things to remember is to distribute the weight evenly.
This will prevent the carrier from becoming unbalanced and potentially tipping over. Place heavier items towards the center of the carrier and lighter items towards the edges. It’s also essential to properly secure your cargo to the carrier using straps or tie-downs.
This will prevent any items from shifting or falling off during transit. Be sure to tighten the straps securely and double-check them before hitting the road. Before you head out, take the time to inspect your hitch cargo carrier and ensure that everything is in good working condition.
Check for any loose bolts or screws, worn straps, or any other signs of damage. Address any issues before embarking on your journey to ensure a safe and secure trip. In summary, making a hitch cargo carrier can be a great way to add extra storage to your vehicle.
Securing the Cargo
Securing the cargo is an essential aspect of transportation, whether you’re driving a truck or towing a trailer. By taking the necessary precautions, you can ensure that your cargo arrives at its destination safely. One important tip is to properly distribute the weight of the cargo.
Uneven weight distribution can affect your vehicle’s stability and handling, increasing the risk of accidents. Make sure to evenly distribute the weight from side to side and front to back. Another safety measure is to use high-quality cargo restraints such as straps, chains, or nets.
These restraints should be tight enough to prevent the cargo from shifting during transit but not so tight that they damage the cargo or put excessive strain on the restraints themselves. Regularly inspecting the restraints for any signs of wear or damage is also crucial. Additionally, it’s important to secure any loose items within the cargo.
Use bracing materials or dividers to prevent movement and potential damage. Lastly, don’t forget to check and comply with local regulations regarding cargo securement. Following these tips and safety precautions will not only protect your cargo but also ensure the safety of yourself and other road users.
So, the next time you hit the road with precious cargo, take the time to secure it properly and avoid any unnecessary risks.
Checking Hitch Stability
Checking hitch stability is crucial for safe towing. Before hitting the road, it’s important to ensure that your trailer hitch is securely fastened and stable. One tip is to use a hitch lock or hitch pin to prevent the hitch from accidentally disconnecting.
Additionally, you should check the hitch ball to make sure it is properly tightened. If the ball is loose, it could lead to trailer sway, making your towing experience more dangerous. Another safety precaution is to inspect the hitch receiver for any damages or signs of wear.
A damaged hitch receiver can compromise the stability of your trailer, so it’s important to address any issues before towing. Overall, taking the time to check your hitch stability can help prevent accidents and ensure a smoother towing experience. So, before hitting the road, give your hitch a thorough inspection to ensure everything is secure and ready to go.
Maintaining the Hitch Cargo Carrier
hitch cargo carrier, maintain, tips, safety precautions Maintaining a hitch cargo carrier is essential to ensure its longevity and safe usage. Here are some tips and safety precautions to keep in mind. First and foremost, it’s important to regularly inspect the carrier for any signs of wear and tear.
Check for any loose bolts or screws and tighten them if necessary. Additionally, it’s crucial to clean the carrier regularly to prevent the buildup of dirt and debris, which can potentially damage the carrier. When cleaning, use a mild soap and water solution and avoid using harsh chemicals that may cause damage.
Another important tip is to regularly lubricate the moving parts of the carrier, such as the hinges and latches, to ensure smooth functionality and prevent rusting. It’s also important to always secure the cargo properly using straps or bungee cords to prevent it from shifting or falling off during transportation. Lastly, always follow the manufacturer’s weight limit guidelines and never exceed the recommended capacity, as this can put excessive strain on the carrier and compromise its safety.
With these tips and precautions in mind, you can ensure that your hitch cargo carrier remains in optimal condition and provides a safe and convenient solution for transporting your belongings.
Conclusion
In conclusion, making a hitch cargo carrier is a fun and rewarding DIY project that will not only save you money but also provide a clever solution for hauling all your gear. By following these steps and using some basic tools, you can create a custom carrier that perfectly fits your needs and vehicle. And remember, not only will you impress your friends with your handiwork, but you’ll also be the envy of all those struggling to fit their luggage into their cramped car trunks.
So why settle for a boring and expensive store-bought cargo carrier when you can create your own stylish and functional one? So go ahead, grab your tools, and let your creativity roam free as you embark on this hitch cargo carrier building adventure. Trust me, your future self will thank you every time you load up your gear effortlessly and hit the road with confidence. Happy hitching!”
FAQs
What materials do I need to make a hitch cargo carrier?
To make a hitch cargo carrier, you will need a steel frame, plywood or aluminum for the cargo platform, bolts and nuts, hitch receiver, and taillights.
Can I make a hitch cargo carrier without welding?
Yes, you can make a hitch cargo carrier without welding by using nuts and bolts to join the different components together.
How much weight can a homemade hitch cargo carrier hold?
The weight capacity of a homemade hitch cargo carrier will depend on the materials used and its design. However, it is recommended to check the weight limit specified by your hitch receiver.
Are there any safety precautions to consider when using a hitch cargo carrier?
Yes, when using a hitch cargo carrier, make sure to evenly distribute the weight, secure the cargo properly, and avoid exceeding the weight capacity. Additionally, regularly check the hitch connection and tighten any loose bolts.
Can I install a hitch cargo carrier on any vehicle?
Hitch cargo carriers are designed to be compatible with vehicles that have a hitch receiver. However, it’s important to check your vehicle’s weight capacity and hitch class before installing a hitch cargo carrier.
How do I attach a hitch cargo carrier to my vehicle?
To attach a hitch cargo carrier to your vehicle, simply slide it into the hitch receiver and secure it with the provided hitch pin. Make sure it is properly aligned and tighten any bolts or straps for added stability.
Can I use a hitch cargo carrier with a spare tire on my vehicle?
It depends on the design and size of your spare tire. Some hitch cargo carriers are designed to accommodate spare tires, while others may require additional modifications or may not be compatible.
How do I maintain and clean a hitch cargo carrier? A8. Regularly inspect the hitch cargo carrier for any signs of damage or wear. Clean it with mild soap and water, and make sure it is dry before storing. Lubricate any moving parts, such as hinges or latches, as needed.
Can I use a hitch cargo carrier for long-distance travel?
Yes, hitch cargo carriers are commonly used for long-distance travel. Just make sure to properly secure the cargo, distribute the weight evenly, and check the carrier and its attachment periodically during the trip.
Are there any legal restrictions or regulations for using a hitch cargo carrier?
Laws regarding hitch cargo carriers may vary by country, state, or region. It is important to familiarize yourself with the local regulations regarding weight limits, lighting requirements, and any other restrictions before using a hitch cargo carrier.
Can I use a hitch cargo carrier on an RV or camper trailer?
Yes, some RVs or camper trailers may have a hitch receiver where a hitch cargo carrier can be attached. However, it is crucial to check the weight capacity and stability of the RV or camper trailer before using a hitch cargo carrier.
Can I modify a pre-made cargo carrier to fit using a hitch?
It is possible to modify a pre-made cargo carrier to fit a hitch receiver, but it will depend on the design and construction of the carrier. It is recommended to consult the manufacturer’s instructions or seek professional assistance for proper modifications.