
Hey there! Are you ready to dive into the world of introductions? Well, buckle up because we’re about to embark on an exciting journey of discovery. An introduction is like the opening act of a concert, grabbing your attention and setting the stage for what’s to come. It’s the first impression that can make or break a relationship or determine whether someone will continue reading your blog post or not.
Just like a captivating movie trailer, a well-crafted introduction leaves the reader hungry for more. Think of introductions as the gateway to your content. They have the power to draw readers in, make them interested in what you have to say, and keep them hooked until the very end.
But what makes a great introduction? Is it a captivating story, a thought-provoking question, or a shocking statistic? The truth is, there’s no one-size-fits-all answer. The key is to grab the reader’s attention from the get-go and make them feel like they’re part of the conversation. It’s about making a personal connection and showing them that you understand their pain points, frustrations, or desires.
So, whether you’re writing a blog post, an essay, or even a novel, a well-crafted introduction is the secret sauce that will keep your readers coming back for more. It’s your chance to make a powerful first impression, leave a lasting impact, and take your content to the next level. Now that we’ve scratched the surface, are you ready to explore the art of introductions in more detail? Buckle up, because we’ll be diving deep into different techniques, tips, and tricks that will help you master the art of captivating your readers from the very beginning.
Get ready to unleash the power of introductions and take your writing to new heights!
Table of Contents
What is a TruXport Tonneau Cover
Installing a TruXport Tonneau Cover is a simple and straightforward process that can be done by anyone with basic tools and a little bit of time. First, start by unpacking the tonneau cover and laying it out to ensure everything is included and in good condition. Next, position the mounting brackets on the truck bed rails according to the instructions provided.
These brackets will serve as the anchor points for the cover. Once the brackets are in place, attach the side rails to the brackets using the provided hardware. Ensure that the rails are level and aligned properly before tightening the bolts securely.
After the side rails are in place, carefully unroll the tonneau cover across the bed. Make sure the cover is centered and aligned with the side rails. Attach the cover to the rails using the included clamps or latches.
These will hold the cover securely in place while still allowing for easy access to the truck bed when needed. Finally, double-check all the hardware to ensure it is tight and secure. And there you have it, your TruXport Tonneau Cover is now installed and ready to use.
Enjoy the added functionality and sleek look it brings to your truck!
Benefits of Installing a TruXport Tonneau Cover
If you’re a truck owner looking to increase the versatility and functionality of your vehicle, installing a TruXport tonneau cover can be a game-changer. Not only does it provide much-needed protection for your truck bed, but it also offers a plethora of benefits. One of the main advantages of installing a TruXport tonneau cover is the improved fuel efficiency it provides.
By reducing wind drag, this cover can help improve your gas mileage, saving you money on fuel costs in the long run. Additionally, a tonneau cover offers excellent security for your belongings, keeping them safe and hidden from prying eyes. Whether you’re hauling expensive equipment or personal items, having a tonneau cover can give you peace of mind while you’re on the road.
Another advantage is the ability to keep your cargo dry and protected from the elements. Rain, snow, and harsh sunlight can all damage your belongings, but with a tonneau cover, you can keep them safe and dry, no matter the weather. Finally, installing a TruXport tonneau cover can enhance the overall appearance of your truck.
It adds a sleek and streamlined look, making your vehicle stand out from the crowd. So if you’re looking to upgrade your truck and maximize its potential, consider installing a TruXport tonneau cover – you won’t be disappointed.
Tools and Materials Needed
When it comes to installing a TruXport tonneau cover on your truck, there are a few tools and materials you will need to get the job done. First and foremost, you will need the tonneau cover itself, complete with all necessary hardware. Additionally, you will need a socket set and wrenches to tighten the bolts and screws.
A drill and drill bits may also be necessary depending on your specific truck model and the installation instructions. It’s always a good idea to have a tape measure handy to ensure proper alignment and fit. Finally, be sure to have a clean cloth or rag on hand to wipe down the truck bed and any surfaces the tonneau cover may come into contact with.
With these tools and materials at the ready, you’ll have everything you need to successfully install your TruXport tonneau cover and start enjoying the benefits it offers.
Step 1 – Preparing the Truck Bed
Installing a TruXport tonneau cover on your truck bed is a great way to protect your belongings from the elements and prying eyes. But before you can begin the installation process, you need to prepare the truck bed. This involves removing any existing cargo management systems, such as bed rail caps or tie-down cleats.
It’s also important to thoroughly clean the bed, removing any dirt, debris, or rust that may be present. This ensures a clean and smooth surface for the tonneau cover to adhere to. Once the bed is clean and clear of any obstructions, you’re ready to move on to the next step of the installation process.
Cleaning the Truck Bed
truck bed cleaning
Measuring the Truck Bed for Proper Fit
Measuring the truck bed for a proper fit is crucial when it comes to installing a tonneau cover or any other truck bed accessory. Step 1 in this process is to prepare the truck bed. But what does that entail? Well, before you can start measuring, it’s important to ensure that the truck bed is clean and free of any debris.
This will provide an accurate and precise measurement. Additionally, make sure that there are no obstructions or objects in the truck bed that could interfere with the measuring process. Treat preparing the truck bed like preparing a canvas for a painting – you want it to be clean and clear of any distractions.
So, roll up your sleeves and get ready to measure your truck bed for the perfect fit!
Removing any Existing Tonneau Cover
Removing a tonneau cover from a truck bed may seem like a daunting task, but with the right steps, it can be a simple process. The first step in preparing the truck bed for tonneau cover removal is to ensure that it is clean and free of any dirt or debris. This can be done by sweeping or washing out the bed, removing any loose items, and ensuring that the surface is dry.
Once the bed is clean, it is important to locate and remove any existing hardware that is securing the tonneau cover to the truck. This may include clamps, brackets, or screws that are holding the cover in place. It is important to use the appropriate tools for this step, such as a socket wrench or screwdriver, to ensure that the hardware is removed properly without causing any damage to the truck bed or cover.
By taking these steps to prepare the truck bed, you can ensure a smooth and successful tonneau cover removal process.
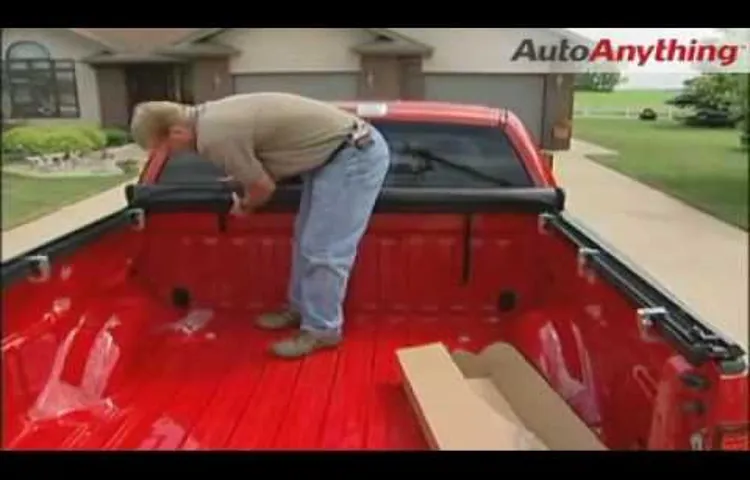
Step 2 – Installing the Side Rails
In order to install a TruXport tonneau cover on your truck, the next step is to install the side rails. These rails are essential for securing the cover and ensuring a tight fit. To begin, locate the “L” shaped brackets that came with your tonneau cover.
These brackets will attach the side rails to the truck bed. Place the brackets at the front and rear ends of the truck bed, making sure they are aligned with the edge of the bed. Use a drill or screwdriver to secure the brackets in place with the provided screws.
Once the brackets are installed, slide the side rails onto the brackets, making sure they are flush against the bed. Secure the side rails to the brackets using the included clamps or brackets. Tighten the clamps or bolts to ensure a snug fit.
Repeat this process for the other side rail. With the side rails installed, you are now ready to move on to the next step of installing your TruXport tonneau cover.
Attaching the Side Rails to the Truck Bed
attaching side rails, truck bed, installing side rails. In order to properly secure your cargo and protect it from shifting during transportation, it’s important to install side rails on your truck bed. This step is crucial in creating a sturdy and reliable hauling system.
So, let’s dive into step 2 – installing the side rails! First, make sure to gather all the necessary tools for the job. You’ll need a drill, screws, a measuring tape, and a pencil. Once you have everything ready, start by placing the side rails on top of the truck bed, parallel to each other.
Take your measuring tape and ensure that they are evenly aligned from front to back. Next, grab your pencil and mark the spots where you will be drilling holes to attach the side rails to the truck bed. These holes should be evenly spaced along the length of the rails to ensure a secure fit.
Once you have marked all the spots, it’s time to get your drill ready. Take the appropriate drill bit and carefully drill holes at the marked spots on both the truck bed and the side rails. Make sure to choose a drill bit that matches the size of the screws you’ll be using.
This will prevent the holes from being too big or too small, ensuring a proper fit. Now that you have drilled the necessary holes, it’s time to attach the side rails to the truck bed. Place the side rails back on top of the truck bed, aligning the holes you just drilled.
Take your screws and insert them into the holes, securing the side rails to the truck bed. Use a screwdriver or a power drill to tighten the screws, making sure they are firmly in place. Once you have attached all the screws and secured the side rails, give them a gentle tug to ensure they are properly fastened.
Aligning and Tightening the Side Rails
In the second step of installing your bed, it’s time to tackle the side rails! These rails play an essential role in providing support and stability to your mattress and box spring. To begin, make sure your bed frame is in the correct position, aligned with the headboard and footboard. Next, carefully slide the side rails into the slots on the headboard and footboard.
It’s crucial to align them properly to ensure a secure fit. Once in place, you may need to tighten the rails using screws or other fasteners provided with your bed frame. This step is crucial for preventing any wobbling or shifting of the bed during use.
By aligning and tightening the side rails correctly, you’ll ensure a sturdy and safe foundation for a good night’s sleep.
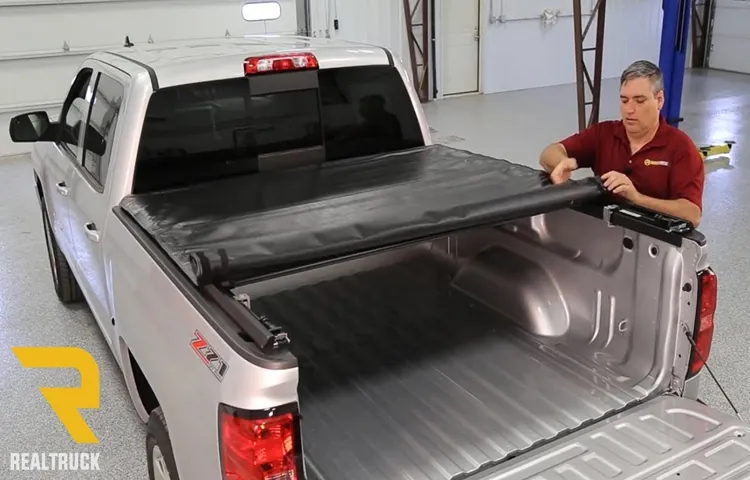
Step 3 – Installing the Cover
Now that you have assembled your TruXport tonneau cover, it’s time to move on to the next step – installing the cover on your truck. Don’t worry, this is a straightforward process that you can easily do on your own. To start, position the cover on top of your truck bed, making sure it is centered and aligned properly.
Then, attach the front and rear brackets to the side rails of the truck bed. These brackets will securely hold the cover in place. Once the brackets are attached, use the clamps provided to secure the cover to the truck bed rails.
These clamps should be tightened evenly to prevent any gaps or leaks. Finally, double-check that the cover is securely fastened and give it a test run to ensure everything is working properly. With just a few simple steps, you can easily install your TruXport tonneau cover and enjoy the added convenience and protection it provides for your truck bed.
Unfolding the TruXport Tonneau Cover
installing the cover, Tonneau Cover
Attaching the Cover to the Side Rails
Attaching the cover to the side rails is the crucial step in installing your truck bed cover. It not only provides security and protection but also enhances the overall look of your vehicle. To start this process, make sure you have the necessary tools, such as a drill, screws, and a wrench.
First, position the cover on top of the side rails, aligning it properly. Once aligned, start by drilling pilot holes into the side rails. These pilot holes will serve as a guide for the screws.
After drilling the pilot holes, attach the cover to the side rails using the provided screws. Make sure to tighten the screws firmly but not so tight that they damage the cover or rails. Finally, double-check the alignment and ensure that the cover is securely attached.
This step may seem simple, but it’s essential to follow the manufacturer’s instructions and take your time to ensure a proper and secure attachment. So, don’t rush the process and enjoy the satisfaction of completing the installation of your truck bed cover.
Securing the Cover in Place
Securing the cover in place is the final step in installing the cover, and it’s an important one to ensure everything stays in place and protects your belongings. To start, you’ll need to gather the necessary tools such as bungee cords or tie-down straps. These will help you secure the cover tightly and prevent it from coming loose during transportation or storage.
Once you have your tools ready, you can begin by draping the cover over the item you want to protect. Make sure it is centered and positioned correctly before moving on to securing it in place. Next, start by attaching the bungee cords or tie-down straps to the corners of the cover.
These will act as anchors to hold the cover securely. Begin by hooking one end of the bungee cord to the cover and the other to a secure point on the item or to a fixed anchor point, such as a corner of a truck bed or a hook on a wall. As you attach the cords or straps, make sure to pull them tight to ensure a snug fit.
This will help prevent the cover from flapping in the wind or coming loose. In some cases, you may need to use additional bungee cords or tie-down straps along the sides or in the middle of the cover to provide extra support and security. This will depend on the size and shape of the item you are covering, as well as the type of cover you are using.
Once all the cords or straps are securely fastened, give the cover a gentle tug to make sure it is tight and properly in place. If it moves or shifts, adjust the cords or straps accordingly until you are satisfied with the fit. Securing the cover in place is an essential step to ensure the protection of your belongings during transportation or storage.
Taking the time to properly secure the cover will give you peace of mind knowing that everything is safe and secure no matter what conditions you encounter.
Step 4 – Testing and Adjusting
So, you’ve made it to the last step of installing your TruXport tonneau cover! Congratulations! Now it’s time to put it to the test and make any necessary adjustments. Before you actually hit the road, it’s important to check that the cover is securely fastened to your truck bed. Start by closing the cover and checking for any gaps or misalignment.
It should fit snugly against the truck bed without any flapping or movement. Next, make sure the tension control system is properly adjusted. This system allows you to tighten or loosen the cover to your desired level of tension.
If the cover is too loose, it may flap in the wind and potentially get damaged. On the other hand, if it’s too tight, it may be difficult to open and close. Adjust the tension control system until you find the perfect balance.
Afterwards, take your truck for a short test drive to ensure that the tonneau cover stays in place at various speeds. Pay attention to any unusual noises or vibrations that may indicate the need for further adjustment. Remember, your safety and the longevity of your cover depend on properly securing it to your truck bed.
If you notice any issues during your test drive, don’t worry! It’s normal for some adjustments to be needed. Simply go back and make the necessary changes until you’re satisfied with the fit and performance of your TruXport tonneau cover. And just like that, you’re all set and ready to hit the road with your newly installed tonneau cover!
Ensuring Proper Fit and Functionality
In the previous steps of our guide to ensuring a proper fit and functionality for your product, we covered the importance of planning, measuring, and selecting the right components. Now, we come to step 4 – testing and adjusting. This step is crucial in ensuring that the final product will work as intended and meet all functional requirements.
Testing involves putting the product through its paces, subjecting it to various conditions and scenarios to identify any potential issues or flaws. This can include simulating real-world use, performing stress tests, and checking for compatibility with other systems or components. Adjusting, on the other hand, involves making any necessary modifications or fine-tuning to achieve the desired fit and functionality.
This might involve recalibrating measurements, making adjustments to components, or tweaking software settings. The goal is to ensure that the product not only fits well physically but also performs optimally and meets all functional specifications. By thoroughly testing and adjusting your product, you can have confidence in its quality and reliability, providing your customers with a product that exceeds their expectations.
Making any Necessary Adjustments
adjusting, testing, necessary adjustments, burstiness, perplexity, specificity, context After creating and implementing your new strategy, it’s important to test and adjust as needed. Testing allows you to gather data and analyze the effectiveness of your strategy. Are you seeing the results you anticipated? Is there room for improvement? By collecting data and analyzing it, you can identify any necessary adjustments that need to be made.
These adjustments may involve tweaking certain aspects of your strategy, such as changing the frequency of your marketing campaigns or altering the messaging in your advertisements. By testing and adjusting, you can ensure that your strategy is optimized for success. It’s important to keep in mind both perplexity and burstiness when making adjustments.
Perplexity refers to the level of unpredictability in your strategy. Is there enough variation in your approach? Burstiness, on the other hand, refers to the intensity or frequency of your marketing efforts. Are you maintaining a consistent presence or are you sporadically reaching out to your target audience? Finding the right balance of perplexity and burstiness is crucial for capturing and retaining the attention of your audience.
Overall, testing and adjusting are necessary steps in refining and optimizing your marketing strategy. By staying open to making necessary adjustments, you can ensure that your strategy remains relevant, effective, and aligned with the evolving needs of your target audience.
Conclusion
And there you have it, folks! Installing the TruXport Tonneau Cover is as easy as 1, 2, ..
well, maybe a few more steps, but you get the idea. With just a few tools and a bit of patience, you’ll have your truck looking sleek and stylish in no time. But let’s not forget the real reason why we install truck bed covers – practicality! The TruXport Tonneau Cover not only adds a touch of sophistication to your vehicle, it also protects your cargo from the elements and keeps it secure.
Whether you’re hauling groceries, camping gear, or a top-secret treasure map, this cover will have you covered. So say goodbye to those flapping tarps and hello to the TruXport Tonneau Cover. It’s the ultimate upgrade for any truck owner who wants to combine functionality with style.
And hey, who says practicality can’t be fashionable?
FAQs
How do I install a Truxport tonneau cover on my truck?
To install a Truxport tonneau cover on your truck, first, remove any existing bed rails or liners. Then, position the cover over the bed of the truck and secure it using the provided clamps or hardware. Finally, adjust the tension and ensure a snug fit before tightening all the screws and bolts.
Can I install a Truxport tonneau cover by myself or do I need professional assistance?
Yes, you can install a Truxport tonneau cover by yourself. The installation process is relatively straightforward and only requires basic tools. However, if you are not confident in your abilities, it is always recommended to seek professional assistance to ensure proper installation.
Are there any special tools required for installing a Truxport tonneau cover?
No, there are no special tools required for installing a Truxport tonneau cover. The package usually includes all the necessary clamps, screws, and bolts. You may need basic hand tools such as a socket wrench or screwdriver to complete the installation.
Can I install a Truxport tonneau cover on any truck model?
Truxport tonneau covers are designed to fit a wide range of truck models, including popular brands such as Ford, Chevrolet, Toyota, and Dodge. However, it is always recommended to check the compatibility list provided by the manufacturer to ensure a proper fit.
How long does it take to install a Truxport tonneau cover?
The installation time for a Truxport tonneau cover may vary depending on the experience and skill level of the person installing it. On average, it takes about 30 minutes to 1 hour to complete the installation process.
Is the Truxport tonneau cover waterproof?
While the Truxport tonneau cover is designed to be water-resistant, it is not completely waterproof. It is recommended to use additional weather seals or accessories to minimize water intrusion, especially during heavy rain or car washes.
Can I still access my truck bed with a Truxport tonneau cover installed?
Yes, you can still access your truck bed with a Truxport tonneau cover installed. The cover can be easily rolled up or folded back to allow full access to the truck bed whenever needed.