
If you’re planning a road trip or need extra space to haul your gear, a hitch-mounted cargo carrier can be a lifesaver. These handy accessories attach to the back of your vehicle and provide additional storage space for luggage, camping gear, sports equipment, and more. But before you hit the road, you need to know how to properly raise and secure your hitch-mounted cargo carrier.
In this blog post, we’ll walk you through the steps to ensure a safe and secure load every time. So, let’s get started!
Table of Contents
- 1 Introduction
- 2 Preparation
- 3 Step-by-Step Instructions
- 3.1 Step 1: Park Your Vehicle on a Level Surface
- 3.2 Step 2: Remove any Existing Cargo from the Carrier
- 3.3 Step 3: Loosen and Remove the U-bolts or Bolts Securing the Carrier to the Hitch
- 3.4 Step 4: Lift the Carrier Off the Hitch
- 3.5 Step 5: Place the Carrier on a Stable Surface
- 3.6 Step 6: Adjust the Height of the Carrier by Inserting or Removing Hitch Shanks or Risers
- 3.7 Step 7: Secure the Carrier Back onto the Hitch
- 4 Tips and Safety Precautions
- 5 Conclusion
- 6 FAQs
Introduction
So, you’ve decided to invest in a hitch-mounted cargo carrier to increase your vehicle’s storage capacity. Smart move! Hitch-mounted cargo carriers are an excellent way to transport bulky items or free up space inside your vehicle for more comfortable travel. But before you hit the road, you might be wondering how to raise your hitch-mounted cargo carrier properly.
Well, fret not! Raising a hitch-mounted cargo carrier is a relatively simple process that can be done in just a few easy steps. In this blog post, we will guide you through the process, ensuring that your cargo carrier is securely raised and ready for your next adventure. So, let’s get started!
Overview of a Hitch Mounted Cargo Carrier
hitch mounted cargo carrier Introduction Are you tired of trying to cram all your belongings into your car when you go on a road trip or camping adventure? Well, say goodbye to the days of overcrowded vehicles and hello to the convenience of a hitch mounted cargo carrier! This innovative device attaches to the hitch on the back of your car, allowing you to easily transport extra cargo without taking up valuable space inside your vehicle. Whether you need to haul camping gear, luggage, or sports equipment, a hitch mounted cargo carrier is the perfect solution. In this blog post, we will provide an overview of what a hitch mounted cargo carrier is and how it can benefit you on your next adventure.
So, let’s dive in and explore the world of hitch mounted cargo carriers!

Benefits of Using a Hitch Mounted Cargo Carrier
hitch mounted cargo carrier. Introduction: Are you in need of extra space to transport your belongings on your next road trip? Look no further than a hitch-mounted cargo carrier. This convenient accessory attaches to the back of your vehicle and provides a secure and practical solution for transporting luggage, camping gear, or any other bulky items.
Say goodbye to the days of cramming everything into your trunk or investing in a rooftop cargo box. The hitch-mounted cargo carrier offers numerous benefits that will make your travels much easier and more enjoyable. Let’s explore these benefits in more detail.
Preparation
So you’re planning a road trip and want to maximize your storage space by using a hitch mounted cargo carrier. Great idea! But before you hit the road, it’s important to know how to properly raise your hitch mounted cargo carrier to ensure a safe and secure journey. First, make sure you have all the necessary tools.
You’ll typically need a socket wrench or adjustable wrench to loosen and tighten the bolts on the carrier. If you’re using a new carrier, it’s also a good idea to have the instruction manual handy in case you need to refer to it. Next, locate the hitch receiver on your vehicle.
This is the square opening on the back of your vehicle where the cargo carrier will attach. Ensure that the hitch receiver is clear of debris and any obstructions, and make sure that the hitch pin hole is aligned with the pin hole on the cargo carrier. Now it’s time to raise the cargo carrier onto the hitch receiver.
This can be a two-person job, so if possible, enlist the help of a friend. Position the carrier so that the hitch post aligns with the hitch receiver. Slowly lift the cargo carrier onto the hitch receiver, making sure it is centered and level.
Once the cargo carrier is in place, insert the hitch pin through the aligned holes and secure it with a clip or lock. This will prevent the cargo carrier from detaching while you’re on the road. Lastly, double-check that the cargo carrier is securely attached by giving it a good shake.
It should not move or wobble excessively. If it does, tighten the bolts or hitch pin to ensure a tight fit. With your hitch mounted cargo carrier properly raised and secured, you’re ready to hit the road with confidence, knowing that your belongings will be safe and secure throughout your journey.
Check the Weight Capacity of Your Hitch and Carrier
One crucial aspect to consider before attaching any hitch-mounted carrier to your vehicle is the weight capacity of both the hitch and carrier. This often overlooked but essential step ensures that you do not overload your hitch or carrier, preventing any potential accidents or damage to your vehicle. So, before you start loading up your carrier with all your gear, take a moment to check the weight capacity.
Remember, just like your car has a maximum weight it can carry, your hitch and carrier do too. It’s like trying to fit ten suitcases in a tiny car trunk – something is bound to give. So make sure you know your hitch and carrier’s weight limits to ensure a safe and successful trip.
Gather the Necessary Tools and Equipment
“Preparation is key when it comes to gathering the necessary tools and equipment for any task. Whether you’re embarking on a DIY project or tackling a home repair, having the right tools on hand can make all the difference. So, what exactly do you need to do to prepare? First, assess the project at hand and make a detailed list of the tools and materials you’ll need.
This will help ensure that you don’t forget any important items. Once you have your list, gather your tools and equipment together in one convenient location. This will save you time and effort later on, as you won’t have to search for items when you need them.
Additionally, check the condition of your tools and equipment to make sure they are in good working order. If anything is damaged or missing, now is the time to replace it. Taking these steps will set you up for success and make your project go much smoother.
“
Inspect Your Hitch Mounted Cargo Carrier
“hitch mounted cargo carrier inspection” Preparation is key when it comes to inspecting your hitch mounted cargo carrier. Before you even start, make sure you have all the necessary tools and equipment handy. And don’t forget your flashlight! You’ll want to have a clear view of every nook and cranny.
Start by visually inspecting the carrier for any signs of damage or wear. Look for cracks or dents in the metal, and check that all the welds are secure. Don’t forget to inspect the straps or tie-downs for any fraying or signs of weakness.
Next, give the carrier a good shake to see if there is any excessive movement. It’s important that the carrier is securely attached to your vehicle’s hitch. Finally, take a moment to check that all the mounting hardware is tightened properly.
Loose bolts or nuts can lead to a dangerous situation on the road. By taking the time to properly prepare for your inspection, you’ll ensure that your hitch mounted cargo carrier is in top-notch condition and ready for your next adventure.
Step-by-Step Instructions
If you’re planning a road trip or need to transport extra items, a hitch mounted cargo carrier can be a game-changer. But how exactly do you raise it? Don’t worry, it’s simpler than you might think! Follow these easy steps to get your cargo carrier ready for the road. First, make sure your vehicle is parked on a level surface and engage the parking brake for safety.
Next, locate the hitch receiver on the back of your vehicle and check that it is clean and free from any debris or obstacles. Then, line up the cargo carrier with the hitch receiver and carefully insert the hitch pin into the designated hole, ensuring it is securely fastened. Once the pin is in place, you can use the built-in handle or lever to raise the cargo carrier.
Simply pull up on the handle or lever, applying steady pressure until the carrier is in the desired raised position. It’s important to be cautious and mindful of your surroundings while raising the carrier, as it can be heavy and may require some effort. Once the cargo carrier is elevated, double-check that it is securely in place before loading any items onto it.
And voila! You’re ready to hit the road with all your extra gear securely stored and easily accessible. Raising a hitch mounted cargo carrier is a simple process that can greatly enhance your travel experience. Plus, with the right technique, you’ll be a pro in no time!
Step 1: Park Your Vehicle on a Level Surface
park your vehicle on a level surface. When it comes to parking your vehicle, it’s important to start off on the right foot. One of the first steps you should take is to find a level surface to park on.
Parking on a level surface is essential for a few reasons. First and foremost, it ensures that your vehicle is stable and won’t roll away. Parking on an incline or decline can increase the risk of your vehicle rolling and potentially causing damage.
Secondly, parking on a level surface allows for easier entry and exit from your vehicle. It can be quite tricky to get in and out of a car that is tilted at an angle. By parking on a level surface, you can avoid unnecessary strain and discomfort.
Lastly, parking on a level surface makes it easier to load and unload any items from your vehicle. Whether it’s groceries, luggage, or other belongings, having a stable platform to work from makes the task much simpler. So, the next time you go to park your vehicle, be sure to find a level surface and start off on the right foot.
Step 2: Remove any Existing Cargo from the Carrier
Once you have determined that your cargo carrier is in need of repair, the first step is to remove any existing cargo from it. This is an important step to ensure that you have a clear workspace and that your cargo is not damaged in the process. To remove the cargo, start by carefully unloading it from the carrier.
If the cargo is heavy or bulky, you may need assistance to safely remove it. Once the cargo is unloaded, set it aside in a safe location where it will not be in the way. It is important to handle the cargo with care to avoid any injuries or damage.
By following these steps, you can ensure that your cargo carrier is ready for repair.
Step 3: Loosen and Remove the U-bolts or Bolts Securing the Carrier to the Hitch
Once you have successfully aligned the carrier with your hitch, the next step is to loosen and remove the U-bolts or bolts that are securing the carrier to the hitch. This is an important step in the process of removing or adjusting your carrier, as it allows you to easily detach it from your vehicle. To begin, you will need to locate the U-bolts or bolts that are holding the carrier in place.
These can typically be found on the underside of the hitch, where it connects to the carrier. Using a wrench or socket set, loosen each bolt by turning it counterclockwise. It may be helpful to have a friend or family member assist you in holding the carrier steady as you work.
Once the bolts are loosened, you can begin to remove them completely. Again, you will need to turn them counterclockwise until they are fully unscrewed. Depending on the type of carrier you have, there may be multiple U-bolts or bolts to remove.
Take your time and ensure that all of them are fully removed before attempting to lift or adjust the carrier. Once the U-bolts or bolts are removed, you can then gently lift the carrier up and away from the hitch. Be cautious when doing this, as the carrier may be heavy and you don’t want to risk injuring yourself.
If you are planning on reattaching the carrier, make sure to set the U-bolts or bolts aside in a safe place so that you can easily find them later on. Removing or adjusting a carrier can seem like a daunting task, but by following these step-by-step instructions, you can easily remove the U-bolts or bolts that are securing the carrier to the hitch. Remember to always take your time and be cautious throughout the process.
With a little patience and the right tools, you’ll be able to remove or adjust your carrier in no time!
Step 4: Lift the Carrier Off the Hitch
“lifting a carrier off the hitch” So, you’ve successfully completed the first three steps of removing a carrier from your hitch, and now it’s time for the final step: lifting the carrier off the hitch. This step requires some strength, so make sure you’re prepared. Stand facing the carrier, with your feet shoulder-width apart for stability.
Bend your knees slightly and place your hands on the carrier, making sure you have a firm grip. Use your leg muscles to push upwards while pulling the carrier towards you. If the carrier is heavy, you may need some help from a friend or family member to lift it off the hitch.
Once the carrier is clear of the hitch, carefully set it down on the ground or in a safe area nearby. And just like that, you’ve successfully removed the carrier from your hitch!
Step 5: Place the Carrier on a Stable Surface
When it comes to placing your carrier on a stable surface, it’s important to choose a location that provides both safety and security for your pet. Ideally, you’ll want to find a flat and level surface that won’t easily tip or wobble. This could be the floor of your car, the ground outside, or a sturdy table or countertop if you’re indoors.
By placing the carrier on a stable surface, you’ll ensure that your pet feels secure and comfortable during their journey. Plus, it helps to prevent any potential accidents or injuries. So, take a moment to assess your surroundings and find the perfect spot for your pet’s carrier.
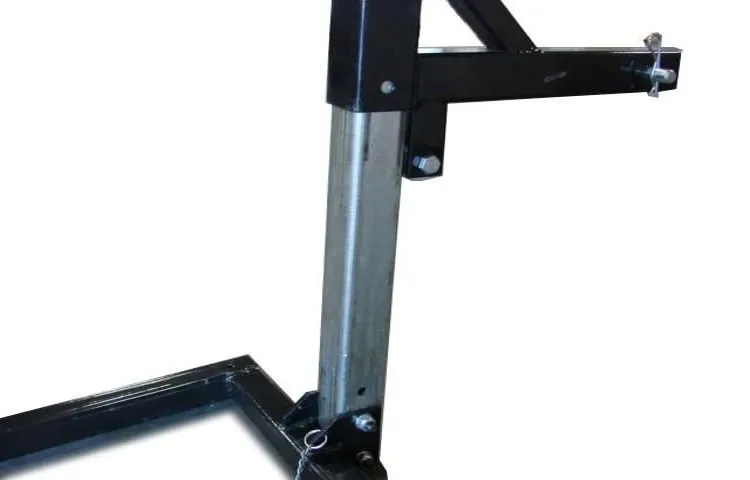
Step 6: Adjust the Height of the Carrier by Inserting or Removing Hitch Shanks or Risers
When it comes to transporting bikes or other heavy items, having a hitch carrier can be a game changer. But before you hit the road, you’ll want to make sure that the carrier is adjusted to the right height. This is where hitch shanks or risers come into play.
The height of the carrier should be adjusted so that it is level with the ground when the vehicle is loaded. To do this, you may need to insert or remove hitch shanks or risers. Hitch shanks are metal bars that attach to the hitch receiver and extend outwards, while risers are specially designed pieces that can be added to the shanks to provide additional height.
By inserting or removing these shanks or risers, you can ensure that the carrier is at the perfect height for safe and easy transportation. So, the next time you’re planning a road trip with your bikes or other heavy items, don’t forget to adjust the height of your hitch carrier using hitch shanks or risers. It’s a simple step that can make a big difference in your travel experience.
Step 7: Secure the Carrier Back onto the Hitch
Securing the carrier back onto the hitch is the final step in the process of installing a hitch-mounted carrier onto your vehicle. This step ensures that the carrier is properly attached and ready to carry your belongings safely. To begin, align the holes on the carrier with the hitch and insert the hitch pin.
Once the pin is inserted, secure it in place with a cotter pin or lock. This will prevent the carrier from coming loose while you are driving. Next, tighten any remaining bolts or screws to ensure that the carrier is securely fastened to the hitch.
Finally, double-check that everything is tight and secure before hitting the road. By following these step-by-step instructions, you can feel confident that your carrier is securely attached to the hitch, allowing you to transport your belongings safely and easily.
Tips and Safety Precautions
If you’re looking to increase your cargo space when traveling, a hitch mounted cargo carrier is a great solution. However, it’s important to raise the hitch mounted cargo carrier properly to ensure safety on the road. Here are some tips and safety precautions to keep in mind.
First, make sure to read the manufacturer’s instructions carefully before attempting to raise the cargo carrier. Each carrier may have slightly different instructions, so it’s essential to follow them closely. Secondly, when raising the cargo carrier, always have a second person available to assist you.
This will make the process easier and safer, as it can be challenging to lift and secure the carrier on your own. Additionally, wear proper protective gear, such as gloves, to prevent any injuries while handling the carrier. Lastly, make sure to double-check that the cargo carrier is securely attached to the hitch before setting off on your journey.
Check that all bolts and pins are tightly secured, and give the carrier a gentle shake to ensure it’s stable. By following these tips and taking appropriate safety precautions, you can safely raise your hitch mounted cargo carrier and enjoy the convenience of extra cargo space on your travels.
Always Adhere to the Weight Capacity of Your Hitch and Carrier
weight capacity of your hitch, carrier, tips, safety precautions, adhering to weight capacity, proper loading techniques When it comes to using a hitch and carrier, it’s important to always adhere to the weight capacity guidelines. This is crucial not only for your safety but also to protect your vehicle and the items you’re transporting. Exceeding the weight capacity can put extra strain on your hitch and cause damage or even failure.
Before loading up your carrier, be sure to check the weight capacity listed in the manufacturer’s specifications. It’s always better to be safe than sorry. Once you know the weight capacity, make sure to weigh your items before loading them onto the carrier.
This includes considering the weight of the carrier itself. It’s also a good idea to distribute the weight evenly and secure everything tightly to prevent shifting during transport. By following these simple tips and safety precautions, you can enjoy a stress-free journey and protect your hitch and carrier from unnecessary strain or damage.
Use Proper Lifting Techniques to Prevent Injury
lifting techniques, prevent injury, safety precautions. Proper lifting techniques are crucial in preventing injuries when lifting heavy objects.
Whether you’re moving furniture, lifting weights at the gym, or even just picking up a box, it’s important to use the right techniques to avoid straining your muscles or causing other injuries. One of the first things to remember is to lift with your legs, not your back. This means bending your knees and using the strength of your leg muscles to lift the object, rather than relying on your back muscles.
It’s also important to keep the object as close to your body as possible while lifting, as this will help to distribute the weight evenly and reduce the strain on your muscles. Another important tip is to avoid twisting your body while lifting. Instead, use your feet to pivot and turn in the direction you want to go.
By following these proper lifting techniques and taking appropriate safety precautions, you can greatly reduce the risk of injury and ensure that you’re able to lift safely and effectively. So, the next time you need to lift something heavy, remember to use these techniques and take care of your body.
Double Check that the Carrier is Securely Attached to the Hitch
One important step to ensure the safety of your vehicle and cargo is to double-check that the carrier is securely attached to the hitch. This is crucial because a loose or improperly attached carrier can pose a significant risk to both your vehicle and other drivers on the road. To ensure a secure attachment, always follow the manufacturer’s instructions and use the appropriate hardware provided.
Take the time to inspect the carrier and hitch for any signs of wear or damage before each use. Additionally, make sure to tighten all bolts and connections, and use any necessary locking mechanisms to prevent the carrier from coming loose during transit. By taking these precautions and regularly checking the attachment, you can have peace of mind knowing that your cargo will arrive safely at its destination.
Regularly Inspect the Carrier for Any Damage
When it comes to transporting our furry friends, safety should always be our top priority. One important aspect to consider is regularly inspecting the carrier for any damage. This may seem like a simple step, but it can make all the difference in ensuring a smooth and secure journey for your pet.
By inspecting the carrier before each use, you can identify any potential risks and address them before they cause harm to your pet. Look for signs of wear and tear, such as frayed straps or holes in the mesh. Check that all zippers and fastenings are in good working order and that there are no sharp edges or protruding parts that could injure your pet.
By taking the time to inspect the carrier, you can provide peace of mind knowing that your pet is traveling in a safe and secure environment.
Conclusion
In conclusion, raising a hitch mounted cargo carrier is the ultimate flex for anyone looking to haul their belongings with style and ease. However, it’s not enough to simply pull a lever or push a button – oh no, that would be far too ordinary. No, raising a hitch mounted cargo carrier requires the finesse of a master magician, the precision of a surgeon, and the strength of a bodybuilder.
First, you must approach the task with the confidence of someone who knows they’re about to dominate the cargo-hauling game. Take a deep breath and channel your inner superhero – because a mere mortal could never handle this level of badassery. Next, locate the lever or button that will initiate the raising process.
This may require some investigative skills, as manufacturers love to hide these things in the most inconspicuous places. But fear not, for you are a modern-day Sherlock Holmes and nothing can escape your keen eye. Once you’ve found the lever or button, prepare yourself for action.
Take a moment to stretch your muscles, for this is the moment where your physical prowess will shine. Flex those biceps, engage those core muscles, and get ready to unleash the power of a thousand bodybuilders. With a swift and calculated motion, activate the lever or push the button.
Feel the rush of adrenaline as the cargo carrier begins its ascent, defying gravity and the expectations of those around you. You are a god among men, a champion of the hitch mounted cargo carrier game. And there you have it – a witty and clever explanation of how to raise a hitch mounted cargo carrier.
Remember, this is not a task for the meek or the feeble. It requires strength, determination, and a healthy dose of showmanship. So next time you find yourself faced with the challenge of raising a hitch mounted cargo carrier, embrace the opportunity to become the ultimate cargo-hauling superhero.
Summary of the Steps to Raise a Hitch Mounted Cargo Carrier
hitch mounted cargo carrier, raise, tips, safety precautions Raising a hitch mounted cargo carrier may seem like a straightforward task, but it’s important to follow the proper steps to ensure it is done safely and securely. First, make sure your vehicle is parked on level ground to provide a stable base. Begin by loosening the bolts or pins that are holding the carrier in the lower position.
Next, carefully lift the carrier using your legs and not your back to avoid injury. Use caution as you raise the carrier to prevent any sudden movements or jerking motions. Once the carrier is in the desired raised position, resecure the bolts or pins to keep it in place.
It’s also important to double-check that the carrier is securely attached to the hitch before loading any items onto it. When raising a hitch mounted cargo carrier, there are a few tips and safety precautions to keep in mind. First, it’s important to check the weight capacity of your vehicle’s hitch and the cargo carrier itself.
Overloading the carrier can lead to damage to the carrier, hitch, or even your vehicle. Additionally, be sure to distribute the weight evenly on the carrier and secure any items with straps or bungee cords to prevent shifting during transit. Before driving with the raised carrier, make sure it does not obstruct your rear view or any lights on your vehicle.
Finally, always follow the manufacturer’s instructions for raising and securing the carrier to ensure proper usage and avoid any accidents. By following these tips and safety precautions, you can safely and effectively raise a hitch mounted cargo carrier for all your hauling needs.
Importance of Following Safety Guidelines
safety guidelines, tips and safety precautions. In our fast-paced world, it’s easy to overlook safety guidelines. However, following these guidelines can make all the difference when it comes to protecting ourselves and those around us.
Whether it’s at home, in the workplace, or out in public, taking simple precautions can help prevent accidents and injuries. One of the most important tips for staying safe is to be aware of your surroundings. This means staying alert and mindful of potential hazards.
For example, when walking on the street, it’s important to pay attention to traffic and crosswalks. Similarly, at work, being aware of equipment and machinery can help you avoid accidents. Another crucial safety measure is to always use protective gear.
Whether it’s wearing a helmet while biking or donning safety goggles in the lab, protective gear can significantly reduce the risk of injury. It may seem inconvenient or unnecessary at times, but taking the extra step to protect yourself can save you from a potential disaster. In addition, it’s important to practice good hygiene and cleanliness.
Washing your hands regularly can help prevent the spread of germs and diseases. This is particularly important in crowded areas or during flu season. Simple actions, such as covering your mouth when coughing or sneezing, can go a long way in keeping yourself and others safe.
Lastly, it’s crucial to follow instructions and guidelines provided by experts and authorities. Whether it’s following fire safety regulations or reading the instructions on a medication bottle, these guidelines are in place for a reason. Ignoring or disregarding them can have serious consequences.
Final Thoughts on Hitch Mounted Cargo Carriers
Hitch mounted cargo carriers can be a great addition to your vehicle, providing extra storage space and making it easier to transport larger items. However, it’s important to follow some tips and safety precautions to ensure that you use these carriers safely and effectively. First and foremost, make sure to choose a carrier that is compatible with your vehicle’s hitch and weight capacity.
It’s also a good idea to distribute the weight evenly across the carrier and secure everything tightly with straps or bungee cords. Additionally, be mindful of the added length and height that the carrier may add to your vehicle and adjust your driving accordingly. Lastly, always double-check that everything is securely fastened before hitting the road.
By taking these precautions, you can enjoy the convenience of a hitch mounted cargo carrier without compromising safety.
FAQs
How to raise a hitch-mounted cargo carrier?
To raise a hitch-mounted cargo carrier, follow these steps:
1. Loosen the bolts or locks securing the cargo carrier to the hitch receiver.
2. Lift the cargo carrier by gripping the frame or designated lifting points.
3. Adjust the carrier to the desired height and make sure it is level.
4. Tighten the bolts or locks to securely attach the carrier to the hitch receiver.
Is it necessary to raise a hitch-mounted cargo carrier?
Raising a hitch-mounted cargo carrier can be beneficial in some situations, such as:
– Providing additional ground clearance for the cargo carrier and preventing damage on uneven terrain.
– Allowing easier access to the rear of the vehicle (e.g., opening the trunk or tailgate) without interference from the carrier.
Can I use a hitch extender to raise my cargo carrier?
Yes, a hitch extender can be used to raise a hitch-mounted cargo carrier. A hitch extender is a device that extends the distance between the vehicle’s hitch receiver and the cargo carrier, providing additional height and clearance. However, it is essential to choose a hitch extender that is compatible with your hitch class and weight capacity.
Are there weight limitations when raising a hitch-mounted cargo carrier?
Yes, there are weight limitations when raising a hitch-mounted cargo carrier. Both the hitch receiver and the cargo carrier itself have weight capacities that should not be exceeded. It is crucial to check the owner’s manual or consult the manufacturer’s specifications to determine the maximum weight capacity for your specific hitch and carrier.
Are there any safety considerations when raising a hitch-mounted cargo carrier?
Yes, when raising a hitch-mounted cargo carrier, it is essential to consider the following safety measures:
– Ensure that the cargo is properly secured to the carrier to prevent shifting during transport.
– Maintain a safe distance between the vehicle and any obstacles or other vehicles, especially when the carrier is raised.
– Regularly inspect the carrier, hitch, and all connections for any signs of wear, damage, or instability.
– Follow the manufacturer’s instructions and guidelines for the specific carrier model.
Can I raise a hitch-mounted cargo carrier while it is loaded?
It is not recommended to raise a hitch-mounted cargo carrier while it is loaded. Raising the carrier with a significant load can be dangerous and potentially damage the carrier, the hitch, or the vehicle. It is best to unload the cargo carrier before attempting to raise it to avoid any risks or complications.
Is there a specific tool or equipment required to raise a hitch-mounted cargo carrier?
Raising a hitch-mounted cargo carrier typically does not require any specialized tools or equipment. However, having a wrench or socket set may be necessary to loosen and tighten any bolts or locks securing the carrier to the hitch receiver. Additionally, using gloves or protective gear can help with grip and safety during the lifting process.