
Have you ever found yourself in a sticky situation where you need to remove the winch cable from your ATV? Whether it’s due to wear and tear, damage, or simply the need for a replacement, removing the winch cable can be a tricky task. But fear not, because in this blog post, we will guide you through the process step by step. Think of this guide as your trusted companion, ready to help you tackle this challenge head-on, just like a skilled mechanic removing a stubborn bolt from an engine.
So grab your tools and let’s dive into the world of ATV winch cable removal!
Table of Contents
- 1 Introduction
- 2 Step-by-Step Guide
- 2.1 Step 1: Gather the necessary tools
- 2.2 Step 2: Locate the winch cable on the ATV
- 2.3 Step 3: Disconnect the power source
- 2.4 Step 4: Release tension on the winch cable
- 2.5 Step 5: Remove the winch cable from the winch drum
- 2.6 Step 6: Inspect the winch cable for any damage
- 2.7 Step 7: Install a new winch cable (optional)
- 3 Conclusion
- 4 FAQs
Introduction
Are you tired of dealing with a tangled mess every time you try to use your ATV winch? Removing the winch cable can be a daunting task, but with the right steps, you can do it hassle-free. Follow these simple steps to remove your ATV winch cable easily. First, make sure your ATV is parked on a flat and stable surface to ensure safety during the process.
Next, locate the winch drum and secure it using a winch strap or a pair of locking pliers. This will prevent the drum from spinning while you remove the cable. Then, find the cable tensioner and loosen it using a wrench or socket.
Once the tension is released, carefully slide the cable off the drum and guide it out through the fairlead. Remember to pay attention to any clips or retaining rings that may be holding the cable in place. Finally, coil the cable neatly and store it in a safe place to prevent tangles or damage.
By following these steps, you can easily remove your ATV winch cable and say goodbye to the hassle of dealing with a tangled mess.
Overview of ATV Winch
ATV winches are essential accessories for any ATV owner. These powerful tools are used to help pull or lift heavy objects, making them a must-have for outdoor enthusiasts, off-roaders, and those who frequently use their ATVs for work. With an ATV winch, you can easily handle tasks such as recovering a stuck vehicle, pulling logs or rocks out of the way, or even load a game animal onto your ATV.
These winches are designed to be mounted onto the front or rear of your ATV and come with a strong cable or rope that can be attached to an anchor point. With the push of a button or the turn of a handle, you can effortlessly control the movement of the cable, allowing you to pull or lift with ease. ATV winches usually have a high pulling capacity, often ranging from 2,000 to 6,000 pounds, ensuring that they can handle even the toughest jobs.
Additionally, they offer convenience and safety features such as wireless remote controls, automatic brakes, and weatherproof construction. Investing in an ATV winch is a wise decision as it can greatly enhance the utility and versatility of your ATV, allowing you to tackle challenging tasks with confidence. So, whether you’re an off-roading enthusiast or someone who frequently ventures into rugged terrain, an ATV winch is a valuable tool that will undoubtedly come in handy.
Importance of Removing ATV Winch Cable
ATV winch cables are an essential component of any off-roading adventure. They allow us to maneuver through challenging terrains, pull ourselves out of sticky situations, and help others in need. However, it is equally crucial to recognize the importance of removing the ATV winch cable once the task is completed.
While it may seem like a tedious chore, neglecting this step can have severe consequences. In this blog post, we will discuss why it is crucial to remove the ATV winch cable and the potential dangers of leaving it attached. Let’s dive in and explore this topic further.
Safety Precautions
Safety precautions are crucial in ensuring the well-being and protection of individuals in various situations. Whether it be at home, in the workplace, or on the road, taking proper safety measures can help prevent accidents, injuries, and even save lives. These precautions can range from simple acts like wearing seat belts in vehicles or installing smoke detectors in homes, to more complex protocols like implementing security measures in offices or following safety guidelines in hazardous work environments.
By implementing these precautions, we reduce the risks and increase the chances of a safe and incident-free environment. So, let’s dive deep into the different safety precautions that we can apply in various aspects of our lives, and how they contribute to our overall well-being and peace of mind.
Step-by-Step Guide
If you own an ATV and need to remove the winch cable, don’t worry – it’s a fairly straightforward process. First, make sure your ATV is parked on a level surface and turned off. Locate the winch fairlead, which is a metal guide located on the front of your ATV.
Use a wrench to remove the bolts holding the fairlead in place. Once the fairlead is removed, you can access the winch drum. Depending on the type of winch you have, you may need to loosen a tension bolt or release a tension lever to take the pressure off of the cable.
With the tension released, carefully spool the winch cable off of the drum, making sure to keep it organized to avoid tangles. Once the cable is completely off the drum, you can detach it from the ATV. Be sure to inspect the cable for any signs of wear or damage and replace if necessary.
Installing a new winch cable is the reverse of this process, simply attach the new cable to the ATV and spool it onto the drum, making sure to maintain tension as you go. Removing and replacing the winch cable on your ATV can be frustrating if you’re not familiar with the process, but with a little patience and the right tools, it can be done easily.
Step 1: Gather the necessary tools
For a successful DIY project, it’s essential to have all the necessary tools gathered before starting. This step is crucial to ensure that you have everything you need on hand and won’t waste time searching for missing tools halfway through the project. Before you begin, take some time to assess the required tools for your specific project.
Different projects may require different tools, so it’s important to do your research beforehand. Start by making a list of the tools you already have and compare it to the list of tools you need. If you’re missing any tools, make a plan to acquire them before you start the project.
Consider borrowing from a friend or neighbor if possible, or check out local hardware stores for rental options. Purchasing tools can be expensive, so it’s important to evaluate whether it’s worth buying them outright or if renting or borrowing is a more cost-effective option. Once you have all the necessary tools, gather them in one central location.
This will help you stay organized throughout the project and prevent any unnecessary delays or frustrations. It can also be helpful to have a designated workspace for your DIY project, where you can easily access your tools and work comfortably. By taking the time to gather all the necessary tools before starting your DIY project, you’ll set yourself up for success.
You’ll be able to work efficiently and confidently, knowing that you have everything you need to complete the project. So, grab your tools and get ready to tackle that DIY project!
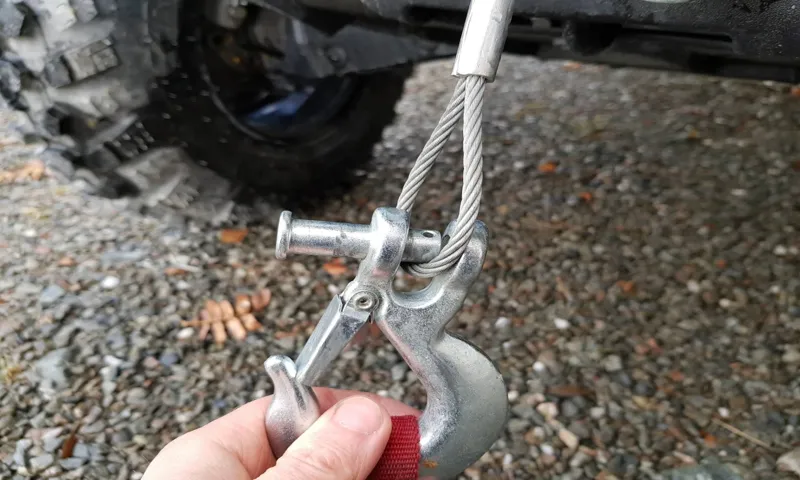
Step 2: Locate the winch cable on the ATV
ATV winches are incredibly useful and versatile tools, capable of pulling heavy loads and getting you out of tough situations. However, in order to use them effectively, you need to know how to locate the winch cable on your ATV. This step is crucial because it allows you to connect the winch cable to the object you want to pull or the anchor point.
To locate the winch cable, start by looking at the front of your ATV. Most winches are mounted near the front bumper or on the front rack. Look for a thick, metal cable neatly wound around a spool.
This cable is usually made of synthetic rope or steel, both of which are strong and durable. Once you’ve found the winch cable, take a moment to inspect it. Look for any signs of fraying or damage that could compromise its strength and effectiveness.
It’s essential to keep your winch cable in good condition to ensure it can handle the load you need to pull. If you notice any issues, it’s best to replace the cable before using the winch. Locating the winch cable on your ATV is an important step in preparing your winch for action.
This step ensures that you can connect the winch cable securely to your desired object or anchor point, allowing you to make full use of the winch’s pulling power. Take the time to locate and inspect your winch cable before every use to ensure your safety and the effectiveness of your winch.
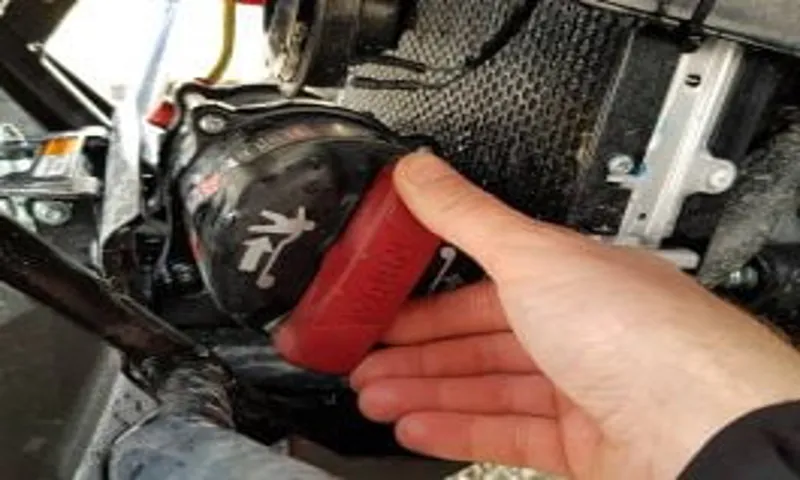
Step 3: Disconnect the power source
In the third step of disconnecting the power source, it is crucial to follow the right procedure to ensure safety and avoid any accidents. First, locate the power source that needs to be disconnected. This may be a power cord, an electrical outlet, or a circuit breaker.
Once you have identified the power source, it is essential to turn it off or unplug it. Make sure to use caution and avoid touching any exposed wires or connections. This step is crucial to protect yourself and prevent any potential electrical shocks.
Remember, safety should always be the top priority when working with electrical equipment, so take your time and double-check that the power source is completely disconnected before proceeding with any further steps.
Step 4: Release tension on the winch cable
When it comes to using a winch, it’s important to know how to release tension on the winch cable safely. This step is crucial to prevent any potential accidents or damage. So, let’s dive into the step-by-step process.
First, ensure that the winch is in neutral and the vehicle’s engine is turned off. Then, locate the tension nut or clutch on the winch. Loosen it by turning it counterclockwise, which will release the tension on the cable.
It’s important to do this slowly and carefully to avoid any sudden movements or jerks. Once the tension is released, you can safely unhook the winch cable from its anchor point. Always remember to wear appropriate protective gear and to follow the manufacturer’s instructions when working with a winch.
By following these steps, you can release tension on the winch cable safely and efficiently.
Step 5: Remove the winch cable from the winch drum
In this step-by-step guide, we will be taking a closer look at how to remove the winch cable from the winch drum. This is an important step to ensure the proper functioning of the winch and to prevent any accidents or damages. Removing the winch cable from the drum may seem like a daunting task, but with a little patience and the right tools, it can be done easily.
Begin by unspooling the winch cable until it is completely unwound from the drum. Next, locate the bolt that is securing the winch cable to the drum and use a wrench or socket to loosen it. Once the bolt is loosened, carefully remove the winch cable from the drum, taking care not to let it slip and cause injury.
With the winch cable removed, you can now inspect it for any signs of damage or wear and replace it if necessary. By following these steps, you can safely and effectively remove the winch cable from the winch drum.
Step 6: Inspect the winch cable for any damage
winch cable, inspect, damage
Step 7: Install a new winch cable (optional)
new winch cable, step-by-step guide, install a winch cable, replace winch rope, winch cable installation
Conclusion
So, there you have it – a step-by-step guide on how to remove an ATV winch cable. Hopefully, this process will be helpful to all those adventurous souls out there who find themselves in need of a winch cable replacement. Just remember to have the necessary tools on hand, take your time, and don’t be afraid to ask for help if needed.
After all, removing a winch cable is like untangling a particularly stubborn thread – it requires patience, finesse, and a touch of ingenuity. So go forth, fellow off-roaders, and may your winch cables always be untangled and ready for action. Happy trails!”
Final thoughts on removing ATV winch cable
ATV winches are a great tool for off-road enthusiasts, but eventually, you’ll need to replace the winch cable. Removing and replacing the cable may seem like a daunting task, but with a step-by-step guide, it can be done easily. First, make sure your ATV is parked on a level surface and the winch is fully disengaged.
Then, remove the fairlead cover and loosen the bolts securing the fairlead to the winch. Next, feed the free end of the winch cable through the fairlead and remove the hook from the cable. Take note of how the old cable was wound on the winch drum, as this will help when installing the new cable.
Loosen the winch drum bolts and remove the old cable from the winch drum. Finally, attach the new cable to the winch drum, making sure to wind it in the same pattern as the old cable. Tighten the winch drum bolts and reattach the fairlead to the winch.
With these easy steps, you’ll have your ATV winch cable replaced in no time, ready for your next off-road adventure.
Importance of regular maintenance
Regular maintenance is crucial for keeping any system or equipment in good working order, and this holds true for everything from cars to computers. When it comes to our homes, regular maintenance not only keeps everything running smoothly but also prevents major issues from arising down the line. In this step-by-step guide, we will explore the importance of regular maintenance and how it can save us time, money, and stress in the long run.
Step 1: Create a Maintenance Schedule The first step in establishing a regular maintenance routine is to create a schedule. This schedule should outline which tasks need to be done and when they should be performed. For example, you might schedule monthly tasks such as checking and changing air filters, testing smoke detectors, and inspecting plumbing for leaks.
Quarterly tasks might include cleaning gutters, inspecting the roof for damage, and checking the performance of your HVAC system. Step 2: Identify Priority Areas Once you have a maintenance schedule in place, it’s important to identify which areas of your home require priority attention. Some areas that typically require more frequent maintenance include the HVAC system, electrical wirings, plumbing, and the exterior of the home.
These areas often involve critical functions and can have serious implications if they malfunction. Step 3: Keep Up with Regular Cleaning Maintenance isn’t just about fixing things when they break – it’s also about preventing future issues by keeping things clean and well-maintained. Regular cleaning of your home, both inside and out, can help to minimize the risk of damage and keep everything looking fresh and new.
This includes tasks such as dusting and vacuuming, cleaning windows, and regular yard maintenance. Step 4: Stay Proactive and Reactive Regular maintenance involves both proactive and reactive measures. Proactive measures include tasks such as regular inspections, cleaning, and servicing equipment before they break.
Reactive measures, on the other hand, involve addressing issues as they arise. This might involve fixing a leaky faucet, replacing a broken window, or repairing a damaged roof. By staying proactive and reactive, you can catch problems early and prevent them from escalating into major issues.
FAQs
How do I remove an ATV winch cable from the drum?
To remove an ATV winch cable from the drum, first, disconnect the power source. Then, locate the retaining bolt or pin that secures the cable to the drum. Loosen and remove this bolt or pin, allowing the cable to be detached from the drum.
Can I remove an ATV winch cable without using any special tools?
Yes, you can remove an ATV winch cable without using any special tools. Most winch cables can be detached from the drum by manually loosening and removing the retaining bolt or pin, which can usually be done with basic tools such as pliers or a wrench.
What precautions should I take before removing an ATV winch cable?
Before removing an ATV winch cable, it is important to disconnect the power source to prevent accidental operation. Additionally, ensure that the ATV is parked on a level surface and that the winch is not under any tension to avoid any potential accidents.
How often should I remove and inspect my ATV winch cable?
It is recommended to periodically remove and inspect your ATV winch cable for any signs of wear, fraying, or damage. The frequency of inspection can vary depending on the frequency and intensity of use, but a general guideline is to inspect the cable at least once every few months.
Are there any specific maintenance steps I should follow while removing an ATV winch cable?
While removing an ATV winch cable, it is a good practice to inspect the drum for any dirt, debris, or corrosion. Clean the drum thoroughly before reattaching a new cable. Additionally, check the winch’s gears, bearings, and other moving parts for any signs of wear or damage and lubricate them if necessary.
Can I reuse my old ATV winch cable after removal?
It is generally not recommended to reuse an old ATV winch cable after removal, especially if there are signs of wear, fraying, or damage. It is safer to replace the cable with a new one to ensure optimal performance and safety during future winching operations.
Where can I find a replacement ATV winch cable?
Replacement ATV winch cables can be found at most ATV accessory stores, online retailers, or direct from the winch manufacturer. Ensure that you purchase a cable that is compatible with your specific winch model and rated for your ATV’s weight capacity.