
If you’re an ATV enthusiast, you know how important a winch is for those off-road adventures. Whether you’re pulling yourself out of a muddy pit or helping a friend out of a tight spot, a winch can be a lifesaver. However, over time, the winch cable can start to fray or even break, rendering your winch useless.
But fear not, because in this blog, I’m going to show you how to repair your ATV winch cable and get back on the trails in no time. Imagine this: you’re in the middle of nowhere, surrounded by trees and steep hills. Suddenly, you find yourself stuck in deep mud or tangled in a mess of fallen branches.
Your heart sinks as you realize your winch cable has snapped, leaving you stranded. It’s moments like these that make you wish you had the knowledge to fix it yourself. Well, worry no more! Repairing an ATV winch cable is easier than you might think.
It’s like untangling a knot or repairing a broken fishing line – with a little patience and the right tools, you can have your winch back in working order in no time. First, you’ll need to assess the damage. Is the cable simply frayed, or has it snapped completely? If it’s frayed, you can often get by with a simple repair.
Start by trimming off the frayed ends with a sharp knife or wire cutters. Then, use some electrical tape or heat shrink tubing to cover the frayed area and secure it in place. This will prevent further fraying and give your cable some extra strength.
If the cable has snapped, you’ll need to replace it entirely. Start by disconnecting the winch from your ATV and removing the old cable. Take note of how the old cable was wound around the winch drum, as you’ll need to replicate this when installing the new one.
Table of Contents
Introduction
Do you enjoy riding your ATV but are frustrated because your winch cable keeps getting damaged? Don’t worry, you’re not alone. It’s a common problem that many ATV owners face. However, with a little know-how and some basic tools, you can easily repair your ATV winch cable yourself.
Whether it’s a frayed cable or a broken end, this guide will walk you through the steps to get your winch cable back in working order. So grab your tools and let’s get started on fixing that winch cable so you can get back to enjoying your off-road adventures.
Explanation of the importance of a functioning winch cable
A winch cable may seem like a small component in the grand scheme of things, but it plays a crucial role in the functioning of a winch. Without a properly functioning winch cable, your winch is essentially useless. So, what exactly makes the winch cable so important? Well, think of it like the lifeline of your winch.
It’s what allows you to pull and lift heavy objects with ease. Without a strong and reliable winch cable, you won’t be able to perform any of the tasks that a winch is designed for. Imagine trying to tow a stranded vehicle or haul a heavy piece of equipment without a functioning winch cable – it would be nearly impossible.
That’s why it’s so important to ensure that your winch cable is in good condition and capable of handling the load you’ll be putting on it.

Tools and Materials Needed
When it comes to repairing an ATV winch cable, you’ll need a few tools and materials to get the job done. First and foremost, you’ll need a replacement cable. Make sure to choose one that is the same length and thickness as the old cable to ensure proper fit.
Additionally, you’ll need a pair of wire cutters to cut through the old cable and remove it from the winch. A socket wrench or adjustable wrench will also come in handy for removing and tightening the bolts that hold the cable in place. Finally, you may need a pair of pliers or a wire rope clamp to secure the new cable to the winch drum.
List of tools and materials required for repair
When it comes to repairing something, having the right tools and materials is essential. Whether you are fixing a leaky pipe, repairing a broken chair, or doing any other repairs around the house, having the necessary tools on hand can make the job much easier and more efficient. Some basic tools that you should have include a hammer, screwdriver set, pliers, wrenches, and a tape measure.
These tools can help you with a wide range of repairs and should be part of any DIY toolkit. In addition to these basic tools, there are also specific tools that may be required for certain types of repairs. For example, if you are working with electrical wiring, you will need wire cutters, strippers, and a voltage tester.
If you are repairing drywall, you will need a putty knife, sandpaper, and joint compound. It is important to assess the repair job beforehand to determine the specific tools and materials that you will need. Gathering all of the necessary tools and materials beforehand can help ensure that you have everything you need to complete the repair efficiently and effectively.
Step-by-Step Instructions
Are you tired of dealing with a broken ATV winch cable? Don’t worry; repairing it is easier than you might think! In this step-by-step guide, I’ll show you how to fix your ATV winch cable so you can get back to enjoying your off-road adventures. First, you’ll need to gather the necessary tools and materials. You’ll need a replacement cable, a pair of pliers, a socket set, and some cable ties.
Once you have everything you need, start by disconnecting the power source and removing the old cable from the winch drum. Next, attach the new cable to the winch drum using the socket set. Make sure it’s tightly secured so it won’t come loose during operation.
Then, thread the cable through the fairlead and secure it in place with cable ties. Finally, reconnect the power source and test the winch to make sure it’s working properly. With these simple steps, you’ll be able to repair your ATV winch cable in no time!
Step 1: Inspect the cable for damage
When it comes to maintaining your cables, it’s important to start with a thorough inspection for any signs of damage. This step is crucial to ensure the overall safety and functionality of the cable. Begin by visually examining the cable from end to end.
Look for any cuts, fraying, or exposed wires. If you notice any damage, it’s essential to address it promptly to prevent further harm or potential electrical hazards. Additionally, check for any loose connections or bent pins, as these can also impact the cable’s performance.
By taking the time to inspect your cables regularly, you can catch any issues before they become more significant problems. So, grab a cup of coffee, put on your detective hat, and give those cables a close examination. Your devices will thank you for it!
Step 2: Remove the damaged section of the cable
Removing the damaged section of a cable is an essential step in repairing it. To begin, you’ll need to locate the damaged area by inspecting the cable for any visible signs of wear or tear. Once you’ve identified the damaged section, you can proceed with removing it.
Start by carefully cutting through the cable just before the damaged area using a cable cutter or knife. Be cautious not to cut into any surrounding wires or cables. Once you’ve made the initial cut, gently pull apart the two ends of the cable to expose the damaged section.
Depending on the severity of the damage, you may need to make additional cuts to fully remove the damaged part. Again, take care to avoid damaging any other parts of the cable. Once the damaged section has been removed, you can proceed with the next steps to repair or replace the cable as needed.
By following these step-by-step instructions, you’ll be well on your way to successfully removing the damaged section of a cable.
Step 3: Measure and cut a new section of cable
When it comes to fixing a broken cable, measuring and cutting a new section is an essential step. This is where precision and accuracy are crucial. To begin, gather the necessary tools: a sharp pair of cable cutters and a measuring tape.
Start by locating where the damaged section begins and ends. Use the measuring tape to measure the length of the damaged section. Now, it’s time to cut the new section of cable.
Take the cable cutters and place them on one end of the damaged section. Apply enough pressure to cut through the cable, ensuring a clean and even cut. Repeat this step on the other end of the damaged section.
Congratulations! You have successfully measured and cut a new section of cable. Now, you’re one step closer to fixing your cable and getting things back to normal.
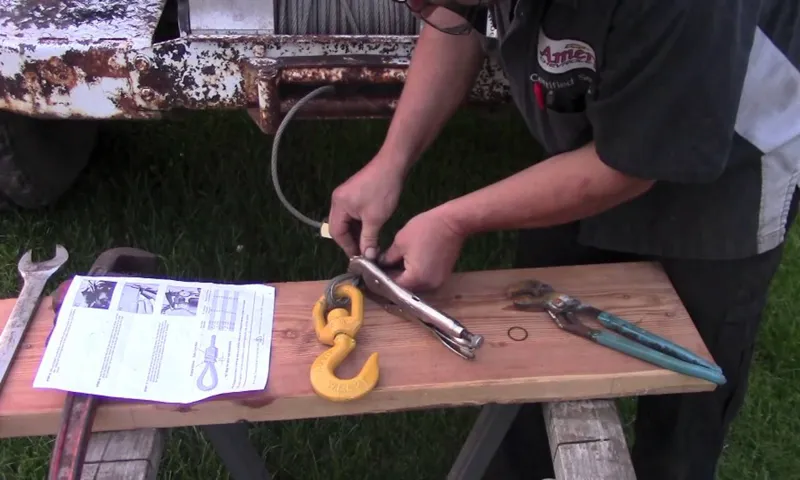
Step 4: Attach the new cable to the winch drum
attaching a new cable to the winch drum Step 4 of replacing a winch cable involves attaching the new cable to the winch drum. This is an important step as it ensures that the cable is properly secured and can handle the load it will be subjected to. To begin, you will need to locate the spooling point on the drum, which is usually marked by a groove or notch.
Once you have found the spooling point, take the end of the cable and thread it through the spooling point, making sure to leave a bit of slack. Next, you will need to secure the cable to the drum by tightly wrapping it around the drum a number of times. This will provide a firm grip and prevent the cable from slipping or unraveling during use.
Once you have wrapped the cable around the drum, secure the end of the cable by using a cable clamp or other means of securing it. Ensure that the clamp is tight enough to hold the cable in place, but not so tight that it damages the cable. Congratulations, you have successfully attached the new cable to the winch drum!
Step 5: Reattach the cable to the winch hook
reattach cable winch hook Now that you’ve successfully detached the cable from the winch drum, it’s time to move on to the next step: reattaching the cable to the winch hook. This step is important because it ensures that the cable is securely connected to the winch hook and will be able to handle the load you’re about to lift. To do this, start by locating the winch hook at the end of the cable.
The winch hook is typically a heavy-duty metal hook with a latch or safety clasp to keep the cable in place. Make sure the latch is open or released before proceeding. Next, position the cable so that the hook of the winch hook is aligned with the opening of the cable loop.
Gently insert the hook into the loop, making sure it goes through all layers of the cable. Once the hook is securely inside the loop, close the latch or safety clasp to lock the cable in place. Give it a gentle tug to make sure it’s secure.
It’s important to note that when reattaching the cable to the winch hook, you should never skip the step of ensuring that the latch or safety clasp is securely closed. This is because it serves as an extra layer of protection and prevents the cable from accidentally dislodging during operation. With the cable reattached to the winch hook, you’re now ready to move on to the next step in the process.
Whether you’re using your winch for off-roading adventures or lifting heavy loads, knowing how to properly reattach the cable to the winch hook is crucial for a safe and successful operation. So take your time, double-check your work, and make sure everything is securely fastened before moving forward.
Step 6: Test the repaired winch cable
testing winch cable, repairing winch cable In the final step of repairing your winch cable, it’s crucial to test it to ensure that it is working properly and is safe to use. Testing the winch cable will give you peace of mind, knowing that it will perform as expected when you need it most. To test the repaired winch cable, you will need to attach it to a load and operate the winch.
Start by connecting one end of the winch cable to the winch drum and the other end to the load you want to move. Make sure the cable is properly secured and not tangled or twisted. Then, slowly and carefully operate the winch to lift the load off the ground.
Pay close attention to any unusual noises or vibrations, as these could indicate a problem with the cable. Once the load is off the ground, hold it in the air for a few seconds to ensure that the cable is holding up and there are no issues with slipping or breaking. Finally, lower the load back down to the ground and detach the winch cable.
If the cable performs well throughout the testing process, you can have confidence that it has been successfully repaired and is ready for use. However, if you notice any issues or concerns during the test, it’s important to address them before using the winch cable in a real-life situation. By thoroughly testing the repaired winch cable, you can ensure that it functions optimally and provides you with the reliability and durability that you need.
Tips and Precautions
If you enjoy riding your ATV, then you know how important it is to have a functioning winch cable. However, over time, the cable may start to wear out or get damaged. If you find yourself in this situation, don’t worry.
Repairing an ATV winch cable is a relatively simple process that you can do on your own. Here are some tips and precautions to keep in mind. First, make sure to inspect the winch cable thoroughly to identify the extent of the damage.
Look out for fraying, kinks, or any signs of weakness. If the cable is severely damaged, it may need to be replaced entirely. If the damage is minor, you can proceed with repairing it.
Before you start working on the cable, it’s essential to disconnect the winch from any power source and make sure the ATV is in a stable position. Safety should always be your top priority. Next, you will need to remove the damaged section of the cable.
Use a pair of cable cutters to cut the cable cleanly, ensuring that there are no jagged edges. It’s essential to ensure a smooth transition between the old and new cable sections. Once you have removed the damaged section, you can now attach the new cable.
Make sure to match the diameter and length of the new cable to the original one. You can use a cable connector or a swage sleeve to secure the new cable to the old one. After connecting the cables, check the winch to ensure it is functioning correctly.
Provide tips for preventing future cable damage
Keywords: preventing future cable damage, tips and precautions When it comes to preventing future cable damage, there are a few tips and precautions that can help you avoid costly repairs and downtime. First and foremost, it’s important to properly plan and install your cables. This means ensuring that they are installed away from any potential hazards such as sharp objects, heavy machinery, or high-traffic areas.
Additionally, using protective measures such as conduit or cable trays can provide an extra layer of protection. Another important tip is to regularly inspect and maintain your cables. This involves checking for any signs of wear and tear, such as frayed or exposed wires, and promptly addressing any issues that are discovered.
Regularly cleaning your cables can also help prevent damage caused by dirt, dust, or other contaminants that can build up over time. In addition to proper installation and regular maintenance, it’s important to consider the environment in which your cables are located. Extreme temperatures, high humidity, and exposure to chemicals or moisture can all contribute to cable damage.
Taking steps to regulate and control these factors, such as using insulation or climate-controlled enclosures, can help protect your cables from potential damage. Lastly, it’s important to educate and train your employees on proper cable handling and maintenance. This includes teaching them how to properly coil cables, avoid pulling or bending them at sharp angles, and how to safely handle and transport cables.
By ensuring that everyone is aware of the importance of cable care and following proper procedures, you can greatly reduce the risk of future cable damage. In conclusion, preventing future cable damage involves a combination of proper planning and installation, regular inspections and maintenance, considering the environmental factors, and educating your employees. By following these tips and precautions, you can help protect your cables and avoid costly repairs and downtime.
Safety precautions to follow during the repair process
During the repair process, it is crucial to follow safety precautions to ensure the well-being of both yourself and others around you. One important tip is to always wear the appropriate safety gear, such as goggles, gloves, and a helmet, depending on the task at hand. This will protect you from any potential hazards, such as flying debris or harmful chemicals.
Additionally, it is essential to work in a well-ventilated area to prevent the buildup of toxic fumes. When using power tools, make sure to read the instructions carefully and follow them precisely to avoid accidents. It is also important to keep a clean and organized workspace to minimize the risk of tripping or falling.
Lastly, remember to use common sense and take breaks when necessary to prevent fatigue and maintain focus. By following these tips and precautions, you can ensure a safe and successful repair process.
Conclusion
In conclusion, repairing an ATV winch cable is a task that requires patience, attention to detail, and a touch of wit. It’s like a game of unraveling a cable puzzle, where you have to channel your inner detective to figure out the root cause of the problem. With the right tools and a little bit of finesse, you can save yourself from getting tangled in a web of frustration.
Just remember to approach it with a sense of humor and embrace the challenge, because let’s face it, fixing an ATV winch cable is like untangling the mysteries of life – it’s a test of wit and problem-solving skills. So, grab your tools, put on your detective hat, and let the quest for a perfectly functioning winch cable begin!”
Final thoughts on repairing an ATV winch cable
When it comes to repairing an ATV winch cable, there are a few tips and precautions to keep in mind. First of all, always make sure to wear protective gloves and eyewear. This will not only protect your hands and eyes from any potential harm, but it will also provide a better grip when working with the cable.
Secondly, before attempting any repairs, it is important to thoroughly inspect the cable for any signs of damage or wear. This includes checking for frayed strands or kinks in the cable. If you spot any issues, it is best to replace the cable entirely rather than trying to repair it.
Additionally, when repairing the cable, always ensure that it is properly tensioned and secured. This will prevent any accidents or injuries while using the winch. Finally, it is important to regularly maintain and lubricate the cable to prevent rust and maintain its functionality.
By following these tips and taking the necessary precautions, you can effectively repair your ATV winch cable and ensure its longevity and effectiveness.
FAQs
How to repair a damaged ATV winch cable?
To repair a damaged ATV winch cable, start by assessing the extent of the damage. If it’s a minor fray or cut, you can try using a cable repair kit with clamps and sleeves. Follow the instructions provided to secure the damaged area. If the damage is severe or extends to the inner strands of the cable, it’s best to replace the entire cable for safety reasons.
What are common signs of a worn-out ATV winch cable?
Common signs of a worn-out ATV winch cable include visible fraying, kinks or twists in the cable, and loss of strength or tension. If you notice any of these signs, it’s important to address the issue promptly to avoid any accidents or further damage.
Can I repair an ATV winch cable myself or should I seek professional help?
Repairing an ATV winch cable yourself is possible if the damage is minor and you have the necessary tools and expertise. However, it’s recommended to seek professional help if the damage is severe or if you’re unsure about your repair skills. A professional can ensure the cable is repaired or replaced correctly to maintain safety and functionality.
What tools do I need to repair an ATV winch cable?
To repair an ATV winch cable, you’ll need a cable repair kit (including clamps and sleeves), cable cutters or a hacksaw to cut the cable if necessary, pliers for securing the clamps, and a heat gun or blowtorch for applying heat to shrink the sleeves in the repair kit.
How often should I inspect and replace my ATV winch cable?
It’s recommended to inspect your ATV winch cable before each use to check for any signs of wear or damage. If you notice any issues, it’s best to replace the cable immediately. Additionally, it’s a good practice to replace the winch cable every 1-2 years or as specified by the manufacturer to ensure optimal performance and safety.
Are there any safety precautions I should take while repairing an ATV winch cable?
Yes, there are several safety precautions to take while repairing an ATV winch cable. Make sure to disconnect the winch from the power source and ensure the vehicle is in a stable position. Wear safety gloves and goggles to protect your hands and eyes. Follow the instructions provided in the repair kit carefully and avoid any open flames or sparks when working with heat.
Can I use a winch cable repair kit on any type of ATV winch?
Winch cable repair kits are designed to be compatible with most ATV winches. However, it’s important to check the specifications of your specific winch model and compare it with the repair kit before proceeding. If you’re unsure, it’s best to consult the manufacturer or a professional for advice on the most suitable repair method for your particular winch model.