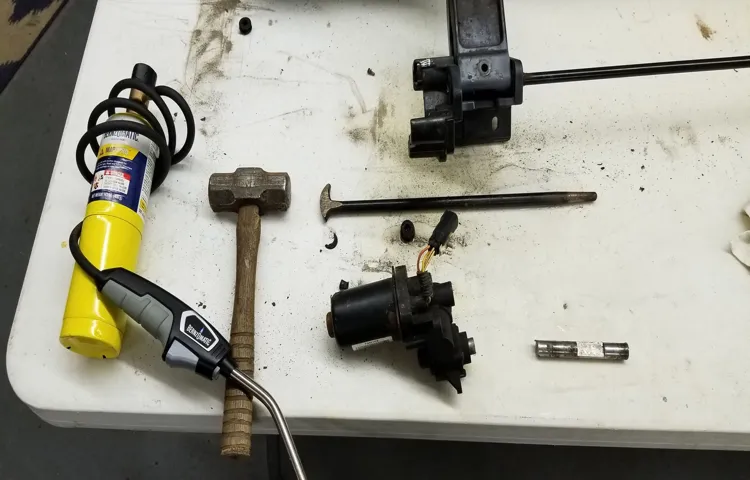
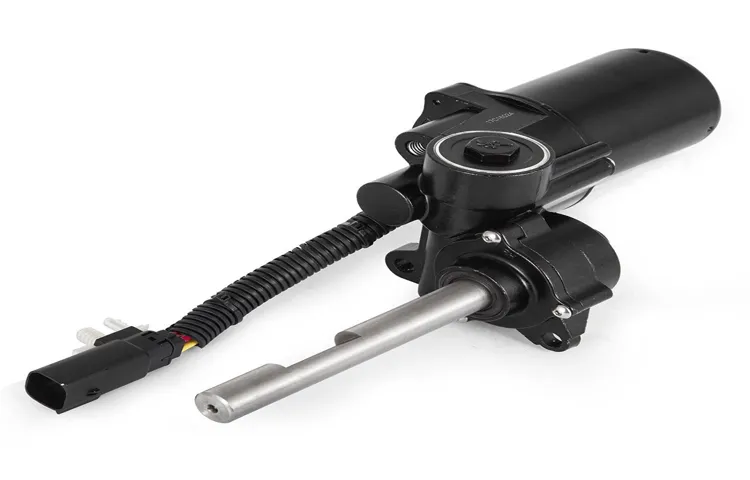
Have you ever encountered issues with your Ford power running board motor and wondered how to remove it? Well, you’re in luck! In this blog, we will guide you through the process step-by-step, so you can easily remove the power running board motor on your Ford vehicle. The power running board motor is responsible for the smooth operation of your running boards. Over time, it may become worn out or malfunction, requiring replacement.
Removing the motor is the crucial first step in this process. Before getting started, it’s important to gather the necessary tools for the job. You will need a set of wrenches, a socket set, and possibly a flathead screwdriver.
Additionally, it is advisable to have a jack and jack stands to elevate the vehicle safely. To begin, locate the power running board motor, which is usually found underneath your vehicle, typically on the driver’s side. Look for a black box attached to the running board assembly.
Next, disconnect the battery to ensure your safety during the removal process. This step is crucial since it will prevent any accidental electrocution. Simply remove the negative terminal from the battery using a wrench or socket.
Once the battery is disconnected, you can proceed to remove the motor. Start by disconnecting any electrical connections attached to the motor. These connectors may vary depending on the model and year of your Ford vehicle, so refer to your owner’s manual for specific instructions.
After disconnecting the electrical connections, you will need to remove the mounting bolts that secure the motor to the running board assembly. Use the appropriate socket or wrench to loosen and remove these bolts. It’s important to support the weight of the motor as you remove the last bolt to prevent it from falling and causing damage.
Table of Contents
Introduction
If you’re having trouble with your Ford power running board motor and need to remove it, you’re in the right place. The power running boards on Ford vehicles are a great convenience feature, but if the motor starts to malfunction, it can be frustrating. Removing the motor is a relatively straightforward process that can be done with some basic tools.
First, locate the motor under the vehicle. It is typically located near the rear wheel on the driver’s side. Once you have located the motor, disconnect the wiring harness and remove any mounting bolts or screws that are holding it in place.
Once the motor is free, carefully remove it from the vehicle. Remember to be cautious and take your time during the removal process to avoid any damage to the motor or your vehicle. With the motor removed, you can either repair or replace it to get your power running boards back in working order.
Overview of Ford Power Running Board Motor
Ford Power Running Board Motor Introduction: The Ford Power Running Board Motor is an essential component in modern vehicles that have power running boards. These running boards are retractable platforms that extend outward when you open the door, providing an extra step for easy entry and exit. The power running board motor is responsible for controlling the movement of the running boards, ensuring smooth operation every time you open or close the door.
Without this motor, the running boards would not be able to extend or retract, making it difficult for passengers to enter or exit the vehicle. In this blog section, we will take a closer look at the functionality and importance of the Ford Power Running Board Motor. So, let’s dive in and explore this crucial piece of technology in more detail.

Materials Needed
Removing the power running board motor from a Ford vehicle is a relatively straightforward process, but you will need a few materials to get started. First and foremost, you will need a socket wrench set with different sizes of sockets to fit the various bolts and screws on the motor. Additionally, you will need a pair of pliers to remove any wiring connectors or clips that are holding the motor in place.
It is also a good idea to have a can of penetrating oil on hand, as some of the bolts may be tightly secured and could benefit from a little extra lubrication. Finally, having a bucket or container to collect any fluids that may leak out during the removal process can help to keep your work area clean. With these materials and a little bit of patience, you will be well-equipped to remove the power running board motor from your Ford vehicle.
List of Tools and Equipment
In order to successfully complete any project or task, it’s important to have the right tools and equipment. Whether you’re a professional or a DIY enthusiast, having the necessary materials on hand can make all the difference. Here is a list of tools and equipment that you might need for various projects:
Basic Hand Tools: This includes items like screwdrivers, hammers, pliers, wrenches, and tape measures. These tools are essential for any household task and can be used for a wide range of projects.
Power Tools: Power tools can help you get the job done faster and more efficiently. Some common power tools include drills, saws, sanders, and routers. These tools can be expensive, but they are worth the investment if you plan on doing a lot of DIY projects.
Safety Equipment: Safety should always be a top priority when working with tools and equipment. Be sure to have safety goggles, gloves, and a dust mask on hand to protect yourself from any potential hazards.
Measuring and Marking Tools: Accurate measurements are crucial for any project. Consider investing in a level, a square, and a measuring tape to ensure that your work is precise.
Painting Supplies: If you’re planning on painting a room or a piece of furniture, you’ll need supplies like brushes, rollers, drop cloths, and painter’s tape.
Additional Materials
To fully engage in a DIY project, it’s essential to have the right materials on hand. When it comes to crafting, there are a few basic items that will come in handy. First and foremost, you’ll need a good pair of scissors.
Whether you’re cutting fabric, paper, or other materials, having a sharp pair of scissors will make the job much easier. Another essential tool for any craft project is a glue gun. A glue gun is perfect for attaching materials together quickly and securely.
You’ll also want to have a variety of paints and brushes on hand for adding color and detail to your projects. Additionally, having a ruler, pencil, and eraser will ensure that your measurements and markings are precise. Finally, don’t forget about safety! It’s important to have protective goggles and gloves on hand to keep yourself safe while working with certain materials.
By having these materials readily available, you’ll be well-prepared for any craft project that comes your way.
Step-by-Step Guide
If you own a Ford vehicle equipped with power running boards, you may find yourself needing to remove the power running board motor at some point. Whether you’re replacing a faulty motor or performing maintenance, the process is relatively straightforward. Here’s a step-by-step guide on how to remove the Ford power running board motor:
Begin by locating the power running board motor. It is typically located underneath the vehicle, on either side, near the running board itself.
Before starting any work, make sure to disconnect the vehicle’s battery to prevent any accidental electrical shock. Next, you’ll need to disconnect the electrical connections to the power running board motor.
This may involve removing any connectors or wiring harnesses that are attached to the motor. Once the electrical connections have been disconnected, you’ll need to remove any mounting bolts or screws that are securing the motor in place.
These bolts can usually be accessed from underneath the vehicle. Carefully slide the power running board motor out from its mounting location.
Be mindful of any wiring or other components that may be in the way. Once the motor is removed, you can either replace it with a new one or perform any necessary repairs or maintenance.
Step 1: Prepare the Vehicle
When it comes to preparing your vehicle for a road trip, there are a few important steps to consider. First, you’ll want to make sure your vehicle is in good working condition. This means checking things like the tires, brakes, and fluids.
Are your tires properly inflated and in good shape? Are your brakes functioning properly? Are your oil, coolant, and other fluids at the correct levels? Taking the time to inspect these things before you hit the road can help prevent any issues or breakdowns along the way. Plus, it will give you peace of mind knowing that your vehicle is ready for the journey ahead. So, take a few moments to give your car a thorough once-over and make any necessary repairs or adjustments before you hit the road.
Your vehicle and your passengers will thank you.
Step 2: Disconnect the Negative Battery Terminal
Disconnecting the negative battery terminal is a crucial step in many automotive tasks, such as changing or servicing the battery, working on the electrical system, or performing maintenance procedures. This step ensures the safety of both the vehicle and the person working on it by preventing any accidental electrical mishaps. When you disconnect the negative battery terminal, you are essentially cutting off the power supply to the vehicle’s electrical system.
It’s like flipping a switch that turns off all the lights in a room. By doing this, you eliminate the risk of electrical currents flowing through the system and causing any unintended accidents. Think of it as unplugging an appliance before working on it to avoid getting shocked.
So, let’s delve into the step-by-step process of disconnecting the negative battery terminal, so you can perform your automotive tasks with confidence and safety!
Step 3: Locate the Power Running Board Motor
power running board motor, power running boards, locate, step-by-step guide
Step 4: Remove the Motor Connector
Now that you have detached the back panel of your washing machine and exposed the motor, it’s time to remove the motor connector. This connector is responsible for transmitting power and signals between the motor and the control panel. It is essential to remove this connector properly to avoid any damage or electrical hazards.
Start by locating the motor connector, which is usually attached to the motor itself. Carefully examine the connector to identify any locks or latches that are holding it in place. In most cases, you will find a small tab or lever that needs to be released to unlock the connector.
Gently press or pull this tab to unlock the connector. Once the connector is unlocked, you can begin to remove it. Slowly and steadily pull the connector away from the motor.
Be mindful of any resistance or tightness while removing the connector. If it feels stuck, double-check for any additional locks or releases that may be holding it in place. If the connector still won’t budge, you may need to use a small screwdriver to carefully pry it loose.
However, exercise caution to avoid damaging the connector or the motor. Once the connector is successfully removed, take a moment to inspect it for any signs of wear or damage. Look for any loose wires or frayed connections that may need repair or replacement.
With the motor connector removed, you can now proceed to the next step in troubleshooting or repairing your washing machine. Whether it’s fixing a faulty motor or replacing a damaged connector, you are well on your way to restoring your washing machine to its full functionality.
Step 5: Remove the Motor Mounting Bolts
When it comes to removing the motor mounting bolts, it’s important to approach the task with caution and care. These bolts keep the motor securely in place, so you want to make sure you don’t damage them in the process. Begin by locating the motor mounting bolts, which are typically found on either side of the motor.
Most motors have anywhere from two to four mounting bolts. Once you’ve found them, grab a wrench or socket set that fits the bolts and begin loosening them. It’s a good idea to start with the top bolts first, as this will help to ensure the motor remains stable as you remove the remaining bolts.
As you loosen each bolt, be sure to keep an eye on the motor to make sure it doesn’t shift or tilt. Once all of the bolts are loosened, you can fully remove them and set them aside. With the motor mounting bolts removed, you’ll be able to access the motor more easily for any necessary repairs or maintenance tasks.
Step 6: Remove the Power Running Board Motor
power running board motor, remove power running board motor, step-by-step guide
Safety Precautions
If you find that your Ford power running board motor is malfunctioning and needs to be removed, there are a few safety precautions you should take before starting the process. First and foremost, always make sure the vehicle is parked on a level surface with the engine turned off and the parking brake engaged. This will prevent any accidental movement of the vehicle while you are working.
Additionally, it is advisable to wear protective gloves and safety glasses to protect yourself from any potential hazards. It is also important to disconnect the vehicle’s battery before attempting to remove the power running board motor to avoid any electrical shocks or injuries. By following these safety precautions, you can ensure a safe and successful removal of the Ford power running board motor.
Wear Safety Gloves and Glasses
safety gloves and safety glasses, wear safety gloves, wear safety glasses Gone are the days when safety gloves and glasses were considered optional accessories for certain professions. Today, the importance of wearing safety gloves and glasses cannot be emphasized enough. Whether you are working in a construction site, handling hazardous materials, or even doing simple household chores, these protective gears are essential to ensure your safety.
Safety gloves are designed to protect your hands from various types of injuries. They provide a barrier against cuts, abrasions, and even chemical exposure. Imagine the damage that can be done to your hands if you accidentally come into contact with sharp objects or corrosive substances.
Safety gloves not only prevent such injuries but also provide a better grip, allowing you to handle objects with ease and precision. Similarly, safety glasses play a crucial role in protecting your eyes from potential hazards. Whether it’s dust, debris, or harmful chemicals, your eyes are vulnerable to a wide range of dangers.
Wearing safety glasses can shield your eyes from flying particles and splashes, preventing eye injuries that could have long-lasting consequences. By wearing safety gloves and glasses, you are taking proactive measures to prioritize your safety and well-being. These simple yet effective gears can significantly reduce the risk of accidents, injuries, and even permanent damage.
Remember, prevention is always better than cure, and investing in safety gear is a small price to pay for your peace of mind. So the next time you find yourself in a situation that could potentially harm your hands or eyes, don’t hesitate to wear safety gloves and glasses. They are not just fashion accessories but powerful tools that safeguard your health and protect you from harm.
Prioritizing your safety is essential, and safety gears like gloves and glasses are your best defense against potential risks. Stay safe, be smart, and always wear your safety gloves and glasses!
Do Not Rush the Removal Process
removal process, safety precautions
Conclusion
So there you have it, folks. Removing a Ford power running board motor may seem like a daunting task, but fear not! With a little determination and some handy tools, you can feel like a superhero taking down a villainous motor in no time. Just remember to disconnect the battery, arm yourself with the right tools, and take your time to carefully maneuver around those pesky bolts.
And if all else fails, don’t be afraid to call on your trusty sidekick, a knowledgeable friend or mechanic, to lend a hand. With their help and these tips, you’ll have that power running board motor removed quicker than you can say “Avengers, assemble!” Happy motor removing, fellow Ford enthusiasts!”
Summary of the Removal Process
safety precautions, removal process, hazardous materials, protective gear, ventilation system, risk-free, handling, proper disposal, potential dangers, health hazards, PPE In any removal process, safety precautions should always be a top priority. Whether you are dealing with hazardous materials, toxic substances, or any other potentially harmful substances, taking the necessary precautions is crucial to ensure a risk-free environment. One of the first steps in ensuring safety is to provide the proper protective gear to all individuals involved in the removal process.
This includes gloves, goggles, masks, and any other required personal protective equipment (PPE). Additionally, it is important to have a well-ventilated area, either through natural ventilation or a ventilation system, to minimize the risk of inhaling harmful fumes or particles. Handling hazardous materials should be done with extreme care and caution, as one wrong move could result in serious health hazards.
Once the removal process is complete, proper disposal of the materials is essential to prevent any potential dangers to the environment or human health. By taking these safety precautions, the removal process can be carried out smoothly and efficiently while minimizing any potential risks.
Troubleshooting Tips
“Troubleshooting Tips: Safety Precautions for a Smooth Experience” When it comes to troubleshooting, it’s essential to prioritize safety precautions. After all, dealing with technical issues can sometimes involve electricity, moving parts, or potentially hazardous materials. By taking some simple steps to ensure your safety, you can get back to enjoying a smooth and hassle-free experience.
First and foremost, always start by disconnecting the power source. Whether you’re dealing with a malfunctioning appliance or a computer that won’t turn on, unplugging it from the power outlet should be your first instinct. This will eliminate any risk of electric shock and give you a safe working environment.
In addition to disconnecting the power, it’s also crucial to wear appropriate personal protective equipment (PPE). Depending on the task at hand, PPE may include safety glasses, gloves, a mask, or even a helmet. Always assess the potential risks involved in your troubleshooting process and choose the necessary protective gear accordingly.
Furthermore, be sure to work in a well-ventilated area. Some troubleshooting tasks may involve the release of fumes or fine particles, which can be harmful if inhaled. By working in a ventilated space, you’ll minimize your exposure to any potentially hazardous substances and protect your respiratory system.
Lastly, don’t hesitate to seek professional help if you’re unsure or uncomfortable with a particular troubleshooting task. Some issues may require specialized knowledge or tools that are best handled by experts. It’s better to be safe than sorry, so reach out to professionals who can assist you in resolving the problem safely and efficiently.
Remember, troubleshooting can be a rewarding experience, but it’s important to prioritize safety every step of the way. By following these simple precautions and taking the necessary steps to protect yourself, you can enjoy the satisfaction of successfully troubleshooting your way through technical issues while keeping yourself out of harm’s way.
Additional Resources
Safety Precautions: Ensuring Your Well-being during Outdoor Activities When it comes to enjoying outdoor activities, ensuring your safety should always be a top priority. Whether you’re hiking, camping, biking, or participating in any other outdoor adventure, taking the necessary precautions can make all the difference. First and foremost, it’s essential to research and plan ahead.
Familiarize yourself with the location, weather conditions, and any potential hazards or risks. Additionally, always pack a well-stocked first aid kit and carry essential safety equipment, such as a whistle, flashlight, and map. It’s also important to dress appropriately for the activity and weather, wearing comfortable and sturdy shoes, and layering up if necessary.
Remember to inform trusted individuals about your plans, including your expected return time, and check in with them regularly to provide updates on your status. While enjoying your outdoor adventure, stay hydrated by drinking plenty of water and have snacks readily available to maintain your energy levels. Finally, listen to your body and know your limits, taking breaks when needed and avoiding pushing yourself too hard.
By following these safety precautions, you can enjoy your outdoor activities while minimizing the risks and ensuring your well-being.
FAQs
What is a Ford power running board motor and why would I need to remove it?
A Ford power running board motor is a component that controls the movement of the running boards on certain Ford vehicles. You may need to remove it if it becomes faulty and needs to be replaced or repaired.
How do I identify if my Ford vehicle has a power running board motor?
To identify if your Ford vehicle has a power running board motor, look for retractable running boards that automatically extend when the vehicle doors are opened. These running boards are usually equipped with a motor that powers their movement.
Can I remove the power running board motor myself or should I take it to a professional mechanic?
Removing the power running board motor can be a complex task, so it is recommended to take it to a professional mechanic who has experience working with Ford vehicles. They will have the necessary tools and knowledge to safely remove the motor without causing any damage.
What tools will I need to remove the Ford power running board motor?
The specific tools required may vary depending on the model of your Ford vehicle, but common tools that may be needed include socket wrenches, screwdrivers, and pliers. It is best to consult the vehicle’s manual or seek professional advice to determine the exact tools needed.
Are there any precautions I should take before removing the power running board motor?
Before removing the power running board motor, disconnect the vehicle’s battery to prevent any electrical shorts or accidents. It is also important to follow safety guidelines and wear protective gear, such as gloves and eye goggles, to avoid any injuries.
Can I simply disconnect the power running board motor without removing it completely?
Yes, if you only want to disable the power running board motor temporarily, you can disconnect its wiring harness located near the motor. This will prevent the motor from functioning and therefore disable the running boards’ movement.
Are there any troubleshooting steps I can take before deciding to remove the power running board motor?
Yes, before removing the power running board motor, you can try troubleshooting steps such as checking the fuse related to the motor, inspecting the wiring harness for any damage or loose connections, and ensuring there are no obstructions preventing the running boards from moving properly.


