
If you’ve ever driven a vehicle with a trailer hitched to the back, then you know the importance of having an equalizer hitch. This device helps distribute the weight of the trailer evenly across your vehicle, making for a smoother and safer ride. But what happens when it’s time to take off that equalizer hitch? Don’t worry – we’ve got you covered.
In this blog post, we’ll guide you through the step-by-step process of removing an equalizer hitch, ensuring that you can do it with ease and confidence. So, let’s dive in and get your trailer ready for the road!
Table of Contents
Introduction
If you’re new to towing trailers or RVs with a weight distribution hitch, you may find yourself wondering how to take off the equalizer hitch. Don’t worry, it’s actually quite a simple process once you understand the steps involved. First, you’ll need to release the tension on the spring bars by removing the weight from them.
This can be done by lowering the tongue of the trailer or RV using the trailer jack. Once the tension is released, you can remove the pins holding the spring bars in place and slide them out. Next, you’ll need to remove the hitch head from the receiver on your tow vehicle.
This can usually be done by removing the pins or bolts that hold it in place and lifting it off. Finally, you can detach the trailer or RV from the hitch ball by releasing any latches or pins that are holding it in place. With these steps completed, you’ll have successfully taken off the equalizer hitch and can safely store it until your next towing adventure.
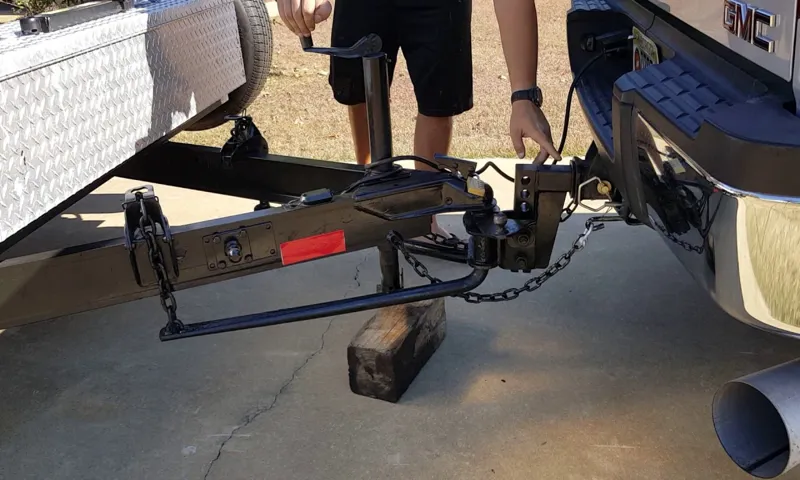
Explanation of an Equalizer Hitch
equalizer hitch
Importance of Properly Removing an Equalizer Hitch
Equalizer hitch, properly removing, importance, trailer stability Introduction: Removing an equalizer hitch may seem like a simple task, but it is essential to do it properly to ensure the safety and stability of your trailer. An equalizer hitch is a device that connects your trailer to the towing vehicle, distributing the weight evenly and improving stability while towing. When it comes time to remove the hitch, following the correct procedure is crucial to avoid damaging the hitch or putting yourself at risk.
In this blog post, we will explore the importance of properly removing an equalizer hitch and discuss the steps to do it safely and efficiently.
Step 1: Prepare the Trailer
Before attempting to take off an equalizer hitch, it’s important to properly prepare the trailer. Begin by parking the trailer on a level surface and engaging the parking brake. Next, make sure the trailer is detached from the tow vehicle and that the weight distribution bars are disengaged.
This will make it easier to remove the hitch. To take off the equalizer hitch, start by disconnecting the safety chains and breakaway cable. Then, use a socket wrench to remove the bolts or pins that secure the hitch head to the trailer tongue.
Once the hitch head is removed, lift the spring bars off the L-brackets on the trailer frame. Finally, remove the L-brackets and any additional components such as sway control bars or weight distribution bars. Taking the time to properly prepare the trailer before removing the equalizer hitch will ensure a smooth and safe process.
Park the Trailer on a Level Surface
park the trailer on a level surface
Lower the Tongue Jack
tongue jack, trailer, lower, prepare, step 1, Lowering the tongue jack is an essential step in preparing your trailer for use. The tongue jack is located at the front of the trailer and is used to raise and lower the trailer’s tongue. This allows you to easily attach and detach the trailer from your vehicle.
Before you lower the tongue jack, it’s important to make sure the trailer is properly prepared. This includes ensuring that the trailer is on a level surface and that the hitch is securely attached to the vehicle. Once you’ve taken these steps, it’s time to lower the tongue jack.
This can typically be done by using a crank handle to turn the jack in a counterclockwise motion. As you turn the crank, you’ll notice that the trailer’s tongue begins to lower. It’s important to lower the tongue jack slowly and carefully to ensure that the trailer remains stable.
Once the tongue is low enough, you can proceed with attaching the trailer to your vehicle or performing any other necessary tasks. So always remember, before you hit the road, take the time to properly prepare your trailer and lower the tongue jack for a safe and successful journey.
Disconnect the Safety Chains and Electrical Connection
Now that we’ve covered the basics of preparing your trailer for towing, it’s time to move on to the first step in disconnecting the safety chains and electrical connection. This step is essential for safe and successful towing. Before disconnecting the safety chains and electrical connection, it’s crucial to prepare your trailer.
Start by parking it on a level surface to ensure stability. If needed, chock the wheels to prevent any accidental movement. Next, engage the parking brake on both the trailer and the towing vehicle.
This will add an extra layer of safety during the disconnection process. Once the trailer is secured, it’s time to disconnect the safety chains. These chains are an important backup in case the trailer becomes detached from the towing vehicle.
Simply unhook the chains from their attachment points on the trailer hitch. Make sure to do this slowly and carefully, as the chains may be under tension. Once the chains are disconnected, be sure to secure them so they don’t drag on the ground or get tangled up.
After the safety chains are taken care of, it’s time to disconnect the electrical connection. This connection allows the towing vehicle to communicate with the trailer’s lights and brakes. Depending on the type of connection, you may need to press a release button or slide a lever to disconnect the plug.
Again, take care to disconnect this slowly and gently to avoid any damage to the wiring. By completing these steps, you’ll have successfully disconnected the safety chains and electrical connection, ensuring a safe and smooth towing experience. Remember to always follow the manufacturer’s instructions for your specific trailer and towing vehicle, as they may have additional steps or precautions to consider.
Step 2: Loosen the Weight Distribution Bars
So you’ve got an Equalizer hitch and you’re looking to take it off, but you’re not quite sure where to start. Well, the first step in removing an Equalizer hitch is to loosen the weight distribution bars. These bars are what help distribute the weight of your trailer evenly across the tow vehicle, helping to create a smoother and more stable ride.
To begin, you’ll want to start by removing the clip or pin that is securing the weight distribution bars to the hitch head. This will allow you to lift the bars up and out of the hitch head. Next, you’ll want to use the lever or wrench that came with your Equalizer hitch to loosen the tension on the bars.
By turning the lever or wrench counterclockwise, you’ll be able to loosen the weight distribution bars, making them easier to remove. Once the bars are loosened, you can then remove them completely by sliding them out of the hitch head. And with that, you’ve successfully completed step two in removing your Equalizer hitch.
Locate the Weight Distribution Bars and Sway Control
In order to properly distribute the weight and control the sway of your trailer, it’s important to locate and loosen the weight distribution bars. These bars are a vital component of your towing setup and play a crucial role in ensuring a safe and stable towing experience. To begin, you’ll want to locate the weight distribution bars, which are typically attached to the frame of your trailer.
They are designed to transfer the weight of your cargo from the rear of the trailer to the front axle of your towing vehicle, which helps to maintain proper balance and control while on the road. Once you’ve located the bars, it’s time to loosen them. This is an important step to ensure that the weight distribution system is functioning properly and provides the necessary level of stability.
Loosening the bars allows for greater flexibility and movement, which is essential for absorbing any uneven terrain or sudden shifts while towing. It’s important to note that while loosening the weight distribution bars increases flexibility, it should be done in moderation. Over-loosening can lead to instability and sway, while under-loosening can limit the effectiveness of the system.
Finding the right balance is key. By following these steps and properly loosening the weight distribution bars, you’ll be well on your way to a safer and more controlled towing experience. Remember, always consult your owner’s manual or seek professional guidance if you’re unsure about any steps in the process.
Happy towing!
Use a Wrench to Loosen the Bolts on the Weight Distribution Bars
weight distribution bars, weight distribution hitch, tow vehicle, weight distribution system, towing capacity, weight distribution process, equal distribution, weight distribution hitch head, towing experience, weight distribution bars bolts, trailer tongue weight, anti-sway control, spring bars, weight transfer. In step two of the weight distribution process, we will guide you through the process of loosening the bolts on the weight distribution bars. This step is vital to ensure that the weight distribution system functions properly and provides you with a smoother towing experience.
To begin, you will need a wrench to loosen the bolts on the weight distribution bars. These bolts secure the spring bars to the weight distribution hitch head. By loosening these bolts, you allow for the weight transfer to occur, which helps in achieving equal distribution between your tow vehicle and the trailer.
As you start loosening the bolts, you may encounter some resistance. This is normal, as the weight distribution bars are designed to provide stability and support. However, with a little bit of elbow grease, you will be able to loosen the bolts and adjust the weight distribution as needed.
Remember, the purpose of a weight distribution system is to evenly distribute the weight of the trailer tongue across the axles of both the tow vehicle and the trailer. This helps to maintain the stability and control of your towing setup, especially when it comes to minimizing trailer sway. Loosening the bolts on the weight distribution bars is an essential step in the weight distribution process.
It helps to achieve the proper weight distribution and ensures a safer and more comfortable towing experience. So grab your wrench, roll up your sleeves, and let’s get those bolts loosened for a smoother ride down the road!
Remove any Pins Holding the Sway Control in Place
When it comes to towing a trailer, ensuring weight distribution and sway control is crucial for a safe and comfortable journey. In this step-by-step guide, we will cover how to loosen the weight distribution bars on your trailer. After removing any pins holding the sway control in place, the next step is to focus on the weight distribution bars.
These bars are responsible for distributing the weight of the trailer evenly between the tow vehicle and the trailer’s axles. By doing so, they help to stabilize the trailer and prevent swaying or fishtailing while on the road. To loosen these bars, you will need to locate the tensioning controls on either side of the hitch head.
These controls can typically be adjusted using a wrench or a specialized tool provided with your weight distribution system. By loosening the tension on the bars, you are essentially allowing them to pivot more freely, which will make it easier to remove them later on in the process. So, grab your tool and let’s get those weight distribution bars loosened up!
Step 3: Remove the Hitch Ball
So, you’ve successfully detached the weight distribution bars from your equalizer hitch. Great job! Now, it’s time to move on to the next step: removing the hitch ball. The hitch ball is the component that attaches to your trailer’s coupler and allows it to be connected to the hitch receiver on your tow vehicle.
To remove the hitch ball, you’ll need a few tools: a wrench or socket set that fits the nuts on the ball mount, and possibly a pair of pliers if the nuts are stubborn. Start by locating the nuts on the underside of the ball mount. These nuts keep the hitch ball secure, so you’ll need to remove them in order to take off the ball.
Once you have your tools ready, use the wrench or socket set to loosen and remove the nuts. If the nuts are rusted or stuck, you may need to apply some penetrating oil and give them a little extra effort. Once the nuts are off, the hitch ball should slide out easily from the ball mount.
If it’s being stubborn, you can use the pliers to help give it a little tug. Just be careful not to damage the threads or the ball mount itself. Voila! With the hitch ball removed, you’ve successfully completed the third step in taking off your equalizer hitch.
Now, you’re one step closer to being ready for your next towing adventure. Keep up the great work!
Use a Wrench to Loosen and Remove the Hitch Ball
hitch ball, remove, wrench, loosen Imagine you’ve just finished a long road trip and the time has come to remove the hitch ball from your vehicle. You might be wondering how to go about this task, but fear not! The process is relatively simple and requires just a few tools. The first step is to locate the hitch ball, which is typically found on the rear bumper.
Once you’ve located it, the next step is to use a wrench to loosen and remove the hitch ball. A wrench, with its sturdy design and adjustable grip, is the perfect tool for this job. By placing the wrench over the bolts securing the ball, you can easily turn it counterclockwise to loosen them.
As you loosen the bolts, you’ll notice that the ball becomes more and more detached from the vehicle. With a bit of strength and a few more turns of the wrench, the hitch ball will eventually come free. It’s important to work slowly and steadily during this process to ensure that the hitch ball is safely removed without causing any damage.
So don’t let the thought of removing a hitch ball leave you feeling overwhelmed. With a trusty wrench in hand, you’ll have the hitch ball removed in no time!
Step 4: Unhook the Spring Bars
Now that you’ve successfully detached the sway control and raised the trailer, it’s time to move on to the next step: unhooking the spring bars. The spring bars are a crucial part of the equalizer hitch as they distribute the weight evenly across all axles, reducing sway and improving stability during towing. To remove the spring bars, start by releasing the tension on the snap-up brackets.
This can typically be done by using a pry bar or a specially-designed tool. Once the tension is released, carefully unhook the spring bars from the trailer frame using the attached pins or clips. It’s important to be cautious during this step as the spring bars can be heavy and exert a significant amount of force.
Make sure to have a firm and secure grip on the spring bars before removing them completely. Once the spring bars are unhooked, you can store them safely until you are ready to reattach the equalizer hitch. Congratulations! You’re now one step closer to properly removing your equalizer hitch.
Use a Wrench or Socket to Loosen and Remove the Spring Bars
When it comes to removing the spring bars from a watch, using a wrench or socket is the way to go. These tools provide the necessary grip and torque to easily loosen and remove the spring bars. To start, you’ll need to locate the spring bars on your watch strap.
They are small metal bars that hold the strap or bracelet in place. Once you’ve identified them, place the wrench or socket on the end of the spring bar and turn it counterclockwise to loosen it. Be careful not to apply too much pressure, as you don’t want to damage the spring bar or the watch.
Once the spring bar is loose, you can easily unhook it from the ends of the watch strap or bracelet. Gently pull the spring bar out of the holes on the watch and set it aside. Repeat this process for the other end of the strap or bracelet to completely remove it.
Using a wrench or socket makes removing the spring bars a breeze and ensures that your watch strap or bracelet can be easily replaced or adjusted as needed. So go ahead, grab your tools, and give it a try!
Step 5: Lift Up and Remove the Hitch
To disconnect an equalizer hitch and remove it from your vehicle, you’ll need to follow a few simple steps. The first step is to make sure your vehicle is parked on a level surface and the trailer is unhitched. Next, locate the hitch head and release the spring bars by unhooking the safety chains and undoing the snap-up lever.
Then, use a jack to lift the trailer and remove the weight from the hitch. Now, you can remove the hitch ball from the coupler by loosening the nut and sliding it out. Finally, use the jack to lift the hitch off the ball mount and disconnect the brackets from your vehicle’s frame.
With these steps completed, you’ll have successfully taken off your equalizer hitch. Remember to store the hitch in a secure location and keep it properly maintained for future use.
Attach a Tow Vehicle or Jack to Lift the Hitch off the Trailer Tongue
Remove hitch from trailer. Now that you have disconnected all the electrical and safety connections, it’s time to remove the hitch from the trailer tongue. This can be a bit tricky, as the hitch is heavy and may require some effort to lift it off.
To make the process easier, you can attach a tow vehicle or use a jack to lift the hitch off the trailer tongue. If you have a tow vehicle, simply back it up to the trailer hitch and attach it using the appropriate connection. If you don’t have a tow vehicle available, you can use a jack to lift the hitch off the tongue.
Position the jack under the hitch, making sure it is secure and stable. Slowly crank the jack to lift the hitch off the tongue. Be careful not to lift too quickly or jerk the jack, as this could cause the trailer to become unstable.
Once the hitch is lifted off the tongue, carefully slide it out from under the trailer. Make sure to support the hitch with your hands or have someone help you to prevent any injuries or damage. Removing the hitch from the trailer is an important step in the process of disconnecting your trailer.
By following these steps and using the appropriate equipment, you can safely and efficiently remove the hitch and prepare your trailer for storage or transportation.
Carefully Lift the Hitch and Remove it from the Trailer
Removing the hitch from a trailer can be a bit tricky if you’re not familiar with the process, but with a little patience and careful maneuvering, it can be done. Once you have detached the trailer from your vehicle, it’s time to tackle the hitch removal. The first thing you’ll want to do is ensure that the trailer is secure and stable.
This might involve chocking the wheels or using a leveling jack to keep it in place. Once you’re confident the trailer is secure, you can begin the process of removing the hitch. Start by carefully lifting the hitch with both hands, making sure to maintain a firm grip.
Slowly and steadily, lift the hitch away from the trailer, keeping your back straight and using your leg muscles to do the heavy lifting. It’s important to use proper technique to avoid straining your back or causing injury. As you lift the hitch, pay attention to any resistance or sticking points.
If you encounter any, take a moment to assess the situation and adjust your approach if necessary. Once the hitch is fully lifted, you can set it aside in a safe area away from the trailer. And just like that, the hitch is removed, and you can move on to the next step in preparing your trailer for storage or maintenance.
Removing the hitch may take a little effort, but with the right technique and a steady hand, it can be done quickly and safely. So go ahead and give it a try, and before you know it, you’ll have that hitch off and ready for whatever comes next.
Conclusion
So, there you have it – the foolproof guide on how to take off an equalizer hitch. Remember, this process requires grace, precision, and a touch of patience. Just like unraveling a complex equation or untying a stubborn knot, taking off an equalizer hitch is a delicate dance that requires finesse and finesse alone.
So, grab your toolbox, summon your inner MacGyver, and get ready to liberate your trailer from the clutches of this hitching contraption. But let’s be real for a moment – removing an equalizer hitch is no walk in the park. It’s a bit like trying to solve a Rubik’s Cube while riding a unicycle and juggling flaming swords.
You need to be both a mechanical genius and a Jedi master of leverage. One wrong move and you could find yourself in a tangled mess of steel and chains, desperately searching for the nearest chiropractor. But fear not, intrepid traveler of the open road! With a little guidance and a dash of wit, you’ll be able to conquer this hitch with the same ease and finesse of a prima ballerina pirouetting across the stage.
Just remember to approach the task with confidence, a sprinkle of caution, and a pinch of humor – after all, laughter is the best lubricant for any mechanical endeavor. So, take a deep breath, steady your hands, and prepare to unlock the mysteries of the equalizer hitch. With these steps as your trusty sidekick, you’ll be ready to bid adieu to the weight distribution bars, the pesky chains, and the metal contraption that has held your trailer captive for far too long.
Remember, it’s all about finding the right balance, just like in life. So, as you twist, turn, and dismantle the equalizer hitch, remember to approach it with the same charm and wit that you navigate the twists and turns of this crazy journey called life. And once you’ve finally succeeded in freeing your trailer from the grip of this mechanical beast, take a moment to revel in your triumph.
Feel the satisfaction of a job well done, and bask in the glory of your newfound hitch-removing expertise. So, go forth, my fellow adventurers, and conquer the equalizer hitch with the fearless determination of a seasoned mechanic and the quick wit of a stand-up comedian. With a sprinkle of knowledge, a dash of humor, and a heaping spoonful of patience, you’ll be able to tackle any hitch that comes your way.
Tips for Safe and Efficient Removal of an Equalizer Hitch
“equalizer hitch,” “safe removal,” “efficient removal,” “lift up,” “remove the hitch” In Step 5 of removing an Equalizer hitch, it’s time to lift up and remove the hitch itself. This step is crucial, as it ensures that the weight distribution system is properly disengaged and ready to be removed. To lift up the hitch, you’ll want to use a hydraulic jack or a hitch stand, depending on the weight of the hitch.
It’s important to be mindful of your posture and use proper lifting techniques to prevent any strain or injury. Once the hitch is lifted, you can carefully slide it out of the receiver. Remember to keep a firm grip and maintain control of the hitch as you remove it, as it can be quite heavy.
By following these steps, you can safely and efficiently remove your Equalizer hitch without any hassle.
Proper Storage and Maintenance of an Equalizer Hitch
proper storage and maintenance of an equalizer hitch, lift up and remove the hitch
FAQs
How do I take off an equalizer hitch?
To take off an equalizer hitch, first make sure your trailer is parked on a level surface. Remove the weight distribution bars by lifting them off the hitch head and either placing them on the ground or storing them securely. Next, detach the spring arms from the trailer frame by releasing the clips or pins. Finally, lower the trailer hitch coupler onto the hitch ball and disconnect any safety chains.
What tools do I need to remove an equalizer hitch?
The tools you will need to remove an equalizer hitch include a wrench or socket set for removing the bolts or nuts securing the hitch head to the trailer frame, a hitch pin or clip for removing the hitch ball from the trailer coupler, and possibly a pry bar or rubber mallet for loosening or adjusting any tight or stuck components.
Can I remove an equalizer hitch by myself, or do I need help?
It is possible to remove an equalizer hitch by yourself, but it can be easier and safer with the assistance of another person. Having someone to help guide you and provide extra support can make the process smoother and reduce the risk of injury or damage.
Should I remove my equalizer hitch when not towing?
It is generally recommended to remove your equalizer hitch when not towing for several reasons. Firstly, it can make maneuvering and parking your trailer easier and less restricted. Secondly, removing the hitch reduces the risk of theft or tampering. Lastly, it can prevent unnecessary wear and tear on the hitch components and prolong their lifespan.
How often should I inspect and maintain my equalizer hitch?
It is important to regularly inspect and maintain your equalizer hitch to ensure safe and efficient towing. Check for any signs of wear, such as loose or damaged components, rust, or excessive movement. Lubricate moving parts as recommended by the manufacturer, and verify that all bolts and nuts are tightened to the specified torque. Perform a thorough inspection before each towing trip and address any issues promptly.
Can I use the same equalizer hitch for different trailers?
In some cases, you can use the same equalizer hitch for different trailers, as long as they have compatible hitch couplers and weight ratings. However, it is important to adjust the hitch settings and weight distribution properly for each specific trailer to ensure safe and stable towing. Consult the hitch manufacturer’s guidelines and consider seeking professional advice if uncertain.
What are the benefits of using an equalizer hitch?
Using an equalizer hitch can provide several benefits for towing. It helps distribute the weight of the trailer more evenly across the tow vehicle and trailer axles, which can improve stability, handling, and braking performance. It can also minimize trailer sway and reduce the potential for fishtailing, making towing safer and more comfortable. Additionally, an equalizer hitch can help level the tow vehicle and trailer combination, enhancing visibility and reducing wear on tires and suspension.