
Are you familiar with ATV winches? These powerful machines are often used for off-road adventures and hauling heavy loads. One crucial component of an ATV winch is the switch, which allows you to control the winch’s movements. But how do you know if the switch is working properly? In this blog, we will explore the process of testing an ATV winch switch.
Imagine you are deep in the wilderness, stuck in a mud pit, and relying on your ATV winch to save the day. You reach for the switch, but nothing happens. Panic sets in as you wonder if the switch is malfunctioning.
Is there a way to test it before you find yourself in a dire situation? Testing an ATV winch switch is a critical step in ensuring its functionality. A faulty switch could leave you stranded or unable to complete necessary tasks. By following a few simple steps, you can determine whether your switch is in good working order or if it requires repairs or replacement.
In this blog, we will guide you through the process of testing an ATV winch switch, step by step. We will discuss the tools you will need, the safety precautions to take, and the specific tests you can perform to evaluate the switch’s performance. By the end of this blog, you will feel confident in your ability to diagnose any issues with your ATV winch switch.
So, whether you are a seasoned ATV enthusiast or a beginner looking to gain some knowledge, join us as we dive into the fascinating world of ATV winch switches. Let’s begin our exploration of how to test an ATV winch switch and ensure that your off-roading adventures are safe and successful.
Table of Contents
Introduction
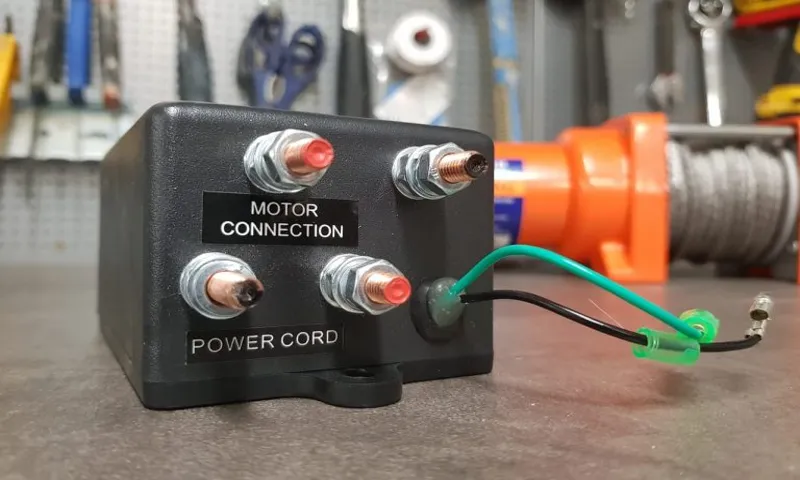
If you own an ATV with a winch, it’s important to know how to test the winch switch to ensure it is functioning properly. The winch switch is the device that controls the movement of the winch, allowing you to pull in or let out the cable. Testing the winch switch is fairly simple and can be done with a few basic tools.
First, you will need to locate the winch switch on your ATV. It is typically mounted somewhere on the handlebars for easy access. Once you have located the switch, you can begin the testing process.
One way to test the switch is to use a multimeter. Set the multimeter to the “ohms” setting and touch the probes to the terminals on the switch. If the switch is working properly, the multimeter should show a reading of zero ohms when the switch is in the “on” position and infinity or a high resistance reading when the switch is in the “off” position.
Another method to test the switch is by using a test light. Connect one end of the test light to the positive terminal on the battery and touch the probe of the test light to the terminal on the winch switch. If the switch is working correctly, the test light will illuminate when the switch is turned on and will not illuminate when the switch is turned off.
By testing the winch switch regularly, you can ensure that it is functioning properly and avoid any issues when you need to use your ATV winch.
What is an ATV Winch Switch?
ATV winch switch. Introduction: An ATV winch switch is a crucial component of an ATV winch system. It is a specialized switch designed to control the movement and operation of the winch.
The switch allows the user to control the winch wirelessly, making it a convenient and essential tool for ATV enthusiasts. When you find yourself in a sticky situation on the trails, an ATV winch can be a lifesaver. Whether you’re stuck in mud or need to haul heavy loads, a winch can pull you out of trouble.
But to operate the winch effectively, you need a reliable switch that allows you to control its functions. That’s where the ATV winch switch comes into play. Think of the ATV winch switch as the remote control for your winch.
It allows you to control the direction and speed of the winch wirelessly, making it incredibly convenient. No more reaching down to the winch itself and manually operating it. With the winch switch in hand, you can operate the winch from a safe distance, keeping you out of harm’s way.
The ATV winch switch is typically designed with user-friendly functions and controls. It may have buttons for forward and reverse movements, as well as a power button to turn the winch on and off. Some switches also come with additional features like an LED indicator to show power status or a built-in circuit breaker to protect the winch from overload.
Installing an ATV winch switch is relatively simple. It usually involves connecting the switch to the winch’s control box using cables. Once installed, you can mount the switch on your ATV’s handlebar or any other convenient location within reach.
Why is it important to test the switch?
switch testing, importance of testing the switch. Introduction: Testing the switch is a crucial step in ensuring the smooth functioning and reliability of any electrical system. Whether it’s a light switch in your home or a complex network switch in a large organization, conducting thorough testing is essential.
By testing the switch, you can detect any potential issues or faults before they cause major problems. This not only helps in preventing downtime and expensive repairs but also ensures the safety of the users. In this blog post, we will discuss why it is important to test the switch and the benefits it offers in maintaining a robust electrical system.
Materials and Tools Needed
To test an ATV winch switch, you will need a few materials and tools. First, you’ll need a voltmeter or multimeter to measure the voltage. This device allows you to check if the switch is functioning properly.
You’ll also need a set of pliers, a screwdriver, and electrical tape. These tools come in handy for removing the switch cover, accessing the wiring, and securing any loose connections. Additionally, having a wiring diagram specific to your ATV model can be helpful for understanding the electrical connections and troubleshooting any issues.
Once you have these materials and tools ready, you’ll be well-equipped to test your ATV winch switch and ensure its proper functioning.
ATV winch
ATV winch One of the essential tools for your ATV is a winch. Whether you’re out on the trails or deep in the woods, having a winch can be a lifesaver in sticky situations. But before you rush out to buy one, it’s important to know what materials and tools you’ll need to install it properly.
First and foremost, you’ll need the winch itself. Look for a winch that is specifically designed for ATVs and has the right capacity to handle your vehicle’s weight. It’s important to choose a quality winch that can handle the toughest conditions and will last for years to come.
Next, you’ll need a winch mount. This is the bracket that will attach the winch to your ATV. Make sure to choose a mount that is compatible with your specific make and model of ATV.
Many manufacturers offer mounting kits that are designed to fit their ATV models perfectly, so it’s worth checking if they have one available for your ATV. In addition to the winch and mount, you’ll need some basic tools to complete the installation. These may include a socket set, a wrench set, wire cutters, and a crimping tool.
You may also need some additional hardware, such as bolts and washers, depending on the specific winch and mount you choose. Installing an ATV winch may sound daunting, but with the right materials and tools, it can be a relatively straightforward process. Just be sure to follow the manufacturer’s instructions carefully and take your time to ensure a proper installation.
With a winch on your ATV, you’ll have the peace of mind knowing that you can handle whatever obstacles come your way on your off-road adventures.
Multimeter
The materials and tools needed for using a multimeter are quite minimal. All you really need is the multimeter itself, a set of test leads or probes, and a power source to test. The multimeter is the main tool that allows you to measure various electrical quantities such as voltage, current, and resistance.
It typically has a display screen where the measurements are shown. The test leads or probes are attached to the multimeter and are used to connect the multimeter to the circuit or device you want to test. Finally, the power source you use will depend on what you are testing.
For example, if you are testing a battery, you would need a battery to provide the power for the test. Overall, the materials and tools needed for using a multimeter are simple and readily available, making it a versatile and accessible tool for anyone working with electrical systems.
Safety gloves
safety gloves, materials needed, tools needed
Step-by-Step Guide
If you own an ATV and it has a winch switch, it’s important to regularly test the switch to ensure it is in proper working condition. Testing the ATV winch switch is a relatively simple process that can be done in a few steps. First, start by disconnecting the power source to the winch to prevent any accidents.
Then, visually inspect the switch for any signs of damage or wear. Next, use a multimeter to test the continuity of the switch. Set the multimeter to the continuity mode and touch the probes to the terminals of the switch.
If the switch is working correctly, the multimeter should beep, indicating continuity. If it doesn’t beep, it may be a sign that the switch is faulty and needs to be replaced. Additionally, you should also test the switch under load by connecting the winch to a power source and using the switch to operate the winch.
If the winch doesn’t respond or operates intermittently, it may be a sign of a faulty switch. In such cases, it’s best to consult a professional or replace the switch. Overall, testing the ATV winch switch regularly ensures its reliability and prevents any unexpected issues on your ATV adventures.
Step 1: Safety precautions
In this step-by-step guide, we will go through the safety precautions you need to take before starting any home improvement project. Safety should always be your top priority when it comes to DIY projects. Before diving into any task, make sure to wear the appropriate safety gear, including gloves, safety goggles, and a dust mask if necessary.
Assess the area where you will be working and remove any potential hazards, such as sharp objects or loose wires. If you plan on using power tools, be sure to familiarize yourself with their proper usage and safety guidelines. It’s also important to have a well-ventilated workspace and to keep a fire extinguisher nearby, just in case.
By taking these safety precautions, you can minimize the risk of accidents and injuries, allowing you to focus on completing your project successfully.
Step 2: Disconnect the power
In Step 2 of our step-by-step guide on disconnecting the power, we will ensure your safety by cutting off all sources of electricity before starting any work. This is an essential step to prevent any accidents or electrical shocks. Begin by locating the main electrical panel or circuit breaker box in your home.
Open the panel and find the main switch that controls the power supply to the entire house. Flip the switch to the “off” position, effectively cutting off all power. It’s a good idea to label the switch or panel as “Do Not Turn On” to avoid any confusion.
Additionally, it’s important to note that some appliances or areas in your home may have their own dedicated breakers or switches. Take the time to identify and switch these off as well to ensure complete power disconnection. Only proceed to the next steps once you are certain that all power sources have been disconnected.
Step 3: Access the winch switch
winch switch access, step-by-step guide
Step 4: Test for continuity
In continuing our step-by-step guide on how to troubleshoot electrical problems, we have now reached step 4: testing for continuity. Continuity refers to the uninterrupted flow of electrical current through a circuit. By testing for continuity, you can determine if there is a break or a short in the circuit that may be causing the problem.
To test for continuity, you will need a digital multimeter (DMM) set to the continuity mode. This mode emits a beeping sound when there is continuity in the circuit, and no sound when there is a break. First, ensure that all power to the circuit is turned off.
Then, disconnect the circuit from the power source and any other components. Touch the two leads of the multimeter to the two ends of the circuit you want to test. If you hear the beeping sound, it means that there is continuity and the circuit is intact.
If there is no sound, it indicates a break in the circuit. This could be due to a loose connection, a damaged wire, or a faulty component. Test different sections of the circuit to pinpoint the exact location of the break.
Once you have identified the problem area, you can then proceed to fix or replace the faulty component or repair the circuit. Testing for continuity is an essential step in troubleshooting electrical problems as it helps you identify and isolate the issue, allowing for a more efficient and effective repair process.
Step 5: Test for power
power supply, computer troubleshooting, testing power
Common Issues and Troubleshooting
If you’re a fan of off-road adventures and own an ATV with a winch, you know how essential the winch switch is. However, like any other mechanical component, the winch switch can experience issues. So, how do you test an ATV winch switch? First, check the wiring connections from the winch switch to the winch motor.
Ensure that they are securely connected and not loose or damaged. If the connections are good, move on to testing the switch itself. One way to do this is by using a multimeter to check for continuity.
Set the multimeter to the ohms setting and touch the probes to the terminals on the back of the switch. If there is no continuity or an inconsistent reading, it’s likely that the switch is faulty and needs to be replaced. Additionally, you can visually inspect the switch for any signs of damage or wear.
Look for broken or bent terminals, melted plastic, or loose components. These are all indications that the switch may be malfunctioning. In conclusion, testing an ATV winch switch is a simple process that involves checking the wiring connections and using a multimeter to test for continuity.
By following these steps, you can identify any issues with the switch and take the necessary steps to fix or replace it. Remember, it’s always important to ensure the proper functioning of your ATV winch switch to ensure a smooth and hassle-free off-road experience.
No continuity
“No continuity” Have you ever experienced the frustration of watching a TV show or reading a book, only to find that there is no continuity in the storyline? It can be infuriating when the characters and plot seem to change from one moment to the next, leaving you confused and disconnected from the story. This lack of consistency can make it difficult to follow along and fully immerse yourself in the fictional world. So, what exactly causes this issue, and how can you troubleshoot it? One common cause of a lack of continuity is poor planning and organization on the part of the writers.
If the creators of a TV show or book series do not have a clear vision for where the story is going, it can result in plot holes, inconsistencies in character development, and contradictory events. This can leave the audience feeling unsatisfied and underwhelmed, as they struggle to make sense of the disjointed narrative. Another factor that can contribute to a lack of continuity is changes in the creative team.
If new writers or directors come on board mid-way through a project, they may not have a full understanding of the established world and characters. This can lead to a shift in tone or direction that feels jarring and out of place, disrupting the flow of the story. So, how can you troubleshoot this issue as a reader or viewer? One option is to go back and revisit earlier parts of the story to see if you missed any crucial details or connections.
Sometimes, a lack of continuity is a result of a subtle hint or foreshadowing that you may have overlooked. Additionally, engaging in discussions with fellow fans or reading analysis and theories can help shed light on any confusing aspects of the story. In conclusion, a lack of continuity can be a frustrating issue in any form of storytelling.
It can make it difficult to fully immerse yourself in the narrative and understand the motivations and actions of the characters. By understanding the common causes of this problem and troubleshooting it through careful analysis and discussion, you can enhance your enjoyment of a story and overcome any obstacles to understanding its world.
No power
No power, common issues, troubleshooting One of the most frustrating things that can happen is when you go to turn on your device or appliance, and there’s absolutely no power. It’s like being stranded in the middle of nowhere with no gas in your car. But fear not! There are several common issues that can cause this problem, and luckily, most of them are easy to troubleshoot.
First, check to make sure that the device or appliance is properly plugged in. It may sound simple, but sometimes a loose or disconnected power cord can be the culprit. Give it a good tug to ensure it’s securely in place.
Next, take a look at the power outlet itself. Sometimes, the outlet can be faulty or not supplying power for some reason. Try plugging something else into the same outlet to see if it works.
If it doesn’t, then you know the issue lies with the outlet and not the device or appliance. Another common issue is a blown fuse or tripped circuit breaker. This can happen if there’s a surge in power or if too many devices are plugged into the same circuit.
Check your fuse box or circuit breaker panel and look for any switches that are in the “off” position or any fuses that are blown. If you find one, simply switch it back on or replace the blown fuse. If none of these solutions work, then it’s possible that there’s a deeper problem with the device or appliance itself.
It may be a faulty power supply or a more complex electrical issue. In this case, it’s best to consult with a professional or contact the manufacturer for further assistance. In conclusion, no power can be a real headache, but with a little troubleshooting, you can usually get things up and running again.
Conclusion
So, there you have it – the end of our journey to test an ATV winch switch. While the process may seem daunting, with a little patience and the right tools, you can confidently diagnose any issues and get your winch back in working order. Remember, just like a detective on a case, you need to think outside the box and follow your instincts.
And who knows, maybe one day you’ll be able to solve the mystery of the spontaneous winch activation. But until then, happy testing and may your ATV winch always bring you out of sticky situations!”
Importance of testing an ATV winch switch
Winch switch, troubleshooting, ATV, common issues. In the world of off-roading, having a reliable winch switch for your ATV is crucial. Whether you’re using it to pull yourself out of a sticky situation or helping a friend out of a jam, a winch can be a lifesaver.
But what happens when your winch switch starts acting up? This is where testing becomes important. By testing your ATV winch switch, you can identify any potential issues and troubleshoot them before they become major problems. Common issues with winch switches include connectivity problems, faulty wiring, or a worn-out switch mechanism.
Troubleshooting these issues can be as simple as checking the connections or replacing the switch altogether. Regular testing not only helps to ensure the proper functioning of your winch switch but also increases your safety and peace of mind when out on the trails. So, don’t underestimate the importance of testing your ATV winch switch!
Regular maintenance and troubleshooting
Regular maintenance and troubleshooting are essential for ensuring that your devices and systems continue to function smoothly. However, it is common to encounter some issues along the way. One common issue that many people face is slow internet speed.
There could be several reasons for this, such as a weak Wi-Fi signal, too many devices connected to the network, or even malware or viruses on your device. To troubleshoot this issue, you can try moving closer to the Wi-Fi router, reducing the number of devices connected to the network, or running a malware scan on your device. Another common issue is a device not connecting to the internet.
This can be frustrating, especially if you need to get work done. In this case, you can try restarting your device, checking your Wi-Fi password, or resetting your network settings. Regular maintenance and troubleshooting can help you identify and fix these issues, ensuring that your devices and systems continue to work smoothly.
FAQs
How does an ATV winch switch work?
An ATV winch switch is a device that enables the control and operation of an ATV winch. It usually consists of a lever or button that can be moved or pressed to activate the winch motor for either pulling or releasing the cable.
What are the common types of ATV winch switches?
The most common types of ATV winch switches include rocker switches, handheld switches, and wireless remote controls. Rocker switches are typically mounted on the ATV’s dashboard, while handheld switches are connected to the winch via a cable. Wireless remote controls provide the convenience of operating the winch from a distance.
How do I test an ATV winch switch for functionality?
To test an ATV winch switch, you can start by visually inspecting the switch for any damage or loose connections. Then, using a multimeter, check for continuity between the switch terminals when in different positions (ON/OFF). Make sure to follow the manufacturer’s instructions and refer to the ATV’s wiring diagram for accurate testing procedures.
What could be the possible causes of a faulty ATV winch switch?
A faulty ATV winch switch can be caused by various factors, including loose or damaged wiring connections, a worn-out switch mechanism, or water/moisture damage. Additionally, excessive heat or vibrations can also contribute to switch failure over time.
Can I replace an ATV winch switch myself?
Yes, you can replace an ATV winch switch yourself as long as you have the necessary tools and knowledge. It is important to refer to the ATV’s manual and the replacement switch’s installation instructions to ensure proper installation. If you are not confident in your abilities, it is recommended to seek professional assistance.
Are ATV winch switches waterproof?
Not all ATV winch switches are waterproof. Some switches come with a waterproof rating, allowing them to withstand exposure to water and moisture. It is important to check the manufacturer’s specifications to determine if the switch you have or intend to purchase is waterproof or water-resistant.
How can I maintain my ATV winch switch for optimal performance?
To maintain your ATV winch switch, periodically inspect it for any signs of damage or wear. Keep it clean and free from dirt, debris, and moisture. Lubricate any moving parts as recommended by the manufacturer. Additionally, avoid using excessive force or rough handling when operating the switch to prevent premature wear.