
Hey there! So, you’ve stumbled upon this blog looking for an introduction. Well, you’re in the right place! In this blog, we’re going to delve into the world of introductions, why they matter, and how to make them captivating. We’ve all come across introductions in various forms – from the beginning of a book to the start of a speech.
But have you ever stopped to think about just how important they are? Picture this: you’re at a social gathering, and you’re meeting someone for the first time. What’s the first thing you do? You introduce yourself, of course! An introduction serves as a gateway to establishing connections and breaking the ice. It sets the tone for what’s to come, creating intrigue and grabbing the attention of whoever you’re trying to connect with.
Similarly, when it comes to writing, an introduction is your first impression to the reader. It’s your chance to entice them, make them curious, and convince them to keep reading. Just like meeting someone new, a well-crafted introduction builds anticipation and creates a foundation for the rest of your content.
But here’s the thing – introductions are not just about getting attention. They also serve a crucial purpose in delivering the main idea or message you want to convey. Think of it as the opening act of a play or the prologue of a book.
It sets the stage, establishes the context, and outlines what the reader can expect. So, how do you create a captivating introduction? Well, it’s all about finding the perfect balance of providing enough information to pique the reader’s curiosity while leaving some mystery to be unraveled. It’s like giving a glimpse of what’s inside a beautifully wrapped gift – you want to create anticipation but not spoil the surprise.
Throughout this blog, we’ll explore different techniques and strategies to craft compelling introductions that will make your readers eager to dive into your content. From using rhetorical questions to incorporating analogies and metaphors, we’ll cover it all. So buckle up and get ready for a journey into the art of introductions! Stay tuned for our next blog where we’ll discuss the power of rhetorical questions and how to use them effectively in your introduction.
Table of Contents
- 1 What is an equalizer trailer hitch?
- 2 Why do you need an equalizer trailer hitch?
- 3 Benefits of using an equalizer trailer hitch
- 4 Step 1: Gather the necessary tools and materials
- 5 Step 2: Prepare the tow vehicle and trailer
- 6 Step 3: Install the equalizer hitch components
- 7 Step 4: Adjust the equalizer hitch
- 8 Step 5: Test the setup
- 9 Swaying while towing
- 10 Uneven weight distribution
- 11 Excessive bouncing
- 12 Enjoy a safe and stable towing experience with an equalizer trailer hitch
- 13 Conclusion
- 14 FAQs
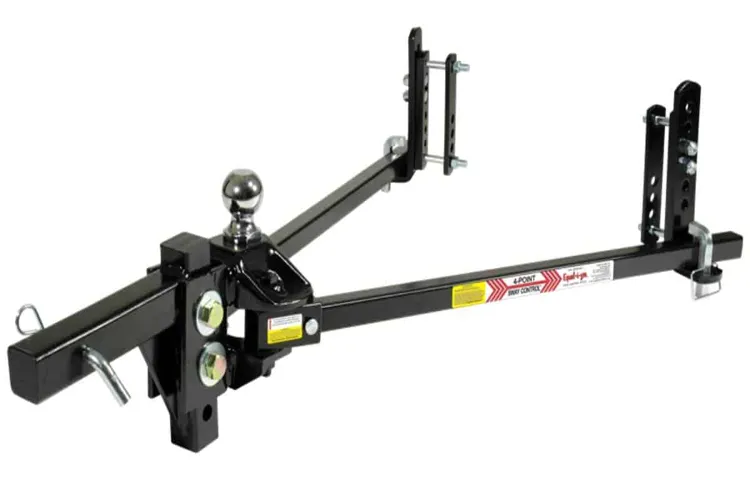
What is an equalizer trailer hitch?
Setting up an equalizer trailer hitch can provide you with a smoother and safer towing experience. This type of hitch is designed to distribute the weight of the trailer evenly across your vehicle, reducing the amount of strain placed on your rear axle. But how exactly do you set up an equalizer trailer hitch? Well, it’s actually quite simple.
First, you’ll need to attach the hitch receiver to your vehicle’s frame. Then, you’ll need to connect the trailer to the hitch ball and secure it with a coupler lock. Next, you’ll want to adjust the tension on the equalizer bars so that the trailer is level and the weight is evenly distributed.
Finally, you’ll need to double-check all of your connections and make sure everything is secure. With a properly set up equalizer trailer hitch, you can enjoy a smoother ride and peace of mind knowing that your trailer is securely attached to your vehicle. So, next time you’re planning a towing trip, make sure to take the time to properly set up your equalizer trailer hitch.
Why do you need an equalizer trailer hitch?
Setting up an equalizer trailer hitch is essential for a smooth and safe towing experience. This type of hitch helps to distribute the weight more evenly between your vehicle and the trailer, reducing the chances of swaying or fishtailing. Wondering how to set up an equalizer trailer hitch? It’s actually easier than you might think.
Start by attaching the hitch to your vehicle’s tow bar or receiver, making sure it is securely fastened. Next, adjust the height of the hitch head to match the height of your trailer’s coupler. This will ensure a level towing setup.
Then, connect the trailer to the hitch using the coupler and safety chains. Finally, attach the weight distribution bars and make sure they are properly tensioned to evenly distribute the weight. Taking the time to properly set up an equalizer trailer hitch can greatly improve your towing experience and provide peace of mind on the road.
Benefits of using an equalizer trailer hitch
If you’re new to trailering or looking for ways to improve your towing experience, setting up an equalizer trailer hitch can make a huge difference. This type of hitch is designed to evenly distribute the weight of your trailer across all four wheels of your towing vehicle. Why is this important? Well, when the weight of your trailer is unevenly distributed, it can cause your towing vehicle to become unbalanced and lead to issues like swaying, bouncing, and even fishtailing.
By using an equalizer trailer hitch, you can ensure a safer and smoother towing experience. This type of hitch works by using spring bars to transfer weight from the rear axle of your towing vehicle to the front axle, reducing the amount of weight being placed on the rear wheels. This helps to improve braking and steering control, making it easier to navigate turns and maintain stability on the road.
Another benefit of using an equalizer trailer hitch is improved ride comfort. When your trailer is properly balanced, it puts less strain on your towing vehicle’s suspension system, resulting in a smoother and more comfortable ride for both you and your passengers. This can be especially important if you’re planning on taking longer trips or driving on rough terrain.
In addition to these advantages, an equalizer trailer hitch can also help to extend the lifespan of your towing vehicle and trailer. By evenly distributing the weight, you’ll put less stress on your vehicle’s frame, suspension, and tires. This can help to prevent premature wear and tear and potentially costly repairs down the line.
Overall, setting up an equalizer trailer hitch is a simple yet effective way to improve your towing experience. By ensuring that the weight of your trailer is evenly distributed, you can enjoy a safer, more comfortable, and more enjoyable journey. So, whether you’re hauling a camper, a boat, or any other type of trailer, consider investing in an equalizer trailer hitch for peace of mind on the road.
So you’ve decided to upgrade your towing capabilities and invest in an equalizer trailer hitch? Smart move! With an equalizer hitch, you can ensure that your trailer is balanced and stable, providing a smoother and safer towing experience. But how do you set up an equalizer trailer hitch? Don’t worry, we’ve got you covered with step-by-step instructions to make the process as simple as possible. Whether you’re an experienced trailer owner or a novice, this guide will give you all the information you need to get your equalizer trailer hitch up and running in no time.
So grab your tools and let’s get started!
Step 1: Gather the necessary tools and materials
If you’re planning to tow heavy loads with your vehicle, setting up an equalizer trailer hitch is a must. To get started, you’ll first need to gather the necessary tools and materials. The tools you’ll need include a socket set, torque wrench, drill, and a level.
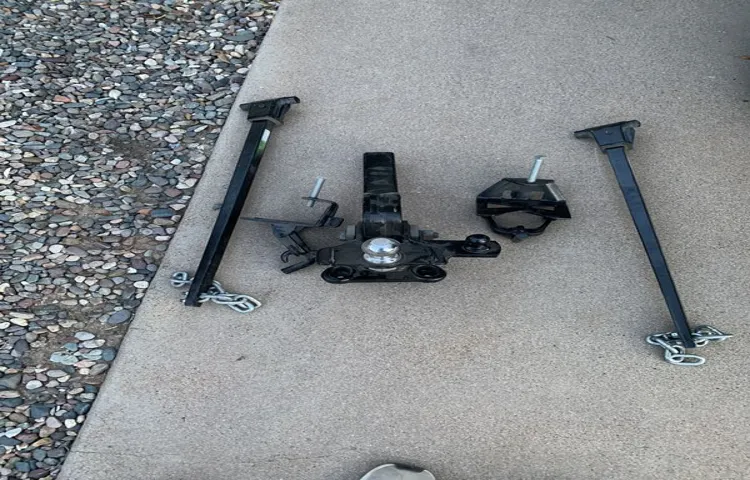
As for materials, you’ll need the equalizer hitch assembly, which includes the ball mount, weight distribution bars, and sway control bar. Additionally, you’ll need a trailer ball that matches the size and weight capacity of your trailer. Having all these tools and materials on hand will make the installation process much easier and more efficient.
So, before you begin, double-check that you have everything you need.
Tools
step 1, gather, necessary tools, materials. When it comes to tackling any DIY project, having the right tools and materials is essential. Before you dive headfirst into your project, take the time to gather everything you’ll need to get the job done efficiently.
The last thing you want is to be midway through a project and realize that you’re missing a crucial tool or material, causing unnecessary delays and frustration. So, let’s go through the steps of gathering the necessary tools and materials for your upcoming project. First, assess the project at hand and make a list of all the tools and materials you will need.
This can include anything from hammers, screwdrivers, and wrenches to specific materials like wood, paint, or nails. Take the time to research and understand which tools and materials are required for your particular project. Once you have a comprehensive list, check your toolbox and supplies to see what you already have.
This will help you avoid purchasing unnecessary items. If there are any missing items, make a note of them and create a shopping list. Now, head to your local hardware store or home improvement center to gather the remaining tools and materials.
Consider the quality and durability of the products you are purchasing to ensure they will stand the test of time. By following these steps and taking the time to gather the necessary tools and materials, you’ll be setting yourself up for success in your DIY project. So, grab your list and get ready to create something amazing!
Materials
When embarking on a DIY project, gathering the necessary tools and materials is the first step to success. Having the right equipment on hand will not only make your task easier, but it will also ensure that you can complete the project efficiently. The specific tools and materials you will need will depend on the nature of your project, but there are some basics that every toolbox should have.
A good set of screwdrivers, a hammer, pliers, and a tape measure are essential tools that can be used for a wide range of projects. Additionally, stock up on nails, screws, and other fasteners, as well as adhesives such as glue or tape. It’s also a good idea to invest in a sturdy tool box or storage system to keep everything organized and easily accessible.
So, before you dive into your next DIY project, take some time to gather all the necessary tools and materials – you’ll be glad you did.
Step 2: Prepare the tow vehicle and trailer
Now that you have chosen and installed an equalizer trailer hitch, it’s time to move on to the next step: preparing the tow vehicle and trailer. This crucial step ensures that your towing experience will be safe and successful. First, you’ll want to double-check that your tow vehicle is properly equipped to handle the weight and size of the trailer you’re towing.
This includes checking the hitch receiver, ensuring it is the correct size and class for your trailer, and that it is securely attached to the vehicle. You’ll also want to make sure that your tow vehicle’s tires are properly inflated and in good condition, as that will impact the overall stability of the tow. Additionally, it’s a good idea to check and adjust the trailer’s tire pressure, as well as making sure the trailer’s lights and brakes are in proper working order.
Taking the time to properly prepare both your tow vehicle and trailer will ensure a safe and smooth towing experience.
Check the trailer weight
trailer weight, tow vehicle, prepare, step 2
Check the tongue weight
When preparing your tow vehicle and trailer for a trip, one important step is to check the tongue weight. The tongue weight refers to the amount of downward force that the trailer tongue exerts on the hitch of the tow vehicle. It is essential to ensure that the tongue weight is within the recommended range for your particular trailer and tow vehicle combination.
Too much or too little tongue weight can affect the stability and handling of your tow vehicle and trailer. To check the tongue weight, you can use a tongue weight scale or a bathroom scale and a simple formula. By properly balancing the weight between the tow vehicle and trailer, you can have a smoother and safer towing experience.
So, before hitting the road, don’t forget to check the tongue weight!
Distribute the load in the trailer
In order to safely tow a trailer, it’s important to distribute the load evenly within the trailer. Uneven weight distribution can cause a variety of problems, including trailer fishtailing, decreased stability, and uneven tire wear. To distribute the load properly, start by placing heavier items in the front of the trailer, closer to the tow vehicle.
This will help balance out the weight and prevent the trailer from becoming too back-heavy. If you have multiple heavy items, try to evenly distribute them on both sides of the trailer for even weight distribution. Additionally, be mindful of the trailer’s weight capacity and never exceed it.
By distributing the load evenly and staying within the weight limits, you’ll be able to safely tow your trailer and avoid any potential accidents or damage.
Step 3: Install the equalizer hitch components
Now that you have gathered all the necessary tools and materials, it’s time to move on to setting up the equalizer hitch components. This part is crucial for ensuring the stability and balance of your trailer while towing. Start by attaching the spring arms to the trailer frame.
These spring arms are a key component of the equalizer hitch and help distribute the weight of the trailer more evenly. Make sure to align the holes on the spring arms with the holes on the trailer frame before securing them with bolts and nuts. Next, you’ll need to install the hitch head onto the receiver of your tow vehicle.
Use the appropriate hardware and tighten it securely to ensure a strong connection. The hitch head should be level with the ground when the trailer is attached. Once the hitch head is in place, attach the spring bars to the hitch head using the necessary hardware.
These spring bars connect the trailer to the tow vehicle and play a crucial role in reducing the sway while towing. Make sure to follow the manufacturer’s instructions for the proper attachment and adjustment of the spring bars. After attaching the spring bars, it’s time to connect the trailer ball to the coupler on the trailer.
Make sure the trailer ball is properly tightened and securely attached to the tow vehicle. Double-check all the connections and ensure that everything is properly tightened. Once all the components are installed, it’s important to make some final adjustments.
Adjust the tension on the spring bars using the built-in tensioning system or by adding or removing washers. The goal is to achieve a balanced distribution of weight between the tow vehicle and trailer. Lastly, take a few minutes to double-check everything.
Attach the receiver hitch
receiver hitch, equalizer hitch components, install, step 3
Mount the ball mount
equalizer hitch components
Attach the spring bars
In the third step of installing an equalizer hitch, we come to a crucial component: attaching the spring bars. These bars are what provide the necessary tension and weight distribution for your trailer. To begin, you’ll want to find the appropriate socket size for your spring bar attachment bolts.
Make sure you have the correct size socket wrench on hand, as this will make the process much smoother. Next, align the spring bar with the attachment point on the hitch head and insert one end of the bar into the socket on the hitch head. Once the spring bar is securely in place, tighten the attachment bolt with your socket wrench.
Repeat this process for the other spring bar. It’s important to ensure that the spring bars are equally tightened on both sides to maintain balance and stability. Once both spring bars are attached, you’re ready to move on to the next step of installing your equalizer hitch.
Keywords: attach the spring bars, equalizer hitch, weight distribution, tension, trailer, attachment bolts, hitch head, socket wrench, balance, stability.
Install the sway control
equalizer hitch components, sway control, install, towing, safety Step 3 of installing an equalizer hitch is to install the sway control. Sway control is an essential component of your towing setup as it helps to minimize trailer sway while you are driving. This is particularly important when towing larger trailers or in windy conditions.
To install the sway control, you will need to attach it to the frame of your trailer and to the hitch head. The sway control works by exerting force on the trailer, helping to keep it in line with your vehicle. It can be adjusted to provide more or less sway control depending on your specific towing needs.
When installing the sway control, it is important to follow the manufacturer’s instructions to ensure proper installation and operation. By incorporating sway control into your equalizer hitch setup, you are taking a proactive step towards improving towing safety and stability.
Step 4: Adjust the equalizer hitch
So, you’ve got yourself an equalizer trailer hitch – great! Now it’s time to set it up properly to ensure a smooth and safe towing experience. One important step in this process is adjusting the hitch itself. The equalizer hitch is designed to distribute the weight between the trailer and the towing vehicle, reducing sway and improving stability.
To adjust the hitch, start by attaching the trailer to your vehicle and positioning it on a level surface. Then, use a wrench to loosen the tension on the spring bars. You can do this by turning the chains clockwise.
Once the tension is released, use a trailer tongue jack to raise or lower the trailer hitch until it is level with your vehicle. This will help ensure that the weight is evenly distributed. Finally, tighten the tension on the spring bars by turning the chains counterclockwise.
It’s important to find the right balance here, so you may need to adjust the tension a few times until the hitch is properly set up. Keep in mind that the specific instructions for adjusting your equalizer hitch may vary depending on the brand and model, so it’s always a good idea to consult the manufacturer’s manual for guidance. With a properly adjusted equalizer hitch, you’ll be ready to hit the road with confidence knowing that your trailer is securely attached and the weight is distributed correctly.
Set the height of the ball mount
In step 4 of setting up your equalizer hitch, you’ll need to adjust the height of the ball mount. This is an important step because it determines how level your trailer will be when it’s connected to your tow vehicle. To begin, you’ll want to measure the height of your trailer’s coupler.
This is the part of the trailer where the ball of the hitch connects. Next, measure the height of the hitch receiver on your tow vehicle. The goal is to make sure that the coupler and the hitch receiver are at the same height when the trailer is connected.
If the coupler is too low, your trailer will have a nose-down position and can put excess weight on the rear of your tow vehicle. On the other hand, if the coupler is too high, your trailer will have a nose-up position, which can be dangerous and cause instability during towing. If the coupler and the hitch receiver are not at the same height, you’ll need to adjust the ball mount.
This is the part of the hitch that holds the ball and connects to the hitch receiver. Most ball mounts have multiple holes that allow you to adjust the height. Simply remove the ball mount from the hitch receiver, choose the appropriate hole that aligns with your desired height, and reattach the ball mount.
Once the ball mount is adjusted to the correct height, tighten the bolts or screws to secure it in place. It’s important to make sure that the ball mount is tightly secured to prevent any movement during towing. By adjusting the height of the ball mount, you can ensure that your trailer is level when connected to your tow vehicle.
This will not only make for a safer and more stable towing experience but also help to distribute the weight evenly between the trailer and the tow vehicle. So take your time, make the necessary adjustments, and get ready for a smooth ride ahead.
Adjust the tension of the spring bars
equalizer hitch, tension, spring bars So you’ve successfully installed your equalizer hitch and now it’s time to fine-tune it for optimal towing performance. Step 4 in the process involves adjusting the tension of the spring bars. The tension in these bars helps distribute the weight evenly between your tow vehicle and trailer, ensuring a smooth and stable ride.
To adjust the tension, start by loosening the bolts that hold the spring bars in place. This will allow you to move the bars up or down, depending on the desired tension. If you find that your trailer is sagging too much and putting too much weight on the rear of your tow vehicle, you can increase the tension by moving the bars up.
On the other hand, if your trailer is riding too high and putting too little weight on the rear of your tow vehicle, you can decrease the tension by moving the bars down. Finding the right tension may require some trial and error. It’s important to make small adjustments and test the setup after each adjustment to gauge the effect on your towing experience.
Remember, the goal is to have a level trailer that is evenly distributing the weight between the tow vehicle and trailer. Once you have achieved the desired tension, tighten the bolts securely to ensure the spring bars stay in place during your journey. It’s a good idea to recheck the tension periodically throughout your trip, as vibrations and road conditions may cause the bolts to loosen.
By properly adjusting the tension of the spring bars on your equalizer hitch, you can ensure a safe and comfortable towing experience. Take the time to find that sweet spot where your trailer is level, and you’ll be able to enjoy the open road with peace of mind.
Set the sway control
equalizer hitch adjustment Once you have set up the sway control on your trailer, the next step is to adjust the equalizer hitch. This is an essential part of the setup process, as it helps distribute the weight of the trailer evenly onto the tow vehicle. By adjusting the equalizer hitch, you can ensure a smooth and stable ride for both your trailer and your vehicle.
To begin, make sure your trailer is fully loaded with all the items you plan to transport. This will give you an accurate representation of the weight distribution. Then, measure the height from the ground to the top of your tow vehicle’s hitch receiver.
Next, measure the height from the ground to the bottom of the trailer’s coupler. Ideally, these two measurements should be within one inch of each other. If they are not, you will need to adjust the equalizer hitch to achieve the desired height.
Start by removing or adding washers to the hitch head to raise or lower the trailer’s coupler. Each washer typically adjusts the height by around 1/8 to 1/4 inch. Once you have made the necessary adjustments, tighten the bolts on the hitch head to secure it in place.
Be sure to follow the manufacturer’s instructions for your specific equalizer hitch, as the adjustment process may vary slightly. After adjusting the equalizer hitch, it is important to test the setup by taking your trailer for a short test drive. Pay attention to how the trailer and tow vehicle handle during turns, braking, and acceleration.
If you notice any swaying or instability, further adjustments may be needed. Remember, the goal of the equalizer hitch is to distribute the weight evenly between your trailer and tow vehicle. This will help to improve stability and control while towing.
Step 5: Test the setup
Now that you have successfully installed your equalizer trailer hitch, it’s time to test the setup to make sure everything is working properly. Start by attaching your trailer to the hitch using the appropriate coupler. Make sure it is securely latched and locked into place.
Next, connect the safety chains to the designated attachment points on your vehicle. These chains should crisscross underneath the trailer tongue and should be crossed to prevent the tongue from hitting the ground in case of detachment. Once the trailer is securely connected, test the lights to ensure they are working properly.
Turn on your vehicle’s headlights, brake lights, and turn signals, and check that these signals are being transmitted correctly to the trailer. Finally, take a short test drive to assess the handling and stability of your trailer. Pay attention to any excessive bouncing, swaying, or instability during turns or lane changes.
Adjust the weight distribution and the tension on the equalizer bars if necessary, and make any necessary changes until you achieve a smooth and controlled ride. Remember that proper setup and testing are essential for safe towing, so take your time to ensure everything is in order before hitting the road.
Connect the trailer to the tow vehicle
connect the trailer, tow vehicle, test the setup
Check the level of the trailer
check the level of the trailer
Test the performance on the road
Test the performance on the road After completing the setup of your car, the next step is to test the performance on the road. This is where you can see how well your modifications and adjustments have improved the overall handling and ride quality. Start by taking your car for a short drive around the block to get a feel for how it handles in different situations.
Pay attention to how it accelerates, brakes, and corners. Is it more responsive than before? Does it feel more stable and secure? These are all important factors to consider when evaluating the performance of your setup. Once you feel comfortable with the initial testing, you can gradually push the car harder and see how it performs under more demanding conditions.
Take it on a winding road to test the cornering abilities, or try some quick stops and starts to test the braking performance. By pushing the car to its limits, you can get a better understanding of its capabilities and make any necessary adjustments to optimize its performance. Don’t be afraid to experiment and make changes as needed until you’re satisfied with the results.
Having trouble with your electronic devices? Frustrated by frequent glitches and malfunctions? Don’t worry, you’re not alone. We’ve all experienced those moments of panic when our laptop crashes, our smartphone freezes, or our printer refuses to cooperate. But fear not, because help is at hand! In this blog, we’re going to delve into the world of troubleshooting common issues and provide you with some handy tips and tricks to keep your devices running smoothly.
So grab a cup of coffee, sit back, and get ready to tackle those tech challenges head-on!
Swaying while towing
Are you tired of your trailer swaying back and forth while you’re towing? It can be a nerve-wracking experience, especially on highways or windy roads. But fear not, there’s a solution that can help stabilize your trailer and make your towing experience much smoother – an equalizer trailer hitch. This type of hitch is designed to distribute the weight of your trailer evenly across all four tires of your vehicle, reducing the swaying motion.
So how do you set up an equalizer trailer hitch? First, you’ll need to attach the hitch to your trailer and your vehicle’s trailer hitch receiver. Make sure it’s securely fastened and level. Next, you’ll need to adjust the weight distribution bars so that the weight is evenly distributed.
This can be done by loosening the bolts and adjusting the chains until the bars are level. Lastly, you’ll need to adjust the sway control device, if your equalizer hitch has one. This device helps to minimize any side-to-side movement.
Adjust it according to the manufacturer’s instructions to achieve optimal results. With your equalizer trailer hitch properly set up, you’ll notice a significant improvement in the stability of your trailer while towing. No more swaying back and forth, just a smooth ride ahead.
Happy towing!
Uneven weight distribution
If you’ve ever dealt with an uneven weight distribution while towing a trailer, you know how frustrating and even dangerous it can be. One solution to this problem is to use an equalizer trailer hitch. This type of hitch is designed to evenly distribute the weight of the trailer across all four wheels of the towing vehicle, ensuring a smoother and safer ride.
But how do you set up an equalizer trailer hitch properly? Well, first you’ll need to determine the total weight of your trailer and the tongue weight (the weight that rests on the hitch). Then, you’ll need to adjust the tension bars on the equalizer hitch to distribute the weight evenly. It may take some trial and error to get it just right, but once you do, you’ll notice a significant improvement in your towing experience.
So next time you’re dealing with an uneven weight distribution, consider investing in an equalizer trailer hitch and follow these steps to set it up properly.
Excessive bouncing
If you’ve ever towed a trailer before, you might have experienced the frustration of excessive bouncing. This can make the towing experience uncomfortable and even dangerous. One way to minimize this bouncing is by properly setting up an equalizer trailer hitch.
An equalizer hitch distributes the weight of the trailer more evenly between the towing vehicle and the trailer, resulting in a smoother and more stable ride. To set up an equalizer trailer hitch, you’ll need to start by connecting the trailer to the hitch ball on your towing vehicle. Then, adjust the height of the trailer hitch so that it is level with the trailer.
This will help to ensure that weight is evenly distributed and reduce bouncing. Next, adjust the tension on the equalizer bars to match the weight of your trailer. This can be done by using a specialized tool or a wrench.
Finally, make sure that the hitch ball and the coupler on the trailer are properly tightened to prevent any movement during towing. By following these steps and properly setting up your equalizer trailer hitch, you can greatly reduce the amount of bouncing you experience while towing, making for a safer and more comfortable journey.
Hey there! Are you looking for a clear and concise conclusion to your blog post? Well, you’ve come to the right place! In this blog intro, we’ll explore the importance of having a strong conclusion and how it can leave a lasting impact on your readers. So, grab a cup of coffee and let’s dive right in! Imagine this: you’ve spent hours researching, writing, and editing your blog post. You’ve carefully crafted each paragraph to convey your message and engage your audience.
But what about the conclusion? That final paragraph that ties everything together and leaves your readers with a lasting impression. It’s often overlooked, yet crucial to the overall success of your blog post. A well-crafted conclusion is like the cherry on top of a delicious sundae.
It summarizes your main points, reinforces your key message, and offers a sense of closure to your readers. Just like the last bite of that sundae, the conclusion is what your readers will remember most about your post. But why is a conclusion so important? Well, it’s the last opportunity you have to make a lasting impact on your audience.
It’s your chance to leave them with a feeling of satisfaction, inspiration, or even a call to action. Without a strong conclusion, your blog post may feel unfinished or leave your readers dangling, unsure of what to take away from your writing. So, how do you craft a powerful conclusion? It starts by revisiting your main points and summarizing them in a concise and impactful way.
Think of it as a recap, reminding your readers of the key takeaways from your post. But don’t just regurgitate what you’ve already said – offer a fresh perspective, a thought-provoking question, or a call to action that encourages further exploration. In conclusion (pun intended), a well-crafted conclusion is an essential component of any successful blog post.
It leaves a lasting impact on your readers, reinforces your main points, and offers a sense of closure. So, the next time you’re wrapping up your blog post, remember to give your conclusion the attention it deserves. Your readers will thank you for it!
Enjoy a safe and stable towing experience with an equalizer trailer hitch
If you’re looking for a way to safely and securely tow your trailer, an equalizer trailer hitch is the way to go. These hitches are designed to distribute the weight of your trailer evenly across your towing vehicle, providing a stable and smooth towing experience. But how do you set up an equalizer trailer hitch? The first step is to ensure that your vehicle and trailer are on level ground.
Then, you’ll need to adjust the height of the hitch head so that it is level with the trailer coupler. Once that’s done, you’ll need to attach the spring bars to the hitch head, making sure to tighten them securely. Finally, you’ll need to attach the weight distribution shank to your vehicle’s receiver and secure it with the appropriate hardware.
With these steps completed, you’ll be ready to hit the road with confidence, knowing that your equalizer trailer hitch is providing the stability and safety you need for a successful towing experience.
Conclusion
In conclusion, setting up an equalizer trailer hitch is like finding the perfect dance partner for your towing adventures. Just like a well-choreographed dance routine, the equalizer hitch ensures a smooth and balanced performance on the road. Installing this ingenious contraption is as easy as following a few simple steps.
First, make sure you have the right sized hitch for your trailer – we don’t want any Cinderella slipper situations here! Next, attach the hitch to your towing vehicle, ensuring it’s securely fastened like a well-tailored suit. Now comes the fun part – adjusting the weight distribution bars. Think of these bars as the harmonizing force in your trailer hitch symphony.
Just like a skilled conductor, you’ll need to find the perfect balance between the weight of your trailer and the weight on your towing vehicle. Adjust them too light, and your trailer might sway like a flag in the wind; adjust them too heavy, and you’ll be dragging your towing vehicle along for an unwanted joyride. But fear not, fellow adventurers! With a little patience and some trial and error, you’ll soon become a maestro of trailer hitch equilibrium.
Fine-tune the tension using the handy dandy wrench provided, and voila! Your trailer will glide alongside your towing vehicle like Fred and Ginger on the dancefloor. Now, take a moment to appreciate the elegance of your newly set up equalizer trailer hitch. It’s the hero of your towing escapades, ensuring stability, safety, and a delightful towing experience.
So next time you hit the road with your trailer in tow, remember to thank your trusty equalizer hitch for keeping things in perfect harmony. Happy towing, my fellow adventurers, and may your equalizer hitch always lead the way to trouble-free travels!”
FAQs
How does an equalizer trailer hitch work?
An equalizer trailer hitch works by evenly distributing the weight of the trailer across the tow vehicle and trailer axles, improving stability and control while towing.
How do I install an equalizer trailer hitch?
To install an equalizer trailer hitch, start by attaching the hitch head to the trailer ball on the tow vehicle. Then, connect the trailer to the hitch head using the spring bars and adjust the tension and angle of the hitch to achieve proper weight distribution.
What are the benefits of using an equalizer trailer hitch?
Some benefits of using an equalizer trailer hitch include improved towing stability, reduced sway and fishtailing, better control and handling, and even tire wear on both the tow vehicle and trailer.
How do I select the right equalizer trailer hitch for my towing setup?
When selecting an equalizer trailer hitch, consider the weight of your trailer and tow vehicle, the tongue weight, and the towing capacity of your vehicle. It’s important to choose a hitch that can handle the weight and properly distribute it for optimal towing performance.
What maintenance is required for an equalizer trailer hitch?
Regular maintenance for an equalizer trailer hitch includes greasing the hitch ball and pivot points, inspecting the spring bars and brackets for wear or damage, and ensuring all bolts and nuts are properly tightened.
Can I use an equalizer trailer hitch with any type of trailer?
While an equalizer trailer hitch can be used with various types of trailers, it is primarily designed for use with travel trailers, fifth wheels, and larger boat trailers.
Do I need any special tools to install or adjust an equalizer trailer hitch?
Installing and adjusting an equalizer trailer hitch typically requires basic hand tools such as wrenches and sockets. However, a torque wrench may be needed to properly tighten the hitch components to the recommended specifications.