
Do you rely on an inverter power fan to keep your home or workspace cool? If so, you know how important it is to keep this essential equipment clean and in proper working order. After all, a dirty fan can not only become less effective at cooling but also lead to a buildup of dust and debris that can clog the system and cause it to overheat. And that’s the last thing you want when you’re trying to beat the heat! Cleaning your inverter power fan may seem like a daunting task, but with the right approach, it can be a relatively simple and straightforward process.
In this step-by-step guide, we will walk you through the process of cleaning your inverter power fan to ensure it stays in top-notch condition. So, grab your cleaning supplies and let’s get started!
Table of Contents
Introduction
If you’re experiencing issues with your inverter power fan, there are a few steps you can take to clean it up and get it functioning properly again. First, it’s important to ensure that the power supply to the inverter is turned off before you begin any maintenance. Once the power is off, you can remove the fan cover to access the fan blades.
Using a small brush or a can of compressed air, carefully remove any dust or debris that may have accumulated on the blades. Be sure to also clean the surrounding area to prevent any particles from being sucked back into the fan. Once the blades and area are clean, you can reattach the fan cover and restore power to the inverter.
Cleaning the fan regularly will help to prevent overheating and prolong the lifespan of your inverter.
What is an Inverter Power Fan?
inverter power fan Introduction: Have you ever heard of an inverter power fan? If not, don’t worry, you’re not alone! Inverter power fans are a relatively new innovation in the world of fans, and they offer some exciting advantages over traditional fans. In this blog post, we’ll explore what exactly an inverter power fan is and how it works. We’ll also dive into the benefits of using an inverter power fan and why you might want to consider investing in one for your home or office.
So, let’s get started and discover the world of inverter power fans!
Why is it Important to Clean Your Inverter Power Fan?
inverter power fan, clean your inverter power fan, importance of cleaning your inverter power fan Introduction: Cleaning your inverter power fan is an essential maintenance task that should not be overlooked. Just like any other electronic device, inverters generate heat during operation. This heat needs to be dissipated to prevent the overheating of internal components.
The inverter power fan plays a crucial role in this dissipation process by pulling in cool air and pushing out hot air. Over time, dust, dirt, and debris can accumulate on the fan blades, obstructing airflow and reducing its efficiency. Regularly cleaning the inverter power fan not only improves its performance but also extends the lifespan of the inverter itself.
In this blog post, we will explore the importance of cleaning your inverter power fan and the steps you can take to keep it running smoothly.
Tools and Materials Needed
When it comes to cleaning up the power fan on an inverter, there are a few tools and materials that you will need. First and foremost, you will need a clean, dry cloth or towel to wipe down the fan. Make sure that the cloth is lint-free and doesn’t leave any residue behind.
Additionally, you may need a small brush or a can of compressed air to remove any dust or debris that may have accumulated on the fan blades. This will help to ensure that the fan is able to function properly and efficiently. It’s also a good idea to have a vacuum cleaner on hand to suck up any loose dirt or dust that may have collected on or around the inverter.
By having these tools and materials ready, you’ll be able to keep your inverter power fan clean and running smoothly for years to come. So, why wait? Get started on cleaning up your inverter power fan today!
Soft brush or cloth
For the best cleaning results, a soft brush or cloth should be used. When it comes to cleaning, using the right tools and materials is essential. A soft brush or cloth allows you to gently remove dirt and grime without causing any damage to the surface you are cleaning.
Whether you are dusting off furniture, wiping down countertops, or cleaning delicate objects, a soft brush or cloth is a must-have. These tools are gentle enough to avoid scratches or marks, yet effective enough to remove dust, dirt, and other particles. So, next time you need to do some cleaning, don’t forget to grab a soft brush or cloth to make your job easier and more effective.
Compressed air canister
tools and materials needed, compressed air canister When it comes to owning a compressed air canister, there are a few tools and materials that you will need to have on hand to ensure that you are able to use it effectively. Firstly, you will need the compressed air canister itself. These canisters are typically made of durable materials such as steel and come in various sizes and capacities.
You will also need a regulator, which attaches to the canister and allows you to control the air pressure that is released. This is important as different tasks may require different levels of pressure. Additionally, you will need a hose or nozzle attachment, which connects to the regulator and allows you to direct the airflow to the desired location.
This can be helpful for tasks such as cleaning, inflating tires, or even powering pneumatic tools. Lastly, it is important to have safety equipment such as goggles and gloves to protect yourself from any potential hazards. With these tools and materials, you will be well-equipped to harness the power of a compressed air canister for a variety of tasks.
Isopropyl alcohol
isopropyl alcohol, tools and materials needed
Cotton swabs
Cotton swabs, also known as Q-tips, are a common household item that has a variety of uses. Whether you are cleaning your ears, applying makeup, or doing arts and crafts, cotton swabs come in handy in many different situations. To use cotton swabs effectively, you will need a few tools and materials.
First and foremost, you will need the cotton swabs themselves. These can be found at any local store and often come in packs of 100 or more. It is always a good idea to have a few extra on hand, as they tend to be used up quickly.
Additionally, you may want to have a small container or cup to hold your cotton swabs. This will keep them organized and make them easy to access when you need them. Lastly, if you plan on using the cotton swabs for any kind of application, such as applying makeup or cleaning wounds, it is a good idea to have some disinfectant or rubbing alcohol on hand.
This will ensure that the swabs are clean and sanitary before use. With these few tools and materials, you will be ready to make the most out of your cotton swabs and use them effectively in any situation.
Step 1: Turn Off and Unplug Your Inverter
One important step in cleaning up your inverter power fan is to turn off and unplug your inverter. This is an essential safety precaution that ensures you don’t accidentally get electrocuted while cleaning. By turning off and unplugging the inverter, you eliminate the risk of electric shock and can safely clean the fan without any power running through the system.
It’s always better to be safe than sorry, and taking this simple step before cleaning your inverter power fan will protect both you and your equipment. So, remember to always turn off and unplug your inverter before attempting any maintenance or cleaning tasks.
Step 2: Remove the Inverter Power Fan Cover
In this step, we will guide you on how to clean up the inverter power fan. The first thing you will need to do is remove the inverter power fan cover. This cover is usually held in place by screws or clips.
Use a screwdriver or your fingers to remove them and gently lift off the cover. Be careful not to damage any parts inside the inverter while doing this. Once the cover is off, you will have easier access to the power fan.
Cleaning the power fan is important because it can accumulate dust and dirt over time, which can affect its performance and efficiency. Regularly cleaning the fan will help keep your inverter running smoothly and efficiently.
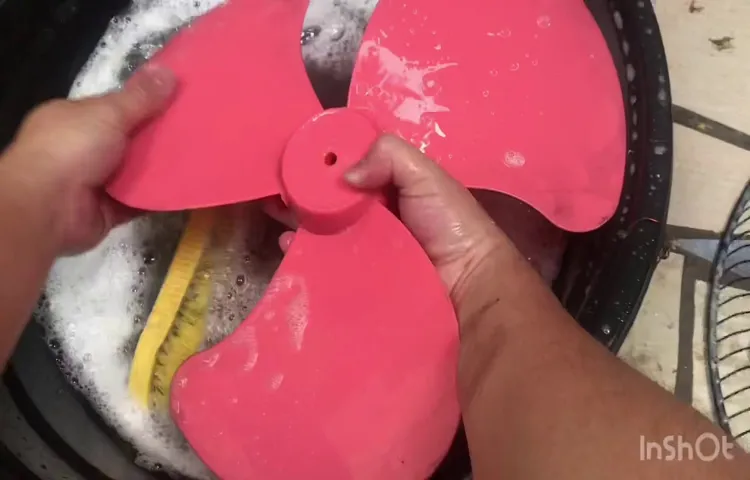
Step 3: Clean the Fan Blades
Now that you’ve unplugged your inverter power fan and removed the front cover, it’s time to move on to the next step: cleaning the fan blades. Over time, dust and dirt can accumulate on the blades, reducing the efficiency of the fan and potentially causing it to overheat. Cleaning the blades is a simple but essential task that can help prolong the life of your fan and ensure optimal performance.
To clean the fan blades, you’ll need a few tools: a soft cloth or microfiber cloth, a vacuum cleaner with a brush attachment, and a can of compressed air. Start by gently wiping the blades with the cloth to remove any loose dust and dirt. Be careful not to apply too much pressure or bend the blades.
If there are stubborn stains or dirt on the blades, you can dampen the cloth slightly with a mixture of water and mild detergent. Next, using the vacuum cleaner with the brush attachment, carefully vacuum the blades to remove any remaining dust and debris. Pay special attention to the areas between the blades, as this is where dust tends to collect the most.
The brush attachment will help loosen any stuck-on dirt and ensure a thorough cleaning. Finally, use the compressed air can to blow away any dust or dirt particles that may still be clinging to the blades. Hold the can a few inches away from the blades and use short bursts of air to avoid damaging the fan.
Move the can back and forth across the blades to ensure all areas are cleaned. Once you’ve cleaned the fan blades, you can also take the opportunity to clean the fan motor and the rest of the fan housing. Use the cloth and vacuum cleaner to remove any dust and dirt from these areas as well.
Cleaning the fan blades of your inverter power fan is a quick and easy task that can help keep your fan running smoothly and efficiently. By regularly cleaning the blades, you can prevent dust build-up and ensure optimal airflow, resulting in a cooler and more comfortable environment. So go ahead and give your fan some TLC – it’ll thank you with a refreshing breeze!
Gently brush or wipe away dust and debris
When it comes to keeping our electronic devices running smoothly, cleaning the fan blades is an essential step. Over time, dust and debris can build up on the blades, causing them to become clogged and less efficient. To clean the fan blades, start by gently brushing or wiping away any visible dust or debris.
Use a soft brush or cloth to avoid scratching the blades. Be sure to get into any hard-to-reach areas and remove as much dust as possible. It’s important to clean the fan blades regularly to prevent them from becoming clogged and potentially overheating your device.
By taking the time to clean the fan blades, you can help extend the life of your electronic device and ensure it continues to run smoothly.
Step 4: Clean the Fan Motor
Cleaning the fan motor is an essential step in maintaining the efficiency and performance of your inverter power fan. Over time, dust and debris can accumulate on the motor, reducing its ability to cool effectively and potentially causing it to overheat. To clean the fan motor, start by unplugging the fan and removing any protective covers.
Use a soft brush or cloth to gently remove any visible dirt or dust from the motor. You can also use a vacuum cleaner with a brush attachment to suck up any loose debris. Be careful not to get the motor wet, as this could damage the electrical components.
Once the motor is clean, replace the protective covers and plug the fan back in. Regularly cleaning the fan motor will help prolong its lifespan and ensure optimal performance.
Use compressed air to blow away dust
cleaning the fan motor One important step in properly maintaining your electric fan is cleaning the fan motor. Over time, dust and debris can accumulate on the motor, causing it to overheat and potentially reducing its lifespan. To clean the fan motor, start by unplugging the fan and ensuring it is completely turned off.
Then, use compressed air to blow away any loose dust or dirt. Be sure to focus on the areas around the motor and vents, as these are the most likely to collect debris. The compressed air will help dislodge stubborn dirt particles and blow them away, leaving your fan motor clean and efficient.
Remember to do this regularly to keep your fan running smoothly and extend its life.
Dampen a cloth or cotton swab with isopropyl alcohol to clean stubborn dirt
Cleaning the fan motor is an essential step in maintaining the functionality and performance of your fan. During regular usage, dirt and dust particles can accumulate on the motor, causing it to run less efficiently and potentially overheat. To clean the fan motor, you’ll need to gather some supplies, including isopropyl alcohol.
Dampen a cloth or cotton swab with the alcohol and gently wipe away any stubborn dirt or grime. Isopropyl alcohol is an effective cleaning agent because it evaporates quickly and leaves no residue behind. This ensures that the fan motor is left clean and free of any contaminants that could hinder its performance.
Remember to be careful when cleaning the motor, as it is a delicate component. Avoid using excessive force or getting any liquid inside the motor housing. Taking the time to clean the fan motor regularly will help to keep your fan running smoothly and efficiently.
Step 5: Reassemble the Inverter
Now that you’ve thoroughly cleaned the power fan in your inverter, it’s time to reassemble everything. Start by carefully placing the fan back onto its designated spot, ensuring that it lines up properly with the screw holes. Then, using the screws you removed earlier, securely fasten the fan back in place.
Be careful not to overtighten the screws, as this can damage the fan or the surrounding components. Next, reconnect any cables or wires that were disconnected during the cleaning process. Take your time to ensure that each connection is secure and properly seated.
Double-check that no connections are loose or damaged, as this can cause issues with the functionality of your inverter. Once all the connections are secure, it’s time to put the cover back on your inverter. Carefully line up the cover with the inverter, making sure that it fits snugly into place.
Depending on the design of your inverter, you may need to use screws, clips, or other fasteners to secure the cover. Finally, give your inverter a quick visual inspection to make sure everything looks clean and properly assembled. If you notice any loose screws, wires, or other components, take the time to address them before powering on your inverter.
And that’s it – you’ve successfully cleaned and reassembled the power fan in your inverter! Now you can confidently power it on, knowing that it’s running at its best.
Replace the fan cover and secure it in place
In step 5 of reassembling the inverter, it’s time to put the fan cover back in place. This is an important step because the fan cover helps to keep the internal components of the inverter safe and secure. To start, make sure you have the fan cover and any necessary screws or clips on hand.
Carefully position the fan cover over the fan and align it with the screw holes or clip slots. Once you have it in the correct position, use a screwdriver or your fingers to secure the cover in place. Make sure all screws are tightened securely, but be careful not to overtighten them as this could cause damage to the cover or the inverter itself.
Once the cover is securely in place, give it a gentle tug to make sure it’s not loose. If everything feels secure, then congratulations! You have successfully reassembled your inverter.
Conclusion
In conclusion, cleaning up an inverter power fan is a breeze (pun intended). By simply following a few easy steps, you can get your fan back to its optimal performance in no time. Remember, a clean fan is a happy fan, and a happy fan means a happy and efficient inverter.
So don’t be afraid to roll up your sleeves and give your fan some TLC. Your inverter will thank you, and so will your electricity bill. Happy cleaning and may your fan forever spin in power-saving glory!
Regularly cleaning your inverter power fan is essential for its optimal performance and longevity
Once you have cleaned all the components of the inverter, it’s time to put everything back together. Reassembling the inverter is a straightforward process, but it’s important to be careful and pay attention to detail. Begin by placing the power fan back into its designated spot on the inverter.
Make sure it is properly aligned and securely attached. Next, reattach any screws or fasteners that were removed during the disassembly process. Be sure to tighten them securely, but not too tight as to damage the components.
Once all the screws are in place, give the inverter a final inspection to ensure everything looks as it should. Congratulations, you have successfully reassembled your inverter!
Follow these easy steps to ensure a clean and well-maintained inverter
reassemble the inverter, clean and well-maintained inverter Now that you have thoroughly cleaned and inspected each individual component of your inverter, it’s time to put everything back together. Reassembling the inverter is a straightforward process, but it’s important to take your time and make sure everything is lined up properly. Start by carefully placing the circuit board back into the housing, ensuring that all the connectors fit snugly into their respective slots.
Next, reattach any screws or fasteners that you removed during the disassembly process, making sure they are tightened securely. Finally, replace the cover of the inverter and secure it in place. Once the inverter is reassembled, give it one final inspection to make sure everything is in order before you power it back on.
By following these steps and regularly cleaning and maintaining your inverter, you can ensure that it remains in optimal working condition for years to come.
Consult your inverter’s manual for specific cleaning instructions
consult inverter’s manual, cleaning instructions, reassemble the inverter. Once you have completed the cleaning process for your solar inverter, it’s time to reassemble it. This is an important step to ensure that the inverter is functioning properly and safely.
First, refer to the manual that came with your specific inverter model for any specific reassembly instructions. The manual will provide you with the necessary guidance on how to correctly put all the components back together. It may also provide information on any additional steps you need to take to properly secure the inverter, such as tightening screws or bolts.
By consulting the manual, you can have the peace of mind knowing that you are reassembling your inverter according to the manufacturer’s specifications and guidelines. This will help ensure that your solar system continues to operate efficiently and effectively.
FAQs
Why is it important to clean the inverter power fan?
Cleaning the inverter power fan is important to ensure proper ventilation and prevent overheating, which can lead to damage or failure of the inverter.
How often should I clean the inverter power fan?
It is recommended to clean the inverter power fan at least once every six months to ensure optimal performance and prevent dust buildup.
What tools do I need to clean the inverter power fan?
To clean the inverter power fan, you will need a soft brush or compressed air canister to remove the dust and debris from the fan blades and surrounding area.
Can I clean the inverter power fan while it is still running?
No, it is important to turn off the inverter and disconnect it from the power source before cleaning the power fan. This ensures safety and prevents any accidental damage.
How can I access the inverter power fan for cleaning?
The inverter power fan is usually located on the side or rear panel of the inverter. You may need to remove the outer casing or access panel to reach the fan for cleaning.
Is it necessary to clean the inverter power fan if it is installed in a clean environment?
Even in a clean environment, dust and debris can still accumulate over time, so it is recommended to clean the inverter power fan periodically to maintain optimal performance.
What are the signs that the inverter power fan needs cleaning?
If you notice excessive noise, decreased airflow, or the inverter getting warmer than usual, it may be a sign that the power fan needs cleaning. Regular maintenance will help prevent these issues.