So you’ve got yourself a power inverter and you’re ready to tap into that sweet, sweet electricity while on the go. But how exactly do you connect it to your car or battery? Well, fear not my friend, because I’ve got you covered. In this blog post, I’ll walk you through the step-by-step process of connecting a power inverter so you can power up your devices and appliances whenever and wherever you please.
Think of it as plugging in your electronic lifeline, ensuring that you’re never left without power when you need it most. So grab your tools and let’s dive right in!
Table of Contents
Introduction
How to Connect a Power Inverter: A Step-by-Step Guide Have you ever found yourself needing to power electrical devices on the go? Whether you’re going on a camping trip or need to charge your laptop while on a road trip, a power inverter can be a lifesaver. But how exactly do you connect a power inverter? Let’s break it down step by step. The first thing you want to do is determine the power rating and type of your inverter.
This information can usually be found on a label on the inverter itself. Next, you’ll need to connect the inverter to your vehicle’s battery. Start by turning off the engine and disconnecting the negative (-) battery cable.
Then, use appropriate-sized cables to connect the positive (+) battery terminal to the positive (+) terminal on the inverter, and the negative (-) battery terminal to the negative (-) terminal on the inverter. Once the connections are secure, you can reattach the negative (-) battery cable. Now, you’re ready to plug in your electrical devices and start enjoying the convenience of portable power.
Just remember to use caution and read the manufacturer’s instructions to ensure you’re using the inverter correctly and safely. So go ahead, stay powered up no matter where you roam!
Overview of Power Inverters
power inverters

Benefits of Using a Power Inverter
power inverter
Step 1: Choose the Right Power Inverter
So you’re ready to connect a power inverter, huh? Well, the first step is to choose the right one for your needs. Power inverters come in various sizes and power outputs, so it’s important to consider what you’ll be using it for. Do you need to power small electronic devices like laptops and smartphones, or do you need to power larger appliances like refrigerators or power tools? This will determine the wattage and voltage requirements of your inverter.
It’s also important to consider the type of connection you’ll be using. Some power inverters connect directly to your vehicle’s battery, while others can be plugged into a cigarette lighter socket. So take some time to research and find the inverter that’s best suited for your specific needs.
Determine your Power Needs
When it comes to choosing the right power inverter, the first step is to determine your power needs. Power inverters come in different sizes and capabilities, so it’s important to understand how much power you will need before making a decision. To determine your power needs, you should consider the appliances or devices you will be using with the inverter.
Each device will have a specific power requirement, which is usually measured in watts. You can usually find this information on the device itself or in the owner’s manual. Once you have a list of the devices you will be using, add up the power requirements for each device to determine your total power needs.
Make sure to account for any additional devices you may want to power in the future. It’s also important to consider the surge power requirement of certain devices. Some appliances, like refrigerators or air conditioners, require an initial surge of power when they start up.
This surge can be higher than the device’s normal power requirement, so it’s important to factor this in when choosing an inverter. Once you have determined your power needs, you can start looking for a power inverter that meets your requirements. Look for an inverter that has a maximum power rating that is higher than your total power needs to ensure that it can handle the highest power demands.
By taking the time to determine your power needs, you can choose the right power inverter that will provide enough power for all of your devices and appliances.
Consider the Inverter Type
power inverter, inverter type, choose the right power inverter
Select the Correct Inverter Size
inverter size, choose the right power inverter Have you ever wondered how to select the correct inverter size for your needs? Well, look no further because this blog post will guide you through the process. Step 1 is to choose the right power inverter for your specific requirements. Power inverters come in various sizes and capacities, so it’s essential to determine the correct one for your unique situation.
Whether you need an inverter for powering small electronic devices or running larger appliances, selecting the appropriate size is crucial for optimal performance. Just like choosing the perfect outfit for a specific occasion, selecting the right power inverter will ensure that your devices receive the correct amount of power and perform as they should. So, let’s dive into step 1 of the process and learn how to choose the ideal power inverter for your needs.
Step 2: Prepare the Connection
So you’ve got yourself a power inverter and you’re ready to connect it to your electrical system. Great! Let’s get started with step 2, which is preparing the connection. Before you begin, make sure you have all the necessary tools and materials handy.
You’ll need a screwdriver, wire cutters, wire strippers, electrical tape, and of course, your power inverter. First, locate your vehicle’s battery. It’s usually found under the hood or in the trunk.
Once you’ve found it, you’ll need to disconnect the negative terminal of the battery. This is an important safety precaution to avoid any accidental electric shocks or short circuits. Next, find a suitable location to mount your power inverter.
It should be securely mounted and easily accessible for future maintenance. Once you’ve found the perfect spot, use screws or brackets to mount it in place. Now, it’s time to connect the inverter to the battery.
Start by connecting the positive terminal of the inverter to the positive terminal of the battery. Make sure to tighten the connection securely to ensure a proper electrical connection. Then, connect the negative terminal of the inverter to the negative terminal of the battery.
Again, double-check that the connection is tight and secure. To ensure there are no loose or exposed wires, wrap each connection with electrical tape. This will prevent any accidental contact or short-circuiting.
Safety Precautions
“Step 2: Prepare the Connection – Ensuring Safety Precautions” Before you start connecting any devices, it is essential to take a few safety precautions to protect yourself and your equipment. One of the first things you should do is make sure to turn off the power to the devices you will be working with. This will help prevent any electrical shocks or damage that may occur during the connection process.
Additionally, it is crucial to use the appropriate safety gear, such as gloves and safety glasses, to protect yourself from any potential harm. Once you have taken these initial safety measures, you can begin preparing the connection between your devices. Start by inspecting the cables you will be using, ensuring they are in good condition.
Look out for any frayed or exposed wires that could be dangerous. It is also important to choose the right type of cable for your connection. Different devices may require different cables, so be sure to check the user manual or do some research beforehand.
Next, find a suitable location for your devices. Make sure to choose a stable surface that is free from any potential hazards, such as water or flammable materials. Setting up your devices in a safe and secure location will help prevent accidents or damage during the connection process.
Before you actually connect the devices, it is a good idea to double-check that you have all the necessary tools and equipment on hand. This can include screwdrivers, wrenches, or any other specialized tools that may be required. Having everything ready and easily accessible will make the connection process smoother and minimize the risk of accidents.
Overall, taking the time to prepare the connection properly and taking the necessary safety precautions will help ensure a successful and secure setup. By being proactive and mindful of potential risks, you can avoid any accidents or damage and enjoy a worry-free connection experience.
Gather the Necessary Tools and Materials
To prepare the connection for your DIY project, you’ll need to gather the necessary tools and materials. This step is crucial in ensuring that everything is ready before you begin working on the connection. First, make sure you have the right tools for the job, such as wire strippers, a screwdriver, and pliers.
These tools will come in handy when working with the wires and connectors. Next, gather the materials you’ll need, like electrical tape, wire nuts, and a junction box. These materials will help secure and protect the connection once it’s made.
It’s important to have everything you need on hand before you start the project to avoid any delays or interruptions. So, take the time to gather your tools and materials, and make sure everything is readily available.
Step 3: Connect the Power Inverter
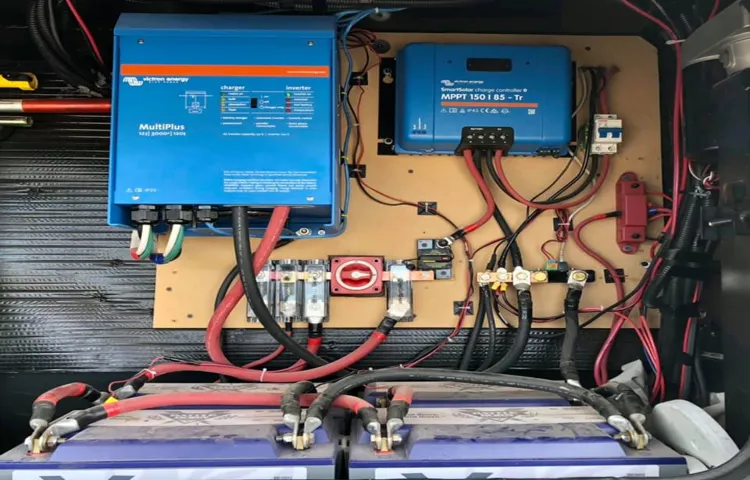
Now that you have your power inverter ready to go, it’s time to connect it to your electrical system. The first thing you’ll want to do is locate the battery in your vehicle. This is where you’ll be connecting the power inverter.
Once you’ve found the battery, you’ll need to connect the positive and negative cables from the inverter to the corresponding terminals on the battery. It’s important to make sure you have a secure connection here, as any loose or faulty connections can cause your inverter to not work properly or even cause damage to your vehicle. Once you have the cables securely connected, you can then connect any devices or appliances that you want to power with the inverter.
Simply plug them into the outlets on the inverter, just like you would with a regular power outlet. And there you have it – your power inverter is now connected and ready to use! Just remember to always use caution when operating electrical equipment in your vehicle, and if you’re unsure about anything, it’s always best to consult a professional.
Locate the Battery
power inverter. So, you’ve found your battery and now it’s time to connect the power inverter. This is a crucial step in setting up your power system, as it will convert the DC power from your battery into the AC power that your electronic devices need to operate.
To connect the power inverter, you’ll need to locate the positive and negative terminals on your battery. These terminals are usually marked with a plus (+) and minus (-) sign. Take a moment to familiarize yourself with these terminals and make sure you know which one is which.
Once you’ve identified the positive and negative terminals, the next step is to connect the cables from the power inverter to the battery. Start by connecting the positive cable from the inverter to the positive terminal on the battery. It’s essential to connect the positive cable first, as this will minimize the risk of any accidental sparking.
Next, connect the negative cable from the inverter to the negative terminal on the battery. Again, make sure you have a secure connection, as this will be crucial for the proper functioning of your power system. Once you’ve connected the cables, it’s a good idea to double-check your connections to ensure they are secure.
Give them a gentle tug to make sure they won’t come loose. It’s also important to take note of any warnings or instructions that may come with your specific power inverter, as these may vary from model to model. And there you have it – you’ve successfully connected your power inverter to the battery.
With this step complete, you’re one step closer to having a fully functional power system that can provide you with the AC power you need for your electronic devices. Now, it’s time to move on to the next step and start enjoying the benefits of your newly installed power system.
Connect the Inverter Cables to the Battery
power inverter, inverter cables, battery connection
Secure the Connection
power inverter, secure the connection
Step 4: Test the Power Inverter
When it comes to connecting a power inverter, the first step is to test it to ensure everything is working properly. This step is crucial to avoid any potential damage to your electronic devices or the power inverter itself. To test the power inverter, start by plugging it into a power source, such as a car battery or a portable generator.
Then, connect a small electronic device, like a phone charger, to the inverter’s AC outlet. If the device powers on and charges properly, it means that the inverter is functioning correctly. However, if the device doesn’t turn on or charges slowly, there may be a problem with the inverter.
In this case, you should double-check the connections and consult the inverter’s manual for troubleshooting tips. Testing the power inverter ensures that it is ready to be used and can provide the necessary power for your devices when you need it.
Turn on the Power Inverter
power inverter, test power inverter, turn on power inverter
Check for Correct Operation
power inverter, test power inverter
Conclusion
So, there you have it – the elusive art of connecting a power inverter demystified. Now, with these foolproof steps, you can harness the power of the mystical inverter and transform your DC energy dreams into AC reality. Just remember, connecting a power inverter is like unraveling the secrets of the universe – it takes a bit of know-how, a dash of confidence, and a sprinkle of wizardry.
But fear not, for with this guide as your trusty spellbook, you’ll soon be conjuring enough electricity to make Nikola Tesla proud. Whether you’re charging your phone on a camping trip, powering your laptop in the middle of nowhere, or simply enjoying the satisfaction of sticking it to the power company, your power inverter will be the ultimate magician’s assistant. So, grab your cables, channel your inner Merlin, and become the master of your own portable power kingdom.
Just be sure to keep an eye out for any suspicious owls delivering acceptance letters to a certain school of magic – they might be after your power inverter secrets too!”
Ensure a Stable and Secure Connection
In order to ensure a stable and secure connection for your power inverter, it is crucial to test it thoroughly. This step is often overlooked, but it is essential for the proper functioning of your power inverter. Testing the power inverter involves checking its voltage output, as well as verifying that it is capable of providing a stable and reliable power supply.
To test the voltage output, you can use a multimeter or a voltage tester. Simply connect the probes of the multimeter or voltage tester to the positive and negative terminals of the power inverter, and check the reading. The voltage should be within the specified range for your particular power inverter.
Additionally, you should also check that the power inverter is capable of sustaining a stable power supply. You can do this by connecting it to a load, such as a small appliance or a light bulb, and observing if there are any fluctuations in the power output. If the power inverter is unable to maintain a steady power supply, it may indicate a fault in the inverter and further troubleshooting may be required.
By thoroughly testing your power inverter, you can ensure that it will provide a stable and secure connection for all your power needs.
Enjoy the Benefits of Using a Power Inverter
power inverter, test the power inverter, benefits of using a power inverter So, you’ve installed your power inverter and you’re ready to start enjoying all the benefits it has to offer. But before you start plugging in your devices, it’s important to test the power inverter to make sure everything is functioning correctly. Testing your power inverter is a crucial step to ensure that it is capable of providing the power you need and that it won’t cause any damage to your devices.
To test the power inverter, start by connecting it to a fully charged battery. Make sure the inverter is turned off before you connect it to the battery terminals. Once connected, turn on the inverter and check for any LED lights or displays that indicate it is receiving power and functioning properly.
Next, plug in a small electronic device such as a phone charger or a laptop charger into one of the AC outlets on the inverter. Make sure the device is turned on and functioning. If the device powers on and charges successfully, it means that the power inverter is working correctly and is capable of providing power to your devices.
If the device doesn’t power on or charges slowly, there may be an issue with the inverter. Check all the connections to make sure they are secure and properly connected. If the issue persists, you may need to consult the user manual or contact the manufacturer for further troubleshooting steps.
Testing your power inverter is an essential step in ensuring that it is reliable and safe to use. It gives you the peace of mind that your devices will be powered properly without any issues. So, before you start using your power inverter, take the time to test it and make sure everything is working as it should.
FAQs
What is a power inverter and what does it do?
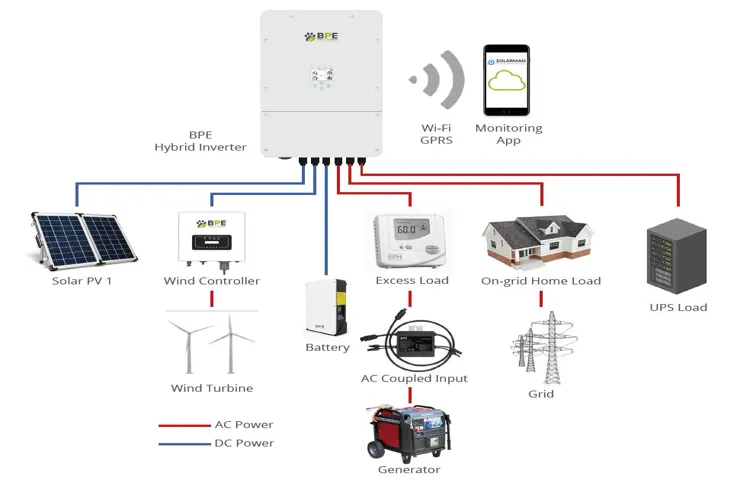
A power inverter is a device that converts direct current (DC) into alternating current (AC), allowing you to use AC-powered devices in your vehicle or other DC power sources.
How do I connect a power inverter to my car?
To connect a power inverter to your car, you need to locate the car’s battery, connect the inverter’s positive cable to the battery’s positive terminal, connect the inverter’s negative cable to the car’s chassis or ground point, and then connect your AC-powered devices to the inverter’s AC outlets.
Can I connect a power inverter directly to a solar panel?
Yes, you can connect a power inverter directly to a solar panel by using a charge controller. The charge controller regulates the voltage and current output from the solar panel to ensure compatibility with the inverter.
What size power inverter do I need for my RV?
The size of the power inverter you need for your RV depends on the power requirements of the devices you want to run. To determine the size, add up the wattage of all the devices you want to power simultaneously and choose an inverter with a higher wattage rating than the total.
Can I connect multiple batteries to a power inverter for increased capacity?
Yes, you can connect multiple batteries to a power inverter for increased capacity. This is called a battery bank. However, it’s important to ensure that the batteries are connected in parallel to maintain the same voltage and increase the overall capacity.
What safety precautions should I take when connecting a power inverter?
When connecting a power inverter, you should make sure to use appropriate gauge cables, secure all connections properly, and follow the manufacturer’s instructions. Additionally, avoid overloading the inverter and use proper ventilation to prevent overheating.
Can I use a power inverter in my home or office?
Yes, you can use a power inverter in your home or office if you need to power AC devices during a power outage or in areas without grid electricity. However, it’s important to ensure that the inverter is properly connected, and the total wattage of the devices does not exceed the inverter’s capacity.


