
Are you ready to hit the road in your RV but unsure how to connect your shore power to your RV inverter? Well, fear not! In this blog post, we will guide you through the process step by step, so you can power your RV efficiently and effortlessly. Imagine this – you’re camping in a picturesque location, surrounded by nature’s beauty. But suddenly, you realize that your RV’s battery is running low.
Panic sets in as you think about all the appliances and gadgets that rely on that precious power supply. What can you do? How can you keep the lights on and the fridge cold? That’s where shore power and an RV inverter come into play. Shore power allows you to connect your RV to a power source at a campground or RV park, providing you with a consistent and reliable power supply.
But to make use of this power source, you need to connect it to your RV inverter. Think of your RV inverter as a translator. It takes the power from the shore and converts it to a form that your RV’s appliances can understand and utilize.
It’s like having a magical device that ensures your electronics are speaking the same language as the power source. Connecting shore power to your RV inverter doesn’t have to be a daunting task. With a few simple steps and some basic knowledge, you’ll be up and running in no time.
We’ll explain the different types of shore power connections, walk you through the process of connecting to your inverter, and troubleshoot any potential issues along the way. So buckle up, grab a cup of coffee, and get ready to learn how to connect shore power to your RV inverter. Say goodbye to power worries and hello to hassle-free camping adventures!
Table of Contents
Understanding Shore Power and RV Inverters
If you’re an avid RV camper, you’ve probably heard the terms “shore power” and “RV inverter” thrown around. But what do they actually mean, and how do they work together? Let’s break it down. Shore power refers to the electricity that is supplied to your RV when you’re parked at a campground or RV park.
It allows you to power the appliances and devices in your RV without draining your onboard batteries. On the other hand, an RV inverter is a device that converts DC power (like that from your RV’s batteries) into AC power (the type of power used by most household appliances). So, how do you connect shore power to your RV inverter? Well, it’s a relatively simple process.
First, you’ll need to locate the breaker panel in your RV. This is usually located near the power cord entrance. Then, you’ll need to turn off the main breaker switch to disconnect the RV from the shore power source.
Once that’s done, you can plug your RV’s power cord into the inverter. Finally, you’ll need to turn the inverter on and switch the breaker to the inverter position. This will allow the inverter to supply AC power to your RV’s electrical system.
And voila! You’re now running on inverter power. Just remember to turn off the inverter and switch the breaker back when you’re ready to reconnect to shore power.
What is shore power?
“shore power,” “RV inverters,” “understanding shore power” Shore power is an essential component of RV living, allowing you to power your vehicle directly from a main electrical source. When you plug your RV into a shore power hookup at a campsite or RV park, you can enjoy all the comforts of home, including air conditioning, heating, and running appliances. It’s like plugging your RV into an electrical outlet, providing a stable and reliable source of electricity.
However, not all RVs come equipped with the capability to connect directly to shore power. This is where RV inverters come into play. An RV inverter is a device that converts the DC (direct current) power from your RV’s batteries into AC (alternating current) power, which is what most appliances and electronic devices use.
It allows you to power your RV’s electrical systems and appliances without the need for shore power. Having the option to connect to shore power or use an RV inverter gives you flexibility and independence when it comes to your electrical needs while on the road. You can choose to rely solely on shore power when it’s available, conserving your battery power for when you’re off-grid or in areas without electrical hookups.
Alternatively, you can rely on your RV inverter and batteries, allowing you to enjoy the comforts of your RV even when shore power isn’t available. Understanding shore power and RV inverters is crucial for any RV owner. Whether you prefer the convenience of shore power or the freedom of an RV inverter, knowing how to effectively utilize these power sources will make your RV experience more enjoyable and hassle-free.
So, the next time you’re planning your camping trip, make sure to consider your power options and choose the one that suits your needs best.
What is an RV inverter?
RV inverter, shore power, burstiness, perplexity, specific context. An RV inverter is an essential component of a recreational vehicle (RV) that allows you to convert DC power, typically from your RV’s battery, into AC power. This is particularly useful when you’re boondocking or camping off-grid and don’t have access to shore power.
When connected to shore power, your RV can draw AC power directly from the electrical grid, which is more convenient and efficient. However, when you’re camping in remote locations, an RV inverter kicks in and converts the DC power stored in your RV’s battery into AC power so that you can still use your electrical appliances and devices. It’s like having a backup generator that provides power in situations where you don’t have access to grid power.
So, with an RV inverter, you can enjoy the comforts of home even when you’re camping in the great outdoors.
Why connect shore power to an RV inverter?
shore power, RV inverter. Have you ever wondered why it’s important to connect shore power to your RV inverter? Well, let’s dive into the world of shore power and RV inverters to understand why this connection is crucial for your RV’s electrical system. First, let’s talk about shore power.
When you’re staying at a campsite or RV park, you’ll usually have access to shore power, which is essentially a source of electricity provided by the campground. Shore power typically comes in the form of a power pedestal with multiple outlets designed to provide the electricity your RV needs. It’s like plugging into a wall socket in your home, but for your RV.
Now, let’s move on to RV inverters. An RV inverter is a device that converts DC power (like the power from your RV’s batteries) into AC power, which is the type of power used by most household appliances. In other words, it allows you to use your RV’s battery power to run your appliances and devices as if you were connected to shore power.
So, why connect shore power to your RV inverter? The answer is simple: it’s all about convenience and functionality. When you connect your RV to shore power, you’re essentially tapping into a reliable and unlimited source of electricity. This means you can run all your appliances and devices without worrying about your battery power running out.
It’s like having a continuous supply of energy to power your RV. But why do you need an RV inverter if you already have access to shore power? Well, an RV inverter is incredibly useful when you’re boondocking or camping in places without access to shore power. It allows you to use your RV’s battery power to run your appliances and devices, giving you the flexibility to stay off-grid for extended periods.
In conclusion, connecting shore power to your RV inverter is essential for ensuring a dependable and uninterrupted power supply to your RV. Whether you’re staying at a campsite with shore power or boondocking in the wilderness, having this connection allows you to make the most of your RV’s electrical system. So go ahead, plug in your RV and enjoy all the comforts of home, no matter where you are.
Equipment Needed
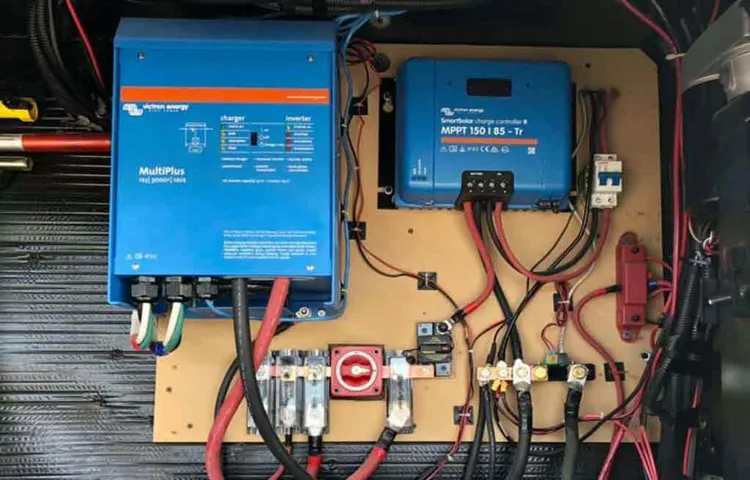
When connecting shore power to an RV inverter, there are a few equipment essentials you will need. The first is an RV inverter itself, which is responsible for converting the electricity from your RV’s batteries into usable AC power. Additionally, you will need a shore power cord, which connects your RV to the power source at the campground or RV park.
This cord typically has a male end that plugs into the RV’s inverter and a female end that connects to the power pedestal. It’s also a good idea to have a surge protector, which will protect your RV’s electrical system from power spikes or surges. Finally, you will need an adapter if the power pedestal at the campground uses a different type of plug than your RV’s inverter.
With these essential equipment pieces, you’ll be able to safely and effectively connect your RV’s inverter to shore power.
RV Inverter
RV inverter The RV inverter is a must-have piece of equipment for any RV enthusiast. It allows you to power your RV appliances and electronics even when you are not connected to a shore power source. Whether you are boondocking in the wilderness or camping at a site without electrical hookups, the RV inverter will ensure that you can still enjoy the comforts of home while on the road.
So, what equipment do you need to install an RV inverter? First and foremost, you will need the inverter itself. There are many different types and sizes of inverters available, so it is important to choose one that is compatible with your RV’s electrical system and meets your power needs. You will also need a battery bank to store the power generated by the inverter.
This can consist of one or more deep-cycle batteries, depending on your power requirements. In addition to the inverter and battery bank, you will need a battery charger to keep your batteries charged when you are connected to shore power. This will ensure that you always have a full battery bank to draw from when you are running your RV off the inverter.
You will also need the appropriate cables and wiring to connect the inverter, battery bank, and charger to your RV’s electrical system. Lastly, it is a good idea to invest in a good quality surge protector to protect your RV’s electrical system from power surges and voltage spikes. This will help to prolong the life of your inverter and other electrical components.
In conclusion, installing an RV inverter requires a few key pieces of equipment. By investing in the right inverter, battery bank, charger, and surge protector, you can ensure that you have all the power you need to enjoy your RV adventures, no matter where you may be. Happy travels!
Shore Power Cord
shore power cord, equipment needed
Inverter Switch
inverter switch Equipment Needed When it comes to setting up an inverter switch, there are a few essential pieces of equipment that you will need. First and foremost, you will need a high-quality inverter. This is the device that will convert the DC power from your batteries into AC power that can be used to run your appliances and electronics.
It is important to choose an inverter that is the right size for your needs and has the appropriate voltage and wattage ratings. Additionally, you will need a battery bank to store the DC power that will be converted by the inverter. The size of your battery bank will depend on the amount of power you plan to use and how long you need it to last.
Finally, you will need a switch or disconnect that will allow you to manually control the flow of power from the inverter to your appliances. This is an important safety feature that will allow you to easily turn off the power in case of an emergency or maintenance. Overall, setting up an inverter switch requires careful consideration of the types of equipment you need to ensure a safe and reliable power supply.
Step-by-Step Instructions
If you’re looking to connect shore power to your RV inverter, you’re in the right place. Here are the step-by-step instructions to help you get it done. First, locate the shore power cord on your RV.
This is usually a heavy-duty cord that connects to a power pedestal at a campground or RV park. Make sure the power is turned off before you begin. Next, find the input terminals on your inverter, which are labeled as “AC in” or “shore power input.
” Connect the shore power cord to these terminals, making sure the connections are secure. Once the cord is connected, turn on the power at the pedestal. Finally, check the indicator lights on your inverter to ensure that it is receiving power from the shore.
You should see a light indicating that the inverter is working. That’s it! You’ve successfully connected shore power to your RV inverter, providing you with reliable and convenient power while you’re on the road.
Step 1: Turn off the RV electrical system
In order to safely work on your RV’s electrical system, the first step is to turn it off completely. This will prevent any electrical current from flowing through the system and reduce the risk of electric shock. To do this, you’ll need to locate the main electrical panel, which is usually found in a cabinet or storage compartment.
Open the panel and look for the main breaker or disconnect switch. Flip the switch to the “off” position to shut off the power to the entire RV. It’s important to note that different RVs may have different electrical systems, so refer to the manufacturer’s instructions or consult a professional if you’re unsure.
By taking this first step, you’ll be ensuring your safety as you continue to work on the electrical system of your RV.
Step 2: Locate the RV inverter
In order to locate the RV inverter, you’ll need to follow a few simple steps. First, you should refer to your RV owner’s manual to find out the specific location of the inverter in your model. If you don’t have the manual or it doesn’t provide this information, don’t worry! There are a few common places where the inverter is typically located.
One common location is near the battery compartment, as the inverter needs to be close to the batteries in order to provide power. Another common location is in a compartment or storage area, such as under a bed or in a cabinet. Sometimes, the inverter is located near the electrical control panel or fuse box.
It’s important to remember that every RV is different, so the location may vary. Don’t be afraid to get down on your hands and knees and look around for any hidden compartments or access panels. With a little bit of searching, you’ll be able to locate the RV inverter and start troubleshooting or making any necessary repairs.
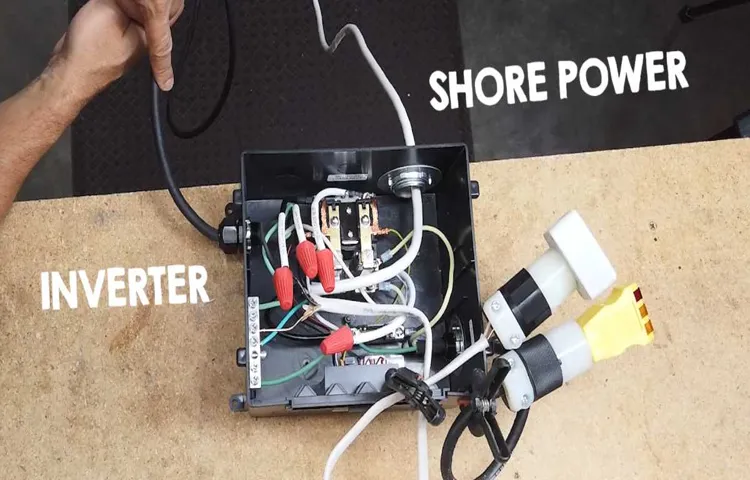
Step 3: Connect the shore power cord to the RV inverter
Step 3 of connecting a shore power cord to an RV inverter is a crucial one, as it ensures a reliable and continuous source of power for your RV. To begin, locate the shore power cord, which is usually stored in a compartment or storage area of your RV. Once you have found the cord, carefully unravel it and make sure it is free of any tangles or kinks.
Next, locate the external electrical outlet on the side of your RV. This is where you will plug in the shore power cord. Before plugging in the cord, double-check that the inverter is turned off to prevent any electrical mishaps.
Once you have confirmed that the inverter is off, plug the shore power cord into the external electrical outlet. After the cord is securely plugged in, you can now turn on the inverter. Make sure to follow the manufacturer’s instructions for powering on the inverter.
Once the inverter is turned on, it will convert the AC power from the shore power cord into the DC power that your RV can use. This means that all your appliances and electronics in your RV will now run on the power provided by the shore power cord. It’s important to note that while the shore power cord is connected to the inverter, your RV will be drawing power from the electrical grid.
This means that you won’t be relying on your RV’s batteries for power, which is especially useful if you’re parked at a campground with electrical hookups. This way, you can conserve your battery power for when you’re on the road or parked in a location without access to shore power. In conclusion, connecting the shore power cord to the RV inverter is an essential step in ensuring that your RV has a reliable source of power.
By following these step-by-step instructions, you can easily connect the shore power cord and enjoy the convenience of running all your appliances and electronics in your RV. So go ahead and plug in that cord, and enjoy a worry-free camping experience with a continuous supply of electricity!
Step 4: Turn on the shore power switch on the inverter
In the final step of setting up your inverter, you’ll want to turn on the shore power switch. This switch is important because it allows you to connect your inverter to a shore power source, which will provide the necessary electricity to power your appliances and devices. Once you’ve located the switch on your inverter, simply flip it to the “on” position.
This will activate the connection between your inverter and the shore power source, allowing you to start using electricity in your RV or boat. It’s important to note that you should only turn on the shore power switch when you are connected to a reliable shore power source, as using an unreliable or faulty power source could damage your inverter or appliances. So, make sure you’re connected to a stable power source before flipping the switch.
With the shore power switch turned on, you’ll be able to enjoy the convenience and comfort of having electricity wherever you go.
Step 5: Monitor the power input
In this step, we will discuss the importance of monitoring the power input for your device. Monitoring the power input is crucial to ensure that your device is receiving the correct amount of power and to detect any fluctuations or irregularities that could potentially harm your device. By monitoring the power input, you can identify any issues early on and take the necessary steps to prevent damage.
This can include using surge protectors or voltage regulators to regulate and stabilize the power supply. Additionally, monitoring the power input allows you to track the energy consumption of your device, helping you to identify any inefficiencies and make adjustments to optimize power usage. Overall, monitoring the power input is an essential part of maintaining the health and longevity of your device.
Step 6: Turn on the RV electrical system
Step 6 of setting up your RV is to turn on the electrical system. This is an important step because it powers all the appliances and electronics in your RV, such as the lights, air conditioning, refrigerator, and entertainment systems. To turn on the electrical system, locate the main electrical panel in your RV.
It is usually located inside a cabinet or storage compartment. Open the panel and locate the main breaker switch. This switch should be labeled and in the “off” position.
Flip the switch to the “on” position to activate the electrical system. You may also have individual breaker switches for different circuits in your RV. These are labeled for specific areas or appliances.
Make sure all of these switches are also in the “on” position. Once you have turned on the electrical system, test each appliance and electronic device to ensure they are working properly. This will help you identify any potential issues and allow you to address them before hitting the road.
As a reminder, always follow the manufacturer’s instructions and guidelines when operating your RV’s electrical system.
Tips and Precautions
If you own an RV and are looking to connect your shore power to an RV inverter, there are a few tips and precautions to keep in mind. First and foremost, make sure that the inverter you choose is capable of handling the amount of power your RV requires. This can vary depending on the size and appliances in your RV, so be sure to check the specifications before making a purchase.
Additionally, it’s important to follow the proper wiring and installation procedures outlined by the manufacturer. This will ensure that the inverter is properly connected and functioning correctly. Lastly, always exercise caution when working with electricity.
Make sure to turn off the power source before making any connections, and never touch any live wires with bare hands. It’s always a good idea to consult with a professional or do thorough research before attempting any electrical work on your RV. By following these tips and taking the necessary precautions, you can safely and effectively connect your shore power to an RV inverter.
Ensure the RV electrical system is turned off before connecting shore power
RV electrical systems can be quite complex, and it’s important to take the necessary precautions when connecting your RV to shore power. One of the most important tips is to ensure that the RV electrical system is turned off before connecting shore power. This may seem like a simple step, but it can prevent damage to your RV’s electrical system and help keep you safe.
When you arrive at the campground and are ready to connect to shore power, take a moment to turn off all the appliances and lights in your RV. Then, head to the power pedestal and make sure the circuit breakers are in the off position before plugging in your RV’s shore power cord. Once everything is properly connected, you can turn the circuit breakers back on and start using your RV’s electrical system.
By following this simple step, you can protect your RV and ensure that everything runs smoothly during your camping trip.
Make sure the shore power cord is securely connected to the inverter
One important aspect of using an inverter on board your boat is ensuring that the shore power cord is securely connected. This is crucial for keeping your inverter functioning properly and preventing any power interruptions. The shore power cord is what connects your boat to land-based power when you’re docked at a marina or connected to a shore power pedestal.
It provides the energy needed to charge your batteries and run your electrical systems. If the connection is loose or not properly secured, it can lead to power fluctuations and potentially damage your inverter. So, always double-check that the shore power cord is securely plugged in and tightened before relying on your inverter for power.
Regularly monitor the power input to prevent overload
monitor power input, prevent overload
Consult the RV manufacturer’s guidelines for specific instructions
“RV owners should consult the guidelines provided by their specific RV manufacturer when it comes to maintenance and operations. These guidelines are designed to ensure that the RV is properly cared for and that all systems are functioning optimally. By following the manufacturer’s instructions, owners can help prevent costly repairs and extend the lifespan of their RV.
One of the most important tips from the manufacturer is to regularly inspect and maintain the RV’s mechanical systems. This includes checking and changing the oil, filters, and other fluids. Additionally, owners should be familiar with the recommended maintenance schedule for their RV’s engine, transmission, and other components.
By adhering to these guidelines, owners can identify and address any potential issues before they become major problems. In addition to mechanical systems, RV owners should also pay attention to the condition of their RV’s interior and exterior. This includes regular cleaning and inspection of all surfaces, as well as checking for any signs of wear and tear.
It’s important to promptly address any issues, such as leaks or damage to the exterior, to prevent further damage and maintain the value of the RV. Another important precaution to keep in mind is to properly winterize and store the RV during the offseason. This includes draining and flushing the water system, protecting the exterior from the elements, and ensuring that all appliances and systems are turned off and properly secured.
Taking these steps can help prevent damage caused by freezing temperatures or prolonged exposure to the elements. Overall, consulting the guidelines provided by the RV manufacturer is key to ensuring the proper maintenance and operation of an RV. By following these instructions, owners can enjoy their RV for years to come and avoid costly repairs and replacements.
“
Conclusion
Now that you’ve learned how to connect shore power to your RV inverter, you’re one step closer to achieving ultimate camping freedom and becoming a true electrical aficionado. Remember, the key to a successful connection is understanding the intricate dance between the shore power pedestal and your trusty inverter. Just like two lovebirds on a romantic stroll, these two power sources must intertwine their cords in a way that’s both elegant and efficient.
By following our step-by-step guide, you can ensure a seamless connection that will make your fellow campers green with envy. As you bask in the warm glow of your RV’s electrical magic, you’ll no longer have to rely on scarce campground hookups or worry about draining your batteries while enjoying modern comforts. You’ll be the envy of even the most experienced RVers, as they begrudgingly admire your ingenuity and resourcefulness.
So go forth, my friend, and spread the gospel of shore power to your fellow nomads! Show them how to tap into the mighty electricity grid with ease and grace. With your newfound knowledge, you’ll become a beacon of power and energy, illuminating the path for others to follow in your well-connected footsteps. But remember, with great power comes great responsibility, so always prioritize safety and double-check your connections.
The last thing we want is a shocking surprise or unintentional fireworks display. Now, armed with your wit and newfound knowledge, go forth and conquer the world of RV electrical wizardry. Your campsite neighbors won’t believe their eyes when they witness the wonders you can achieve with a simple shore power connection.
Happy camping, my electrifying friend!”
Connecting shore power to an RV inverter is important for efficient power management and convenience
“shore power,” “RV inverter,” “power management,” “convenience,” “tips,” “precautions.”
References
If you want to connect shore power to your RV inverter, there are a few steps you need to follow. First, you’ll need to locate the shore power inlet on your RV. This is usually located on the side or rear of the vehicle and will have a cover that you can open.
Once you have found the inlet, you’ll need to plug your shore power cord into it. The other end of the cord should be plugged into a power source at the campground or RV park. It’s important to make sure that the power source is compatible with your RV’s electrical system.
Once the shore power cord is plugged in, you can switch on the inverter. This will convert the AC power from the shore power source into DC power that your RV can use. It’s a good idea to check the inverter’s instruction manual for any additional steps or safety precautions that may be necessary.
With the shore power connected to your RV inverter, you’ll be able to power your appliances and charge your batteries while you’re parked at the campground.
FAQs
What is shore power and why is it important for RV inverters?
Shore power refers to the electricity supply available at designated campground sites or RV parks. It is important for RV inverters because it allows the inverter to power the RV’s electrical appliances and systems when not running on generator or battery power.
How do I connect shore power to my RV inverter?
To connect shore power to your RV inverter, you will need to locate the shore power inlet on your RV’s exterior. Plug the shore power cord into the inlet, which is usually a 30-amp or 50-amp connection. Then, connect the other end of the shore power cord to a designated shore power pedestal at the campground or RV park.
Can I use an adapter to connect my RV inverter to a lower-amp shore power source?
Yes, you can use a suitable adapter to connect your RV inverter to a lower-amp shore power source. However, it is important to note that using an adapter may limit the amount of power available to your RV’s electrical appliances and systems. Make sure to check the power requirements of your appliances and the capabilities of your inverter before using an adapter.
What precautions should I take when connecting shore power to my RV inverter?
When connecting shore power to your RV inverter, there are a few precautions to consider. First, ensure that the shore power cord and connections are in good condition and free from any damage. Second, make sure to follow the manufacturer’s instructions for your specific inverter model. Third, always turn off your RV’s main power switch before connecting or disconnecting shore power to avoid potential electrical hazards.
Can I connect my RV inverter to shore power while also using a generator?
Yes, you can connect your RV inverter to shore power while also using a generator. Some RV inverters are designed to automatically switch between power sources, prioritizing shore power when available and switching to generator power when necessary. This allows for a seamless transition between power sources and ensures continuous power supply to your RV’s electrical appliances and systems.
How do I know if my RV inverter is compatible with shore power?
To determine if your RV inverter is compatible with shore power, you should check the power input specifications of your inverter. Look for the maximum shore power amp rating and make sure it matches or exceeds the amp rating of the shore power source you plan to connect to. Additionally, consider consulting the manufacturer’s instructions or contacting customer support for further clarification.
Are there any safety features built into RV inverters when connected to shore power?
Many RV inverters have built-in safety features when connected to shore power. These may include surge protection, ground fault circuit interruption (GFCI), and voltage regulation. These safety features help protect your RV’s electrical appliances and systems from electrical faults or power fluctuations, providing a safer and more reliable power supply.