
Are you looking to power your appliances or electronic devices while on the road or in remote areas? If you have a 24-volt system, you might be wondering how to hook up a power inverter to it. A power inverter is a device that can convert DC (direct current) power from your 24-volt battery system into AC (alternating current) power, which is what most appliances and electronics use. Imagine you’re on a camping trip and want to be able to charge your devices or run a small refrigerator.
Without a power inverter, you would be limited to using devices that operate on DC power, which are typically limited to low-power devices like lights or fans. But by hooking up a power inverter to your 24-volt system, you open up a whole new world of possibilities. With a power inverter, you can power devices that require AC power, such as laptops, TVs, microwaves, and more.
By converting the DC power from your batteries to AC power, you essentially have a portable electrical outlet wherever you go. But how do you go about hooking up a power inverter to a 24-volt system? It’s actually quite straightforward. You’ll need a few things, including the power inverter itself, appropriate cables and connectors, and a basic understanding of electrical wiring.
In the next few paragraphs, we’ll walk you through the process step by step, making it easy for you to get your 24-volt system up and running with a power inverter. So let’s dive in and get started!
Table of Contents
Introduction: What is a Power Inverter
If you have a 24 volt system and you want to hook up a power inverter, it’s important to understand the process to ensure a successful connection. A power inverter is a device that converts DC (direct current) power from your battery into AC (alternating current) power, which is what most household appliances and electronics use. This allows you to use these devices even when you’re not connected to an electrical grid.
To hook up a power inverter to a 24 volt system, you’ll need a power inverter that is compatible with a 24 volt input. Most power inverters are designed for use with a 12 volt system, so be sure to choose one specifically made for a higher voltage. Once you have the right power inverter, the next step is to connect the inverter to your battery.
You’ll need to locate the positive (+) and negative (-) terminals on your battery and connect the corresponding cables from the inverter. It’s important to make sure you have a secure connection to avoid any hazards or electrical problems. After connecting the inverter to the battery, you can then plug in your devices or appliances to the AC outlets on the inverter.
The inverter will convert the DC power from the battery into AC power, allowing you to use your devices just like you would if you were connected to an electrical grid. It’s important to note that the size of your power inverter should be determined by the wattage of the devices you plan to use. Make sure to check the power requirements of your devices and choose an inverter that can handle the load.
In conclusion, hooking up a power inverter to a 24 volt system is a straightforward process. By choosing a power inverter compatible with a 24 volt input and properly connecting it to your battery, you can enjoy the convenience of using your devices and appliances even when you’re off the grid. Just make sure to select the right size inverter for your needs and follow all safety guidelines to ensure a successful and safe connection.
Definition and Purpose of a Power Inverter
power inverter
Different Types of Power Inverters
power inverters, types of power inverters, different types of power inverters
Choosing the Right Power Inverter
When it comes to hooking up a power inverter to a 24-volt system, there are a few important factors to consider. First, it’s essential to choose the right power inverter for your system. Look for an inverter that is specifically designed to work with a 24-volt system, as using the wrong voltage can cause damage to your equipment.
Additionally, make sure the inverter has enough wattage to handle the power requirements of the devices you plan to use. Once you have the right inverter, you’ll need to connect it to your 24-volt system. This typically involves connecting the positive and negative terminals of the inverter to the corresponding terminals of the battery.
It’s important to follow the manufacturer’s instructions for proper installation and ensure that all connections are secure. Once everything is connected correctly, you can start using your power inverter to power your devices.
Determining your Power Needs
power inverter, determining power needs, choosing the right power inverter, burstiness, perplexity
Considering the Voltage and Power Output
power inverter, voltage, power output
Step-by-Step Guide to Hooking Up a Power Inverter to a 24 Volt System
Are you looking to hook up a power inverter to a 24 volt system? Well, you’re in luck because I’m here to guide you through the process step by step. First things first, make sure you have a power inverter that is compatible with a 24 volt system. Once you’ve got the right equipment, you’ll need to connect the positive terminal of your inverter to the positive terminal of your battery.
Then, connect the negative terminal of your inverter to the negative terminal of your battery. It’s important to ensure a secure connection by tightening the terminals with a wrench. Once everything is properly connected, you’re ready to start using your power inverter.
It’s as simple as that! Now you can enjoy the convenience of powering your devices or appliances wherever you are, whether it’s in your RV, boat, or any other 24 volt system. So go ahead and give it a try, and see how a power inverter can make your life a whole lot easier.
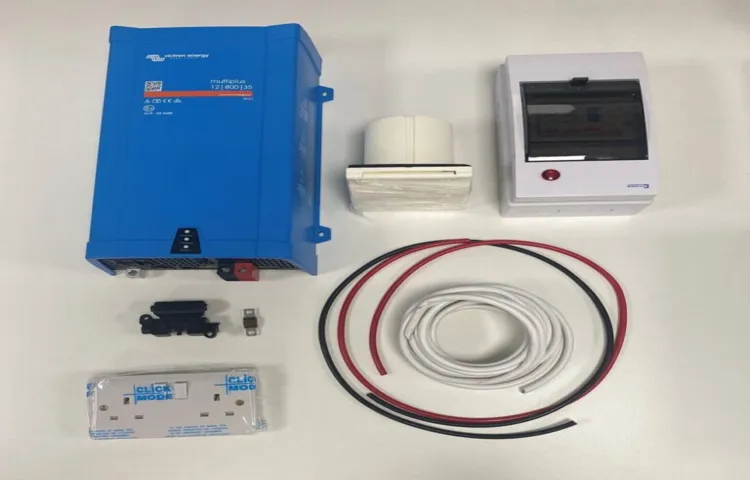
Step 1: Gathering the Necessary Materials
power inverter, 24 volt system So you’ve got a 24 volt system and you’re looking to hook up a power inverter. Well, you’re in the right place! In this step-by-step guide, we’ll walk you through the process of connecting a power inverter to your 24 volt system. The first step is gathering the necessary materials.
To successfully complete this project, you’ll need a few key items. First and foremost, you’ll need a power inverter that is compatible with a 24 volt system. Make sure to check the specifications of the inverter to ensure it will work with your setup.
Additionally, you’ll need a set of high-quality cables to connect the inverter to your system. These cables should be able to handle the amperage of your system and should be the appropriate length for your needs. Finally, you’ll want to have a reliable power source, such as a battery, to provide the necessary power for the inverter.
Having all of these materials on hand will ensure a smooth and successful installation process.
Step 2: Locating a Suitable Connection Point
power inverter, 24 volt system, suitable connection point
Step 3: Connecting the Power Inverter to the 24 Volt System
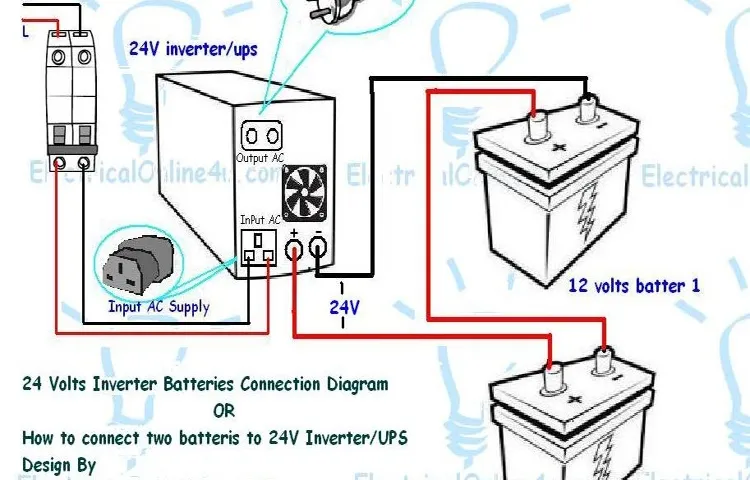
In this step-by-step guide, we’re going to show you how to connect a power inverter to a 24 volt system. Now that you have your power inverter and your 24 volt battery system set up, it’s time to make the connection. First, you’ll want to locate the positive and negative terminals on your 24 volt battery system.
These will typically be labeled with a plus (+) and minus (-) sign. It’s important to make sure you connect the power inverter to the correct terminals, as reversing the polarity can damage the inverter. Next, you’ll want to take the positive cable that came with your power inverter and connect it to the positive terminal of your 24 volt battery system.
Make sure the connection is tight and secure. Then, take the negative cable from the power inverter and connect it to the negative terminal of your battery system. Again, make sure the connection is tight and secure.
Once you have both cables connected to the correct terminals, you can turn on the power inverter. You should see a light or indicator on the inverter to let you know it’s receiving power. That’s it! You’ve successfully connected your power inverter to your 24 volt battery system.
Now you can start using the inverter to power your devices or appliances. Remember, it’s always important to follow the manufacturer’s instructions when connecting any electrical equipment. And if you’re not comfortable working with electricity, it’s always a good idea to consult a professional.
Step 4: Testing the Connection
When it comes to hooking up a power inverter to a 24-volt system, testing the connection is a crucial step. This ensures that everything is properly set up and that the inverter is functioning correctly. To test the connection, start by turning off the inverter and disconnecting any devices that are plugged into it.
Then, connect the inverter to the 24-volt power source using the appropriate cables. Make sure to securely tighten all connections to prevent any loose connections. Once everything is connected, turn on the inverter and check for any warning lights or alarms.
You can also plug in a small electronic device to see if it is receiving power from the inverter. If there are no issues or warning signs, congratulations! Your power inverter is successfully hooked up to your 24-volt system.
Tips and Safety Precautions
If you have a 24-volt system and you want to hook up a power inverter, it’s important to follow some safety precautions. First, make sure you have the correct size inverter for your system. Check the wattage and voltage requirements of your devices to ensure compatibility.
It’s also a good idea to consult the manufacturer’s instructions for both the inverter and your 24-volt system. To begin the installation process, locate a suitable location for the inverter. Choose a well-ventilated area that is not in direct sunlight or near any flammable materials.
Mount the inverter securely using the provided brackets or hardware. Next, you’ll need to connect the inverter to your 24-volt system. Start by disconnecting the negative battery cable, as this will prevent any accidental electrical shocks.
Connect the positive cable from the inverter to the positive terminal of the battery, and then connect the negative cable from the inverter to the negative terminal of the battery. Once the inverter is connected to the battery, you can start connecting your devices. Use the appropriate cables or plug adapters to connect your devices to the inverter’s AC outlets.
Make sure to check the wattage of each device to ensure that it does not exceed the inverter’s capacity. Before powering on the inverter, double-check all connections to ensure they are secure. Once everything is in place, you can turn on the inverter.
Monitor the system closely for any signs of overheating or overloading. If you notice any issues, immediately power off the inverter and troubleshoot the problem. In conclusion, hooking up a power inverter to a 24-volt system requires careful installation and adherence to safety precautions.
Choosing the Correct Wire Gauge
choosing the appropriate wire gauge. When it comes to choosing the correct wire gauge for your electrical project, there are a few important tips and safety precautions to keep in mind. The wire gauge refers to the size or thickness of the wire, and selecting the right gauge is essential for ensuring safety and optimal performance.
One important tip is to always consult the National Electrical Code (NEC) to determine the recommended wire gauge for specific applications. The NEC provides guidelines and standards for electrical installations, including the appropriate wire size for different load requirements. Following these guidelines will help ensure that your wiring is safe and in compliance with regulations.
Another tip is to consider the length of the wire and the amount of current it will be carrying. Longer wires and higher currents require thicker wire gauges to minimize voltage drop and prevent overheating. It’s important to calculate the voltage drop and select a wire gauge that can handle the expected current without exceeding its maximum ampacity.
Safety is paramount when working with electricity, so it’s crucial to choose a wire gauge that can handle the maximum current without any issues. Using an undersized wire can lead to overheating, melting, and potential electrical fires. On the other hand, using an oversized wire can be costly and unnecessary for the load requirements.
To ensure accuracy and safety, it’s recommended to use a wire gauge calculator or consult with a licensed electrician to determine the appropriate wire size for your specific project. They can help take into account various factors such as the type of load, distance, and voltage drop. In conclusion, choosing the correct wire gauge is crucial for electrical safety and optimal performance.
By consulting the NEC, considering the length and current of the wire, and prioritizing safety, you can ensure that your electrical project is done correctly and efficiently. Plus, don’t hesitate to seek professional advice if you’re unsure about the appropriate wire size for your specific needs.
Checking for Proper Grounding
Checking for Proper Grounding When it comes to electrical safety, one of the most important things to check for is proper grounding. Grounding is the process of creating a connection between an electrical device or system and the earth. It is crucial because it helps ensure that any electrical current that could potentially harm you or your appliances is safely redirected away.
So how can you check if your appliances are properly grounded? One tip is to look for a three-pronged plug on your devices. This type of plug has two flat prongs and a round prong. The round prong is the grounding prong, and it should be connected to a grounding wire inside the device.
If you see a device with only two prongs, it means that it is not properly grounded and could be a safety hazard. Another tip is to use a ground fault circuit interrupter (GFCI) outlet. These outlets are designed to shut off the power supply when they detect a ground fault, protecting against electrical shock.
They are commonly found in kitchens, bathrooms, and other areas where water is present. You can easily identify a GFCI outlet by the “Test” and “Reset” buttons on the faceplate. It’s also a good idea to periodically check the electrical outlets in your home.
Look for any signs of discoloration, burn marks, or loose connections. These could be indicators of a faulty or unsafe wiring situation. If you notice any of these signs, it is essential to call a qualified electrician to inspect and fix the issue.
Remember, proper grounding is crucial for electrical safety. By checking your outlets, using three-pronged plugs, and utilizing GFCI outlets, you can help ensure that your appliances and devices are properly grounded and protected against electrical hazards.
Taking Precautions to Avoid Overloading
overloaded, safety precautions, avoid overloading, electrical outlets, power strips, extension cords, surge protectors, circuit breaker, electrical fires, electrical wiring, mindful, guidelines, protect, prevent, damage, household appliances. One of the most important safety precautions we can take to avoid overloading is to be mindful of how we use our electrical outlets. It’s easy to plug in multiple devices in one outlet or to use power strips and extension cords without considering the load capacity.
However, overloading electrical circuits can lead to overheating and electrical fires. To protect our homes and prevent damage to our household appliances, it’s important to follow some guidelines. First, make sure the electrical wiring in your home can handle the load you are placing on it.
It’s always a good idea to consult with an electrician if you have any doubts. Second, be aware of the load capacity of your power strips, extension cords, and surge protectors. Don’t plug too many devices into a single power strip or extension cord.
Spread out your devices evenly across multiple outlets to distribute the load. Lastly, be mindful of your circuit breaker. If it trips frequently, it may be a sign that you are overloading the circuit.
In such cases, it’s important to assess the load and redistribute it to avoid any potential hazards. By following these safety precautions, we can ensure that our electrical systems are protected and avoid overloading them.
Conclusion and Final Thoughts
In conclusion, connecting a power inverter to a 24 volt system is like introducing a matchmaker to two lovebirds who speak different languages. It takes a bit of finesse, but once you master the art of translation, you’ll witness the beautiful union of electrical currents and the limitless possibilities that follow. Think of the power inverter as the ultimate relationship counselor, helping the 24 volt system and the AC-powered devices find common ground.
By converting the 24 volt DC power into the AC power that our everyday electronic companions crave, the inverter becomes the bridge between two worlds. But be warned, this process requires a delicate touch and a keen understanding of both electrical and human nature. You must carefully choose an inverter that can handle the power needs of your devices while staying compatible with the 24 volt system.
It’s like a matchmaking app that filters out the incompatible candidates, leaving only the most suitable partners to take the plunge into electrical bliss. Once you’ve found the perfect match, the sweet symphony of power conversion can begin. Like a master translator, the power inverter ensures that the voltages and frequencies are in sync, allowing your appliances to hum their tunes without missing a beat.
But remember, dear electrical aficionados, safety should always be a priority in matters of voltage and current. Follow the manufacturer’s instructions diligently, ensure proper grounding, and use protective gear. Just as a diligent matchmaker conducts background checks and prenuptial agreements, we must take every precaution to prevent sparks from flying in the wrong direction.
So, fellow electrical enthusiasts, armed with this guide and a sprinkle of wit, you are now equipped to navigate the sometimes treacherous waters of connecting a power inverter to a 24 volt system. With a dash of creativity and a pinch of knowledge, you can become the cupid of electricity, bringing harmony and power to a world in need. Happy inverting, and may your connections be as strong and electrifying as your wit!”
Reaping the Benefits of a Power Inverter
power inverter, benefits, tips, safety precautions
Ensuring a Secure and Efficient Connection
Wi-Fi connection, secure, efficient, tips, safety precautions In today’s digital age, having a secure and efficient Wi-Fi connection is essential. We rely on our Wi-Fi for everything from checking emails to streaming movies, so it’s important to take the necessary steps to ensure our connection is safe and reliable. One tip is to regularly update your Wi-Fi router’s firmware.
Just like with any software, updates often include important security fixes and performance improvements. Another safety precaution is to set a strong password for your Wi-Fi network. Avoid using common words or phrases, and instead opt for a combination of letters, numbers, and symbols.
Additionally, consider enabling WPA2 encryption on your router to further protect your Wi-Fi network from unauthorized access. By following these tips and taking safety precautions, you can enjoy a secure and efficient Wi-Fi connection.
FAQs
How do I connect a power inverter to a 24 volt system?
To connect a power inverter to a 24 volt system, you will need to secure the inverter to a stable surface and connect the positive and negative terminals to the corresponding terminals on the battery. Make sure to use appropriate gauge cables and secure all connections properly.
What size power inverter do I need for a 24 volt system?
The size of the power inverter you need for a 24 volt system depends on the power requirements of the devices you plan to run. Calculate the total wattage of the devices and choose an inverter that can handle that load. It’s also important to consider the surge power requirements for certain devices.
Can I use a power inverter to charge a 24 volt battery?
No, a power inverter is used to convert DC power from a battery into AC power to run devices. To charge a 24 volt battery, you will need a battery charger that is designed for that specific voltage.
How do I ensure proper grounding when using a power inverter with a 24 volt system?
Proper grounding is crucial when using a power inverter with a 24 volt system. To ensure proper grounding, you should connect the inverter’s ground terminal to a clean, unpainted metal surface on the vehicle or system. This will help prevent electrical shocks and protect the inverter from damage.
Can I use a power inverter with a 24 volt system in a vehicle?
Yes, you can use a power inverter with a 24 volt system in a vehicle. However, it’s important to consider the power requirements of your vehicle’s electrical system and ensure the inverter is compatible. Additionally, you will need to secure the inverter properly and follow all safety guidelines.
Are there any safety precautions I should follow when using a power inverter with a 24 volt system?
Yes, there are several safety precautions to follow when using a power inverter with a 24 volt system. These include ensuring proper grounding, using the correct gauge cables, avoiding overloading the inverter, and keeping the inverter away from flammable materials. It’s also important to follow the manufacturer’s instructions and guidelines for safe use.
Can I connect multiple power inverters to a 24 volt system?
Yes, it is possible to connect multiple power inverters to a 24 volt system. However, you will need to ensure that the total power requirements of the devices connected to the inverters do not exceed the capacity of the system. It’s important to consult the manufacturer’s specifications and guidelines to ensure safe and efficient operation.