
Hey there! Have you ever wondered how you can power your electronic devices when you’re on the go? Well, look no further because today we’re diving into the world of DC to AC power inverters. These nifty devices are the perfect solution for anyone needing to convert DC power, such as from a car battery or solar panels, into AC power for their appliances and gadgets. Imagine you’re on a road trip, enjoying the freedom of the open road, and suddenly your phone dies.
Panic sets in as you realize you have no way to charge it. But fear not! With a DC to AC power inverter, you can tap into your car’s battery and conveniently charge your phone, tablet, or any other AC-powered device. It’s like having a portable wall outlet right in your vehicle! But how exactly do these magical devices work? Essentially, DC to AC power inverters take the direct current (DC) input and transform it into alternating current (AC) output, which is what most of our household appliances and electronic devices require.
They do this through a combination of complex electronic components that convert the voltage and switch the current direction at a high frequency. This way, you can power everything from laptops and televisions to coffee makers and even power tools. Whether you’re a road warrior, a campsite enthusiast, or just someone who values having a reliable power source on the go, a DC to AC power inverter is an essential tool.
And with the many different options available on the market, you can find one that suits your specific needs and power requirements. In our upcoming blog posts, we’ll dive deeper into the different types of power inverters, their features and specifications, as well as tips on selecting the right one for you. We’ll also explore the various use cases for these versatile devices, from emergency backup power to off-grid living.
So stay tuned for more exciting information on DC to AC power inverters and how they can enhance your portable power experience. Trust me, you won’t want to miss it!
Table of Contents
What is a DC to AC Power Inverter?
Are you curious about how to make a DC to AC power inverter? A DC to AC power inverter is a device that converts direct current (DC) power from a battery or solar panel into alternating current (AC) power that can be used to power household appliances. This is incredibly useful in situations where AC power is not readily available or if you want to use renewable energy sources to power your appliances. To make a DC to AC power inverter, you will need a few key components including a transformer, transistors, capacitors, and resistors.
The transformer is responsible for stepping up the low voltage DC power to a higher voltage AC power. The transistors act as switches to control the flow of electrical current, while the capacitors and resistors help regulate and stabilize the electricity. By combining these components in the right configuration, you can create a functional DC to AC power inverter.
This can be a challenging and complex task, so it’s important to carefully research and follow a detailed guide or tutorial to ensure safety and optimal performance. With some technical knowledge and the right materials, you can successfully build your own DC to AC power inverter and harness the power of renewable energy to meet your electrical needs.
Definition of a DC to AC Power Inverter
A DC to AC power inverter is a device that allows you to convert direct current (DC) power from a battery or solar panel into alternating current (AC) power that can be used to run household appliances or other electronic devices. It basically takes the low voltage DC power and boosts it up to a higher voltage AC power that is compatible with the standard electrical outlets in your home. This can be especially useful in situations where you don’t have access to grid power or in off-grid applications such as camping, RVs, or remote locations.
Think of it as a translator that takes the language of batteries or solar panels and translates it into the language that your appliances and devices speak. So, whether you want to power a blender for your morning smoothie or charge your laptop while off the grid, a DC to AC power inverter is the handy gadget that makes it all possible.
Importance of DC to AC Power Inverters
DC to AC power inverters are essential devices that play a crucial role in our daily lives. These inverters convert the direct current (DC) electricity from sources like batteries or solar panels into alternating current (AC) electricity, which is used by most of our electronic devices. Imagine if we didn’t have inverters – we wouldn’t be able to use our laptops, charge our phones, or even watch TV! The importance of DC to AC power inverters is evident in our reliance on electronic devices for communication, entertainment, and work.
These inverters provide us with the convenience of using our devices wherever we go, without the need for a direct connection to a power grid. Whether you’re camping, on a road trip, or living in a remote area, a DC to AC power inverter ensures that you can power your devices wherever you are. So, as you can see, these power inverters are truly indispensable in our modern world.
Choosing the Right Components for Your DIY Inverter
Are you looking to make your own DC to AC power inverter? It can be a fun and rewarding project, but it’s important to choose the right components to ensure that your inverter functions properly. One of the key components you’ll need is a transformer, which will convert the DC input voltage to the AC output voltage. You’ll also need a stable power supply, such as a battery or a solar panel, to provide the DC input.
Additionally, you’ll need an oscillator circuit to generate the AC output signal. This can be achieved using a microcontroller or a dedicated oscillator IC. Finally, you’ll need a power stage to amplify the AC output signal to the desired level.
This typically involves using MOSFETs or IGBTs in a bridge configuration. In summary, choosing the right components for your DIY inverter involves selecting a suitable transformer, power supply, oscillator circuit, and power stage. Once you have all the necessary components, you can start building your own DC to AC power inverter.
Selecting the DC Power Source
When it comes to building your own inverter, one of the most important decisions you’ll need to make is selecting the right DC power source. This is the power source that will convert direct current (DC) into alternating current (AC), allowing you to power your electronic devices. There are a few options to consider when choosing a DC power source for your DIY inverter.
One option is to use a battery, which can provide a reliable source of power. Another option is to use a generator, which can provide a constant source of power but may require fuel to operate. Ultimately, the choice will depend on your specific needs and preferences.
Choosing the AC Output Voltage
Choosing the AC output voltage is an important decision when building your own DIY inverter. The AC output voltage determines the electrical compatibility of the inverter with the devices you plan on powering. It is crucial to choose a voltage that matches the requirements of your devices to ensure smooth and efficient operation.
To determine the right AC output voltage, you need to consider the type of equipment you will be using with the inverter. For example, if you plan on powering household appliances, a standard AC voltage of 120V or 230V will be suitable. However, if you are powering sensitive electronics or medical equipment, you may need a lower voltage, such as 110V or 220V, to avoid any potential damage.
Additionally, it is important to take into account the voltage of the power source you will be using. Most inverters are designed to work with either a 12V or 24V DC power source, so you will need to choose an AC output voltage that is compatible with your chosen power source. Lastly, consider the availability and compatibility of the components when choosing the AC output voltage.
Some components may only be available or suitable for specific voltages, so it is important to check that all of your chosen components can handle the selected output voltage. In conclusion, choosing the right AC output voltage for your DIY inverter is essential for ensuring compatibility with your devices and the power source. Take into account the type of equipment, the voltage of the power source, and the compatibility of the components to make an informed decision.
Picking the Correct Transformer
DIY, inverter, transformer, components, choose, right, pick
Selecting the Suitable Semiconductor Devices
diy inverter, semiconductor devices, suitable components, choosing the right. Are you ready to take the DIY plunge and create your own inverter? One of the most important steps in this process is selecting the suitable semiconductor devices. These components are crucial for converting DC power to AC power, and choosing the right ones can make a big difference in the performance and efficiency of your inverter.
But with so many options available, how do you know which ones are the best fit for your project? Well, think of it like building a puzzle. Each piece has a unique shape and size, and it’s up to you to find the ones that fit together perfectly. In the same way, you need to find semiconductor devices that are compatible with your power requirements, circuit design, and budget.
So, let’s dive in and explore the factors you should consider when selecting these crucial components.
Building Your DC to AC Power Inverter
If you’re looking to build your own DC to AC power inverter, you’re in luck! With a little know-how and some basic electronic components, you can create your own power inverter from scratch. This can be a fun and rewarding project for electronics enthusiasts who want to have a better understanding of how power inverters work. To get started, you’ll need a DC power source, such as a battery, and an oscillator circuit to convert the DC power into AC power.
You’ll also need a transformer to increase the voltage and a bridge rectifier to convert the AC power back into DC power. By following a detailed schematic and carefully assembling the components, you’ll be well on your way to creating your very own DC to AC power inverter. Not only will you have a functioning power inverter, but you’ll also gain valuable knowledge about electronics and circuitry in the process.
So roll up your sleeves and get ready to dive into the world of power inverters!
Step 1: Designing the Circuit Diagram
Building a DC to AC power inverter can be a great project for those interested in electronics and electricity. In this blog section, we will guide you through the first step of the process: designing the circuit diagram. The circuit diagram is like a blueprint for your power inverter.
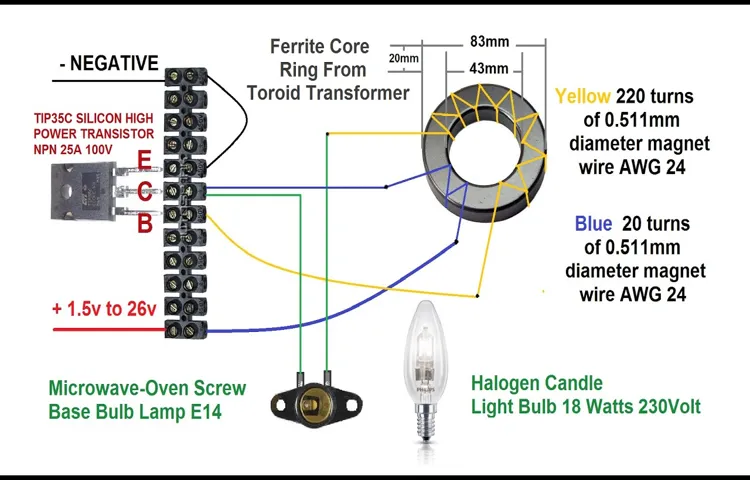
It shows the arrangement and connection of various electrical components that are required for the inverter to function properly. This step is crucial as it lays the foundation for the rest of the construction process. To design the circuit diagram, you will need to gather all the necessary components such as transistors, capacitors, resistors, and transformers.
You will also need a power source, which is typically a DC battery. Start by sketching out the basic layout of the circuit on a piece of paper or using a computer software. Determine how many transistors and capacitors you will need and how they will be connected.
Consider the voltage and current ratings of each component to ensure compatibility. Next, decide on the type of inverter you want to build. There are two common types: square wave and sine wave.
A square wave inverter is simpler and less expensive to construct but may produce a noisy output. On the other hand, a sine wave inverter produces a cleaner and more stable output, but it requires more complex circuitry. Once you have a clear idea of the circuit layout and type of inverter, you can start connecting the components according to the circuit diagram.
Double-check the connections to make sure they are accurate and secure. Designing the circuit diagram is just the first step in building a DC to AC power inverter. In the next sections, we will guide you through the process of selecting components, assembling the circuit, and testing the functionality of your power inverter.
Step 2: Soldering the Components
soldering, components, building a power inverter
Step 3: Assembling the Power Inverter
power inverter, building a power inverter, assembling a power inverter, DC to AC power inverter The third step in building your own power inverter is assembling the power inverter itself. Once you have gathered all the necessary components, it’s time to put them together and create a fully functioning DC to AC power inverter. This step requires careful attention to detail and following the instructions provided with your components.
Begin by connecting the input terminals of the power inverter to the battery. Make sure to connect the positive terminal of the inverter to the positive terminal of the battery, and the negative terminal of the inverter to the negative terminal of the battery. This is crucial for the proper functioning of the inverter.
Next, you will need to hook up the AC output terminals of the inverter to the electrical load you wish to power. This could be anything from household appliances to electronics or even tools. Again, ensure that you connect the positive terminal of the inverter to the positive terminal of the load, and the negative terminal of the inverter to the negative terminal of the load.
Once all the connections are made, it’s time to test your power inverter. Turn on the battery and check if the inverter is providing the desired AC output. If everything is working as expected, congratulations! You have successfully assembled your own DC to AC power inverter.
However, if the inverter is not functioning properly or there are issues with the output, don’t worry. Troubleshooting is a normal part of any DIY project, and there are resources available online or from the manufacturer that can help you identify and fix any issues you may be experiencing. Building your own power inverter can be a rewarding and cost-effective way to provide AC power in situations where it may not be readily available.
By following the instructions provided with your components and carefully assembling the inverter, you can create a reliable and efficient power source for all your needs. So why wait? Get started on building your own power inverter today and unlock the potential of portable AC power.
Testing and Troubleshooting Your DIY Inverter
So you’ve completed your DIY inverter project and now it’s time to put it to the test. Testing and troubleshooting your inverter is essential to ensure it’s working properly and providing the AC power you need. One of the first steps in testing your inverter is to connect a DC power source, such as a battery, to the input terminals of the inverter.
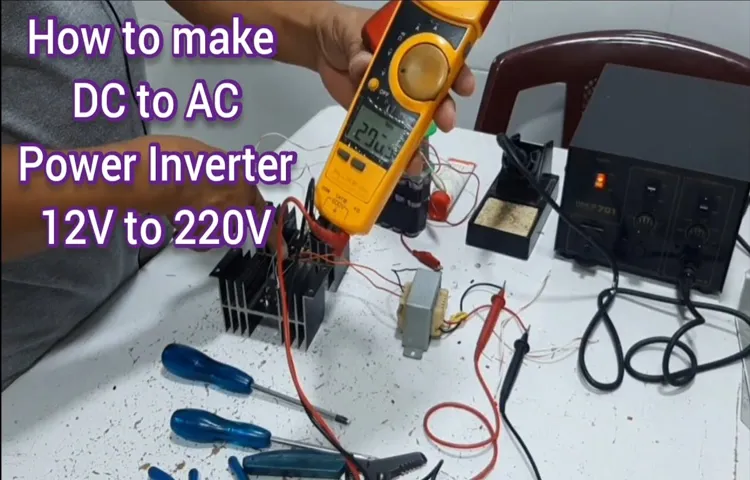
Once connected, you can turn on the inverter and measure the output voltage using a multimeter. Ideally, the output voltage should be the same as the AC voltage you want to convert. If the output voltage is significantly different or the inverter is not working at all, you will need to troubleshoot the problem.
This could involve checking the connections, testing the components, or consulting a guide or expert for help. Troubleshooting can be a bit frustrating at times, but remember, it’s all part of the DIY journey. So don’t get discouraged and keep pushing forward until your inverter is working perfectly.
Soon enough, you’ll have a reliable source of AC power for all your needs.
Ensuring Proper Grounding
testing and troubleshooting your DIY inverter. When it comes to building your own inverter, proper grounding is essential. Grounding ensures that any electrical current that leaks or surges will be directed safely into the ground, protecting both you and your equipment.
To test the grounding of your DIY inverter, you can use a multimeter. Connect the black probe to a known ground source, such as a metal pipe or a grounding rod, and then touch the red probe to the metal casing of your inverter. The multimeter should read near zero, indicating that the grounding is working properly.
If the reading is significantly higher, it may indicate a problem with the grounding. In this case, you will need to troubleshoot your inverter to find and fix the issue. Common problems with grounding include loose or corroded connections, inadequate grounding rods, or improper wiring.
By carefully inspecting and testing each component of the grounding system, you can ensure that your DIY inverter is properly grounded and safe to use.
Testing the Output Voltage
Testing the output voltage of your DIY inverter is crucial to ensure its proper functioning. After all the hard work and effort put into building your own inverter, you want to make sure it delivers the right amount of power. Testing the output voltage will allow you to determine if the inverter is functioning correctly and producing the desired amount of electricity.
To test the output voltage, you will need a multimeter, which is a handy tool that measures electrical current, voltage, and resistance. Start by setting the multimeter to the voltage setting, typically denoted by a “V” with a straight line above it. Next, connect the red probe of the multimeter to the positive terminal of the inverter’s output wire, and the black probe to the negative terminal.
Make sure the connections are secure and the probes are touching the metal terminals. Once the multimeter is properly connected, turn on the inverter and observe the readings on the multimeter. The displayed voltage should match the intended output voltage of your inverter.
For example, if your inverter is designed to produce 120 volts, the multimeter should display a voltage close to 120 volts. If the measured voltage is significantly different from the intended output voltage, there may be an issue with your inverter. It could be a result of a faulty component, poor connection, or incorrect wiring.
In such cases, it’s important to troubleshoot the problem and identify the root cause. Common troubleshooting steps may include inspecting the wiring for loose connections, checking the components for signs of damage or malfunction, and ensuring all the connections are made according to the wiring diagram provided with your inverter kit. Testing the output voltage of your DIY inverter is an essential step in the building process.
It not only ensures that your inverter is functioning correctly but also allows you to identify any potential problems and troubleshoot them effectively. So, before you start powering your devices with your DIY inverter, make sure to test the output voltage and ensure it meets your expectations.
Troubleshooting Common Issues
In the process of creating your own DIY inverter, it is important to thoroughly test and troubleshoot your device to ensure it is functioning properly. One common issue that may arise is when the inverter does not produce any power at all. This could be due to a loose connection or a faulty component.
By carefully inspecting the wiring and connections, you can identify any loose or disconnected wires and securely reconnect them. Additionally, checking the components such as the transformer and capacitors for any signs of damage or malfunction can also help in pinpointing the issue. Another common problem is when the inverter produces power but the output voltage is incorrect or fluctuating.
This could be caused by a problem with the voltage regulation circuitry or a mismatch between the load and the inverter’s capacity. By carefully adjusting the voltage regulation circuit or taking steps to properly match the load with the inverter’s capacity, you can resolve this issue. Testing and troubleshooting your DIY inverter is an essential step in ensuring its functionality and reliability.
By addressing these common issues, you can make sure your inverter is performing as intended and providing the power output you need.
Safety Considerations When Working with Inverters
Making a DC to AC power inverter can be a useful and practical project, but it’s important to consider safety precautions when working with inverters. One of the most important safety considerations is to ensure that the inverter is properly grounded. This helps to prevent electrical shocks and ensures that any excess current is safely directed to the ground.
Additionally, it’s important to choose the right size and type of inverter for your needs. Using an inverter that is too small can lead to overheating and other issues, while using one that is too large can strain your electrical system and potentially cause damage. It’s also important to properly install and secure the inverter, following all manufacturer guidelines.
This helps to ensure that the inverter operates safely and does not pose a risk of falling or shifting during use. Finally, it’s important to regularly inspect and maintain the inverter, checking for any signs of wear or damage. By taking these safety considerations into account, you can safely enjoy the benefits of a homemade DC to AC power inverter.
Following Electrical Safety Practices
inverters, electrical safety practices
Preventing Overheating and Short Circuits
inverters, safety considerations, preventing overheating, short circuits
Working in a Well-Ventilated Area
Working in a well-ventilated area is crucial when it comes to safety considerations when working with inverters. Inverters are electrical devices that convert direct current (DC) to alternating current (AC) and generate a significant amount of heat during operation. Without proper ventilation, this heat can accumulate, leading to overheating and potential fire hazards.
When working with inverters, it’s important to ensure that you are in a well-ventilated space that allows for the dissipation of heat. Adequate airflow can help prevent the build-up of heat and maintain a safe working temperature. Additionally, a well-ventilated area can also help disperse any fumes or odors that may be produced during the operation of the inverter.
So, before starting any work with inverters, take a moment to assess the ventilation in your workspace and make any necessary adjustments to ensure your safety.
Conclusion and Final Thoughts
And there you have it, folks! Your very own DIY DC to AC power inverter. Now you can power up your devices and appliances without relying on traditional power sources. With just a few simple steps and a little bit of technical know-how, you’ve turned yourself into a modern-day magician harnessing the power of electricity.
Remember, safety always comes first when working with electronics, so make sure to take all necessary precautions and follow the instructions carefully. And if you ever find yourself in a situation where the power goes out or you need a portable power source, just grab your trusty power inverter and you’ll be saving the day, one watt at a time. So go forth, my friends, and let the electricity flow freely.
Show the world what you’re capable of with your newfound power – after all, with great power inverter comes great responsibility!”
Summary of the Inverter Building Process
inverter building process, safety considerations, working with inverters
Important Considerations to Remember
safety considerations, working with inverters
Benefits of Building Your Own Inverter
Inverters are a vital component of any solar power system, as they convert the direct current produced by the solar panels into usable alternating current for your home or business. While it may be tempting to purchase an inverter off the shelf, building your own can offer several benefits. One such benefit is the ability to customize the inverter to meet your specific needs.
You can choose the exact specifications and features you desire, ensuring that the inverter will perform optimally for your particular system. Additionally, building your own inverter can save you money. Off-the-shelf inverters can be expensive, but by sourcing and assembling the necessary components yourself, you can significantly reduce costs.
Furthermore, building your own inverter can be a rewarding and educational experience. It allows you to understand the inner workings of the system and gain valuable knowledge about renewable energy. However, it is important to note that working with inverters involves certain safety considerations.
Inverters deal with electric currents, so it is crucial to follow all safety precautions and guidelines throughout the building process. This includes wearing appropriate protective gear, such as gloves and safety glasses, and ensuring that the power is fully disconnected before starting any work. By being mindful of safety, you can ensure a smooth and accident-free experience when building your own inverter.
FAQs
What is a DC to AC power inverter?
A DC to AC power inverter is a device that converts direct current (DC) electricity into alternating current (AC) electricity.
How does a DC to AC power inverter work?
A DC to AC power inverter works by taking the DC input from a battery or other power source and converting it into AC output using electronic switching components.
Why would I need a DC to AC power inverter?
You may need a DC to AC power inverter if you want to use AC-powered devices or appliances in a location that only has DC power available, such as in a car or a boat.
What types of devices can a DC to AC power inverter power?
A DC to AC power inverter can power a wide range of devices, including laptops, smartphones, small appliances, power tools, and even larger appliances like refrigerators or televisions.
Can I use a DC to AC power inverter with solar panels?
Yes, you can use a DC to AC power inverter with solar panels to convert the DC electricity generated by the panels into usable AC electricity for your home or business.
Are there different sizes of DC to AC power inverters?
Yes, DC to AC power inverters come in different sizes or power ratings to accommodate different levels of electrical load. You can choose an inverter based on your specific power needs.
How do I install a DC to AC power inverter in my vehicle?
The installation process for a DC to AC power inverter in a vehicle involves connecting the inverter to the vehicle’s battery and then wiring the inverter to the desired AC outlets or appliances.
Do all DC to AC power inverters come with built-in safety features? A8. No, not all DC to AC power inverters come with built-in safety features. It’s important to choose an inverter that has appropriate safety features like overload protection, short circuit protection, and high-temperature protection.
Can I use a DC to AC power inverter with a generator?
Yes, you can use a DC to AC power inverter with a generator to convert the DC output of the generator into AC electricity.
Are there any maintenance requirements for a DC to AC power inverter?
While DC to AC power inverters generally require minimal maintenance, it’s important to periodically check for any loose connections, clean the cooling fans or vents, and ensure proper ventilation for optimal performance.
Can a DC to AC power inverter be used for off-grid power systems?
Yes, a DC to AC power inverter is commonly used for off-grid power systems, where there is no access to the main power grid and alternative energy sources like solar panels or wind turbines are utilized.
Are there any safety precautions I should take when using a DC to AC power inverter?
Yes, some safety precautions when using a DC to AC power inverter include avoiding overloading the inverter, ensuring proper grounding, keeping the inverter away from moisture or flammable materials, and using appropriate circuit protection devices.