
Hey there, do you have a crack in your car windshield that’s been bothering you? We’ve all been there – a small pebble on the road, a sudden temperature change, and boom, you’re left with a frustrating crack in your windshield. But fear not! Repairing a crack in a car windshield is easier than you might think. Imagine your windshield as a protective shield, shielding you from the elements and keeping you safe on the road.
Just like any shield, it’s bound to suffer some battle scars along the way. However, unlike a medieval knight, you don’t have to replace your whole windshield every time it gets a crack. Repairing a crack in a car windshield requires a few simple steps and the right tools.
First, you’ll need to assess the size and severity of the crack. Is it a small chip or a long, spreading crack? If it’s smaller than a dollar bill, you’re in luck – these smaller cracks can often be easily repaired at home. Next, you’ll need to gather the necessary supplies.
A windshield repair kit is essential for this task, as it contains everything you need to fix the crack. These kits typically include a resin, a syringe, and a curing film. Don’t worry if you’re not familiar with these tools – the kit usually comes with detailed instructions that make the process user-friendly.
Now, it’s time to get to work. Clean the area around the crack with a mild detergent to remove any dirt or debris. This will ensure that the repair is effective and long-lasting.
Once the area is clean, apply the resin to the crack using the provided syringe. Make sure to follow the instructions and apply the resin evenly. After applying the resin, cover the crack with the curing film and let it dry in direct sunlight.
Table of Contents
Introduction
Introduction: Have you ever noticed a crack in your car windshield and wondered how to fix it? Well, you’re not alone! Cracks in windshields can be a common occurrence, especially if you frequently drive on rough roads or in areas with extreme temperatures. The good news is that repairing a crack in a car windshield is not as daunting as it may seem. With a few simple tools and some patience, you can restore your windshield to its former glory.
In this blog post, we’ll walk you through the step-by-step process of repairing a crack in a car windshield, so you can get back on the road safely and with a clear view. So, grab your tools and let’s get started!
Explanation of the importance of repairing windshield cracks
windshield cracks, importance of repairing, safety hazard, visibility, structural integrity, prevent further damage, reduce the risk, replacing the windshield. Introduction: Have you ever noticed a tiny crack or chip on your windshield and thought it was no big deal? Well, think again! Repairing windshield cracks is an essential task that should not be overlooked. Not only do cracks and chips compromise the overall safety of your vehicle, but they can also lead to more significant issues if left unattended.
In this blog post, we will explore the importance of repairing windshield cracks, explore the safety hazards they pose, and discuss how timely repairs can help prevent further damage and the need for windshield replacement. So, let’s dive in and find out why it’s crucial to take care of those minor cracks before they become a major problem!
Discussion on the potential consequences of not repairing a crack
crack repair, potential consequences, repairing a crack, maintenance, structural damage, safety hazards, cost, property value, warranty, aesthetics Introduction: When it comes to maintaining our homes or structures, it’s essential to address any issues promptly. One such issue that often goes overlooked is a crack in the foundation or structure. While it may seem like a minor inconvenience at first, not repairing a crack can lead to potential consequences that can be costly, both financially and in terms of safety.
In this blog post, we will discuss the potential consequences of not repairing a crack, emphasizing the importance of timely maintenance.
Assessing the Crack
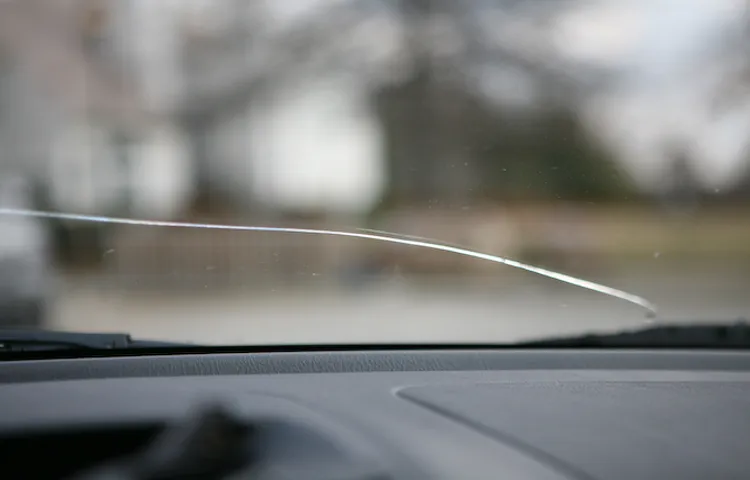
If you’ve ever had the misfortune of finding a crack in your car windshield, you know how frustrating it can be. Not only is it unsightly, but it can also compromise the structural integrity of your windshield, making it a safety hazard. But fear not, because repairing a crack in a car windshield is actually a lot easier than you might think.
All you need is a windshield repair kit, which typically includes a special resin and a few simple tools. With just a bit of patience and a steady hand, you can have your windshield looking good as new in no time. So, don’t let that crack get you down – tackle it head on and get back on the road with confidence.
Methods to identify the severity and size of the crack
When it comes to assessing the severity and size of a crack, there are several methods that can be used. One common way is through visual inspection. This involves closely examining the crack to determine its length, width, and depth.
Additionally, a professional may use a magnifying glass or other tools to get a closer look at the crack. Another method is using specialized equipment like a crack gauge or a crack monitor. These tools can provide more precise measurements and give a clearer indication of the crack’s severity.
Additionally, a professional may use non-destructive testing methods such as ultrasonic testing or magnetic particle inspection to further assess the crack. These methods can help determine if the crack is active or stable and provide insights into its size and depth. Overall, by combining visual inspection with specialized tools and testing methods, professionals can accurately assess the severity and size of a crack.
Steps to measure the crack for repair
When it comes to repairing a crack, the first step is assessing the crack itself. This allows you to determine the extent of the damage and what types of repairs may be required. To do this, you’ll need to carefully examine the crack and take measurements.
Start by cleaning the crack of any debris or loose materials. Then, use a ruler or measuring tape to determine the length and width of the crack. This will give you an idea of the size of the repair that needs to be done.
Additionally, you’ll want to assess the depth of the crack. This can be done by inserting a toothpick or other small object into the crack and measuring how far it goes in. By thoroughly assessing the crack, you’ll be able to accurately plan and execute the necessary repairs.
Repair Options
So you’ve found a crack in your car windshield, huh? Bummer! But don’t worry, there are some repair options available to fix that pesky crack and get your windshield back in tip-top shape. One option is to use a windshield repair kit, which usually comes with a special resin that can fill in the crack and prevent it from spreading. These kits can be purchased at most auto parts stores and are relatively easy to use, even for those who aren’t particularly handy.
Another option is to take your car to a professional windshield repair shop. They have specialized tools and expertise to assess the damage and determine the best course of action. In some cases, they may be able to repair the crack, while in others, they may recommend replacing the entire windshield.
Either way, it’s important to address the crack as soon as possible, as even a small crack can quickly expand and compromise the structural integrity of your windshield. So don’t put off those repairs – get that crack fixed and hit the road with a clear view ahead!
Overview of DIY repair kits
DIY repair kits offer a convenient and cost-effective solution for fixing various household items or small appliances. These kits typically include all the necessary tools and materials, as well as step-by-step instructions, making it easier for homeowners to tackle repairs themselves. Whether it’s a leaky faucet, a broken doorknob, or a damaged smartphone screen, DIY repair kits can save both time and money.
Instead of waiting for a professional to arrive or having to buy a brand-new replacement, these kits allow homeowners to fix the problem on their own. For those who enjoy hands-on projects or want to learn new skills, DIY repair kits provide the perfect opportunity to take matters into their own hands. With the right kit and a bit of patience, anyone can become a capable DIY repair person.
So why not give it a try and see how satisfying it can be to fix things yourself?
Explanation of professional repair services
repair services
Preparing for the Repair
So you’ve discovered a crack in your car windshield? Don’t panic, because repairing it doesn’t have to be a hassle. In fact, with the right tools and a little bit of know-how, you can fix that crack and have your windshield looking as good as new. First things first, you’ll need to gather the necessary supplies.
This includes a windshield repair kit, which can usually be found at your local auto parts store or online. These kits typically come with everything you need to complete the repair, including a resin mixture, applicators, and curing strips. Once you have your kit, you’ll need to clean the crack and the surrounding area.
Use a glass cleaner and a lint-free cloth to remove any dirt or debris. This will ensure that the resin adheres properly to the glass. Next, it’s time to apply the resin.
Squeeze a small amount of the resin into the applicator and carefully place it over the crack. Apply gentle pressure to force the resin into the crack, working from one end to the other. Finally, cover the crack with a curing strip and expose it to sunlight or UV light for the recommended amount of time.
This will harden the resin and complete the repair. And just like that, you’ve successfully fixed the crack in your car windshield! Remember, it’s always best to address these issues as soon as possible, as small cracks can quickly escalate into bigger problems. And if you’re unsure about tackling the repair yourself, don’t hesitate to seek professional help.
Tips for cleaning and prepping the windshield surface
cleaning and prepping the windshield surface Preparing for the Repair Before starting any repair work on your windshield, it’s important to properly clean and prep the surface. This ensures that you have a clear and smooth surface to work with, which will result in a more effective and long-lasting repair. One of the first things you should do is remove any loose debris from the windshield.
This can include dust, dirt, leaves, and any other particles that may have accumulated on the surface. Use a soft brush or cloth to gently sweep away the debris, being careful not to scratch or damage the glass. Next, you’ll want to thoroughly clean the windshield with a glass cleaner.
Choose a cleaner that is specifically designed for automotive glass and avoid using products that contain ammonia, as this can damage the surface. Spray the cleaner onto the glass and use a microfiber cloth to wipe away any dirt or grime. Make sure to clean both the inside and outside of the windshield for a thorough cleaning.
After cleaning the windshield, you’ll want to make sure the surface is completely dry before moving on to the repair. Use a clean, dry cloth or allow the windshield to air dry naturally. It’s important to remove all moisture from the surface to ensure a proper bond between the repair resin and the glass.
In addition to cleaning and drying, you may also need to apply a primer or adhesion promoter to the windshield surface. This is especially important if you are using a DIY windshield repair kit. The primer helps to improve the bond between the glass and the repair resin, ensuring a strong and durable repair.
Follow the instructions provided with your repair kit to properly apply the primer. By properly cleaning and prepping the windshield surface, you’ll set yourself up for a successful repair. Taking the time to remove debris, clean the glass, and ensure a dry and properly primed surface will result in a stronger and longer-lasting repair.
Discussion on the importance of working in a controlled environment
When it comes to repairing anything, whether it’s a small electronic device or a complex piece of machinery, it’s essential to work in a controlled environment. This means creating a space that is well-organized, clean, and free from distractions. Why is this so important? Well, imagine trying to repair a delicate circuit board while surrounded by clutter and noise.
It would be difficult to concentrate and easy to make mistakes. By working in a controlled environment, you can minimize the chances of accidents and errors, ensuring that your repairs are done correctly and efficiently. By preparing a dedicated space for repairs, you can ensure that all the tools and equipment you need are readily accessible.
This saves you time and frustration from searching for what you need and allows you to focus on the task at hand. Additionally, working in a clean and organized environment helps prevent the loss of small parts or tools. It can be incredibly frustrating to misplace a crucial screw or tool, leading to delays in the repair process.
By having a controlled environment, you can keep track of everything, reducing the risk of losing important components. Another significant advantage of working in a controlled environment is the reduced risk of damage to the item being repaired. When you’re surrounded by clutter or distractions, it’s easy to accidentally knock over objects or spill liquids onto delicate equipment.
A controlled environment minimizes the chances of accidents like these happening, ensuring that your repairs go smoothly and without any additional damage. It’s also worth considering the impact that external factors can have on the repair process. For example, working in a noisy environment can make it challenging to hear and diagnose any issues with the device.
Additionally, dust or other debris in the air can interfere with sensitive electronics or delicate mechanisms. By creating a controlled environment, you can eliminate these external factors, allowing you to work with the necessary precision and accuracy. In conclusion, working in a controlled environment is crucial when it comes to repairing anything.
DIY Crack Repair
So, you’re driving along and suddenly, there it is, a crack in your car windshield. Don’t panic! Before you start imagining the cost and hassle of replacing the entire windshield, there are some DIY crack repair options you can try. One method is using a windshield repair kit, which typically includes a special resin and a suction cup device.
First, clean the crack with a glass cleaner and let it dry completely. Then, apply a small amount of the resin to the suction cup and place it over the crack. Press down firmly to create a vacuum seal and leave it for a few hours to allow the resin to fill in the crack.
After that, use a razor blade to remove any excess resin and polish the area with a glass cleaner. Voila! Your crack should be much less noticeable and, more importantly, sealed to prevent further damage. Just keep in mind that this method is best suited for small cracks, and it might not completely eliminate the visibility of the damage.
Step-by-step instructions for repairing a crack using a DIY kit
DIY crack repair is a cost-effective and easy way to fix minor cracks in your walls. With a simple DIY kit, you can repair these cracks yourself without having to hire a professional. Here are some step-by-step instructions on how to use a DIY kit to repair a crack in your wall.
First, you will need to clean the crack and the surrounding area. Use a damp cloth to remove any dirt or dust from the crack. This will ensure that the repair material adheres properly and creates a strong bond.
Next, you will need to apply the repair material. Most DIY kits come with a filler compound or epoxy that you will need to mix together. Follow the instructions on the kit to ensure that you mix the compound properly.
Once mixed, use a putty knife to apply the repair material into the crack. Make sure to fill the crack completely, and smooth out any excess material. After applying the repair material, you may need to sand it down to create a smooth finish.
Use sandpaper or a sanding block to gently sand down the repair material until it is flush with the wall. This will give your repair a seamless look and blend it in with the rest of the wall. Once the repair material is dry and sanded down, you can paint over it to match the rest of the wall.
Use a small brush or roller to apply the paint and blend it in with the surrounding area. Allow the paint to dry completely before touching the repaired area. In just a few simple steps, you can effectively repair cracks in your walls using a DIY kit.
Tips for maximizing the effectiveness of the repair
“DIY Crack Repair” Cracks in our homes can be a source of stress and concern. Luckily, there are steps we can take to fix them ourselves and save some money in the process. One key tip for maximizing the effectiveness of a DIY crack repair is to make sure the area is clean and free of debris before beginning.
This will allow for better adhesion and ensure that the repair holds up over time. Additionally, it’s important to use the right materials for the job. There are a variety of products on the market specifically designed for crack repair, so be sure to choose one that is suitable for your particular situation.
Once you have the right materials, it’s important to follow the instructions carefully and take your time. Rushing through the repair could result in a less effective fix, so be patient and meticulous. Finally, remember that sometimes it’s best to call in the professionals.
While DIY crack repair can be a cost-effective solution, there are instances where a more serious issue may be at play. If you’re unsure about the severity of the crack or if it seems to be worsening, it’s always a good idea to consult with an expert. By following these tips, you can maximize the effectiveness of your DIY crack repair and ensure that your home stays in tip-top shape.
Professional Repair
So, you’ve found yourself with a dreaded crack in your car windshield. It’s a frustrating and potentially dangerous situation, but don’t worry, there are solutions! When it comes to fixing a crack in your windshield, it’s best to leave it to the professionals. They have the training, experience, and specialized tools to get the job done safely and effectively.
Trying to fix it yourself can lead to further damage or an improper repair, which could compromise the integrity of your windshield. A professional repair will ensure that the crack is filled and sealed correctly, restoring the structural integrity of your windshield and preventing further spreading of the damage. Plus, most reputable repair shops offer warranties on their work, giving you peace of mind knowing that if any issues arise, they’ll be taken care of.
So, save yourself the time, hassle, and potential risks by taking your car to a professional repair shop to fix that crack in your windshield.
Explanation of the process used by professionals
Professional Repair When it comes to repairing something, it’s often best to leave it to the professionals. So, what exactly happens when you take your broken item to be fixed by a professional? Well, the process used by professionals can vary depending on what needs to be repaired, but there are some general steps that are commonly followed. First, the professional will assess the item to determine the extent of the damage and what needs to be done to fix it.
They may ask you some questions about what happened to cause the damage and any symptoms you’ve noticed. This information helps them in their diagnostic process. Once they have a good idea of what’s wrong, they will start the repair process.
This could involve taking the item apart to access the faulty component or circuitry. They will then carefully inspect the damaged part to see if it can be repaired or if it needs to be replaced. If possible, they will fix the problem and put everything back together.
Next, the professional will test the repaired item to ensure that everything is working as it should. They will use specialized tools and techniques to measure the performance and make any necessary adjustments. This process can take some time, as they want to make sure that the repair is done correctly and that the item is in good working order.
Once the repair is complete and the item has passed all the tests, the professional will give it a final once-over to make sure everything looks and works as it should. They will clean up any dust or debris that may have accumulated during the repair process and make sure all the screws and connectors are tight. Finally, they will return the item to you, along with any instructions or recommendations for future care.
They may offer a warranty on the repair, giving you peace of mind that if something goes wrong again, they will take care of it. Overall, the process used by professionals for repair involves careful assessment, skilled repair work, thorough testing, and attention to detail. While it may seem like a simple task, repairing something correctly requires knowledge, experience, and the right tools.
Discussion on the benefits of professional repair
professional repair, benefits of professional repair, repair services, skilled technicians. In today’s world of technology, it’s almost impossible to live without our beloved gadgets. Whether it’s our smartphones, laptops, or even our gaming consoles, these devices have become an essential part of our daily lives.
But what happens when these devices break down or start malfunctioning? This is where professional repair services come in. One of the main benefits of opting for professional repair is the expertise and skill that skilled technicians bring to the table. These professionals have years of experience and training under their belts, which allows them to quickly diagnose and fix any issues that your device might be facing.
They have an in-depth understanding of the inner workings of these gadgets, which means that they can provide a more thorough and long-lasting solution compared to DIY repairs. Another advantage of professional repair is the convenience it offers. Nowadays, many repair services provide door-to-door pickup and delivery options, which means that you don’t have to go out of your way to drop off and pick up your device.
This saves you time and effort, allowing you to focus on more important tasks. Additionally, professional repair services often offer warranties on their work, giving you peace of mind knowing that if something goes wrong, they’ll take care of it. Furthermore, professional repair services use high-quality, genuine parts for repairs.
This is crucial for ensuring the longevity and performance of your device. Many DIY repair tutorials online might suggest using cheaper, generic parts, but these can often lead to further issues down the line. Professional repair services have access to original parts from manufacturers, ensuring that your device is restored to its original condition.
In conclusion, professional repair services provide a range of benefits compared to DIY repairs. From the expertise and skill of skilled technicians to the convenience and warranty options, these services offer a reliable and long-lasting solution for your gadgets. So the next time your device breaks down, consider reaching out to a professional repair service for a hassle-free, high-quality fix.
Preventing Future Cracks
Nobody enjoys the sight of a crack in their car windshield. It can be a nuisance and potentially dangerous if left unrepaired. Luckily, there are steps you can take to prevent future cracks from appearing.
One of the most important things you can do is to avoid driving too closely behind large trucks or vehicles that are carrying loose objects. These objects can easily fly up and hit your windshield, causing cracks. Additionally, be cautious when parking your car.
Parking in areas with heavy tree cover increases the likelihood of branches falling and damaging your windshield. Another way to prevent cracks is by avoiding extreme temperature changes. Sudden temperature changes can cause the glass to expand or contract, leading to potential cracks.
By taking these preventative measures, you can keep your windshield in pristine condition and avoid the hassle of repairing cracks in the future.
Tips for maintaining the windshield to minimize the risk of cracks
One of the best ways to prevent future cracks in your windshield is to maintain it properly. Here are a few tips to help you minimize the risk of cracks. Firstly, make sure to keep the windshield clean and clear of debris.
Small particles can cause scratches, which can lead to cracks over time. Regularly washing the windshield with a mild detergent can help remove dirt and grime. Additionally, avoid slamming the doors and trunk too hard, as the vibrations can put stress on the windshield and cause it to crack.
Another tip is to park your car in shaded areas whenever possible. Extreme temperatures, especially direct sunlight, can weaken the glass and make it more susceptible to cracking. Lastly, be cautious while driving on uneven or bumpy roads, as these can cause the windshield to flex and potentially crack.
By following these tips, you can maintain your windshield in good condition and minimize the risk of cracks.
Discussion on avoiding potential causes of cracks
Preventing future cracks in structures is crucial to ensure their longevity and structural integrity. One of the primary causes of cracks in buildings is poor construction practices or the use of low-quality materials. Ensuring that the construction is carried out by skilled professionals using high-quality materials is the first step in preventing cracks.
Additionally, controlling the moisture levels in the building is essential as excessive moisture can lead to expansion and contraction, resulting in cracks. Proper waterproofing and drainage systems should be in place to prevent water from seeping into the structure. Regular maintenance and inspections are also vital to identify any signs of potential cracks early on and address them promptly.
By taking these preventive measures, we can minimize the risk of cracks in structures and ensure their long-term durability.
Conclusion
In conclusion, fixing a crack in your car windshield is a skill that may seem daunting at first, but with the right tools and a dash of determination, you can conquer this task like a true automotive hero. Remember, when it comes to cracks, time is of the essence – fix them promptly to prevent them from spreading like a juicy rumor at a family reunion. So, whether your windshield has suffered a minor chip or a dramatic crack resembling a lightning bolt from Zeus himself, fear not! Armed with a windshield repair kit and a can-do attitude, you can restore your vision of the road ahead in no time.
Just remember to exercise caution and patience during the process. Approach it like a delicate dance, or better yet, a high-stakes game of Jenga. Slowly and methodically, remove any loose glass fragments and apply the resin as if you were an artist mending a priceless work of art – or at least a Picasso painting.
And voilà! Like magic, the crack will begin to fade away, as if it were trying to make a stealthy escape like a fugitive from windshield jail. With each passing moment, you’ll feel a sense of accomplishment wash over you, much like the satisfaction of successfully folding a fitted sheet on the first try. But wait, there’s more! As an added bonus, fixing your windshield crack will save you from the dreaded experience of interacting with a less-than-enthusiastic repair technician, who may resemble a grumpy cat that got out of the wrong side of bed.
Instead, you’ll stand proudly, the hero of your own automotive tale, regaling your friends and family with your exceptional DIY skills at the next neighborhood barbecue. So, go forth, my fellow windshield warriors, armed with repair kits and a spirit of adventure. Defy the odds and show those cracks who’s boss.
For in the world of car repairs, the windshield crack is no match for your wit, cleverness, and determination. Happy repairing!”
Summary of the importance of promptly repairing windshield cracks
windshield cracks, promptly repairing, preventing future cracks
Final tips and considerations for crack repair
To prevent future cracks in your walls or floors, there are a few important tips and considerations to keep in mind. First and foremost, it’s essential to address any underlying issues that may be causing the cracks, such as foundation or structural problems. If these issues are not properly fixed, the cracks may reappear or worsen over time.
Additionally, it’s important to maintain a consistent moisture level in your home, as excessive moisture can cause the materials to expand and contract, leading to cracks. This includes properly sealing any leaky pipes or windows and using dehumidifiers in areas prone to high humidity. Furthermore, it’s important to be mindful of the weight load on your walls and floors.
Excessive weight from heavy furniture or equipment can also lead to cracks over time. Finally, regular inspections and maintenance can help identify any potential issues before they become major problems. By taking these preventative measures, you can minimize the risk of future cracks and ensure the long-term stability of your home.
FAQs
What causes cracks in car windshields?
Cracks in car windshields can be caused by a variety of factors, including temperature changes, impacts from rocks or debris, and stress from improper installation.
Can a crack in a car windshield be repaired?
Yes, depending on the size and location of the crack, it may be possible to repair it rather than replacing the entire windshield. A professional windshield repair technician can assess the damage and determine the best course of action.
How long does it take to repair a crack in a car windshield?
The time required to repair a crack in a car windshield can vary depending on the size and complexity of the damage. In general, most repairs can be completed within 30 minutes to an hour.
Is windshield repair covered by car insurance?
In many cases, windshield repair is covered by car insurance policies that include comprehensive coverage. However, it’s best to check with your insurance provider to determine your specific coverage and any potential deductibles.
Can a windshield crack spread over time?
Yes, if left untreated, a crack in a car windshield can spread over time. Factors such as temperature changes, vibrations, and continued driving can cause the crack to lengthen and widen, potentially compromising the integrity of the windshield.
What is the cost to repair a crack in a car windshield?
The cost to repair a crack in a car windshield will depend on various factors, such as the size and location of the crack, the type of vehicle, and the service provider. On average, the cost can range from $50 to $150.
Can I drive my car with a cracked windshield?
It is generally not recommended to drive a car with a cracked windshield, especially if the crack obstructs the driver’s view or compromises the structural integrity of the windshield. It’s best to have the crack assessed and repaired as soon as possible to ensure safe driving conditions.