

Hey there! Are you curious about the world of blogging? Well, you’ve come to the right place! In this blog post, we’ll be diving into the exciting world of blogging and exploring everything you need to know to get started. So, what exactly is blogging? At its core, blogging is the act of creating content and sharing it online. It’s a way for individuals and businesses to connect with their audience, share their thoughts and expertise, and build an online presence.
Whether you’re passionate about travel, food, fashion, or any other topic under the sun, blogging provides a platform for you to express yourself and share your unique perspective. Now, you might be wondering why blogging has become such a popular activity. Well, part of its appeal lies in its accessibility.
Blogging allows anyone with an internet connection to become a content creator. You don’t need fancy equipment or a degree in writing to start a blog. All you need is an idea and a willingness to put your thoughts out there for the world to see.
But blogging is about so much more than just hitting the publish button. It’s about building a community, connecting with like-minded individuals, and sharing your experiences. It’s also a great way to learn new things, connect with others in your industry, and potentially even make money.
In this blog series, we’ll be covering everything from choosing a blogging platform, to crafting captivating content, to promoting your blog and growing your audience. We’ll also delve into the world of monetization and explore different ways you can turn your blog into a source of income. So, if you’re ready to embark on a blogging adventure, then grab your laptop and let’s get started! Whether you’re a seasoned writer looking to try something new or a complete newbie eager to dip your toe into the blogging waters, this series is for you.
So, buckle up and get ready to unleash your creativity in the wonderful world of blogging!
Table of Contents
Understanding the Problem
Have you ever found yourself driving down the road, only to hear a loud crack and see a dreaded chip or crack in your windshield? It’s a common problem that can happen to anyone, and it’s important to address it as soon as possible to prevent further damage. While you may initially think that repairing a cracked windshield requires a trip to the professionals, it is actually possible to fix it at home. By using a windshield repair kit, you can tackle the problem yourself and save both time and money.
These kits typically include a resin that is specially designed to fill and seal the crack, preventing it from spreading. With just a few simple steps, you can have your windshield looking as good as new in no time.
What causes windshield cracks?
windshield cracks, causes, understanding the problem, automotive safety, weather conditions, road debris, stress, temperature changes Have you ever wondered what causes those frustrating windshield cracks? It’s a common problem that plagues many drivers, yet few truly understand why it happens. Well, let’s get to the bottom of it together. One of the most significant factors that contribute to windshield cracks is the unpredictable weather conditions we often encounter on the road.
From extreme temperatures to sudden storms, these natural phenomena can place immense stress on your windshield. Additionally, the everyday hazards of the road, such as loose gravel, rocks, and debris, can also cause cracks. Even small chips and dings can quickly turn into larger cracks if left untreated.
Lastly, the constant changes in temperature can weaken the structural integrity of your windshield, making it more susceptible to cracking. So the next time you find yourself dealing with a pesky crack, remember that understanding the problem is the first step towards maintaining your automotive safety.
Different types of windshield cracks
windshield cracks, types of cracks, understanding the problem
Assessing the Damage
If you find yourself with a cracked windshield, you may be wondering if there’s any way to repair it at home. Luckily, there are some DIY solutions you can try before resorting to professional help. First, assess the damage to determine if it’s a minor crack or a larger one.
If it’s only a small crack, you can try using a windshield repair kit. These kits typically come with a resin that you apply to the crack, which helps to seal it and prevent further damage. However, if the crack is larger or spreading, it’s best to seek professional assistance as they have the necessary tools and expertise to fix the problem effectively.
Remember, safety is paramount, so don’t hesitate to ask for assistance if you’re unsure of how to proceed.
Examining the crack
examining the crack, assessing the damage
Determining if the crack can be repaired at home
crack repair at home Assessing the Damage If you’ve noticed a crack in your wall or floor, your first instinct might be to try and fix it yourself. While doing home repairs can be rewarding, it’s important to properly assess the damage before attempting any fixes. The severity of the crack will determine whether or not it can be repaired at home.
Start by examining the size and length of the crack. Is it small and superficial, or does it run deep and wide? Small cracks are often superficial and can be easily repaired by filling them in with patching materials. However, larger cracks may be indicative of underlying structural issues, such as foundation problems, and may require professional attention.
Additionally, consider the location of the crack. Is it in a high-traffic area or in a spot that is likely to be subject to further stress or movement? If so, it may not be suitable for a DIY repair. Keep in mind that the safety and stability of your home should always take precedence, so if you’re unsure about the severity of the crack or lack the necessary skills to fix it, it’s best to consult a professional.
Gathering the necessary materials
If you have a cracked windshield and want to save some money by fixing it yourself, there are a few materials you’ll need to gather first. One essential tool is a windshield repair kit, which typically includes a resin adhesive and a suction cup applicator. You’ll also need a razor scraper or a similar tool to remove any loose glass or debris from the crack.
To ensure a clean and smooth surface, you’ll want to have some rubbing alcohol or glass cleaner on hand. Additionally, masking tape or clear tape can be useful for creating a barrier around the crack to prevent the resin from spreading onto the surrounding glass. By collecting these materials before you start the repair process, you’ll be well-prepared to tackle the job and restore your windshield to its former condition.
Safety glasses
safety glasses
Gloves
When it comes to gathering the necessary materials for making gloves, there are a few key items you’ll need to have on hand. First and foremost, you’ll need a good quality fabric or leather material to serve as the main body of the glove. This should be durable and able to withstand the rigors of everyday wear.
Additionally, you’ll need a sewing machine or needle and thread to stitch everything together. Depending on the type of glove you’re making, you may also need other materials such as lining fabric, padding, or elastic to add comfort and functionality. It’s important to have all of these materials ready and easily accessible before you begin crafting your gloves.
By gathering all of the necessary materials beforehand, you’ll be able to streamline your process and create a more efficient and successful end product. So, gather up your fabrics, thread, and other supplies, and get ready to create a pair of gloves that are not only stylish but also practical!
Resin repair kit
resin repair kit, materials needed, gather materials, fix small cracks, chips, scratches, damage, reinforce weakened areas, prevent further damage Keywords to include in the paragraph once : resin repair kit, materials needed, gather materials, fix small cracks, chips, scratches, damage, reinforce weakened areas, prevent further damage Are you tired of staring at that unsightly chip or crack in your favorite ceramic or glass item? It’s time to take matters into your own hands and fix it yourself with a resin repair kit. But before you can get started, you’ll need to gather the necessary materials. First and foremost, you’ll need the resin itself, which is the magic ingredient that will bond and repair your damaged item.
Make sure to choose a resin that is specifically designed for the material you are working with, as different resins have different bonding properties. Next, you’ll need some cleaning supplies to prepare the surface of the damaged area. A mild detergent and a soft cloth should do the trick.
You’ll also need some sandpaper or a file to smooth out any rough edges. And finally, don’t forget about safety goggles and gloves to protect yourself during the repair process. Once you have all of these materials gathered, you’ll be ready to fix those small cracks, chips, and scratches, reinforcing weakened areas and preventing further damage.
With a little patience and some skillful application, your item will look as good as new in no time.
Razor blade
Before starting the process of shaving with a razor blade, it’s important to gather all the necessary materials. This will ensure a smooth and comfortable shaving experience. The first item you’ll need is a sharp razor blade.
You can choose between a disposable razor or a safety razor, depending on your preference. Disposable razors are convenient and easy to use, while safety razors offer a closer shave and are more environmentally friendly. Whichever option you choose, make sure the razor blade is sharp and in good condition to avoid any cuts or irritation.
Additionally, you’ll need shaving cream or gel to create a smooth surface for the razor blade to glide over. It’s best to choose a product that is suitable for your skin type and provides adequate lubrication. Lastly, don’t forget to have a clean towel or washcloth nearby to wipe off any excess shaving cream or water during the process.
By gathering these materials beforehand, you’ll be well-prepared for a comfortable and precise shave.
Clean cloth
clean cloth, gathering materials, cleaning supplies, non-abrasive cloth Are you ready to give your home a sparkling clean makeover? One essential item you’ll need in your cleaning arsenal is a clean cloth. But not just any cloth will do the job. To achieve a streak-free shine, you’ll want to gather the necessary materials to ensure a thorough and efficient cleaning session.
First and foremost, make sure you have a variety of cleaning supplies on hand. This may include all-purpose cleaners, window cleaners, and disinfectants. Once you have your cleaning products ready, it’s time to gather your cloths.
Opt for non-abrasive cloths that are gentle on surfaces but still effective in picking up dirt and grime. Microfiber cloths are an excellent choice as they have tiny fibers that can trap dust and particles without scratching delicate surfaces. Remember to have enough cloths on hand so you can switch them out as they become dirty.
With the right materials at your disposal, you’ll be well-prepared to tackle any cleaning task that comes your way. So get those cleaning supplies and clean cloths ready, and let’s start cleaning!
Plastic film
“Plastic film” Keywords for secondary use: materials, gathering, necessary materials So you’ve decided to embark on a crafting project using plastic film. But where do you start? Well, the first step is gathering all the necessary materials. You’ll need plastic film, of course, but there are a few other items you may need as well.
The most important material for your project is the plastic film itself. There are many different types of plastic film available, so it’s important to choose the right one for your needs. Consider factors such as thickness, transparency, and durability when selecting your plastic film.
If you’re unsure, don’t hesitate to ask for recommendations at your local craft store. In addition to the plastic film, you may also need some cutting tools. Depending on the complexity of your project, scissors or a hobby knife may be sufficient.
However, if you’re working with thicker or more rigid plastic film, you may need a utility knife or even a rotary cutter. Another item you may need is a cutting mat or surface. This will help protect your work area and ensure clean, precise cuts.
A self-healing cutting mat is a popular choice, as it can be used with both scissors and hobby knives. Once you have all your materials gathered, you’re ready to start your plastic film project. With a little creativity and the right materials at hand, there’s no limit to what you can create with plastic film.
So get started and let your imagination run wild!
Preparation
Have you ever found yourself with a cracked windshield and wondered if there was a way to repair it at home? Well, you’re in luck! With a few simple tools and a little bit of patience, you can actually fix a cracked windshield yourself. The first step is to assess the size and location of the crack. If it’s small and not obstructing your line of vision, then it’s likely a good candidate for a DIY repair.
Next, you’ll need to gather the necessary materials, such as a windshield repair kit that includes resin and a bridge device. These kits can be found at most automotive stores or online. Once you have the kit, you can begin the repair process by cleaning the crack and applying the resin.
The resin is designed to fill in the crack and prevent it from spreading. After applying the resin, you’ll need to use the bridge device to create pressure and help the resin bond to the glass. Finally, you’ll need to let the resin dry and then polish any excess off the windshield.
Keep in mind that this process may not work for larger or more severe cracks, and it’s always a good idea to consult a professional if you’re unsure. However, if the crack is small and you follow these steps carefully, you just might be able to repair your cracked windshield at home.
Cleaning the windshield
Cleaning the windshield can be a hassle, but with the right preparation, it can be a breeze. Before you start cleaning, gather all the necessary tools and supplies. You’ll need a bucket filled with warm water and a mild detergent or glass cleaner.
Don’t forget to grab a sponge or soft cloth, as well as a squeegee and clean microfiber towels. It’s also important to park your car in a shaded area to prevent the cleaning solution from drying too quickly. By taking the time to gather your supplies and find a suitable location, you’ll set yourself up for success when it comes time to clean your windshield.
Securing the crack
sealing the crack. The first step in securing a crack is proper preparation. Before you even begin to think about sealing the crack, you need to ensure that the area is clean and free from any debris or loose material.
This can be done by sweeping or using a broom to remove any loose dirt or dust. Additionally, if the crack is in a concrete surface, it may be necessary to use a wire brush or chisel to remove any loose or flaking concrete. Once the area is clean, the next step is to ensure that the crack is properly filled and leveled.
This can be done by using a crack filler compound or a patching material. It’s important to choose a filler or patching material that is compatible with the surface you are working on, as different materials have different properties and may not adhere properly if not properly matched. After filling and leveling the crack, it is crucial to allow the filler or patching material to dry and cure completely before moving on to the next step.
This typically takes a few hours to a few days, depending on the specific product used and the environmental conditions. It’s important to follow the manufacturer’s instructions for drying and curing times to ensure the best results. Once the filler or patching material has dried and cured, it’s time to apply a sealant to the crack.
A sealant acts as a protective barrier, preventing water or other liquids from seeping into the crack and causing further damage. There are many different types of sealants available, including silicone-based sealants, epoxy sealants, and elastomeric sealants. The specific type of sealant you choose will depend on the type of surface you are working on and the specific needs of the crack.
Applying the sealant is a relatively simple process. Using a caulk gun or similar applicator, carefully apply a thin, even layer of sealant over the crack. Be sure to fill the entire length of the crack, ensuring that no gaps or voids are left unfilled.
Wearing safety gear
One of the most important aspects of staying safe while engaging in any activity is wearing the appropriate safety gear. Whether you’re participating in a high-impact sport or conducting construction work, properly equipping yourself with the necessary protective gear is crucial. Preparation is key when it comes to safety, and this includes choosing the right gear for the specific task at hand.
Imagine heading out on a bike ride without wearing a helmet. The risk of injury from a fall or collision is significantly higher without proper head protection. The same goes for other activities like skateboarding, skiing, and even rock climbing.
Wearing a helmet isn’t just an option – it’s a non-negotiable when it comes to safety. Similarly, in construction or industrial settings, wearing safety gear like hard hats, steel-toe boots, and high-visibility clothing is essential. These items provide protection against potential hazards such as falling objects, heavy machinery accidents, and visibility issues.
Without these safeguards, the risk of serious injury or even death increases significantly. So, before engaging in any activity that carries a risk of injury, take the time to prepare by wearing the appropriate safety gear. It’s not just about following rules or regulations; it’s about protecting yourself and ensuring your well-being.
Don’t underestimate the importance of properly equipping yourself – it can make all the difference in the world.
Repairing the Crack
Have you ever had the unfortunate experience of getting a crack in your windshield? It can be quite frustrating and expensive to get it repaired professionally, but did you know that you can actually fix it yourself at home? Yes, that’s right! With a little bit of patience and some basic tools, you can easily repair a cracked windshield on your own. First, gather the necessary materials. You’ll need a windshield repair kit, which typically includes a resin, curing film, and an applicator.
You can easily find these kits at your local auto parts store or online. Additionally, you’ll need a razor blade, rubbing alcohol, a clean cloth, and a hairdryer. Start by cleaning the crack and the area surrounding it with a mixture of water and mild soap.
Use the razor blade to carefully remove any loose glass or debris from the crack. Once the area is clean and dry, apply a small amount of rubbing alcohol to a clean cloth and wipe the crack to remove any remaining dirt or grease. Next, follow the instructions on the windshield repair kit to prepare the resin.
Typically, you’ll need to mix the resin with a hardening agent and place it in the applicator. Gently insert the applicator into the crack and slowly fill it with the resin. Be sure to apply enough resin to completely fill the crack.
Once the crack is filled, place the curing film over the resin and use the hairdryer on its lowest heat setting to gently warm the area. This will help the resin to cure and bond with the glass. Hold the hairdryer about six inches away from the crack and move it back and forth for about ten minutes.
After the resin has cured, carefully remove the curing film and use the razor blade to scrape off any excess resin. Finish by cleaning the repaired area with a mixture of water and mild soap to remove any remaining residue. Remember, while this method can be effective for repairing small cracks, it may not work for larger or more severe damage.
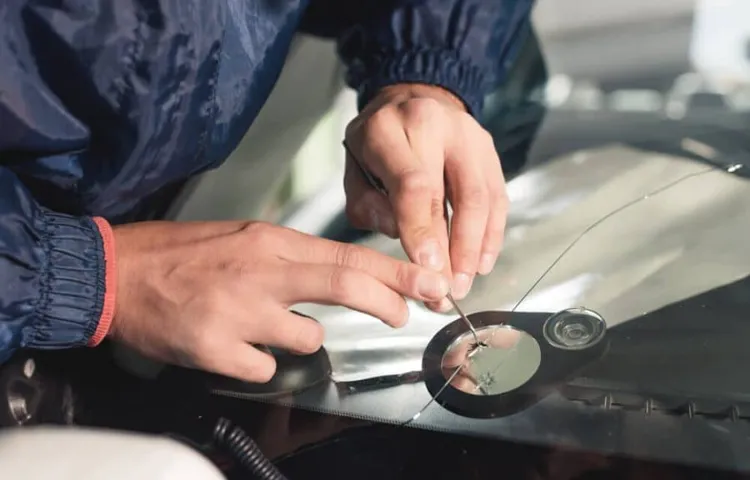
Applying the resin
“applying resin to repair a crack” When it comes to repairing a crack, applying resin is an effective way to fix the problem. Resin is a thick, sticky substance that can be used to fill in and seal cracks, creating a strong and durable bond. To start the repair process, you will need to clean the crack thoroughly to ensure that the resin adheres properly.
Use a brush or cloth to remove any dirt or debris from the crack. Next, mix the resin according to the manufacturer’s instructions. This typically involves combining a resin and a hardener, which chemically react to create a strong bond.
Once the resin is mixed, carefully pour or spread it into the crack, making sure to fill it completely. Use a putty knife or similar tool to smooth out the surface of the resin and remove any excess. Allow the resin to dry and harden according to the manufacturer’s instructions.
Once it is fully set, you can sand down the surface if necessary to create a smooth finish. With the crack repaired and the resin applied, your item will be as good as new!
Curing the resin
resin curing, repairing crack, fix Curing the resin is an essential step when working with resin projects. Resin is a versatile material that can be used for various crafts, but it can also be prone to cracking. If you notice a crack in your resin creation, don’t worry! It is possible to repair it and make it look as good as new.
The first step in fixing a resin crack is to clean the area around the crack thoroughly. This is important to ensure a good bond between the resin and the repair material. Once the area is clean, you can apply a thin layer of resin to the crack.
Make sure to spread it evenly and fill in the crack completely. After applying the resin, use a heat gun or a torch to cure it. Applying heat will make the resin harden and bond with the surrounding material, creating a strong and seamless repair.
Keep in mind that the curing process may take some time, so be patient and let the resin cure completely before handling the repaired item. Once the resin has cured, you can sand and polish the repaired area to make it blend in with the rest of the surface. So, don’t panic if you find a crack in your resin project.
With some simple steps and a little bit of patience, you can fix it and have your creation looking flawless again.
Scraping off excess resin
Scraping off excess resin Once the glue has dried and the resin has fully cured, it’s time to remove any excess resin on the surface of the cracked area. This step ensures a smooth and seamless repair. To do this, take a scraper or putty knife and gently scrape off any resin that is protruding above the surface.
Be careful not to apply too much pressure or you may risk damaging the surrounding area. The goal is to level the resin with the surface and create a flush finish. It may take some time and patience to remove all the excess resin, especially if the crack is deep or wide.
Take your time and work in small sections to achieve the best results. Once you have scraped off all the excess resin, wipe the surface with a clean cloth to remove any loose particles.
Buffing the windshield
windshield repair, cracked windshield, buffing the windshield
Checking for any remaining damage
After repairing the crack in your home’s foundation, it’s important to check for any remaining damage. While the crack itself may have been fixed, there could still be underlying issues that need to be addressed. One common problem that can arise is water infiltration.
Water can seep through cracks in the foundation and cause further damage over time. To check for this, you can inspect the walls and floor for any signs of moisture or water stains. Additionally, you can look for any other signs of damage such as sagging or uneven floors, sticking doors or windows, or cracks in the walls or ceiling.
These could indicate that there is still an issue with the foundation that needs to be fixed. If you notice any of these signs, it’s important to contact a professional to assess the situation and determine the best course of action. By addressing any remaining damage promptly, you can ensure the long-term stability and safety of your home.
Additional Tips and Safety Precautions
If you have a cracked windshield and want to try repairing it at home, it’s important to exercise caution and follow some safety guidelines. First, make sure you’re working in a well-ventilated area to avoid inhaling any fumes from the repair materials. Next, wear protective gloves and safety glasses to protect your hands and eyes from any potential harm.
Before starting the repair process, thoroughly clean the cracked area with a glass cleaner to remove any dirt or debris. Then, apply a windshield repair kit, which typically consists of a resin and a bridge tool. Gently squeeze the resin into the crack and use the bridge tool to apply pressure and make sure it fills the entire crack.
Leave it to dry as per the instructions provided in the kit. Finally, once the repair is complete, avoid subjecting your windshield to extreme temperature changes for the next few days and be cautious while driving to prevent further damage. Following these tips and safety precautions can help you successfully repair your cracked windshield at home.
Avoiding DIY repairs for larger cracks
One of the disadvantages of attempting to repair larger cracks in your home’s foundation is the potential for further damage if not done correctly. While it might be tempting to save money and tackle the repair yourself, it is important to consider the expertise and experience needed for such a task. Hiring a professional contractor will ensure that the job is done properly, minimizing the risk of structural issues down the line.
Additionally, professionals have access to specialized equipment and materials that DIYers may not have, ensuring a more durable and long-lasting repair. It is also important to note that attempting to repair large cracks without proper knowledge and equipment can be dangerous. The stability of your home’s foundation is crucial for its overall structural integrity, and any mistakes made during the repair process can potentially compromise this.
It is always best to err on the side of caution and trust the expertise of professionals.
Consulting a professional if unsure
“Consulting a professional if unsure” When it comes to tackling a project or problem around the house, it can be tempting to try and handle it on your own. After all, we live in the age of DIY, with countless tutorials and how-to videos available at the click of a button. However, it’s important to remember that there are some tasks that are best left to the experts.
If you find yourself unsure or inexperienced in a particular area, it’s always a good idea to consult a professional. Why is it so crucial to seek expert advice? Well, for starters, professionals have the knowledge and skills necessary to handle a wide range of situations. They have spent countless hours training and honing their craft, so they know what they’re doing.
They can offer guidance, troubleshoot problems, and provide solutions that you may not have even considered. Not only that, but they also have access to specialized tools and equipment that can make the job easier and more efficient. Another reason to consult a professional is safety.
Many home improvement projects require working with electricity, plumbing, or other potentially dangerous elements. Without the proper knowledge and experience, attempting these tasks on your own could put you and your loved ones at risk. Professionals have the training and expertise to handle these situations safely and effectively, minimizing the chance of accidents or injuries.
Lastly, consulting a professional can save you time and money in the long run. While it may seem like a DIY approach is more cost-effective, it can often lead to costly mistakes. If you attempt a project without the necessary skills, you may end up causing further damage or needing to hire a professional to fix what you’ve done.
By seeking expert advice from the beginning, you can avoid these pitfalls and ensure that the job is done right the first time. In conclusion, sometimes it’s best to leave certain tasks to the professionals. If you find yourself unsure or inexperienced in a particular area, don’t hesitate to consult an expert.
Preventing windshield cracks in the future
windshield cracks, preventing, future, additional tips, safety precautions
Conclusion
So there you have it, folks – a simple and cost-effective way to repair a cracked windshield right in the comfort of your own home. With just a few basic tools and a little bit of patience, you can avoid the time-consuming and expensive trip to the auto repair shop. But before you go and become your neighborhood’s friendly windshield repair guru, remember to always prioritize safety.
If you’re not confident in your abilities or if the crack is too severe, it’s best to leave it to the professionals. Now, go forth and conquer those cracks! Show that windshield who’s boss by giving it a quick fix and a new lease on life. And hey, if all else fails, you can always tell people it adds character to your vehicle – a fashionable battle scar that sets you apart from the crowd.
Just remember, this witty solution comes with a dose of humor, so please exercise caution and prioritize safety above all else. Happy repairing!”
FAQs
Can I repair a cracked windshield at home without professional help?
Yes, you can repair a cracked windshield at home using a windshield repair kit that is easily available in the market.
What are the steps to repair a cracked windshield at home?
The steps to repair a cracked windshield at home include cleaning the cracked area, applying the windshield repair resin, and allowing it to cure.
Is it safe to drive with a cracked windshield?
It is not recommended to drive with a cracked windshield as it can compromise the structural integrity of the vehicle and may obstruct your visibility.
How long does it take to repair a cracked windshield at home?
The time required to repair a cracked windshield at home can vary depending on the severity of the crack and the type of repair kit being used. It can take anywhere from 30 minutes to a couple of hours.
How much money can I save by repairing a cracked windshield at home?
By repairing a cracked windshield at home, you can potentially save hundreds of dollars that would have been spent on professional windshield repair or replacement.
Can I use a DIY windshield repair kit on a large crack?
DIY windshield repair kits are generally designed for small cracks or chips. It is recommended to consult a professional if the crack is large or spreading.
What are the limitations of repairing a cracked windshield at home?
There are limitations to repairing a cracked windshield at home, such as the size and location of the crack, the type of glass, and the skills or experience of the person attempting the repair. It is always advisable to seek professional help for complex or extensive damage.