
Do you have a small chip on your windshield that’s been bothering you? Maybe it happened while driving on the highway and a small rock hit your windshield at just the right angle. Or perhaps it’s the result of a wayward baseball from a nearby game. Whatever the cause, dealing with a chip on your windshield can be a frustrating experience.
But fear not, because in this blog post, we’re going to show you how to repair that small chip and get your windshield looking as good as new. Think of it as a DIY project that can save you time and money in the long run. So let’s dive in and get started!
Table of Contents
Introduction
Have you ever experienced the frustration of finding a small chip on your windshield? It can be a real eyesore, not to mention a potential hazard if left unaddressed. But fear not! Repairing a small chip on your windshield is actually quite simple. With a few basic tools and some patience, you can restore your windshield to its former glory in no time.
In this blog post, we will walk you through the step-by-step process of how to repair a small chip on your windshield. So, let’s get started and bring back that crystal-clear view of the road ahead!
Materials Needed
When you discover a small chip on your windshield, it’s essential to address it promptly to prevent further damage. Repairing a small chip on your windshield is a relatively simple process that you can do yourself with the right materials. To get started, you’ll need a windshield repair kit, which typically includes a bridge or suction cup device, resin, curing strips, an adhesive seal, and a razor blade or sharp utility knife for cleaning the chip.
These materials are readily available at automotive stores or online. Once you have your kit, you can follow the step-by-step instructions provided to fill the chip with resin, seal it, and allow it to cure. By repairing the chip, you can restore the structural integrity of your windshield and prevent it from spreading, prolonging the life of your glass.
So, if you notice a small chip on your windshield, don’t hesitate to gather the materials you need and take action to fix it as soon as possible.
Safety goggles
safety goggles, materials needed When it comes to protecting our eyes, safety goggles are a must-have. Whether we’re working in a construction site or doing some DIY repairs at home, safety goggles can prevent potential eye injuries from flying debris or harmful chemicals. So, what materials do we need to make our own safety goggles at home? It’s quite simple actually.
First and foremost, we need a sturdy frame for our goggles. This can be made from various materials such as plastic, metal, or even wood. It’s important to choose a material that is durable and can withstand impact.
After all, the purpose of safety goggles is to protect our eyes, so we want them to be able to withstand any potential dangers. Next, we’ll need clear lenses for our goggles. These lenses should be made from a material that is shatterproof and scratch-resistant.
Polycarbonate is often the material of choice for safety goggles lenses as it meets these requirements and provides excellent clarity. To hold the lenses in place, we’ll need some sort of adhesive or clips. Adhesive can be used to secure the lenses to the frame, ensuring they don’t pop out unexpectedly while we’re wearing the goggles.
Alternatively, clips can be used to hold the lenses in place and allow for easy lens replacement if needed. Lastly, we need a comfortable strap to keep our safety goggles securely on our head. Elastic straps are commonly used for this purpose as they are adjustable and can provide a snug fit.
This ensures that the goggles won’t slip or fall off while we’re wearing them. By having these materials on hand, we can easily make our own safety goggles at home. Whether we’re engaging in a DIY project or working in a hazardous environment, having a pair of safety goggles will protect our eyes and give us peace of mind.
Protective gloves
When it comes to protective gloves, it’s important to understand the materials needed to ensure maximum safety and effectiveness. One of the most common materials used in protective gloves is latex. Latex gloves are known for their exceptional elasticity and ability to provide excellent barrier protection against a wide range of chemicals and biological agents.
They are also highly durable and have a high level of puncture resistance. Another popular material for protective gloves is nitrile. Nitrile gloves are similar to latex gloves in terms of their stretchability and barrier protection, but they are also resistant to oils and many chemicals.
Additionally, nitrile gloves are a great option for individuals with latex allergies. Another material used in protective gloves is vinyl. Vinyl gloves are cost-effective and provide a good level of barrier protection, but they are not as elastic as latex or nitrile gloves.
Finally, there are also gloves made from various other materials such as neoprene, polyurethane, and even Kevlar, which are used for specific applications that require extra protection. It’s important to consider the specific needs of the task at hand when selecting the appropriate material for protective gloves.
Plastic scraper
In order to make a plastic scraper, you will need a few materials. First, you will need a plastic sheet or board. This can be made from a variety of plastics, such as acrylic or polycarbonate.
You will also need a cutting tool, such as a utility knife or a jigsaw, to cut the plastic to the desired shape. Additionally, you will need sandpaper or a file to smooth the edges of the plastic. This will ensure that the scraper is safe to use and won’t cause any scratches or damage.
Finally, you may want to consider adding a handle to the scraper for easier grip and control. This can be made from any sturdy material, such as wood or metal. Once you have gathered all of the materials, you can start cutting and shaping the plastic to create your own custom scraper.
Whether you need it for cooking, crafting, or any other tasks, a plastic scraper can be a useful tool to have in your arsenal. So why not give it a try and make one for yourself? You’ll be amazed at how handy it can be!
Windshield repair kit
windshield repair kit, materials needed, crack or chip, resin, curing strips, curing film, razor blade, alcohol wipe When it comes to fixing a crack or chip in your windshield, having the right materials on hand is essential. To effectively repair the damage, you’ll need a windshield repair kit that includes a few key items. One of the most important components of a windshield repair kit is the resin.
This is the substance that actually fills in the crack or chip, sealing it and preventing it from spreading further. Along with the resin, you’ll also need curing strips or curing film. These are used to cover the resin and help it cure properly.
Additionally, a razor blade may be needed to remove any excess resin or to clean up the surrounding area. And before applying any of these materials, it’s important to properly clean the windshield with an alcohol wipe to ensure that the repair will adhere properly. With these materials at your disposal, you’ll have everything you need to efficiently and effectively repair a crack or chip in your windshield.
Step 1: Preparation
Have you noticed a small chip on your windshield recently and want to know how to repair it? Don’t worry, we’ve got you covered! The first step in repairing a small chip on your windshield is preparation. First, gather all the necessary tools and materials such as a windshield repair kit, which typically includes a resin, applicator, and curing strips. Make sure you read the instructions carefully before starting the repair process.
Next, clean the chip and the surrounding area with a glass cleaner to ensure there is no dirt or debris that could interfere with the repair. Once the area is clean and dry, you are ready to move on to the next step. With these preparations in place, you can now move forward with repairing the chip on your windshield to ensure its longevity and safety.
Park your car in a shaded area
When it comes to keeping your car cool in the summer heat, finding a shaded parking spot is key. Parking your car in a shaded area not only helps to protect your vehicle’s interior from the sun’s damaging rays, but it also helps to keep the temperature inside cooler. Imagine parking your car in direct sunlight on a scorching summer day.
The temperature inside can quickly climb to uncomfortable, even dangerous levels. By finding a shady spot, you can prevent your car from turning into a hot oven. Plus, parking in the shade can also help to protect your car’s exterior from UV damage, prolonging its paint and preventing fading.
So, the next time you park your car, be sure to look for a nice shady spot to keep it cool and protected.
Clean the chip and surrounding area
cleaning a chip, surrounding area, preparation Cleaning the chip and its surrounding area is the first step in ensuring a successful repair. Before you begin, gather the necessary tools such as a microfiber cloth, alcohol wipes, and compressed air. Start by turning off and unplugging the device to avoid any electrical hazards.
Carefully inspect the chip for any visible dirt, dust, or debris. Use a microfiber cloth to gently wipe away any loose particles from the chip and its surrounding area. Be careful not to apply too much pressure, as it could damage the delicate components.
Once you have removed the loose dirt, use an alcohol wipe to clean the chip. The alcohol will help dissolve any sticky residue or grime that may be present. Finally, use compressed air to blow away any remaining dust or particles.
This will ensure that the chip is clean and ready for repair. Remember, taking the time to properly clean the chip and its surrounding area will help ensure a successful repair and prolong the life of your device.
Place a piece of clear tape over the chip
In order to fix a chip in your windshield, you need to follow a few simple steps. The first step is to prepare the area by placing a piece of clear tape over the chip. This will help to keep out dirt and prevent any further damage.
The tape should be placed directly over the chip, making sure to cover it completely. This will create a barrier between the chip and any outside elements, helping to protect it while you work on repairing it. Once the tape is securely in place, you can move on to the next step in the process.
Step 2: Repairing the Chip
So you’ve discovered a small chip on your windshield, and now you’re wondering how to fix it. Don’t worry, repairing a small chip on your windshield is actually a fairly simple process that you can do yourself. The first step is to gather the necessary materials, which include a windshield repair kit, rubbing alcohol, a clean cloth, and clear nail polish.
Once you have these items on hand, clean the chip and the surrounding area with rubbing alcohol and a clean cloth. This will remove any dirt or debris that could interfere with the repair process. Next, apply a small amount of clear nail polish to the chip.
The nail polish will help to seal the chip and prevent further damage. After the nail polish has dried, use the windshield repair kit to fill the chip with resin. Follow the instructions provided with the kit to ensure you apply the resin correctly.
Once the resin is applied, cover it with a patch or clear tape to protect it from dirt and debris while it cures. Leave the resin to cure for the recommended amount of time, then remove the patch or tape and use a razor blade to scrape away any excess resin. And there you have it – a small chip on your windshield repaired and good as new!
Put on safety goggles and protective gloves
In the next step of repairing a chip in your car’s windshield, it’s important to prioritize safety. Put on those safety goggles and protective gloves before you begin the repair process. By doing so, you’re protecting your eyes from any debris that may fly off while working on the chip, as well as shielding your hands from any potential harm.
It may seem like a small and simple step, but it’s an important one to ensure your own well-being. Just like how a superhero dons their costume to protect themselves from danger, you’re suiting up to tackle this repair job with confidence and safety. So, go ahead and gear up, because it’s time to get down to business and fix that chip!
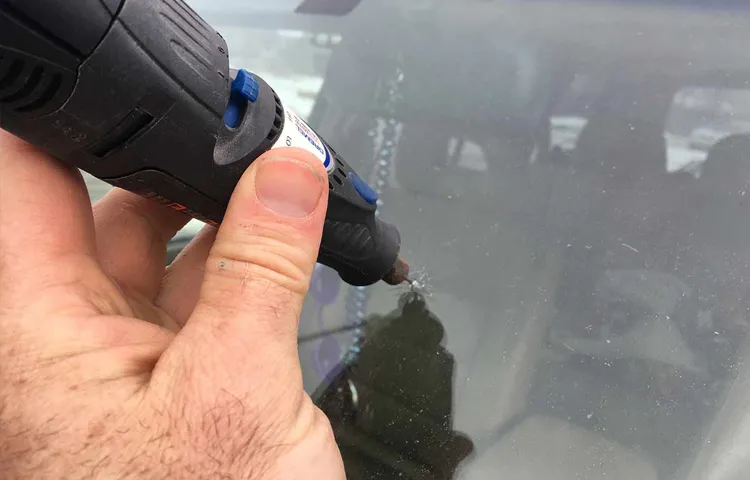
Apply the resin to the chip
resin application, repairing the chip
Place the curing strip over the resin
In this step of repairing a chip on your windshield, we are going to place the curing strip over the resin. This is an important part of the process as it helps to contain the resin and ensure that it properly bonds with the glass. First, make sure that the resin has been applied to the chip and is in place.
Then, take the curing strip and carefully place it over the resin, making sure to cover the entire area. Press down gently to ensure that the strip is in contact with the resin and the glass. The purpose of the curing strip is to create a barrier between the resin and the air, allowing the resin to properly cure and harden.
This step is crucial in ensuring a strong and durable repair. So, don’t skip it! By following the proper steps, you can easily repair a chip on your windshield and prevent it from spreading further.
Allow the resin to cure under sunlight
In the second step of repairing a chipped windshield, you need to allow the resin to cure under sunlight. Once you’ve applied the resin to the chip, it’s important to expose it to sunlight to help it harden and bond with the glass. Sunlight provides the necessary heat and UV rays to kickstart the curing process.
You can place the vehicle in an area where it receives direct sunlight for optimum results. Remember to position the vehicle in such a way that the chip is directly exposed to the sun. The curing time can vary depending on the temperature and the size of the chip, so it’s essential to be patient and give the resin enough time to harden properly.
Rushing the curing process could result in an ineffective repair, so it’s best to leave it under the sunlight for the recommended duration.
Step 3: Finishing Touches
So, you’ve followed the first two steps of repairing a small chip on your windshield, and now it’s time for the finishing touches. These final steps will ensure that the repair is seamless and long-lasting. First, you’ll want to clean the repaired area and remove any excess resin.
You can use a razor blade or a simple razor scraper to carefully scrape away any extra resin. Be sure to clean the area thoroughly with glass cleaner or rubbing alcohol to remove any residue. Next, you’ll want to smooth out the repaired chip.
You can do this by using a small piece of cotton or a microfiber cloth soaked in glass polish or a fine-grit buffing compound. Gently rub the cloth over the repaired area in circular motions, applying light pressure. This will help blend the resin with the surrounding glass and create a smooth finish.
Once you’re satisfied with the appearance of the repair, you can apply a coat of clear nail polish or a glass sealant over the area. This will provide an extra layer of protection and help prevent the chip from spreading or becoming more damaged. Simply apply a thin layer of the nail polish or sealant with a small brush, making sure to cover the entire repaired area.
After allowing the nail polish or sealant to dry, your windshield should be good as new! However, it’s important to remember that these repair methods are only temporary solutions. It’s always best to have a professional inspect and repair any chips or cracks in your windshield for a more permanent fix. Taking proper care of your windshield, such as avoiding sudden changes in temperature and excessive pressure, can also help prevent future damage.
Remove the curing strip and tape
After the paint has dried and you’ve applied the final coat, it’s time to remove the curing strip and tape to reveal your beautifully painted surface. This step is crucial for achieving a clean and professional finish. Start by gently peeling off the curing strip, being careful not to lift any paint with it.
The curing strip is designed to protect the area underneath from any accidental spills or splatters, so removing it slowly and steadily will ensure that the paint has fully dried and won’t smudge. Once the curing strip is off, carefully remove the tape that was used to create clean paint edges. Pull the tape away at a 45-degree angle to avoid tearing or leaving behind any adhesive residue.
If any paint does come off with the tape, don’t panic! Simply touch up those areas with a small paintbrush or sponge and let it dry. With the curing strip and tape removed, step back and admire your handiwork. The finishing touches are complete, and your painted surface is ready to impress!
Use the plastic scraper to remove excess resin
plastic scraper, resin
Clean the windshield with glass cleaner
One important step in giving your car a thorough cleaning is to ensure that your windshield is sparkling clean. After you have washed the exterior of the car and cleaned the tires, it’s time to give attention to the windshield. A dirty windshield can not only be a hazard while driving, but it can also be an eyesore.
To clean the windshield effectively, you will need a good quality glass cleaner and a microfiber cloth. Start by spraying the glass cleaner directly onto the windshield, making sure to cover the entire surface. Using the microfiber cloth, wipe the glass cleaner in a circular motion, ensuring that you reach all corners and edges of the windshield.
This will help remove any stubborn dirt or grime that may have accumulated. Repeat the process if necessary until the windshield is spotless and clear. Not only will a clean windshield improve your visibility while driving, but it will also give your car a polished and well-maintained look.
So, don’t forget this crucial step when cleaning your car!
Conclusion
In the realm of windshield mishaps, the small chip is the unruly little sibling, always begging for attention. But fear not, fellow drivers! With a little patience and a touch of DIY magic, you too can vanquish the tiny tyrant and restore your windshield to its former glory. First off, let’s address the elephant in the room – why bother fixing a minuscule chip when it seems like a mere speck in the grand scheme of things? Well, my astute friend, just like covering up an embarrassing pimple before a big date, taking care of that chip now will save you from a world of future troubles.
Neglecting it could lead to nasty cracks spreading like an unstoppable wildfire, forcing you to fork over your hard-earned cash for a pricey windshield replacement. We don’t want that, do we? Now, to embark on this quest, you’ll need a few trusty companions in your arsenal. Grab a small chip repair kit, readily available at your nearest automotive store or online marketplace.
Think of it as your knight in shining armor, ready to battle the chip monster. Start by thoroughly cleaning the chip area with a mild detergent and water. Wipe away any grime or debris, making it as pristine as a freshly polished porcelain bowl.
Remember, cleanliness is next to windshield godliness. Next, carefully follow the instructions on your repair kit, playing the role of a diligent student. Mix up the resin and apply it to the chip, painstakingly filling it up like a tiny, transparent jigsaw puzzle.
Make sure to press gently, treating it with the delicate touch of a surgeon. Once you’ve filled the chip to your heart’s content, cover it up with a curing strip, reminiscent of a superhero’s mask, shielding it from harmful UV rays. Now all that’s left to do is wait, my friend.
Sit back, relax, and let time work its magic. After the recommended curing period, remove the strip with flashy anticipation, like unwrapping a long-awaited present. Voila! Behold the miracle of a repaired small chip, a testament to your DIY prowess.
Preventing Future Damage
If you have a small chip on your windshield, it’s important to address it as soon as possible to prevent it from spreading and potentially requiring a full windshield replacement. Luckily, there are a few simple steps you can take to repair a small chip on your windshield. First, clean the chip and the surrounding area with glass cleaner and a soft cloth.
Next, apply a windshield repair resin to the chip, following the instructions on the product. Use a curing light to harden the resin, and then gently remove any excess resin with a razor blade. Finally, use a glass cleaner to give your windshield a thorough cleaning.
By following these steps, you can prevent future damage and restore the integrity of your windshield.
Avoid driving on rough roads
Driving on rough roads can be a challenge and can potentially cause damage to your vehicle. One way to prevent future damage is by avoiding driving on rough roads altogether. When you drive on rough roads, the constant vibrations and jolts can put stress on your vehicle’s suspension system, tires, and other components.
Over time, this can lead to premature wear and tear, and even costly repairs. Instead, try taking alternate routes that are known for their smoother surfaces. You may have to add a few extra minutes to your journey, but it can save you money and headaches in the long run.
Additionally, consider investing in a vehicle with better suspension or higher ground clearance if you frequently encounter rough roads. By being proactive and avoiding rough roads whenever possible, you can help extend the lifespan of your vehicle and minimize the risk of future damage.
Keep a safe distance from other vehicles
preventing future damage, safe driving, keep a safe distance When it comes to safe driving practices, one of the most important things you can do to prevent future damage is to keep a safe distance from other vehicles on the road. Maintaining a safe distance not only gives you more time to react to any unexpected situations but also reduces the chances of a collision or accident. Imagine driving on a highway where the car in front of you suddenly slams on its brakes.
If you’re tailgating or following too closely, you might not have enough time to stop and avoid a rear-end collision. However, if you have a safe distance, you can safely slow down and come to a stop without any damage or injuries. This simple action can make a huge difference in preventing future damage and keeping you and others on the road safe.
So, the next time you’re driving, make it a habit to maintain a safe distance from the vehicle in front of you.
Repair small chips promptly to prevent further damage
chips promptly, prevent further damage, repair small chips, preventing future damage, fixing chips When it comes to maintaining your vehicle’s appearance, it’s important to address small chips and cracks in your car’s paintwork as soon as they occur. While it may seem like a minor issue, these small chips can quickly escalate into larger problems if left untreated. Not only can they worsen over time, but they can also leave your car vulnerable to rust and corrosion.
By taking the time to repair small chips promptly, you can prevent further damage and save yourself from more costly repairs down the line. Small chips in your car’s paintwork can occur for a variety of reasons, from stones and debris on the road to accidental bumps and scrapes. Regardless of the cause, it’s essential to address these chips as soon as you notice them.
Even the tiniest chip can expose the underlying metal to moisture, which can lead to rust and corrosion. Over time, this can cause the affected area to deteriorate, resulting in a larger and more expensive repair job. By repairing small chips promptly, you can prevent moisture from seeping into the exposed metal.
This not only stops rust and corrosion in its tracks but also preserves the integrity and appearance of your vehicle’s paintwork. Whether you choose to repair the chip yourself or take it to a professional, fixing the issue early on will ensure that your car remains protected and looking its best. In addition to the risk of rust and corrosion, small chips can also compromise the smooth surface of your car’s paint.
Over time, these chips can collect dirt, dust, and other debris, making them more prominent and harder to repair. By addressing the issue promptly, you can prevent dirt and debris from accumulating and potentially causing further damage to your car’s paintwork. If you’re worried about the cost or time involved in repairing small chips, consider the potential consequences of leaving them unattended.
What may seem like a simple cosmetic issue can quickly escalate into a more significant problem that requires a costly paint job or even panel replacement. By taking action early on, you can save yourself time, money, and the headache of more extensive repairs. So, the next time you notice a small chip or crack in your car’s paintwork, don’t underestimate its potential to cause further damage.
FAQs
How to repair a small chip on a windshield?
To repair a small chip on a windshield, you can use a windshield repair kit. First, clean the area around the chip with a glass cleaner. Then, apply the resin from the repair kit onto the chip and cover it with a curing strip. Allow the resin to dry and remove the strip. Finally, use a glass cleaner to clean any excess resin, and the chip should be repaired.
What causes a small chip on a windshield?
A small chip on a windshield can be caused by various factors, such as a rock hitting the windshield while driving, extreme temperature changes, or even a manufacturing defect. These chips may seem small, but if left unrepaired, they can potentially grow and lead to further damage or even compromise the structural integrity of the windshield.
Can I repair a small chip on my windshield myself?
Yes, you can repair a small chip on your windshield yourself using a windshield repair kit. These kits are readily available and usually come with detailed instructions on how to use them. However, it’s important to note that not all chips can be effectively repaired using these kits, especially if the chip has already spread or if it’s in the driver’s line of sight. In such cases, it’s best to consult a professional windshield repair technician.
Will repairing a small chip on my windshield make it invisible?
While repairing a small chip on your windshield can significantly improve its appearance, it may not make it completely invisible. The goal of a windshield repair is to restore the structural integrity of the glass and prevent further spreading of the chip. However, the repair process may leave a slight mark or discoloration, which is often barely noticeable compared to the original chip.
How long does it take to repair a small chip on a windshield?
Repairing a small chip on a windshield typically takes around 30 minutes to an hour, depending on the type of repair kit being used and the complexity of the chip. The actual repair time may vary, as it also depends on the resin’s curing time. It’s essential to follow the manufacturer’s instructions and allow sufficient time for the resin to dry and cure properly for the best results.
Can a small chip on a windshield lead to a crack?
Yes, a small chip on a windshield has the potential to develop into a crack if left unrepaired or subjected to stress. Environmental factors such as temperature changes, road vibrations, or even further impacts can cause the chip to spread and eventually lead to the formation of a crack. It’s crucial to address any chips promptly to prevent further damage and avoid the need for a windshield replacement.
Are there any safety concerns with driving with a small chip on the windshield?
Driving with a small chip on the windshield may pose safety concerns. Though a small chip may not immediately affect the integrity of the windshield, it can impact visibility by causing glare or distracting the driver’s attention. Additionally, a small chip can compromise the overall strength of the windshield, making it more susceptible to further damage in the event of an accident or impact. It’s always recommended to repair or replace a damaged windshield for the safety of both the driver and the passengers.