

Are you frustrated because you have a small crack in your glass windshield? It’s a common problem that many people face, but don’t worry, repairing it is easier than you think! A crack in your windshield can be a major inconvenience, not to mention a safety hazard. However, with a little bit of know-how and the right tools, you can fix it yourself and save yourself a trip to the auto repair shop. In this blog post, I will guide you through the steps of repairing a small crack in a glass windshield, so you can get back on the road in no time.
So, grab your toolkit and let’s get started!
Table of Contents
Section 1: Assessing the Damage
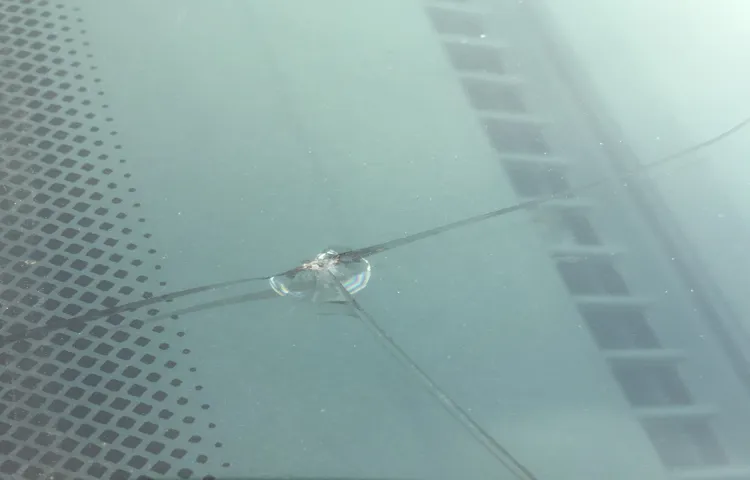
Small cracks in a windshield can be a nuisance, but they don’t have to be a major headache. If you have a small crack in your glass windshield, there are a few steps you can take to repair it yourself. First, assess the damage to determine how severe it is.
If the crack is longer than a dollar bill or if it is in your field of vision while driving, it’s best to seek professional help. However, if it’s a small crack that doesn’t impede your visibility, you can opt to repair it yourself. One simple solution is to use a windshield repair kit, which typically contains a resin that fills in the crack and reinforces the windshield.
These kits are easy to use and can be found at most automotive stores. By following the instructions carefully, you can effectively repair the crack and prevent it from spreading. It’s important to note that this method is most effective for small cracks, so be sure to examine the damage before attempting to repair it yourself.
– Examining the crack
crack, assess damage, inspect, foundation, structural issues A crack in your home’s foundation can be a concerning sight. It’s normal to feel a sense of worry when you first notice it. However, before you jump to conclusions and panic, it’s important to take the time to assess the damage properly.
Inspecting the crack thoroughly will help you determine if it’s a simple cosmetic issue or if it indicates a more significant structural problem. When examining the crack, begin by observing its length, width, and depth. Is it a hairline crack that’s barely visible or a larger, more prominent one? The size and characteristics of the crack can give you an initial idea of its severity.
Additionally, look for any movement in the crack. Have the edges shifted or expanded? Any signs of movement should be taken seriously as they may indicate ongoing issues with your home’s foundation. Next, inspect the surrounding area.
Do you notice any other cracks or signs of damage nearby? If there are multiple cracks or other signs of structural issues, it’s possible that the crack you’re examining is just one symptom of a larger problem. It’s also important to consider the direction and location of the crack. Is it vertical, horizontal, or diagonal? Vertical cracks are typically less concerning than horizontal or diagonal ones, as they often result from natural settling or minor shifts in the foundation.
However, horizontal or diagonal cracks can be indicative of more serious structural issues and should be evaluated by a professional. Finally, don’t forget to look for any signs of water damage or moisture near the crack. Water intrusion can worsen the condition of the crack and lead to further issues, such as mold growth or weakening of the foundation.
Assessing the damage and inspecting the crack thoroughly will help you determine the next steps to take. While some cracks may be cosmetic and easily repaired, others may be a symptom of more significant structural issues that require professional attention. By carefully examining the crack and considering these factors, you’ll be better equipped to make informed decisions about repairs and maintenance for your home’s foundation.
– Measuring the size of the crack
assessing damage, measuring crack size Assessing the damage to a structure is crucial in determining the necessary steps for repairs. When it comes to cracks, one of the first things we need to do is measure their size. This measurement will give us an idea of how serious the crack is and what measures need to be taken to fix it.
But how exactly do we measure the size of a crack? One method is to use a ruler or a tape measure to measure the length and width of the crack. This will give us the basic dimensions of the crack, which can be useful in determining the severity of the damage. However, it is important to note that this measurement alone may not provide a complete picture of the crack.
Cracks can be deceiving, and there may be underlying issues that are not immediately visible. To get a more accurate measurement, we may need to use more advanced tools, such as a crack gauge or a laser level. These tools can help us measure the depth and width of the crack, as well as any changes in its size over time.
By tracking these changes, we can determine whether the crack is stable or if it is getting worse. In addition to measuring the size of the crack, it is also important to assess the surrounding area for any signs of damage. Are there any bulges or deformations in the surrounding walls or floor? Are there any gaps or separations between materials? These observations can help us understand the cause of the crack and whether there are any structural issues that need to be addressed.
In conclusion, assessing the damage to a structure involves measuring the size of cracks and looking for any other signs of damage. By using various tools and techniques, we can accurately determine the severity of the damage and develop a plan for repairs. It is important to remember that measuring the size of a crack is just one part of the assessment process and that a comprehensive evaluation is necessary to fully understand the extent of the damage.
– Determining if the crack can be repaired
crack repair, damaged windshield, assess the damage. Imagine this scenario: you’re driving down the highway, enjoying the breeze and the open road, when suddenly you hear a loud *thud* and your windshield develops a crack. It’s a frustrating situation, but before you jump to conclusions and assume you’ll need a full windshield replacement, it’s important to assess the damage and determine if the crack can be repaired.
But how do you do that? Well, first and foremost, you’ll need to carefully examine the crack to determine its size, location, and severity. Is it a small, hairline crack that’s barely visible, or is it a large, jagged crack that spans the entire length of your windshield? Is the crack located near the edges of the glass or in the driver’s line of sight? These factors will all play a role in whether or not the crack can be successfully repaired. So take a moment to assess the damage and weigh your options – you might just be pleasantly surprised by the results.
Section 2: Gathering the Necessary Tools and Materials
Before you begin repairing a small crack in your glass windshield, it’s important to gather the necessary tools and materials. This will ensure that you have everything you need to complete the repair successfully. Some of the tools you may need include a windshield repair kit, which usually includes a bridge injector, resin, and a curing lamp.
You may also need a razor blade or scraper to clean the crack, as well as a cloth or towel to wipe away any excess resin. It’s also a good idea to have some masking tape on hand to protect the surrounding area of the windshield while you work. Once you have all of these items, you’ll be ready to start repairing the crack in your windshield and get it looking as good as new!
– Safety equipment
safety equipment, necessary tools and materials
– Windshield repair kit
windshield repair kit In order to fix that pesky crack or chip in your windshield, you’ll need to gather the necessary tools and materials. One essential item you’ll need is a windshield repair kit. This kit usually includes a special resin that is designed to fill in the cracks and prevent them from spreading.
It also typically comes with everything you need to apply the resin, such as an applicator and curing strips. Some kits even come with a suction cup device to help you apply the resin more easily. With a good windshield repair kit in hand, you’ll be well-equipped to tackle that windshield repair job and get your car back on the road in no time.
– Clean cloth
clean cloth
– Glass cleaner
gathering the necessary tools and materials for making a glass cleaner. When it comes to making your own glass cleaner, there are a few essential tools and materials that you’ll need to gather. First and foremost, you’ll need a spray bottle to hold the homemade glass cleaner.
Make sure to choose a bottle with a nozzle that can produce a fine mist for even application. Additionally, you’ll need a measuring cup or spoon to accurately measure the ingredients. Next, you’ll need distilled water, as tap water can leave streaks and residue on glass surfaces.
Distilled water is free from impurities that can interfere with the effectiveness of the cleaner. In terms of materials, you’ll need white vinegar, which is a key ingredient in glass cleaning solutions. Vinegar is a natural disinfectant and can help remove dirt and grime from glass surfaces.
You’ll also need rubbing alcohol, which helps the glass cleaner dry quickly and prevents streaks from forming. Lastly, you’ll need a few drops of dish soap or a liquid soap of your choice to help cut through grease and leave your glass surfaces sparkling clean. By gathering these tools and materials, you’ll be well on your way to creating your own homemade glass cleaner that is both effective and environmentally friendly.
Section 3: Preparing the Windshield
One of the first steps in repairing a small crack in a glass windshield is to prepare the area. This involves cleaning the windshield thoroughly to ensure proper adhesion of the repair materials. Start by washing the windshield with a mild detergent and warm water to remove any dirt or debris.
Rinse the windshield thoroughly and then dry it with a lint-free cloth. Next, use a glass cleaner to remove any residue or streaks that may be left behind. It’s important to ensure that the surface of the windshield is clean and free of any contaminants before proceeding with the repair.
Once the windshield is clean, you can move on to the next step in the repair process.
– Cleaning the windshield surface
cleaning the windshield surface When it comes to preparing your windshield for a crystal-clear view, cleaning the surface is an essential step. After all, a dirty windshield can not only hinder your visibility on the road, but it can also be a major safety hazard. So how do you go about cleaning the windshield surface effectively? Well, it’s a lot simpler than you might think.
First, gather your cleaning supplies. You’ll need a good-quality glass cleaner, paper towels, and a microfiber cloth. Start by spraying the glass cleaner onto the windshield, making sure to cover the entire surface.
Then, using the paper towels, wipe away any dirt, dust, or grime from the glass. Make sure to use firm but gentle pressure. Once the majority of the dirt is removed, take the microfiber cloth and polish the windshield in circular motions.
This will help to remove any streaks or smudges left behind. Finally, stand back and admire your sparkling clean windshield. Not only will you have a clearer view of the road ahead, but you’ll also feel safer and more confident while driving.
– Applying tape to protect the surrounding area
windshield preparation, tape application, protecting surrounding area, preparing windshield
Section 4: Filling the Crack
So you’ve noticed a small crack in your windshield, huh? Well don’t panic, because I’m here to guide you through the process of repairing it. Now, when it comes to fixing a crack in a glass windshield, timing is everything. You’ll want to address the crack as soon as possible, before it has the chance to spread and become a bigger problem.
First, you’ll need to gather some supplies. You’ll need a windshield repair kit, which typically includes a bridge or injector tool and resin. You’ll also need a clean, dry cloth, and some water.
Once you’ve got your supplies ready, start by cleaning the crack and the area around it with a mixture of water and a mild detergent. This will help ensure a clean surface for the resin to adhere to. Once the crack is clean and dry, place the bridge or injector tool over the crack, making sure it’s centered.
Apply a small amount of resin to the crack, and use the tool to push the resin into the crack. Make sure to follow the instructions provided with your repair kit for the specific technique and duration to use. After applying the resin, cover it with a small strip of curing film, and use a UV light to cure the resin.
This will harden it and create a strong bond to the glass. Once the resin is fully cured, remove the curing film and wipe away any excess resin with a clean cloth. And voila, your small crack is repaired! Remember, if the crack is larger than a quarter or if it’s in the driver’s field of vision, it’s best to consult with a professional for a proper windshield replacement.
But for small cracks, this DIY repair should do the trick and save you some money in the process. Happy repairing!
– Applying the resin
After preparing the crack and ensuring all loose material has been removed, it’s time to move on to the next step: filling the crack with resin. Resin is a great choice for crack repairs as it is a strong, durable material that bonds well with the surrounding concrete. To apply the resin, you’ll need a caulk gun.
Start by inserting the tube of resin into the gun and then cut off the tip of the tube at a 45-degree angle. This will allow for easier application of the resin. Next, place the tip of the resin tube into the crack and slowly squeeze the trigger of the caulk gun, applying a steady stream of resin into the crack.
Move the caulk gun along the length of the crack, ensuring that the resin fills the entire crack and that there are no air pockets. As you apply the resin, it’s important to be mindful of the consistency. The resin should be thick enough to fill the crack completely, but not so thick that it is difficult to work with.
If the resin is too thick, you can add a small amount of water to thin it out. Once you have filled the crack with resin, use a trowel or putty knife to smooth the surface and remove any excess resin. This will help to create a seamless repair that blends in with the surrounding concrete.
Allow the resin to dry according to the manufacturer’s instructions before moving on to the next step of the repair process.
– Using the provided tools to spread the resin
In this section, we will discuss how to fill the crack using the tools provided. Once you have prepared the crack by cleaning it and widening it slightly, it’s time to apply the resin. The resin is a special adhesive that will bond the cracked surfaces together, creating a strong and solid repair.
To apply the resin, you will need to use the provided tools, such as a spatula or syringe. Gently spread the resin over the crack, making sure to fill it completely. You may need to use a little pressure to ensure that the resin penetrates deeply into the crack.
Take your time and be thorough, as a well-filled crack will result in a stronger and more durable repair. Once the crack is filled, allow the resin to cure according to the manufacturer’s instructions. This may involve waiting for a specific amount of time or using a UV light to speed up the curing process.
Once the resin is fully cured, your crack will be repaired and ready for use.
– Removing excess resin
“Crack filling is a crucial step in the resin repair process, as it helps to seal off the crack and prevent further damage. Once the excess resin has been removed, it’s time to carefully fill the crack with new resin. This process may require multiple layers to ensure a strong and durable repair.
It’s important to apply the resin evenly and smoothly, using a spreading tool or even your fingers, ensuring that it fills in all the nooks and crannies of the crack. Think of it like filling a pothole in the road – you want to make sure that the entire hole is filled in so that it doesn’t cause any further problems. Once the crack is filled, it’s time to let the resin cure and harden, resulting in a seamless repair that will help your item regain its strength and functionality.
“
Section 5: Curing the Resin
If you find a small crack in your glass windshield, don’t worry! It’s actually a common problem that can be easily fixed. The first step is to clean the area around the crack with a mild detergent and water. Once it’s dry, you’ll need to apply a resin to the crack.
This resin will seep into the crack, filling it in and preventing it from spreading further. To apply the resin, you’ll need a repair kit specifically designed for glass windshields. These kits usually come with a syringe-like tool that allows you to inject the resin directly into the crack.
Once the resin is applied, you’ll need to cure it. This is done by exposing the resin to ultraviolet light, which hardens it and makes it permanent. Many repair kits come with a UV light tool for this purpose.
Simply hold the UV light over the crack for a few minutes, making sure the resin is fully cured. And voila! Your small crack is repaired and your windshield is as good as new.
– Using UV light to cure the resin
UV light is a commonly used method for curing resin in various industries. This process involves the use of ultraviolet light to initiate a chemical reaction that hardens or solidifies the resin. The UV light activates certain compounds present in the resin, causing them to cross-link and form a strong, durable bond.
This curing process is incredibly efficient and can take just a matter of minutes, making it highly desirable in industrial settings where time is of the essence. Additionally, UV light curing is known for its ability to produce a smooth, shiny finish, making it a popular choice for applications that require a high level of aesthetic appeal. This method offers a quick and effective way to cure resin, ultimately resulting in high-quality, finished products.
– Allowing sufficient time for the resin to cure
In order for the resin to fully cure and harden, it is crucial to allow sufficient time for the process. Curing the resin involves a chemical reaction that transforms the liquid resin into a solid, durable material. Rushing this stage can lead to incomplete curing, resulting in a weak and brittle final product.
On the other hand, giving the resin ample time to cure ensures a strong bond, excellent adhesion, and optimal physical properties. The exact curing time can vary depending on the type of resin and the environmental conditions. It is important to follow the manufacturer’s instructions for the specific resin you are working with.
Factors such as temperature and humidity can also affect the curing time. In general, a resin will take anywhere from several hours to several days to cure fully. Patience is key during this step, as it can be tempting to handle or use the resin before it is completely cured.
By allowing the resin to cure at its own pace, you can ensure a successful project and long-lasting results.
Section 6: Cleaning and Polishing the Windshield
If you park your car outside for long periods of time, you might notice that your windshield has developed a small crack. While it might seem like a minor issue, a small crack can quickly turn into a big problem if left untreated. So, how can you repair a small crack in a glass windshield? The first step is to clean and polish the windshield.
This will help remove any dirt or debris that may be trapped in the crack. To clean the windshield, use a glass cleaner and a microfiber cloth. Spray the glass cleaner onto the cloth and gently wipe the windshield in a circular motion.
Be sure to reach all areas of the crack. Once the windshield is clean, you can move on to polishing it. Apply a small amount of glass polish to the microfiber cloth and again, using a circular motion, gently buff the windshield.
This will help restore the glass’s clarity and make the crack less noticeable. By cleaning and polishing your windshield, you can not only improve its appearance but also prevent further damage.
– Removing tape and cleaning the windshield
cleaning and polishing the windshield
– Applying glass polish for a smooth finish
glass polish, smooth finish, cleaning, polishing, windshield
Section 7: Evaluating the Repair
So you’ve noticed a small crack in your windshield and you’re wondering how to repair it. Well, the good news is that you may be able to fix it yourself with just a few simple steps. First, clean the crack and the surrounding area with a glass cleaner and a soft cloth.
This will ensure that the adhesive you use will adhere properly. Next, apply a small amount of windshield repair resin to the crack. Be sure to follow the instructions provided with the resin to ensure proper application.
Once the resin is applied, cover the crack with a piece of clear plastic film and use a suction cup or piece of tape to hold it in place. Finally, let the resin cure for the recommended amount of time, usually around 24 hours, before removing the plastic film. With a little patience and attention to detail, you’ll have your windshield looking as good as new in no time.
– Inspecting the repaired crack
crack repair evaluation, inspecting repaired crack, evaluating the success of crack repair
– Checking for any remaining damage
Once you’ve repaired a broken item, it’s important to evaluate the repair to ensure that it was successful and there is no remaining damage. This final step is crucial to avoid any future issues or further damage to the item. To evaluate the repair, start by carefully inspecting the repaired area.
Look for any visible signs of damage or weakness. Pay close attention to any seams or joints, as these areas are often the weakest points. You can also gently apply pressure or give the item a light shake to see if it holds up.
Additionally, consider testing the item in its intended use to determine if the repair has restored its functionality. If there are any lingering concerns or doubts about the repair, it may be helpful to consult with a professional or seek a second opinion. Remember, taking the time to thoroughly evaluate the repair will ensure that the item is safe to use and can prevent any future problems.
Conclusion
In conclusion, repairing a small crack in a glass windshield is like performing a delicate surgery on a precious gemstone. It requires precision, finesse, and the skill of a master artisan. Just like a crack in your favorite fancy teacup, this tiny imperfection has the potential to shatter your driving dreams if left untreated.
Remember, procrastination is not your friend when it comes to windshield cracks – they won’t magically disappear like that extra piece of pie you hide from your family. But fear not, intrepid windshield warrior, armed with a repair kit and a little know-how, you can conquer this crack with the grace of a ballerina pirouetting on a tightrope. Just like a superhero swooping in to save the day, you’ll have your windshield looking as flawless as a red carpet celebrity.
And who knows, maybe the windshield repair dance will become the next TikTok trend! So, gather your tools, channel your inner glass guru, and get to work. Remember, be patient, be precise, and most importantly, be proud of your handy work. Because like a true DIY champion, you can proudly proclaim, “I fixed a crack in my windshield, and now I can conquer the open road again!””
– Recap of the repair process
“evaluating the repair process” After going through the entire repair process, it’s important to take the time to evaluate how well it went. Start by assessing whether or not the repair was successful. Did the issue get resolved? Is the item now functioning as it should? If not, it may be necessary to go back and make further repairs.
Next, consider the overall quality of the repair work. Are there any visible signs that the item was repaired, such as mismatched paint or loose screws? Pay close attention to the details and make any necessary adjustments to ensure a seamless finish. Additionally, consider the efficiency of the repair process.
Were all the necessary tools and materials readily available? Did it take longer than expected to complete the repair? Identifying areas for improvement can help streamline future repair jobs. Finally, ask yourself if the cost of the repair was justified. Compare the cost of the repair to the value of the item being repaired.
If the repair cost exceeds the item’s value, it may be more cost-effective to replace it instead. By evaluating the repair process, you can learn from any mistakes and improve your skills for future repairs.
– Importance of professional repair for larger cracks
cracks are a common problem that many homeowners face at some point. While small cracks may not seem like a big deal, larger cracks can be more concerning. When it comes to evaluating the repair needed for larger cracks, it’s important to seek professional help.
Professional repair services have the expertise and knowledge to properly assess the severity of the crack and determine the best course of action. They can identify the underlying cause of the crack, whether it’s due to foundation issues, moisture problems, or structural damage. By addressing the root cause, they can ensure that the repair is not just a quick fix but a long-term solution.
Additionally, professional repair services have access to specialized tools and materials that are needed to effectively repair larger cracks. They can use techniques such as epoxy injections or carbon fiber strips to strengthen the cracked area. These methods are much more effective and durable than DIY solutions.
So, if you notice a larger crack in your home, don’t hesitate to call in the professionals. They will ensure that the repair is done correctly and help prevent any further damage to your home.
– Maintaining the windshield to prevent further damage
evaluating the repair, maintaining windshield, preventing further damage Now that you’ve repaired your windshield, it’s important to evaluate the effectiveness of the repair and take steps to prevent any further damage. Start by giving your windshield a thorough inspection. Look for any signs of cracking, chipping, or other damage that may have been missed during the repair process.
If you notice any new damage or if the repaired area doesn’t look quite right, it’s important to address it as soon as possible. Ignoring small issues can lead to bigger problems down the road, so don’t hesitate to seek professional help if needed. After evaluating the repair, it’s crucial to take proactive steps to maintain your windshield.
Regular cleaning is essential to prevent dirt and debris from causing any scratches or damage. Use a soft cloth or sponge and a gentle, non-abrasive cleaning solution to keep your windshield spotless. Additionally, make sure to keep your windshield wipers in good condition and replace them as needed.
Worn-out wipers can cause streaks and damage to your windshield, so it’s important to replace them at the first sign of wear. Another important aspect of maintaining your windshield is protecting it from extreme temperatures. Avoid parking your car in direct sunlight for extended periods of time, as this can cause the glass to expand and contract, leading to cracks.
Similarly, avoid using hot water to defrost your windshield in the winter, as the sudden change in temperature can also cause cracks. Instead, use an ice scraper or a car defroster to gently remove ice and frost. By regularly evaluating the repair and taking proactive steps to maintain your windshield, you can prevent further damage and ensure that your windshield stays in optimal condition for years to come.
Don’t overlook the importance of regularly inspecting your windshield and addressing any issues promptly. It’s much easier and more cost-effective to fix small problems now than to deal with larger, more expensive repairs in the future. So, take care of your windshield and enjoy clear and safe driving!
FAQs
Can a small crack in a glass windshield be repaired?
Yes, a small crack in a glass windshield can often be repaired using a windshield repair kit.
What is a windshield repair kit?
A windshield repair kit is a DIY solution that typically includes a resin, an applicator, and other accessories needed to fix small cracks in a glass windshield.
How does a windshield repair kit work?
The resin in a windshield repair kit is used to fill in the crack, and then it is hardened using UV light. This helps to restore the structural integrity of the glass and prevent the crack from spreading further.
Can I use a windshield repair kit on a large crack in a glass windshield?
Windshield repair kits are typically designed for small cracks and chips. It is recommended to consult a professional if you have a large crack in your windshield.
How long does it take to repair a small crack in a glass windshield?
The time it takes to repair a small crack in a glass windshield can vary depending on the kit and the size of the crack. However, most repairs can be completed in less than an hour.
Will the repair be invisible after using a windshield repair kit?
While a good repair job can greatly minimize the visibility of the crack, it may still be slightly noticeable. However, it will help prevent the crack from spreading and further damaging your windshield.
What are the benefits of repairing a small crack in a glass windshield?
Repairing a small crack in a glass windshield can help avoid the need for a costly windshield replacement. It also helps to maintain the structural integrity of the windshield and ensure clear visibility while driving.