
Are you tired of constantly having to take your car into the mechanic just to get your tires changed? Have you ever wondered if there was a way to break the tire bead at home? Well, wonder no more! In this how-to guide, we’ll give you all the information you need to break a tire bead right from the comfort of your own garage. Breaking a tire bead is essential when changing a tire, and with a little know-how, it’s a job that can be done quickly and easily. By breaking the seal between the tire and the rim, you’ll be able to remove the old tire and replace it with a new one, without the need for a mechanic.
Although breaking a tire bead might seem like a daunting task, with the right tools and a bit of practice, you’ll be able to do it with ease. It’s a great skill to learn, especially for those who frequently drive on rough roads or work in fields, where tires are often damaged, and replacements are needed. So let’s jump in and get started! With our step-by-step guide, you’ll learn all the tips and tricks for breaking a tire bead like a pro.
Trust us; once you’ve mastered this skill, you’ll never have to rely on a mechanic again.
Table of Contents
Tools Needed
Breaking a bead on a tire at home is not as difficult as it may seem, as long as you have the right tools. The primary tool needed is a bead breaker, which can be found at most auto stores or online. A bead breaker is typically a metal device that fits over the tire’s edge and applies pressure to break the bond between the tire and the rim.
Alternatively, a pry bar or tire iron can be used to pry the bead away from the rim. Another essential tool is an air compressor to deflate the tire before attempting to break the bead. It’s important to wear safety glasses and gloves to protect yourself from any debris or sharp edges.
With these tools in hand, breaking the bead on a tire at home can be a straightforward process that anyone can do.
– Tire Bead Breaker Tool – Jack – Rubber Mallet – Pry Bar or Tire Iron – Safety Glasses
When it comes to changing a tire, having the right tools is crucial. One of the most important tools you’ll need is a tire bead breaker tool. This handy tool helps you break the bead on your tire, making it easier to remove the old tire and install a new one.
You’ll also need a jack to lift your vehicle off the ground, a rubber mallet to gently hammer the tire into place, and a pry bar or tire iron to help remove the tire from the rim. It’s important to wear safety glasses throughout the process to protect your eyes from any flying debris. These tools may seem simple, but they can make all the difference when it comes to changing a tire quickly and safely.
So, the next time you’re faced with a flat tire, make sure you have these essential tools on hand.

Preparation
Breaking a bead on a tire can be a difficult task but with the right tools and preparation, you can do it at home. First, make sure you have all the necessary tools such as tire irons, lubricant, and a tire changer. It’s also crucial to take precautionary safety measures such as wearing gloves to avoid any injuries.
Next, release all the air pressure from the tire before proceeding. Then, apply lubricant to the bead to make it easier to work with. Begin by wedging one end of the tire iron under the bead and then using another tire iron to pry the bead away from the rim.
This may require some patience and persistence, but with enough effort, you should be able to pop the bead over the lip of the rim. Once you have successfully broken the bead, you can easily remove the tire from the rim for repair or replacement. Don’t forget to clean the bead before reinstalling the tire.
Overall, breaking a bead on a tire requires proper preparation and the right tools, but it can be accomplished at home with some effort and focus.
– Ensure the tire is fully deflated – Loosen the lug nuts on the wheel
When changing a tire, preparation is key to making the process go smoothly and safely. The first step before jacking up the car is to ensure that the tire is fully deflated. This will make it easier to remove the tire from the wheel and prevent any unnecessary strain on the lug nuts.
Next, you will want to loosen the lug nuts on the wheel before lifting the car off the ground with the jack. This will allow you to easily remove the tire once the car is lifted. It’s also important to make sure you have all the necessary tools on hand, including the spare tire, jack, and lug wrench.
By taking the time to properly prepare for changing a tire, you can avoid any potential mishaps and get back on the road safely in no time. Remember, safety always comes first, and being prepared is the best way to ensure a successful tire change.
Breaking the Bead
If you need to change a tire at home, breaking the bead is a crucial step you’ll need to know. Breaking the bead is essentially separating the tire from the rim, allowing you to remove the tire and either patch a puncture or install a new tire altogether. To get started, you’ll need a few basic tools like a tire iron, pry bars, and a hammer.
First, locate the valve stem and remove the valve core to allow air to escape. Then, use the tire iron to loosen the lug nuts on the tire so you can safely lift the vehicle. Once the tire is off the ground, remove the lug nuts completely and use the pry bar to wedge between the tire bead and rim, carefully working your way around the tire until the bead pops off.
Be sure to repeat the process on the opposite side of the tire to fully break the bead. With a little patience and practice, breaking the bead on a tire at home can be done without a professional mechanic.
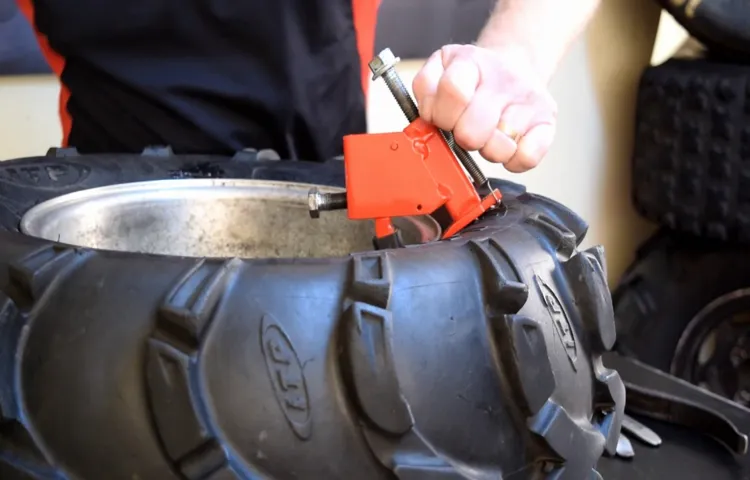
– Position the tire bead breaker tool on the edge of the tire – Use the jack to elevate the wheel – Apply pressure on the tire bead breaker tool until the bead pops off – Repeat on other side of tire
Breaking the bead of a tire can be a challenging task, but with the right tools and technique, it can be done with ease. The first step in breaking the bead is to position the tire bead breaker tool on the edge of the tire. Next, use the jack to elevate the wheel, so you have better access to the tire bead.
Once the tire is elevated, apply pressure on the tire bead breaker tool until you hear a popping sound, indicating that the bead has detached from the rim. Repeat this process on the other side of the tire to complete the job. Now, let’s break down the steps in more detail.
Before starting, it’s important to ensure that you have the right equipment, including the tire bead breaker tool and a jack. Once you have everything in place, position the tire bead breaker tool on the edge of the tire. This tool is specially designed to pry the bead away from the rim and is critical in breaking the bead.
The next step is to elevate the wheel using the jack. This gives you better leverage and ensures that you can apply maximum force to the tire bead breaker tool. Once the tire is elevated, apply pressure on the tool until you hear a loud popping sound.
This sound means that the bead has come off the rim and is now loose. Repeat the process on the other side of the tire until both beads have been successfully detached from the rim. Breaking the bead of a tire is an essential step in replacing the tire, repairing a puncture, or changing the wheel altogether.
However, it’s important to follow the proper steps to avoid damaging the tire or injuring yourself. With these simple steps and the right tools, you can safely and effortlessly remove the bead, making your tire maintenance tasks a breeze. Remember to always follow safety guidelines and wear protective gear to prevent accidents.
Removing the Tire from the Wheel
If you’re wondering how to break a bead on a tire at home, the first step is to remove the tire from the wheel. This can be done using a few basic tools such as tire irons and a bead breaker. Start by loosening the valve core to release any remaining air pressure inside the tire.
Then, place the tire on a level surface and use a bead breaker to loosen the bead from the wheel. Once the bead is loosened, use tire irons to pry it off the wheel. Work around the tire, using the irons to lift and detach the bead until it is completely freed from the wheel.
With the bead loosened and the tire removed from the wheel, you’re now ready to repair, replace, or reuse your tire. Remember to always use caution when handling tires and follow safety procedures to prevent injury.
– Use the rubber mallet to knock the tire off the wheel – Use a pry bar or tire iron to remove the tire completely from the wheel
Removing the tire from the wheel can be quite a daunting task, but it doesn’t have to be. With the right tools and a little bit of patience, anyone can successfully remove a tire from a wheel. The first step is to use a rubber mallet to knock the tire off the wheel.
Take the mallet and gently hit the sidewall of the tire, being careful not to damage either the tire or the wheel. Once the tire has moved away from the wheel a little, use a pry bar or tire iron to remove it completely. With the pry bar, work your way around the edge of the tire, prying it away from the wheel.
If it’s difficult to get the pry bar in between the wheel and tire, try using a hammer to tap it in. Keep working around the tire until it’s completely removed from the wheel. It may take some time, but with a little bit of effort, you’ll have the tire off in no time.
Remember to stay safe and take breaks if needed.
Tips and Safety Precautions
Breaking the bead on a tire can be a daunting task that requires some preparation and safety precautions. To start, make sure you have the proper equipment and tools, including a tire iron, jack, and safety goggles. Begin by loosening the lug nuts and raising the car off the ground with the jack.
Next, position the tire on the ground with the bead facing up and place the tire iron between the tire and rim, slowly applying pressure to break the seal. It may take some effort, so be patient and take breaks if needed. Once the bead is broken, be careful when removing the tire from the rim, as it can spring back suddenly.
Remember to always use caution and wear protective gear to prevent injury. By following these tips and precautions, you can successfully break the bead on a tire at home.
– Wear safety glasses to protect your eyes from debris – Double-check the tire pressure before re-installing the tire – Do not attempt to break a tire bead without proper tools and knowledge
Changing a tire can be a daunting task, especially if it’s your first time doing it. But with the right tools and knowledge, it can be a breeze. However, safety should always be your top priority, so it’s essential to take some precautions before diving in.
First and foremost, wear safety glasses to protect your eyes from debris and potential injury. Double-check the tire pressure before re-installing the tire to ensure proper inflation and avoid any mishaps while driving. Be sure not to attempt to break the tire bead without proper tools and knowledge, as this could result in serious injury or damage to your vehicle.
By taking these simple steps, you can change your tire safely and confidently without any worry, and hit the road with ease.
Conclusion
Breaking a bead on a tire at home may seem like a daunting task, but with the right tools and knowledge, anyone can do it. It’s like opening a jar of pickles, just a little more intense. Remember to protect yourself with gloves and eye protection, use a strong wrench or bead breaker tool, and a little elbow grease.
And just like that, you’ll have successfully broken a bead on your tire, ready for whatever road lies ahead. Who said DIY auto maintenance couldn’t be empowering and satisfying?”
FAQs
What tools do I need to break a bead on a tire at home?
In order to break a bead on a tire at home, you will need a tire iron or pry bar, a bead breaker tool, and a mallet or hammer.
Can I break a bead on a tire without a bead breaker tool?
Yes, you can potentially break a bead on a tire without a bead breaker tool by using a tire iron or pry bar and some lubricant. However, using a bead breaker tool is recommended for ease and safety.
How much force do I need to apply to break a bead on a tire?
The amount of force required to break a bead on a tire will depend on the size and type of tire. Generally, you will need enough force to overcome the friction between the tire bead and the rim.
How do I use a bead breaker tool to break a bead on a tire?
To use a bead breaker tool, place the tool’s jaws underneath the tire bead and then use the tool’s lever to push down and break the bead away from the rim.
What are some safety precautions I should take when breaking a bead on a tire at home?
When breaking a bead on a tire at home, it is important to wear eye protection and gloves to protect yourself from any potential flying debris or injury. Additionally, make sure your vehicle is secured and stable before attempting to remove any tires.
How can I check if I successfully broke the bead on a tire?
You can use a tire iron or pry bar to lightly pry the tire away from the rim and see if there is a gap between the bead and the rim. If there is a gap, then the bead has been successfully broken.
Do I need to replace the tire after breaking the bead?
No, breaking the bead does not necessarily mean that the tire needs to be replaced. However, if the tire is damaged or worn, then it may need to be replaced.