
Whether you’re a seasoned RV traveler or new to the experience, there’s one thing you never want to face on the road: a flat tire. But unfortunately, tire blowouts and punctures can happen to anyone, and it’s important to be prepared. Knowing how to change an RV tire is an essential skill for any RV owner, so in this step-by-step guide, we’ll take you through the process from start to finish.
From gathering the necessary tools to mounting the spare, we’ve got you covered. Whether you’re facing an emergency flat or just want to be prepared for any situation, this guide will help you get back on the road safely and quickly. So let’s dive in and learn how to change an RV tire like a pro!
Table of Contents
Gather Necessary Tools
Changing an RV tire can be a daunting task, but with the right tools and some patience, it can be done. Before you begin, make sure you have all the necessary tools, including a lug wrench, tire jack, spare tire, and wheel chocks. These tools can usually be found in your RV’s storage compartment or trunk.
It’s also a good idea to have a pair of gloves and a flashlight on hand, as well as a tire pressure gauge to ensure your spare tire is properly inflated. Once you have all your tools, find a level and safe place to change the tire. This can be a flat parking lot or the side of the road, just make sure you have enough space to work safely.
By having all the necessary tools and finding a safe location, you can confidently change your RV tire and get back on the road in no time.
Wrench, Jack, Spare Tire, Lug Nut, Wheel Wedges
When it comes to traveling by car, it’s always better to be prepared for the worst. One of the most common mishaps that can occur is a flat tire. That’s why it’s important to have the necessary tools on hand to fix the issue quickly and efficiently.
These tools include a wrench, jack, spare tire, lug nut, and wheel wedges. The wrench is used to remove the lug nuts from the flat tire while the jack lifts the car off the ground. The spare tire is then put on using the lug nut and tightened with the wrench.
Wheel wedges are used to prevent the car from rolling while the tire is being changed. It’s important to keep all of these tools together in your car at all times so that you’re prepared for an unexpected flat tire. Don’t forget to periodically check the air pressure in your spare tire as well to ensure that it’s in good condition and ready to use in case of an emergency.
Park the RV on Flat Ground
If you need to change an RV tire, the first step is to park the vehicle on flat ground. This is important because uneven terrain can make the process unsafe and may even cause further damage to your RV. Once you have found a level spot, turn off the engine, engage the emergency brake, and place wheel chocks in front and behind the tire that is diagonally opposite to the one you want to change.
This will prevent the RV from rolling or moving while you work on the tire. If you don’t have access to wheel chocks, you can also use blocks of wood or bricks. It’s essential to take these safety measures because the last thing you want is for your RV to roll away while you’re changing a tire.
By parking your RV on flat ground and securing it in place, you can feel confident that you can safely and quickly change your RV tire.
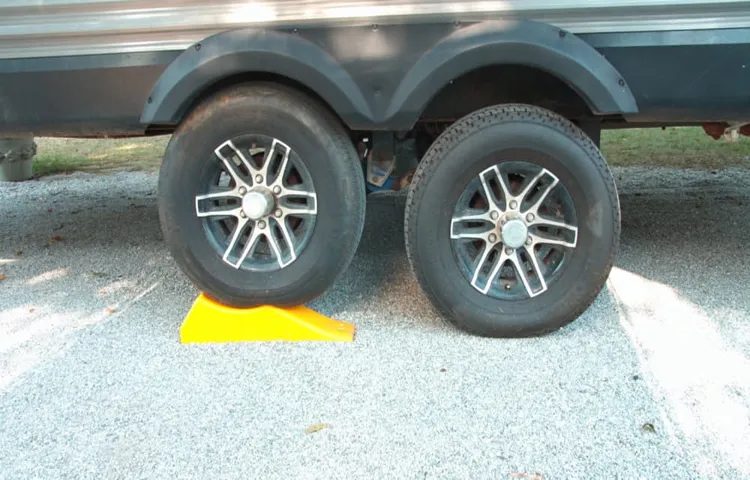
Use Wheel Wedges to Secure RV
When it comes to parking your RV, it’s important to ensure that it’s parked on flat ground. This will help prevent any shifting or rolling of the RV, giving you peace of mind that it’s secure. However, even if you’re parked on flat ground, it’s always a good idea to use wheel wedges to further secure your RV.
Wheel wedges can be placed on the front and/or back wheels of the RV to prevent any movement. They’re easy to use and can make a big difference in keeping your RV in place. So the next time you’re parking your RV, make sure to find flat ground and use wheel wedges for extra security.
Your RV and your mind will thank you.
Loosen Lug Nuts
When changing an RV tire, the first step is to loosen the lug nuts. It may seem like a simple task, but it’s important to do it correctly. Before jacking up the RV, use a lug wrench to turn each lug nut counterclockwise just enough to break it loose.
It may take some effort, especially if the nuts were tightened by a mechanical tool. Make sure you’re applying enough force to turn the nuts, but not so much that you risk injuring yourself or damaging the nuts. If you’re having trouble turning the nuts, try using a penetrating oil to help loosen them up.
Once all the lug nuts are loosened, you can proceed with jacking up the RV and removing the tire. Remember to keep the lug nuts in a safe place during the tire change process, and to tighten them properly once you’ve installed the new tire. With these steps in mind, changing an RV tire can be done safely and efficiently.
Using Wrench, Loosen Nuts Counter-Clockwise
When it comes to changing a flat tire or doing any work on your wheels, it’s important to know how to properly loosen lug nuts. The first step is to use a wrench and apply it to the lug nuts. But which way do you turn the wrench? It’s important to remember to turn the wrench counter-clockwise to loosen the nuts.
This may seem like common sense, but it can be easy to forget in moments of stress or rush. Applying force in the wrong direction could potentially strip the nuts or damage the wheel, which can lead to costly repairs later on. So, take a deep breath, remember to turn the wrench counter-clockwise, and you’ll be well on your way to safely loosening those lug nuts!
Position Jack and Raise RV
If you’re wondering how to change an RV tire, the first step is to position the jack and raise the RV safely. Make sure your RV is parked on level ground and that you have enough clearance to safely get under the RV. Then, place the jack in the proper location under the RV frame and pump it up slowly until it’s supporting the weight of the RV.
It’s important to use a jack that’s rated for the weight of your RV and to always follow the manufacturer’s instructions. Once the RV is securely lifted, it’s time to remove the flat tire and replace it with your spare. Just remember to never stand under the RV while it’s lifted and to always use caution when working with heavy equipment.
With a little know-how and the right tools, changing an RV tire can be a simple process.
Consult Manual for Recommended Jack Point
When it comes to lifting your RV with a jack, it’s crucial to consult your manual for recommended jack points. These points will be specific to your RV model and will provide the safest and most effective means of lifting your vehicle off the ground. Once you’ve determined the proper jack points, position your jack accordingly and begin raising your RV.
It’s important to take your time during this process and make sure the jack is stable and secure before continuing. Remember, safety should always be your top priority when working with heavy equipment like jacks and RVs. So take the time to do it right and enjoy a stress-free adventure on the road!
Remove Flat Tire
Changing an RV tire may be intimidating for some, but it’s actually quite simple with the right tools and knowledge. The first step is to park the RV on a flat surface and engage the emergency brake. Then, locate the flat tire and use a lug wrench to loosen the lug nuts.
Next, use a jack to lift the RV until the tire is off the ground, making sure the RV is stable and secure. Once it’s lifted, remove the lug nuts and the flat tire. Replace it with the spare tire and tighten the lug nuts in a star pattern, ensuring they are snug but not over-tightened.
Finally, lower the RV and remove the jack, then use the lug wrench to fully tighten the lug nuts. It’s important to remember to have the flat tire repaired or replaced as soon as possible, as driving on a spare is only a temporary solution. So, don’t let a flat tire ruin your adventure – with these simple steps, changing an RV tire can be a quick and easy fix.
Use Wrench to Remove All Lug Nuts
When you’re faced with a flat tire, you’ll need to remove it from your car and replace it with a spare. The first step in this process is to use a wrench to remove all of the lug nuts from the flat tire. Lug nuts are the bolts that hold the tire onto the wheel hub of your car, and they need to be removed in order to take the tire off.
Start by finding the lug wrench in your car’s tool kit. Then, place the wrench over the lug nut and turn it counterclockwise. The lug nut should start to loosen, but you might need to use some force to get it off.
Repeat this process for all of the lug nuts on the tire. It’s important to note that some lug nuts might be harder to remove than others. If you’re struggling, try using your body weight to push down on the wrench, or use a breaker bar for more leverage.
Once all of the lug nuts are removed, you’ll be able to take the flat tire off and replace it with your spare tire. Remember to tighten the lug nuts once you’ve put on the spare tire to prevent it from falling off while you’re driving.
Mount Spare Tire
Changing an RV tire can be a daunting task, but it doesn’t have to be. Once you’ve located your spare tire, the next step is to mount it. To do this, first, you’ll need to remove the lug nut covers on the spare tire.
Once the cover is removed, use your lug wrench to loosen the lug nuts holding the spare in place. Don’t remove them just yet, though! Next, you’ll want to get out your jack and position it correctly under the RV – consulting your owner’s manual if necessary. Once the jack is in place, begin raising the RV until the flat tire is off the ground.
At this point, it’s safe to remove the lug nuts entirely and pull the tire off. Then, simply slide your spare tire into place and replace the lug nuts – making sure they’re tight and secure. Finally, lower your RV back down to the ground and tighten the nuts once more.
And just like that, your spare tire is mounted and your RV is ready to hit the road once more. Remember to keep your spare tire properly inflated and in good condition, so it’s ready when you need it.
Align Holes and Hand Tighten Lug Nuts
Mounting a spare tire is a crucial skill that every driver should master. If you find yourself on the side of the road with a flat tire, you’ll need to know how to mount a spare tire. Once you’ve safely pulled over to the side of the road, the next step is to align the holes on the spare tire with the studs on your vehicle.
Make sure that the holes line up correctly to prevent any damage to your car. Once the holes are aligned, it’s time to hand tighten the lug nuts. Ensure that all the nuts are gently tightened, as wrong installation could cause the tire to come off while driving.
You can use a wrench or socket to tighten the lug nuts, but don’t over-tighten them. Remember, the goal is to keep the tire securely in place, but not so tight that you can’t remove them during the next tire change. In conclusion, mounting a spare tire is a relatively simple process, but it’s essential to do it correctly.
By aligning the holes and hand tightening the lug nuts, you can get back on the road safely and confidently in no time.
Lower the RV and Tighten Lug Nuts
Changing an RV tire can be a bit overwhelming, especially if it’s your first time doing it. However, with the right tools and a little bit of know-how, it’s a task that anyone can accomplish. The first step is to find a safe and level spot to park your RV and turn on your emergency flashers.
Next, use a lug wrench to loosen the lug nuts on the wheel that needs to be changed. Once the lug nuts are loose, it’s time to elevate the RV and remove the old tire. When elevating your RV, make sure to use a heavy-duty jack that is designed for the weight of your vehicle.
Never rely on an unstable or homemade jack to lift your RV! Once the RV is elevated, lower the tire by slowly turning the lug nuts counterclockwise. When the tire is off the ground, it’s time to remove the lug nuts and take off the old tire. Before putting on the new tire, take some time to inspect the rim and brake for any damage or wear.
Slide the new tire onto the wheel bolts and hand-tighten the lug nuts. Lower the RV back onto the ground and tighten the lug nuts with your lug wrench. Make sure to use a star pattern when tightening the nuts to ensure that the wheel is secure and evenly tightened.
Finally, lower the RV completely and use a torque wrench to tighten the lug nuts to the manufacturer’s recommended torque setting. Always double-check that each lug nut is tightened securely before heading back out on the road. By following these simple steps, changing an RV tire can be a breeze.
Remember to keep your lug wrench and jack in your RV, just in case you need them again!
Lower RV and Tighten Nuts as Tight as Possible in Star Pattern
Lower RV and Tighten Lug Nuts Lowering the RV and tightening the lug nuts in a star pattern is crucial to ensure the wheels are tightly secured for a smooth and safe ride. First, it’s important to lower the RV until the wheels are supporting the weight of the vehicle, then use a torque wrench to tighten the nuts as tight as possible. The star pattern ensures that the nuts are tightened evenly, which prevents any wobbling or vibration while driving.
This also helps to prevent the wheels from coming loose while on the road, which can be extremely dangerous. It’s recommended to check the lug nuts for tightness after driving the RV for the first 100 miles and then periodically thereafter. The safety of the passengers and the performance of the vehicle depend on a proper tightening of the lug nuts.
Taking this simple step can make all the difference in ensuring a safe and enjoyable journey on the road.
Test Tire
Changing an RV tire can be a tedious task, but it’s crucial for ensuring a smooth and safe journey on the road. The first step is to find a safe and stable area to change the tire. It’s important to park the RV on level ground and engage the emergency brake.
Next, use a lug wrench to loosen the lug nuts on the tire that needs to be changed. Once the lug nuts are loose, use a jack to lift the RV off the ground and remove the lug nuts. Take the old tire off and replace it with the new tire, making sure to align the holes on the tire with the studs on the wheel.
Then, tighten the lug nuts in a star pattern and lower the RV back onto the ground. Finally, double-check that the lug nuts are tightened properly and the tire is secure before hitting the road. With these simple steps, changing an RV tire can be a hassle-free process.
Remember to regularly check your tires for wear and tear and have them replaced as needed to avoid any unexpected blowouts on the road.
Drive Slowly and Check Lug Nuts After 25 Miles
When it comes to testing your tires, there are a few things you should keep in mind. One of the most important is to drive slowly and carefully when you first install your new tires. This will help ensure that they are seated properly and won’t come loose while you’re driving.
After about 25 miles, it’s also a good idea to stop and check your lug nuts. Making sure these are securely tightened will give you added peace of mind and help prevent any accidents or mishaps out on the road. Testing your tires may not be the most exciting topic, but it’s absolutely essential if you want to stay safe while driving.
Whether you’re installing new tires or just checking up on your current set, taking the time to drive slowly and check your lug nuts can make all the difference. So don’t neglect these simple steps – they could be the key to preventing disaster down the line. And remember, if you’re ever in doubt about the condition of your tires, it’s always best to err on the side of caution and have them checked by a professional.
Conclusion
In conclusion, changing an RV tire may seem like a daunting task, but it is easily achievable with the right knowledge and equipment. Remember to always be prepared with a spare tire, jack, and lug wrench before hitting the road. And if all else fails, don’t be afraid to call for roadside assistance.
So the next time you hear that dreaded thumping sound, don’t panic – just follow these simple steps and you’ll be back on the road in no time. Now, if only changing a flat tire could burn calories, we’d all be fit and trim RV enthusiasts!”
FAQs
What tools do I need to change an RV tire?
You’ll need a lug wrench, a jack, and a spare tire, among other optional tools such as gloves or a tire pressure gauge.
How do I know when it’s time to change my RV tire?
Look out for signs of damage or wear and tear such as cracks, bulges, or punctures. Make sure to regularly inspect your tires before hitting the road.
What should I do if I experience a flat tire on my RV?
Find a safe spot to park and utilize your tools to change the tire with the spare. If you’re not comfortable changing the tire yourself, call a professional for assistance.
How often should I rotate the tires on my RV?
It’s recommended to rotate the tires on your RV every 5,000 to 7,000 miles to prevent uneven wear and prolong the life of your tires.
Can I repair a flat RV tire or do I need to replace it?
Depending on the extent of the damage, you may be able to repair a flat RV tire. However, make sure to get it inspected by a professional to ensure it’s safe to drive on.
How long do RV tires typically last?
On average, RV tires can last anywhere from 5 to 7 years, but it’s important to regularly inspect and maintain them to maximize their lifespan.
What should I do if my RV tire blows out while driving?
Stay calm and keep a firm grip on the steering wheel. Slowly come to a stop on the side of the road and follow the steps to change the tire with your spare. Again, if you’re uncomfortable doing this yourself, call for help.