

Have you ever found yourself face to face with a hairline crack in your windshield? It’s a frustrating experience that can leave you wondering how to repair it. Just like a tiny crack in a piece of glass, a hairline crack in your windshield can quickly spread and become a larger problem. It may seem like a minor issue at first, but it can compromise the structural integrity of your windshield and even impair your visibility while driving.
But fear not, there are ways to repair a hairline crack in your windshield without having to replace the entire thing. By taking prompt action and using the right materials, you can save yourself time and money. In this blog post, we’ll explore the different methods you can use to repair a hairline crack in your windshield.
We’ll discuss the tools and materials you’ll need, as well as step-by-step instructions on how to fix the crack. Whether you’re a DIY enthusiast or simply want to save some cash, this guide will provide you with the knowledge and confidence to repair your windshield crack with ease. So, grab your tools and let’s get started on restoring your windshield back to its original condition!
Table of Contents
Introduction
Are you frustrated with a hairline crack in your windshield? You’re not alone. Windshield cracks are a common problem that can occur from a variety of causes, such as rocks hitting your windshield while driving or temperature fluctuations. While it’s tempting to ignore a small crack, it’s important to address it as soon as possible, as it can quickly spread and compromise the integrity of your windshield.
Fortunately, repairing a hairline crack in your windshield is easier than you might think. With the right tools and a little bit of patience, you can fix the crack and prevent further damage. So, don’t let a hairline crack ruin your day.
Let me show you how to fix it yourself and save money on expensive windshield replacements.
What causes hairline cracks in windshields
hairline cracks in windshields, causes of hairline cracks in windshields. Introduction: Have you ever noticed those tiny hairline cracks appearing on your windshield and wondered how they got there? It can be quite frustrating to see them appear seemingly out of nowhere. But fear not, as I am here to shed some light on the mysterious phenomenon of hairline cracks in windshields.
These cracks can be a nuisance and compromise the structural integrity of your windshield, potentially leading to further damage and even the need for a replacement. So, what exactly causes these hairline cracks to form? Let’s dive in and explore the potential culprits behind these annoying fissures.
Why should you repair a hairline crack
hairline crack, repair, why should you repair a hairline crack Introduction: Hairline cracks in various materials, such as concrete, walls, or even hair, may seem trivial at first glance. However, neglecting to repair these seemingly minor imperfections can lead to significant consequences down the line. While it may be tempting to overlook hairline cracks and focus on more obvious issues, taking the time and effort to repair them can save you from bigger headaches in the future.
But why should you bother repairing a hairline crack? In this article, we will explore the reasons why addressing hairline cracks is essential and the potential ramifications of leaving them unattended.
Supplies needed
If you’ve noticed a hairline crack in your windshield, it’s important to address it as soon as possible to prevent further damage. Fortunately, repairing a hairline crack is a relatively simple process that you can do yourself. Before getting started, gather the necessary supplies: a windshield repair kit, which typically includes a resin, applicator, and curing strips.
These kits can be found at most automotive supply stores and are fairly inexpensive. Additionally, make sure you have a clean cloth, rubbing alcohol, and a razor blade or sharp knife on hand. Once you have all your supplies ready, you can begin repairing the crack.
Windshield repair kit
When it comes to repairing your windshield, having the right supplies is key. A windshield repair kit is a handy tool to have, and it comes with everything you need to fix a small crack or chip in your windshield. The kit typically includes a resin or adhesive that is used to fill in the damaged area, as well as a curing film that helps the resin dry and harden.
You’ll also need a syringe or injector to apply the resin, along with a razor blade or other tool to remove any excess resin. Some kits even come with a UV light to speed up the curing process. With all of these supplies on hand, you’ll be able to quickly and easily repair your windshield and prevent the damage from spreading.
Clean cloth
clean cloth, cleaning supplies. In order to keep our homes sparkling clean, it’s important to have the right supplies on hand. One essential item that should be in every cleaning arsenal is a clean cloth.
This simple tool can be used for a wide range of cleaning tasks, from dusting surfaces to wiping down countertops. But what exactly is a clean cloth and how do you ensure that it stays clean? A clean cloth is simply a piece of fabric that is free from dirt, grime, and other impurities. It’s important to choose a cloth that is made from a material that won’t scratch or damage delicate surfaces.
Microfiber cloths are a popular choice as they are soft, absorbent, and gentle. Cotton cloths are also a good option for general cleaning tasks. To keep your cloth clean and ready for use, it’s important to wash it regularly.
Depending on how often you use your cloth, you may need to wash it after each use or once a week. Simply toss it in the washing machine with your regular laundry detergent and wash on a gentle cycle. Avoid using fabric softener as this can leave a residue on the cloth.
In addition to washing, it’s also important to store your clean cloth properly. Avoid leaving it balled up or damp, as this can lead to mildew and odors. Instead, allow the cloth to air dry completely before storing it in a clean, dry place.
Having a clean cloth on hand can make all the difference when it comes to keeping your home clean. By choosing the right material, washing it regularly, and storing it properly, you can ensure that your cloth is always ready for action. So next time you reach for a cleaning tool, don’t forget to grab your trusty clean cloth!
Isopropyl alcohol
Isopropyl alcohol is a versatile and indispensable household item. It has a wide range of uses, from cleaning wounds and disinfecting surfaces to removing sticky residue and sanitizing electronic devices. But in order to make the most of its benefits, there are a few supplies you’ll need.
Firstly, you’ll want to have a good supply of isopropyl alcohol itself. You can find this at most drugstores or supermarkets, usually in the first aid or cleaning aisles. Look for a concentration of at least 70%, which is the most effective for killing bacteria and viruses.
Next, you’ll need some cotton balls or pads, as these are perfect for applying the alcohol to the desired area. They are soft and absorbent, allowing for easy and mess-free application. Additionally, keep some sterile gauze or bandages on hand for larger wounds that may require more extensive cleaning.
Finally, it’s always a good idea to have some disposable gloves available when handling isopropyl alcohol. This will protect your skin from any potential irritations or sensitivities. By having these supplies readily available, you can ensure that you are properly equipped to take full advantage of the benefits of isopropyl alcohol in various situations.
So stock up on these essentials and keep them in your first aid kit or cleaning supplies cupboard for easy access whenever you need them.
Step-by-step process
Are you finding hairline cracks in your windshield and wondering how to repair them? Well, you’ve come to the right place! Dealing with a small crack in your windshield can be a headache, but with the right tools and a step-by-step process, you can fix it yourself and save some money. Here’s how to repair a hairline crack in your windshield. First, you’ll need to gather some supplies.
You’ll need a windshield repair kit, which usually includes a resin solution and a bridge tool. You may also need a razor blade, rubbing alcohol, a clean cloth, and some clear tape. Once you have all your supplies ready, you’ll need to clean the crack and the area around it.
Use the razor blade to remove any loose glass or debris from the crack. Then, clean the area with rubbing alcohol and a cloth to remove any dirt or grime. Next, you’ll need to apply the resin solution to the crack.
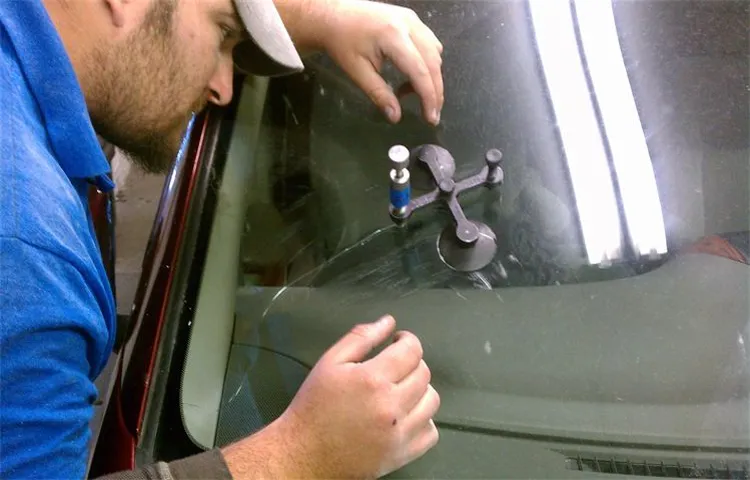
Open up the windshield repair kit and carefully follow the instructions on how to apply the resin. Usually, you’ll need to place the bridge tool over the crack and then fill the crack with the resin solution. Make sure to apply enough resin to completely fill the crack.
After applying the resin, you’ll need to use the bridge tool to press the resin into the crack. This will help ensure that the resin fills the crack completely and forms a strong bond. Follow the instructions provided with your windshield repair kit on how to use the bridge tool properly.
Once you’ve pressed the resin into the crack, you’ll need to let it dry. This can take anywhere from a few minutes to a couple of hours, depending on the specific resin you’re using. Make sure to read the instructions on the resin package to determine the drying time.
Step 1: Clean the crack
When it comes to repairing cracks, the first step is to clean the crack properly. This is an essential step to ensure a strong and effective repair. Start by removing any loose debris, such as dirt, dust, or pieces of the cracked material.
You can use a stiff brush or a vacuum cleaner to do this. Make sure to clean the crack thoroughly, reaching into all the crevices and corners. Once the crack is free of loose debris, you can use a cleaning solution or a degreaser to remove any oil, grease, or other contaminants that may be present.
This will ensure that the repair material adheres properly to the crack without any obstruction. After cleaning the crack, it is important to allow it to dry completely before moving on to the next step.
Step 2: Apply the resin
resin application, apply resin, how to apply resin Once you have prepared your surface and mixed the resin according to the manufacturer’s instructions, it’s time to start applying the resin. This step is crucial in ensuring a smooth and even finish for your project. Begin by pouring a small amount of the mixed resin onto the surface and use a spreader or squeegee to evenly distribute it.
Work in small sections at a time, making sure to spread the resin outwards towards the edges. This will help to prevent any trapped air bubbles from forming. As you continue to apply the resin, be sure to check for any missed spots or uneven areas.
Use a brush or roller to fill in these areas, blending them seamlessly with the rest of the surface. Keep in mind that resin has a limited working time, so work quickly but carefully to achieve the desired result. Once you have evenly applied the resin, allow it to cure according to the manufacturer’s guidelines.
Remember to clean your tools promptly after use to prevent the resin from hardening and becoming difficult to remove.
Step 3: Cure the resin
Step 3 of the resin curing process is an essential one. After applying the resin to your desired surface and ensuring it is evenly spread, it’s time to cure it. Curing the resin refers to the process of allowing it to harden and dry completely.
This step is crucial as it ensures that the resin is durable and will last for a long time. The curing process typically involves using a UV lamp or placing the resin in direct sunlight. The UV rays or sunlight help activate the curing agent within the resin, causing it to harden.
This step usually takes a few minutes to several hours, depending on the type of resin and the curing methods used. It’s important to follow the manufacturer’s instructions for curing times and methods to ensure the best results. Once the resin has cured, it will have a glossy finish and be sturdy enough for you to handle and admire your finished project.
Step 4: Polish the repaired area
“Polishing the repaired area” in the car bodywork process is an important step to achieve a seamless finish. Once the damaged area has been repaired and reshaped, it is time to make it smooth and ready for painting. This step involves using sandpaper, rubbing compound, and a buffer to gradually remove any imperfections and create a smooth surface.
Starting with a coarse-grit sandpaper, you will gently sand down the repaired area until it is level with the surrounding surface. Then, you will move to finer grits of sandpaper to further smooth out any rough spots or scratches. After the sanding process, a rubbing compound is applied to remove any remaining imperfections and enhance the overall shine.
Finally, a buffer is used to bring out the gloss and polish the repaired area to match the rest of the car’s paintwork. By taking the time to properly polish the repaired area, you can ensure a professional and seamless finish that will make your car look as good as new.
Tips for successful repair
If you have noticed a hairline crack in your windshield, don’t panic! It is possible to repair it yourself with a few simple steps. First, make sure to clean the crack and the surrounding area thoroughly. Use a glass cleaner and a soft cloth to remove any dirt or debris.
Next, apply a windshield repair kit that you can purchase at any auto parts store. These kits typically come with a resin that you can use to fill in the crack. Follow the instructions carefully to ensure proper application.
Once the resin is applied, use a curing light (also included in the kit) to harden the resin and create a strong bond. After the resin has hardened, use a razor blade to carefully remove any excess resin and smooth out the surface. Finally, give the repaired area a final cleaning to remove any residue.
With these simple steps, you can successfully repair a hairline crack in your windshield and save yourself the cost of a professional repair or replacement.
Repair small cracks before they become larger
Whether it’s on your walls, floors, or ceilings, small cracks can be quite the annoyance. But the truth is, if left unattended, these small cracks can become larger and more difficult to repair. That’s why it’s important to address them as soon as you notice them.
Here are a few tips for successfully repairing those small cracks before they become a bigger problem. First, make sure to clean the area around the crack thoroughly. Dust, dirt, and debris can prevent the repair material from adhering properly.
Use a brush or vacuum to remove any loose particles. Next, use a putty knife or scraper to widen the crack slightly. This will help the repair material penetrate deeper and provide a stronger bond.
Be careful not to widen the crack too much, as this can weaken the surrounding area. Once the crack is prepared, apply a patching compound or crack filler to the crack. Smooth it out with the putty knife, making sure to fill the crack completely.
Allow the patch to dry according to the manufacturer’s instructions. After the patch has dried, sand it down lightly to smooth out any rough edges. If necessary, apply a second coat of patching compound and repeat the sanding process.
This will ensure a seamless and professional-looking repair. Finally, paint or finish the repaired area to match the surrounding surface. This will not only make the repair blend in seamlessly but also provide additional protection against future cracks.
Avoid extreme temperature changes
Avoiding extreme temperature changes is an important tip to keep in mind when it comes to successful repairs. Whether you’re fixing a leaky pipe or patching up a hole in the wall, sudden shifts in temperature can have a negative impact on the repair job. Extreme heat or cold can cause materials to expand or contract, leading to cracks, warping, or even complete failure of the repair.
To prevent this, it’s crucial to choose the right time to make repairs, avoiding particularly hot or cold days. Additionally, it’s important to ensure that the repair area is kept at a consistent temperature throughout the process. This can be achieved by using fans, heaters, or air conditioners, depending on the situation.
By being mindful of temperature changes and taking appropriate precautions, you can increase the chances of a successful repair.
Park in shaded areas whenever possible
When it comes to parking your car, finding a shaded area may not be the first thing on your mind. However, it can actually make a big difference when it comes to the longevity of your vehicle. Parking in shaded areas whenever possible can help protect your car from the damaging effects of the sun’s rays.
The sun’s UV rays can cause the paint on your car to fade and deteriorate over time. Additionally, the intense heat from the sun can also cause damage to your car’s interior, such as cracking or fading of the dashboard and upholstery. By parking in shaded areas, you can help protect your car’s paint job and interior from these harmful effects.
So next time you’re looking for a parking spot, keep an eye out for those shaded areas and give your car some much-needed protection.
Conclusion
And there you have it, the definitive guide on how to repair a hairline crack in your windshield. Hopefully, armed with this knowledge, you’ll be able to tackle this pesky problem with confidence and finesse. Just remember, repairing a crack in your windshield is like fixing a broken heart.
It requires a delicate touch, a steady hand, and the realization that sometimes, all it takes is a little bit of love (and a high-quality windshield repair kit) to mend what seems irreparable. So don’t despair, my friend, because with the right tools and a sprinkle of determination, you’ll have your windshield looking as good as new in no time. Now, go forth and conquer those hairline cracks like the windshield warrior you were born to be!”
FAQs
What causes hairline cracks in windshields?
Hairline cracks in windshields can be caused by a variety of factors, including extreme temperature changes, road debris hitting the glass, or stress from structural changes in the vehicle.
Can a hairline crack in a windshield be repaired?
Yes, hairline cracks in windshields can be repaired using a specialized glass repair kit. However, it is important to note that the size and location of the crack will determine whether it can be successfully repaired or if windshield replacement is necessary.
How long does it take to repair a hairline crack in a windshield?
The time required to repair a hairline crack in a windshield can vary, but it typically takes around 30 minutes to an hour. However, this can depend on the complexity and size of the crack, as well as the skill of the technician performing the repair.
Can I drive with a hairline crack in my windshield?
It is not recommended to drive with a hairline crack in your windshield, as the crack can weaken the structural integrity of the glass and may spread or worsen over time. It is best to have the crack repaired or the windshield replaced as soon as possible.
How much does it cost to repair a hairline crack in a windshield?
The cost of repairing a hairline crack in a windshield can vary depending on factors such as the size of the crack, the location on the windshield, and the type of vehicle. On average, the cost can range from $50 to $150.
Can I repair a hairline crack in my windshield myself?
While there are DIY windshield repair kits available, it is generally recommended to have a professional handle the repair of a hairline crack. Improper repair techniques or inadequate equipment can lead to further damage or an unsuccessful repair.
Will my insurance cover the cost of repairing a hairline crack in my windshield?
Many comprehensive auto insurance policies cover windshield repairs, including hairline cracks. However, it is important to check with your insurance provider to understand your specific coverage and any applicable deductibles.