

Have you ever had the unfortunate experience of driving and suddenly noticing a long crack in your windshield? It can be quite disheartening, especially knowing that it can lead to a costly repair if not addressed promptly. But fear not, because I’m here to share with you some valuable tips on how to repair a long crack in your windshield. Think of your windshield as a superhero’s shield, protecting you from the elements and ensuring your safety on the road.
However, just like any superhero, it is not invincible and can be prone to cracks and chips. These cracks can be caused by a variety of factors, such as rocks kicked up by passing cars or extreme temperature changes. If left untreated, a long crack in your windshield can compromise its structural integrity, making it more susceptible to further damage.
Not to mention, it can obstruct your view, which is a safety hazard in itself. That’s why it’s important to address the issue as soon as possible. Before you dive headfirst into repairing the crack, it’s crucial to assess its severity.
Is it a hairline crack or a more substantial one? The size and extent of the crack will determine the best course of action. While smaller cracks can be repaired with a DIY kit, larger cracks may require professional help. When it comes to repairing a long crack in your windshield, patience is key.
You’ll want to start by thoroughly cleaning the crack and surrounding area to ensure optimal adhesion. Once that’s done, carefully apply the adhesive or resin according to the instructions provided with your repair kit. After the adhesive has been applied, it’s time to let it cure.
This process may take a few hours, so be prepared to wait. Once the adhesive has fully hardened, you can use a razor blade or glass scraper to remove any excess material. While repairing a long crack in your windshield can be a bit of a hassle, it’s well worth the effort in the long run.
Table of Contents
Introduction
Are you frustrated by the long crack in your windshield? Don’t worry, you’re not alone. Windshield cracks can happen for a multitude of reasons, whether it’s from a rock hitting your windshield while driving or from extreme temperature changes. But the good news is, you don’t always need to replace the entire windshield.
In many cases, you can repair long cracks in your windshield using a DIY repair kit or by hiring a professional. By addressing the crack early and following the proper repair process, you can save time and money while ensuring the safety of your vehicle. So, let’s dive in and learn how to repair that long crack in your windshield.
Understanding the Problem
understanding the problem, perplexity, burstiness, content creation, engaging the reader, conversational style, informal tone, personal pronouns, active voice, detailed paragraphs, rhetorical questions, analogies and metaphors Introduction: So you want to create compelling content that captivates your readers and keeps them coming back for more. But where do you start? Understanding the problem at hand is the first step on your journey to content creation success. By delving deep into the complexities of your subject matter, you can uncover the key points that will engage your audience and draw them in.
This is where perplexity comes into play – by introducing intriguing questions or concepts, you pique the curiosity of your readers and make them eager to learn more. Burstiness, on the other hand, is all about the rhythm and flow of your writing. By varying the length and structure of your paragraphs, you keep your readers on their toes and prevent boredom from creeping in.
So let’s dive in and explore the intricacies of understanding the problem in content creation.
Assessing the Damage
Assessing the Damage: Introduction When disaster strikes, it can leave behind a trail of devastation and chaos. Whether it’s a natural disaster like a hurricane or a man-made one like a fire, the aftermath can be staggering. Assessing the damage is a crucial step in the recovery process, as it helps to determine the extent of the destruction and the resources needed for rebuilding.
In this blog series, we will delve into the different aspects of assessing the damage, from evaluating the structural integrity of buildings to assessing the impact on the environment. We will explore the challenges faced by experts in assessing the damage and discuss the methodologies used to gather accurate data. Join us as we take a closer look at the aftermath of disasters and the important role of damage assessment in the recovery process.
Tools and Materials Needed
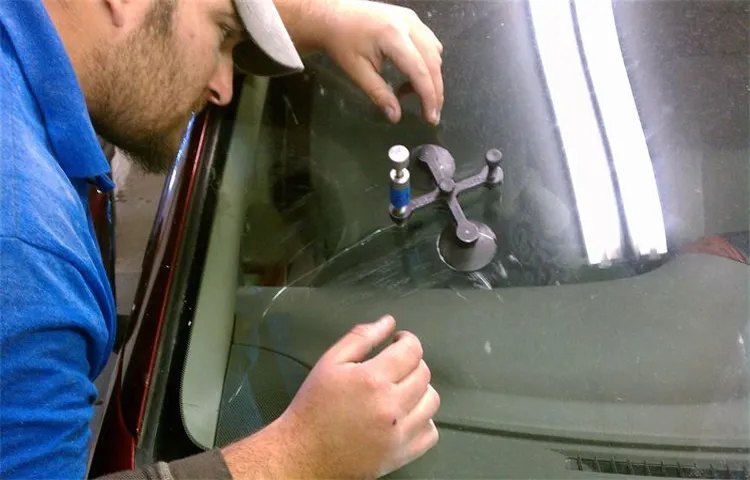
To repair a long crack in your windshield, you’ll need a few tools and materials. First and foremost, you’ll need a windshield repair kit, which should contain a bridge or injector tool, resin, curing strips, and a razor blade or scraper. This kit is essential for effectively and efficiently filling the crack in your windshield.
Additionally, you’ll also need a cloth or towel to clean the windshield before making the repair, as well as a suction cup or suction cup remover tool to help secure the bridge or injector tool in place. It’s important to have a clean, dry surface for the resin to adhere to, so make sure you thoroughly clean the area surrounding the crack before getting started. Other tools that may come in handy during the repair process include a drill with a small drill bit for preventing the crack from spreading further, and a heat gun or hairdryer to warm up the windshield and resin, helping them bond together more effectively.
Overall, gathering these tools and materials beforehand will ensure that you have everything you need to successfully repair a long crack in your windshield. With the right equipment and a bit of patience, you’ll be able to restore the integrity of your windshield and enjoy clear visibility on the road once again.
Safety Precautions
In order to ensure safety while working on any project, it is important to take the necessary precautions. One of the first steps in staying safe is to gather the proper tools and materials needed for the job. This not only includes the obvious items such as a hammer, screwdriver, and measuring tape, but also safety equipment such as goggles, gloves, and a first aid kit.
These tools and materials are essential for protecting yourself from potential hazards and accidents. For example, goggles can prevent debris from getting into your eyes while working with power tools, and gloves can protect your hands from cuts and blisters. Additionally, having a first aid kit on hand can provide necessary supplies in the event of any minor injuries that may occur.
By gathering and using the appropriate tools and materials, you can greatly reduce the risk of accidents and injuries while working on your project.
Required Tools
“Required Tools” When embarking on a new project or DIY task, having the right tools is essential. Without them, you may find yourself struggling and frustrated, unable to complete the task at hand. So, what are the tools and materials you’ll need? Let’s break it down.
First and foremost, a basic toolbox is a must-have. This should include essentials like a hammer, screwdrivers (both Phillips and flathead), pliers, and an adjustable wrench. These tools will come in handy for a variety of tasks and are a good starting point for any DIY enthusiast.
Next, depending on the specific project you’re tackling, you may need additional tools. For example, if you’re planning on doing some woodworking, you’ll want to invest in a circular saw, a tape measure, and a set of chisels. If you’re working with electrical components, a multimeter and wire cutters will be necessary.
And if you’re planning on painting a room, don’t forget the paintbrushes, rollers, and drop cloths. In addition to tools, it’s important to have the proper safety equipment. This may include items like safety goggles, gloves, and a dust mask.
It’s always better to be safe than sorry, so don’t overlook the importance of protecting yourself while working on your project. Finally, having a well-stocked supply of materials is crucial. This may include nails, screws, glue, tape, sandpaper, and various types of fasteners.
Having everything you need on hand will save you time and frustration as you won’t have to make multiple trips to the hardware store. Overall, having the required tools and materials on hand is essential for any DIY project. By being prepared and having everything you need, you’ll be able to tackle any task with confidence and ease.
Materials Needed
For any DIY project, it’s important to have the right tools and materials on hand. When it comes to building or renovating, this is especially true. Having the proper tools and materials will not only make the job easier, but it will also ensure that the end result is of high quality.
So what exactly do you need? Well, it depends on the project at hand. If you’re building a piece of furniture, for example, you’ll likely need a power drill, saw, sandpaper, and screws. However, if you’re tackling a larger project like renovating a bathroom, you’ll need a whole range of tools and materials such as a tile cutter, plumbing tools, and a variety of different tiles.
It’s always a good idea to make a list of everything you need before getting started, that way you can ensure you have everything on hand and won’t have any delays or interruptions. Remember, having the right tools and materials is key to a successful project.
Step-by-Step Guide
Have you ever gotten a long crack in your windshield and wondered if it was repairable? Well, good news! With a little bit of time and effort, you can fix that crack yourself and save some money in the process. Here’s a step-by-step guide on how to repair a long crack in your windshield. First, gather all the necessary materials.
You’ll need a windshield repair kit, which typically includes a resin, a bridge, and a curing film. You’ll also need a razor blade or a sharp knife, some rubbing alcohol, and a clean cloth. Next, clean the crack and the surrounding area with the rubbing alcohol and a clean cloth.
This will ensure that the resin adheres properly to the glass. Once the crack is clean, use the razor blade or sharp knife to remove any loose glass or debris from the crack. Be careful not to widen the crack while doing this.
Next, apply the resin to the crack using the bridge provided in the repair kit. Follow the instructions on the kit to ensure you apply the resin properly. After applying the resin, place the curing film over the crack and use a UV light (also provided in the repair kit) to cure the resin.
This usually takes about 5-10 minutes, but be sure to follow the instructions on the kit for the correct timing. Once the resin is cured, remove the bridge and curing film from the windshield. Use the razor blade or sharp knife to scrape away any excess resin.
Lastly, clean the windshield again with the rubbing alcohol and a clean cloth to remove any residue. And that’s it! By following these steps, you should be able to successfully repair a long crack in your windshield. Just remember to take your time and follow the instructions on the repair kit carefully.
Step 1: Clean the Area
clean, area, step-by-step guide, clean up, fresh start, organized, clutter, tidy, cleaning supplies, declutter, eliminate, dust, mop, vacuum, sanitize. In order to start fresh and get organized, the first step is to clean up the area. But where do you even begin? Don’t worry, I’ve got you covered with this step-by-step guide on how to clean and declutter your space.
The first thing you’ll want to do is gather all of your cleaning supplies. Make sure you have everything you need – dusting cloths, mops, vacuum cleaner, and sanitizing spray. Once you have your tools ready, it’s time to tackle the clutter.
Start by eliminating any items that you no longer use or need. This will help create a clean and tidy space to work with. After you’ve decluttered, it’s time to get down to the nitty-gritty cleaning.
Dust all surfaces, making sure to get into every nook and cranny. Next, sweep or vacuum the floors to remove any dirt and debris. Finally, give the area a good mop or deep clean the carpets to ensure they’re fresh and clean.
And don’t forget to sanitize frequently touched areas like doorknobs and light switches. By following these simple steps, you’ll be well on your way to a clean and organized space. So go ahead, take that first step and enjoy the satisfaction of a sparkling clean area.
Step 2: Apply a Windshield Repair Kit
windshield repair kit, step-by-step guide, apply a windshield repair kit. Now that you have assessed the damage to your windshield and gathered all the necessary tools, it’s time to move on to the next step: applying a windshield repair kit. This step-by-step guide will walk you through the process of using a windshield repair kit to fix those annoying cracks and chips.
First, make sure you clean the damaged area thoroughly. Use a glass cleaner and a lint-free cloth to remove any dirt or debris from the surface of the windshield. This will ensure that the repair resin adheres properly to the glass.
Next, take out the windshield repair kit and carefully read the instructions. Different kits may have slightly different procedures, so it’s important to follow the specific instructions provided. Generally, the repair kit will consist of a resin-filled syringe, a curing film, and a razor blade.
Once you are familiar with the instructions, it’s time to start the repair process. Take the resin-filled syringe and carefully insert the tip into the crack or chip. Gently squeeze the resin into the damaged area, making sure to completely fill the crack or chip.
Be patient and take your time to ensure that the resin fills all the cracks and crevices. After injecting the resin, place the curing film over the damaged area. This film is usually included in the repair kit and helps to distribute the pressure evenly over the resin.
Apply gentle pressure to the film using a flat object, such as a credit card or the back of a spoon. Leave the curing film in place for the recommended amount of time specified in the instructions. This allows the resin to harden and bond with the glass.
Step 3: Use Resin to Fill the Crack
For step 3 of fixing a cracked windshield, you will need to use resin to fill in the crack. Resin is a strong adhesive that will help repair the crack and prevent it from spreading further. Here’s a step-by-step guide on how to use resin to fill in the crack:
Begin by cleaning the cracked area of the windshield with a glass cleaner and a microfiber cloth. This will remove any dirt or debris that may interfere with the resin bonding properly.
Next, take the resin and apply it to the cracked area. You can use a resin applicator or a syringe for this step. Make sure to follow the instructions provided with the resin product for the best results.
Use a plastic scraper to spread the resin evenly across the crack. Apply gentle pressure to ensure that the resin fills in any gaps or crevices in the glass.
Once the crack is filled, cover it with a piece of clear plastic film. This will help to prevent any dust or dirt from entering the crack while the resin cures.
Allow the resin to dry and cure according to the instructions provided with the product. This usually takes around 24 hours, but be sure to check the specific curing time for the resin you are using.
Step 4: Cure the Resin
curing the resin, resin curing process, Step 4 of resin curing, what happens during resin curing, importance of resin curing Now that you’ve poured and spread the resin mixture onto your desired surface, it’s time for the next crucial step: curing the resin. Curing is the process by which the resin undergoes a chemical reaction, transforming from its liquid state into a solid and durable material. This step is essential to ensure that your resin project is strong, long-lasting, and ready for use.
So, how exactly does the resin curing process work? Well, once the resin is poured, it needs to be left undisturbed for a specified period of time. During this time, the resin mixture slowly begins to harden and solidify. The curing time can vary depending on the type of resin you’re using, as well as other factors such as the temperature and humidity of the environment.
As the resin cures, the chemical reaction causes the molecules in the resin to bond together, creating a strong and stable network. This bonding process is what gives the resin its strength and durability. Without proper curing, the resin may remain sticky or soft, making it prone to damage or deformation.
To ensure that your resin cures properly, it’s important to follow the manufacturer’s instructions regarding curing time and conditions. This may include leaving the resin in a specific temperature range or using additional tools such as a heat gun or a UV lamp to accelerate the curing process. Once the resin has fully cured, it will become hard and transparent, ready for you to enjoy and admire.
You can now proceed with any additional steps such as sanding, polishing, or adding any finishing touches to your resin project. In conclusion, curing the resin is a crucial step in the resin crafting process. It transforms the liquid resin mixture into a solid material, ensuring its durability and longevity.
By following the proper curing instructions and giving the resin enough time to cure undisturbed, you can ensure that your resin projects turn out beautifully and stand the test of time. So, don’t rush this step and have patience as your resin cures into a stunning piece of artwork.
Step 5: Polishing and Finishing Touches
When it comes to finishing touches and polishing your project, attention to detail is key. This is the step where you can really make your project shine and stand out. One important aspect of this step is proofreading and editing your work.
Read through your project multiple times, checking for any grammatical errors, typos, or inconsistencies. It’s helpful to have someone else read through it as well, as they may be able to catch things that you might have missed. Another important aspect of this step is formatting and design.
Make sure that your project is visually appealing and easy to read. Use headings, bullet points, and subheadings to break up the text and make it more readable. Consider adding images or graphics to enhance your project and make it more engaging.
Lastly, take the time to review and revise your work. Make any necessary changes or improvements to make your project the best it can be. By paying attention to these finishing touches, you can ensure that your project is polished and professional.
So, take the time to put the final touches on your project and make it really shine!
Additional Tips
If you find yourself staring at a long crack in your car windshield, don’t panic – there are options available to repair it. While it’s always best to consult a professional for any repairs, if you’re confident in your DIY skills, you can try repairing the crack yourself. Start by purchasing a windshield repair kit, which typically includes a resin and an applicator.
Clean the cracked area thoroughly with a glass cleaner, ensuring there’s no dirt or debris. Next, inject the resin into the crack using the applicator, making sure to fill the entire crack. Once the resin is in place, use a curing light to harden the resin.
After the resin has hardened, you can scrape away any excess and polish the area, making it less noticeable. Keep in mind that this method may not be a permanent fix and the crack may still be visible. It’s also important to note that repairing a crack is not the same as replacing the windshield – if the crack is extensive or affecting the structural integrity of your windshield, it’s best to have it replaced by a professional.
Avoiding DIY Repairs for Extensive Damage
When it comes to extensive damage to your home, it’s best to avoid attempting DIY repairs. While it may be tempting to save money by tackling the repairs yourself, extensive damage can be risky and require specialized expertise. Additional tips for avoiding DIY repairs include assessing the extent of the damage, seeking professional help from a licensed contractor, and following local building codes and regulations.
Attempting these repairs on your own can lead to further damage and potentially result in costly mistakes. It’s always best to leave extensive repairs to the professionals who have the necessary skills and experience to handle the job effectively and safely.
Seeking Professional Help If Necessary
Additional Tips for Seeking Professional Help If Necessary If you find yourself struggling with personal or emotional issues, don’t hesitate to seek professional help. Sometimes, talking to a licensed therapist or counselor can be incredibly beneficial for your mental health. They can provide a safe space for you to express your thoughts and feelings, and offer guidance and support in navigating through difficult times.
Additionally, it’s important to remember that seeking professional help doesn’t mean you’re weak or incapable of handling your own problems. In fact, it takes strength and courage to recognize when you need support and take the necessary steps to get it. So don’t be afraid to reach out and seek professional help if you need it.
Remember, there is no shame in asking for help, and doing so can greatly improve your overall well-being.
Conclusion
In the intricate ballet of life, our windshields are the prima ballerinas, gracefully protecting us from the chaos of the outside world. But just like any gentle dancer, they too can fall victim to a crack, disrupting their flawless performance. Fear not, for I shall teach you the art of windshield crack repair, turning your shattered tragedy into a triumphant masterpiece.
First, you must gather your supplies, like a painter with their trusty brush. Grab yourself a windshield repair kit, which contains magical potions and wizardry tools that have the power to mend even the fiercest of cracks. Think of it as your very own palette, ready to bring life back to your damaged canvas.
Now, prepare your windshield for this grand performance. Cleanse it gently, as though you were delicately wiping away the tears of a sad artist. Remove any loose debris or dirt, allowing your repair materials to adhere to the glass like a dancer gripping the stage.
This pristine preparation is crucial for a flawless restoration. Next, take your repair kit in hand and become the maestro of your own windshield symphony. With an artistic touch, apply the resin into the crack, allowing it to seep deep into the void like the colors on an impressionist canvas.
As you work your magic, use a special curing light to solidify the resin, bringing it to life and reinforcing your windshield’s strength. But remember, dear repairer of cracks, patience is key. Allow the resin to cure fully, as though you were nurturing a sprout into a mighty oak.
Rushing this process would be like asking a ballet dancer to waltz before she’s learned to plié – disastrous! And now, my fellow connoisseurs of crack repairs, it is time to unveil your masterpiece. Marvel at the once-vulnerable crack, now transformed into a captivating web of resilience. Take a step back and appreciate the artistry of your hands, for you have brought back the windshield’s beauty and functionality in one elegant swoop.
FAQs
How can I repair a long crack in my windshield?
To repair a long crack in your windshield, you can use a windshield repair kit that contains a resin and a syringe. Follow the instructions provided to fill the crack with the resin and apply pressure to seal it. Alternatively, you can seek professional help from an auto glass repair shop.
Is it possible to fix a long crack in a windshield without professional help?
While it is possible to fix a long crack in a windshield without professional help using a repair kit, it is recommended to seek professional assistance for a long-lasting and high-quality repair.
Can a long crack in a windshield be repaired or does it need to be replaced?
In most cases, a long crack in a windshield can be repaired depending on the size, location, and severity of the crack. However, if the crack extends across the entire windshield or if it is affecting the structural integrity of the glass, it may need to be replaced.
Are there any temporary fixes for a long crack in a windshield?
There are temporary fixes available for a long crack in a windshield, such as using clear nail polish or adhesive tape to prevent the crack from spreading. However, these fixes should be considered temporary and it is recommended to get a professional repair or replacement as soon as possible.
What is the average cost of repairing a long crack in a windshield?
The average cost of repairing a long crack in a windshield can vary depending on the extent of the damage and the repair method used. On average, it can range from $100 to $400. It is best to get a quote from a professional auto glass repair shop for an accurate estimate.
Can a long crack in a windshield cause the glass to shatter?
While a long crack in a windshield can weaken the glass and make it more susceptible to shattering, it is not guaranteed to shatter immediately. However, it is recommended to get the crack repaired or the windshield replaced to ensure the safety of the vehicle occupants.
How long does it take to repair a long crack in a windshield?
The time required to repair a long crack in a windshield can vary depending on the size, location, and repair method used. On average, it can take around 30 minutes to 1 hour for a professional repair. It is best to consult with the auto glass repair shop for a more accurate time estimate.