
Are you dealing with a long crack in your windshield? It can be frustrating and inconvenient, but fear not, because there are ways to repair it. Driving around with a cracked windshield is not only unsafe, but it can also lead to further damage and more costly repairs down the line. In this blog post, we will explore the steps you can take to repair a long cracked windshield and get you back on the road safely.
Imagine driving down the road and suddenly a rock flies up from the car in front of you, leaving a crack in your windshield. It’s like a tiny spider web that just keeps getting longer and longer. You might think that getting a new windshield is your only option, but that’s not always the case.
There are actually methods available for repairing long cracks, saving you time and money. Think of your windshield like a puzzle. When it’s intact, it provides a protective barrier between you and the elements.
But when there’s a crack, it’s like a missing piece that weakens the overall structure. Repairing a long crack involves carefully filling in the gap, restoring the strength and integrity of your windshield. Repairing a long cracked windshield is not as difficult as it may seem.
In fact, there are do-it-yourself repair kits available that can help you fix the problem yourself. These kits usually come with a resin, an applicator, and clear instructions on how to complete the repair. Before you start the repair process, it’s important to clean the cracked area thoroughly.
This will ensure that the resin adheres properly and gives you the best chance of a successful repair. Once the area is clean, follow the step-by-step instructions provided with your repair kit to apply the resin and fill in the crack. The key to a successful repair is patience.
Table of Contents
Introduction
In today’s fast-paced world, it’s common for windshields to become damaged or cracked. It can be a frustrating experience, especially when it disrupts your daily routine or compromises your safety on the road. However, the good news is that you don’t always have to replace your entire windshield when it becomes cracked.
In many cases, it is possible to repair the crack and restore your windshield to its former glory. In this blog post, we will explore the process of repairing a long cracked windshield and provide you with tips and tricks to ensure a successful repair. So, buckle up and let’s get started on this journey to windshield restoration!
Understanding the Damage
fire damage, water damage, restoration process Introduction: When a disaster strikes, whether it be a flood, fire, or any other kind of accident, the damage can be devastating. It’s important for homeowners and business owners to understand the extent of the damage caused by these types of incidents in order to properly assess and restore their property. Fire and water damage are two of the most common types of destruction seen after a disaster.
Both can cause severe structural damage, ruin personal belongings, and create hazardous environments. However, the restoration process for each type of damage is different. In this blog post, we will discuss the basics of fire and water damage, as well as the steps involved in the restoration process for both.
Safety Precautions
Introduction When it comes to safety precautions, it’s always better to be safe than sorry. Whether you’re at home, work, or out and about, taking the necessary steps to protect yourself and those around you is essential. From simple measures like wearing a seatbelt when driving to more complex strategies like risk assessments in the workplace, safety precautions help prevent accidents and minimize potential harm.
But why are these precautions so important, and how can we ensure we’re doing everything we can to stay safe? In this blog section, we’ll explore the significance of safety precautions and discuss how they can be implemented in various aspects of our lives. So let’s dive in and learn how we can prioritize safety every day.
Assessing the Crack
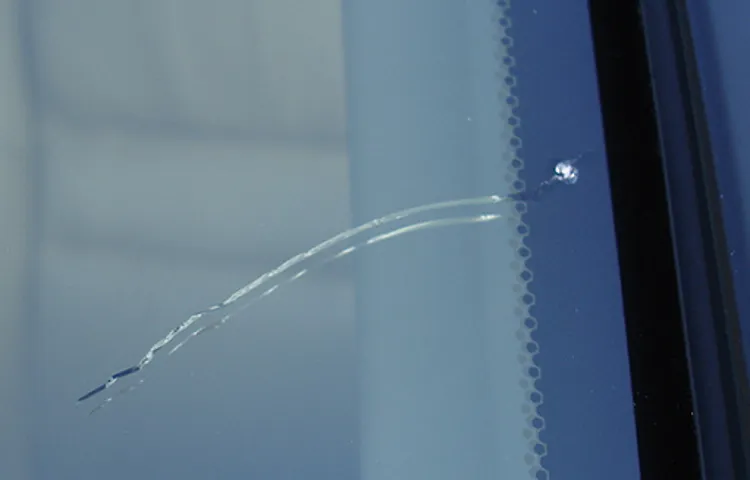
So you’re driving down the road and suddenly notice a long crack in your windshield – what a bummer! But don’t fret, because there are ways to repair a long cracked windshield and get it back to its original condition. First, assess the crack to determine if it can be repaired. Look closely at the length and depth of the crack.
If it’s longer than 6 inches or has penetrated both sides of the windshield, it may not be repairable and you will need to consider replacing it. However, if the crack is shorter and hasn’t reached the edges of the windshield, you can try to fix it yourself or take it to a professional. There are DIY repair kits available that use special resin to fill in the crack and prevent it from spreading.
Just make sure to follow the instructions carefully and take your time to ensure a proper repair. If you’re not confident in your DIY skills, it’s best to leave it to the experts. They have the tools and experience to handle the repair properly and can ensure that the crack is fixed safely and effectively.
So next time you find yourself with a long crack in your windshield, remember that it may be repairable and you have options to get it fixed. Keep calm and drive on!
Measuring the Crack
crack assessment, measuring the crack Assessing the crack in a structure is a crucial step in determining its severity and potential risks. It involves carefully examining the crack and gathering information to understand its nature and extent. One of the most common methods used in crack assessment is visual inspection.
This involves looking closely at the crack to determine its size, shape, and location. It is important to note that visual inspection alone may not provide enough information, especially in cases where the crack is deep or hidden. In such situations, more advanced methods like laser scanning or acoustic emission testing may be needed.
These methods can accurately measure the crack’s dimensions and detect any internal damage that may not be visible to the naked eye. Additionally, crack assessment also involves evaluating the surrounding area for signs of distress or movement, as this can provide valuable insights into the underlying causes of the crack. By thoroughly assessing the crack, engineers and experts can make informed decisions about appropriate repair and maintenance strategies to ensure the safety and stability of the structure.
Determining the Extent of the Damage
When it comes to assessing the damage caused by a crack, there are a few important factors to consider. First, you need to determine the extent of the crack. Is it superficial and only affecting the surface, or does it run deep and potentially compromise the structure? This can be done by examining the size and location of the crack.
A small, hairline crack may not be cause for immediate concern, but a larger, jagged crack could indicate a more serious issue. Additionally, the location of the crack is important. Cracks that occur near load-bearing walls or foundation areas may be more worrisome than cracks in non-structural walls.
It’s also important to consider whether the crack is growing or stable. If it is spreading or widening, it may indicate ongoing structural issues. On the other hand, if the crack has remained the same size for an extended period, it may be less of a concern.
Overall, assessing the crack requires a thorough examination of its size, location, and stability to determine the extent of the damage.
Identifying Repairable Cracks
crack assessment, identifying repairable cracks
Preparing for the Repair
So you’ve noticed a long crack in your windshield…
bummer! But don’t worry, because I’m here to tell you how to repair that pesky crack and save yourself some money in the process. The first thing you’ll need to do is gather the necessary tools and materials. You’ll need a windshield repair kit, which typically includes a bridge or suction cup device, resin, and curing strips.
You may also need a drill if the crack has
Gathering the Necessary Tools and Materials
“Preparing for the Repair: Gathering the Necessary Tools and Materials” So, you’ve decided to tackle that repair project yourself – congratulations! Before you dive in, it’s important to gather all the necessary tools and materials to ensure a smooth and successful repair. You don’t want to be halfway through the project and realize you’re missing a crucial tool or component, do you? First things first, take a moment to assess the repair you’ll be undertaking. What tools and materials will you need specifically for this project? Make a list and double-check it to ensure you have everything you need.
It’s better to be over-prepared than under-prepared. Now it’s time to gather your tools. Look through your toolbox and see what you already have on hand.
Depending on the project, you may need basic tools like screwdrivers, pliers, and wrenches. Or, you may need more specialized tools like soldering irons, levels, or pipe cutters. If you’re missing anything, consider borrowing from a friend or neighbor, or check out your local hardware store for affordable options.
Once you have your tools sorted, it’s time to gather the necessary materials. This could include things like replacement parts, adhesives, or paints. If you’re not sure what materials you’ll need, do some research online or consult a professional for guidance.
It’s important to use the right materials to ensure a long-lasting repair. Lastly, don’t forget about safety gear. Depending on the project, you may need protective goggles, gloves, or a respirator.
Safety should always be a top priority, so make sure you have the appropriate gear to keep yourself protected. In conclusion, preparing for a repair project involves gathering the necessary tools and materials. Take the time to assess the project, make a list, and gather all the tools you’ll need.
Choosing a Repair Kit
When it comes to repairing something, preparation is key. Before you dive into fixing whatever is broken, you need to make sure you have all the tools and materials you’ll need. This is especially true when it comes to repair kits.
Choosing the right repair kit can make all the difference in the success of your repair job. So, how do you prepare for the repair? Firstly, assess the problem to determine what tools and materials you’ll need. For example, if you’re fixing a leaky faucet, you might need a wrench, plumber’s tape, and replacement parts.
Once you know what you need, do some research to find the best repair kit for your specific issue. Consider the quality of the tools and materials included in the kit, as well as any additional items that might be helpful. Read reviews from other customers to get an idea of how well the kit has worked for them.
Ultimately, choosing the right repair kit will ensure that you have everything you need to successfully fix whatever is broken.
Cleaning the Windshield
windshield cleaning, preparing for repair
Repairing the Crack
If you’ve noticed a long crack in your windshield, it’s important to address it as soon as possible to prevent further damage. While a cracked windshield can be a nuisance, it’s not something to be taken lightly. There are a few steps you can take to repair the crack and ensure the safety of yourself and others on the road.
One option is to use a windshield repair kit, which typically includes a resin that can fill in the crack and bond the glass back together. These kits are relatively easy to use and can be a cost-effective solution. However, if the crack is particularly long or deep, it’s best to leave the repair to the professionals.
They have the necessary tools and expertise to properly repair the crack and ensure the structural integrity of the windshield is not compromised. Remember, a cracked windshield can impair your vision and pose a safety hazard, so don’t ignore it. Take the necessary steps to repair the crack and keep yourself safe on the road.
Applying the Resin
repairing a crack When it comes to repairing cracks on different surfaces, using resin can be a game-changer. Resin is a versatile material that can be used to fix cracks in various materials like glass, wood, and even concrete. To repair a crack using resin, you’ll need to follow a few simple steps.
First, make sure the surface is clean and free from any debris. Next, apply a generous amount of resin to the crack, making sure it fills the entire space. Then, use a putty knife or scraper to smooth out the resin and remove any excess.
Finally, let the resin dry completely before using the repaired item. By following these steps, you can easily repair cracks and extend the life of your belongings. So, why wait? Grab some resin and get to work on those pesky cracks today!
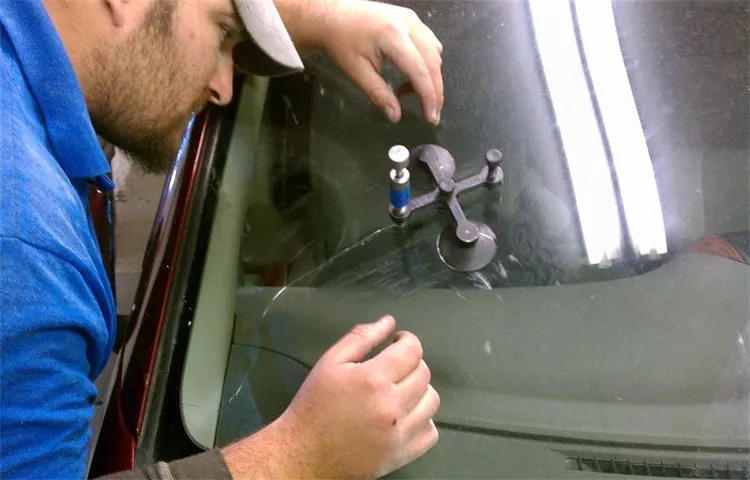
Using the Bridge or Injector Tool
Using the Bridge or Injector Tool to repair a crack in your windshield is a simple and effective solution. This tool is designed to fill in the crack and strengthen the glass, preventing it from spreading further and causing more damage. The process involves injecting a special resin into the crack, which bonds with the glass and fills in the gaps.
The bridge or injector tool helps to ensure that the resin is distributed evenly and fills the entire crack. It is a cost-effective and time-saving method compared to replacing the entire windshield. So, if you notice a crack in your windshield, don’t panic.
With the help of the bridge or injector tool, you can easily repair it and get back on the road in no time.
Curing the Resin
UV resin is a versatile and popular material used for various crafting projects. However, one common issue that crafters may encounter is a cracked resin. Fortunately, repairing a cracked resin is a straightforward process.
The first step is to identify the crack and clean the damaged area. Next, mix a small amount of fresh resin and apply it to the crack using a toothpick or small brush. Be sure to smooth out the resin to create a seamless finish.
Once the crack is filled, carefully cure the resin under a UV lamp or in direct sunlight for the recommended time. This will ensure that the resin hardens and becomes durable once again. After curing, the crack should be virtually invisible, and your resin project will be ready to be enjoyed once again.
By following these simple steps, you can easily repair a cracked resin and continue with your crafting projects.
Removing Excess Resin
“Removing Excess Resin” When it comes to repairing a crack in your resin project, it’s important to take the proper steps to ensure a successful fix. One of these steps involves removing any excess resin that may have seeped into the crack. This is crucial because if left untouched, the excess resin can prevent the crack from closing properly, resulting in a less than perfect repair.
To remove the excess resin, you’ll need a few simple tools such as a craft knife or razor blade, sandpaper, and a cloth or sponge. Start by carefully scraping away any resin that is protruding from the crack using the craft knife or razor blade. Be sure to work slowly and gently, applying light pressure to avoid any further damage to the crack or surrounding area.
Once you have removed as much excess resin as possible, use sandpaper to smooth out the area around the crack. Start with a coarse grit sandpaper to remove any rough edges or uneven surfaces, and then gradually work your way up to a finer grit for a smooth finish. Be sure to sand in a circular motion to avoid creating any new scratches or marks.
After sanding, use a cloth or sponge dampened with warm water to wipe away any remaining resin dust or debris. This will help to give the repaired area a clean and polished appearance. Finally, allow the resin to fully cure according to the manufacturer’s instructions before handling or using the project.
By taking the time to remove excess resin from the crack, you’ll ensure that your repair is not only visually appealing but also durable and long-lasting. So don’t overlook this important step in your resin project repair process. Your finished project will thank you!
Polishing the Repair
Polishing the Repair: Repairing the Crack So you’ve identified a crack in your beloved possession. Maybe it’s a cherished mug, a favorite vase, or a treasured heirloom. Regardless of what it is, the sight of that crack can be disheartening.
But fear not! There are ways to repair that crack and bring your item back to life. First, assess the damage. Is the crack minor, or does it extend through the entire item? This will help you determine the best course of action.
For minor cracks, a simple adhesive may do the trick. Look for a glue that is specifically designed for bonding the material your item is made of. Apply the adhesive to both sides of the crack, and then carefully press them together.
Wipe off any excess glue, and let it dry according to the manufacturer’s instructions. If the crack is more severe, you may need to employ a different method: reinforcement. This involves adding a material to provide extra support and stability.
One option is to use a patch or a piece of fabric that matches the item. Apply adhesive to the patch and carefully place it over the crack, ensuring that it covers the entire damaged area. Press it firmly in place and again, wipe off any excess glue.
Allow it to dry fully before handling the item. Of course, not all cracks are repairable, especially if they are large or if the item is made of a delicate material. In these cases, it may be best to consult a professional who specializes in restoration.
Preventing Further Damage
If you’ve noticed a long crack in your windshield, it’s important to take action to prevent further damage. Ignoring the crack could lead to it spreading and eventually causing your windshield to shatter. Luckily, there are steps you can take to repair a long cracked windshield.
One option is to use a windshield repair kit, which typically includes resin and a specialized applicator. This allows you to fill in the crack and reinforce the damaged area. However, it’s important to note that DIY windshield repairs may not be as effective as professional repairs, especially for long cracks.
Professional repair shops have access to more advanced equipment and techniques, which can result in a stronger and more durable repair. It’s also worth mentioning that if the crack is too severe or located in a critical area of the windshield, you may need to have the entire windshield replaced. In any case, it’s best to consult with a professional to determine the most appropriate course of action for repairing your long cracked windshield.
Avoiding Extreme Temperatures
preventing damage, extreme temperatures, HVAC system, regular maintenance, insulation, thermostat, weather stripping
Maintaining a Safe Following Distance
maintaining a safe following distance When driving on the road, it’s crucial to maintain a safe following distance between your vehicle and the one in front of you. This not only helps prevent accidents but also allows you enough time to react if the car in front suddenly brakes or swerves. So, how can you ensure that you’re maintaining a sufficient distance? Well, imagine you’re on a ship in stormy seas.
You wouldn’t want to be too close to the ship in front of you, right? Similarly, on the road, you want to avoid tailgating and give yourself enough space to stop safely if needed. A good rule of thumb is to keep at least a three-second gap between your car and the one in front. To determine this, choose a fixed object on the road, such as a sign or a tree.
When the car in front passes that object, start counting “one Mississippi, two Mississippi, three Mississippi.” If you reach the object before finishing the count, you’re following too closely and need to increase the distance. By maintaining a safe following distance, you’re not only protecting yourself but also ensuring the safety of others on the road.
So, the next time you get behind the wheel, remember to give yourself ample space to react and prevent further damage.
Practicing Safe Driving Habits
safe driving habits, preventing further damage
Conclusion
In conclusion, repairing a long cracked windshield is a task that requires patience and skill, but with the right tools and technique, you can make your windshield look as good as new. So don’t let that annoying crack get you down – grab some resin, put on your repair cap, and show that windshield who’s boss! Remember, the key to a successful repair is taking your time and ensuring you have a steady hand. And hey, if all else fails, you can always tell people that your windshield crack is there to keep you entertained on long road trips – it’s like nature’s own personal Netflix!
Final Thoughts and Recommendations
In order to prevent further damage, it is crucial to take immediate action. One of the first steps to take is to assess the situation and identify the cause of the damage. Is it a leaky roof, a burst pipe, or something else? Once the cause is determined, it is important to address the issue as soon as possible.
This may involve repairing the roof, fixing the pipe, or calling in professionals to help with water extraction and drying. It is also important to remove any standing water as quickly as possible, as this can lead to mold growth and further damage. Additionally, it is important to thoroughly dry out the affected area to prevent mold and other issues.
This may involve using dehumidifiers and fans, as well as ensuring good ventilation in the space. Finally, it is important to document the damage for insurance purposes. Take photos and keep a record of any repairs and expenses incurred as a result of the damage.
This will help with the claims process and ensure that you receive the compensation you are entitled to.
FAQs
How to repair a long cracked windshield?
To repair a long cracked windshield, you will need to follow these steps:
1. Clean the cracked area with a glass cleaner and a lint-free cloth.
2. Apply a windshield repair resin to the crack, filling it completely.
3. Use a windshield repair bridge or tool to apply pressure and ensure proper adhesion of the resin.
4. Allow the resin to cure and harden according to the manufacturer’s instructions.
5. Once cured, carefully remove any excess resin using a razor blade or similar tool.
6. Polish the repaired area to restore clarity and smoothness to the windshield.
Can I repair a long cracked windshield myself?
Yes, it is possible to repair a long cracked windshield yourself. However, it is recommended to have some knowledge and experience in windshield repair techniques. If you are unsure or uncomfortable with the process, it is best to seek professional help or consult a windshield repair specialist.
How long does it take to repair a long cracked windshield?
The time it takes to repair a long cracked windshield can vary depending on the size and severity of the crack, as well as the specific repair method used. Generally, it can take anywhere from 30 minutes to a couple of hours to complete the repair process.
What are the potential risks of attempting to repair a long cracked windshield?
While it is possible to repair a long cracked windshield, there are some risks involved, including:
– The crack may spread further during the repair process, making it more difficult or even impossible to repair.
– The repair may not be successful in completely restoring the integrity and strength of the windshield, compromising its safety.
– Improper repair techniques or materials may result in a distorted or hazy area on the windshield, affecting visibility.
Can a long cracked windshield be fixed without replacing it?
In many cases, a long cracked windshield can be repaired without the need for a full replacement. However, the repairability of a crack depends on various factors, including its size, location, and extent. It is best to consult with a professional windshield repair technician to determine if a repair is feasible in your particular case.
How much does it cost to repair a long cracked windshield?
The cost of repairing a long cracked windshield can vary depending on factors such as the size of the crack, the repair method used, and the geographical location. As a rough estimate, windshield repairs typically range from $50 to $150. However, it is recommended to contact local windshield repair shops or professionals to get an accurate quote.
Is it necessary to repair a long cracked windshield immediately?
It is advisable to repair a long cracked windshield as soon as possible to prevent the crack from spreading or further damage occurring. Cracks can compromise the structural integrity of the windshield and can impair visibility, increasing the risk of accidents. Ignoring or delaying repairs may result in the need for a complete windshield replacement in the future.