
Is your windshield trim starting to come loose? Have you noticed a gap between your windshield and the surrounding frame? If so, don’t panic! It’s a common issue that many car owners face, but fortunately, it’s also one that can be easily fixed. In this blog post, we will guide you through the process of repairing loose windshield trim, step by step. Think of your car’s windshield trim like the icing on a cake.
It not only adds a touch of beauty to your vehicle, but it also serves an important purpose – keeping the windshield securely in place. Over time, however, the trim can become loose due to various factors such as temperature changes, vibrations from the road, or simply wear and tear. The first step in repairing loose windshield trim is to identify the problem area.
Inspect the trim carefully to see if it is completely detached or if it is just loose in certain spots. If it is completely detached, you may need to purchase a replacement trim. However, if it is still intact but just loose, you can proceed with the repair.
One method to fix loose windshield trim is to use an adhesive. Clean the trim and the area around it thoroughly to remove any dirt or debris. Apply a small amount of adhesive to the trim, making sure to spread it evenly.
Press the trim firmly onto the windshield and hold it in place for a few minutes to allow the adhesive to bond. Once the adhesive has dried, check if the trim is securely attached. If the adhesive method doesn’t work, another option is to use a special windshield adhesive tape.
This tape is specifically designed for automotive applications and provides a strong bond. Clean the trim and the surrounding area, then cut the tape to the desired length. Peel off the backing and carefully apply the tape to the trim, pressing it firmly.
Introduction
Are you tired of your windshield trim coming loose and flapping in the wind? Don’t worry, you’re not alone. Loose windshield trim is a common problem that many car owners face. But the good news is that it’s relatively easy to fix.
In this blog post, we’ll show you how to repair loose windshield trim so that you can drive with peace of mind. Whether it’s just a small piece coming loose or the entire trim is hanging off, we’ve got you covered. So let’s get started and get that trim back in place!
Overview of the problem
Introduction Have you ever wondered why some words or phrases become suddenly popular and widely used, while others seem to fade into obscurity? This phenomenon is known as “burstiness” and it plays a significant role in the field of natural language processing. Burstiness refers to the tendency of certain words or phrases to occur in clusters, or bursts, within a given time period. These bursts can occur for a variety of reasons, such as the emergence of a new trend or the occurrence of a major event.
Understanding burstiness is crucial for analyzing and predicting language patterns, which has many practical applications ranging from marketing strategies to social network analysis. In this blog post, we will explore the concept of burstiness in more detail and discuss its implications for natural language processing.
Importance of fixing loose windshield trim
loose windshield trim, importance of fixing, windshield trim, fixing loose trim, potential hazards Introduction: You’re driving down the road, the wind blowing in your hair, and your favorite song playing on the radio. But wait, what’s that noise? It sounds like a rattling coming from your windshield. You glance over, only to see that the trim around your windshield is loose and flapping in the wind.
You might think it’s just a minor annoyance, but did you know that fixing loose windshield trim is important? In this blog post, we’ll explore the potential hazards of driving with a loose windshield trim and why it’s essential to address this issue as soon as possible. So, buckle up as we dive into the world of windshield trim and its importance!
Materials and tools needed
Introduction Before you dive into any DIY project, it’s important to make sure you have all the necessary materials and tools on hand. This ensures that your project goes smoothly and you’re not running around trying to find the right supplies halfway through. Whether you’re fixing something around the house or creating a beautiful piece of art, having the right materials and tools can make all the difference.
In this blog section, we’ll cover the essential materials and tools needed for various DIY projects, so you can be prepared and ready to tackle any task.
Step-by-step Guide
Are you tired of driving around with loose windshield trim? It can be quite annoying, not to mention potentially dangerous. But don’t worry, repairing loose windshield trim is actually a lot easier than you might think. In fact, with just a few simple steps, you can have your trim looking as good as new.
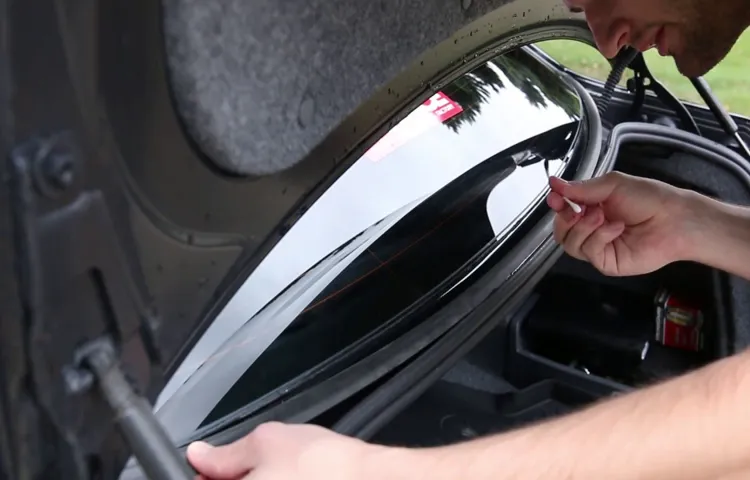
The first thing you’ll want to do is gather all the necessary tools and materials. You’ll need a screwdriver, some adhesive, and maybe even a trim removal tool. Once you have everything you need, start by carefully removing the loose trim from the windshield.
Be gentle, as you don’t want to damage the trim or the windshield itself. Once the trim is removed, clean both the trim and the windshield surface thoroughly, removing any dirt or debris. Next, apply a small amount of adhesive to the back of the trim and carefully position it back onto the windshield.
Use some pressure to ensure it sticks properly. Finally, let the adhesive dry for the recommended amount of time before driving your car again. And that’s it! With just a few simple steps, you’ve successfully repaired your loose windshield trim.
Now you can enjoy a smooth and safe ride without any annoying rattling or flapping. So why wait? Get started on repairing your loose windshield trim today and enjoy the results!
Step 1: Remove the loose trim
Removing loose trim from your walls or furniture is a simple and satisfying DIY project that can instantly refresh the look of your space. In this step-by-step guide, we will walk you through the process of removing loose trim with ease. The first step is to identify any loose trim that needs to be removed.
This could be in the form of molding, baseboards, or any other decorative trim. Take a close look at the trim and gently tug on it to see if it moves or comes off easily. If it does, then it is time to remove it.
To remove the loose trim, you will need a few tools. A putty knife or a flathead screwdriver will come in handy for prying the trim away from the wall or furniture. Start by inserting the putty knife or screwdriver between the trim and the surface it is attached to.
Gently apply pressure and wiggle the tool back and forth to loosen the trim. Once the trim has loosened, continue to work your way along its length, using the same prying motion. Be careful not to apply too much force, as this can damage the trim or the surface it is attached to.
Take your time and be patient. As you remove the trim, you may encounter nails or staples that were used to secure it in place. Use a pair of pliers or a hammer to pull these out if necessary.
Once all the trim has been removed, inspect the surface to ensure it is clean and free of any remaining debris. With the loose trim gone, you now have a blank canvas to work with. Whether you choose to replace the trim with something new or leave the space bare is up to you.
Step 2: Clean and prepare the area
clean and prepare the area, step-by-step guide, cleaning supplies, protective gear, declutter, dusting, scrubbing, mopping, organizing, fresh start In order to successfully clean and prepare an area, it’s important to have all the necessary supplies and equipment on hand. Before you begin, make sure you have cleaning solutions, scrub brushes or sponges, mops or floor cleaners, and trash bags. Additionally, it’s important to have the appropriate protective gear such as gloves and masks to ensure your safety while cleaning.
Once you have gathered all the necessary materials, it’s time to declutter the space. Remove any items that are not needed or do not belong in the area you are cleaning. This will create a clean and organized space for you to work in.
After decluttering, begin by dusting all surfaces, including furniture, shelves, and windowsills. Use a microfiber cloth or duster to effectively remove dust and dirt. Next, tackle any stains or grime that may be present.
Scrub surfaces using the appropriate cleaning solutions and scrub brushes or sponges. For floors, sweep or vacuum to remove any loose dirt or debris before mopping. Choose a cleaning solution that is suitable for the type of flooring you have, and mop the area thoroughly.
Finally, take the opportunity to organize the space as you clean. Arrange items in an orderly manner and create designated storage spaces for different items. By following these steps, you will be able to clean and prepare the area for a fresh start.
Step 3: Apply adhesive
In the third step of our countertop installation guide, it’s time to apply the adhesive. This is a crucial part of the process, as it ensures that your countertop is securely attached to the base and will stay in place for years to come. To begin, make sure that the surface of your base is clean and dry.
Remove any dust or debris that could interfere with the adhesive bond. Next, apply the adhesive to the base in a zigzag pattern, leaving a gap of about one inch between each line. This will ensure even distribution and coverage.
Once the adhesive is in place, carefully lower your countertop onto the base, aligning it properly. Press down firmly to create a strong bond between the countertop and the base. Allow the adhesive to cure according to the manufacturer’s instructions before moving on to the next step.
Step 4: Reattach the trim
In the fourth and final step of reattaching trim, you’ll want to make sure you have all the necessary tools handy. This includes a pry bar or hammer, finishing nails, a putty knife, and wood filler or caulk. Start by carefully lining up the trim with the appropriate space on the wall or surface.
Once aligned, use the pry bar or hammer to gently tap the trim into place. Make sure it is flush against the wall and securely attached. Next, use the finishing nails to secure the trim in place.
Place the nails evenly along the length of the trim, ensuring they are driven in at an angle to prevent splitting the wood. After all the nails are in place, use a putty knife to fill any nail holes or gaps with wood filler or caulk. This will give the trim a seamless and polished look.
Once the filler is dry, sand it down until it is smooth and even with the rest of the trim. You can then finish the trim with paint or stain to match the rest of the room. With these simple steps, you’ll have your trim reattached and looking as good as new!
Step 5: Secure the trim
In this step-by-step guide, we will walk you through the process of securing the trim in your home. The trim refers to the decorative finishing touches around windows, doors, and baseboards that add character and beauty to your space. Often made of wood or PVC, trim can come in various styles and designs.
Once you have chosen the right trim for your home, it’s time to install and secure it in place. The first step is to measure and cut the trim to the desired length. Using a miter saw or a miter box, make precise cuts at a 45-degree angle for corners and 90-degree angles for straight cuts.
Next, apply a strong construction adhesive to the back of the trim, ensuring a solid bond with the wall or surface. Press the trim firmly against the wall, making sure it aligns perfectly with the edges and corners. Use a level to check for straightness and adjust as necessary.
Finally, secure the trim in place using finishing nails or screws. Be sure to countersink them slightly to create a smooth and seamless finish. Fill any nail holes or gaps with wood putty or caulk for a professional-looking result.
With these simple steps, you can easily secure the trim in your home and elevate its overall aesthetic appeal.
Tips and Precautions
If you’ve noticed that your windshield trim is loose and in need of repair, don’t worry! It’s a common problem that can be easily fixed with a few simple steps. First, assess the damage and determine whether the trim needs to be replaced or simply reattached. If it’s just a matter of reattachment, you can use a strong adhesive or trim adhesive tape to secure it back in place.
Make sure to clean the area thoroughly before applying any adhesive to ensure a strong bond. If the trim needs to be replaced, you can order a new one from your car’s manufacturer or a trusted auto parts store. When installing the new trim, be gentle and ensure that it fits snugly into place.
It’s also important to be cautious when removing the old trim, as you don’t want to damage the windshield or surrounding areas. Take your time and follow the manufacturer’s instructions carefully. With a little patience and the right approach, repairing loose windshield trim can be a quick and easy fix to make your car look as good as new.
Tips for a successful repair
repair tips, successful repair, tips and precautions, Paragraph: When it comes to repairing something, whether it’s a gadget or a piece of furniture, there are a few tips and precautions that can help ensure a successful outcome. Firstly, it’s important to gather all the necessary tools and materials before starting the repair process. This will save time and prevent any unnecessary trips to the store.
Additionally, it’s crucial to read and understand any instructions or manuals that come with the item you’re repairing. This will give you a better understanding of the problem and the steps required to fix it. Another important tip is to take your time and work methodically.
Rushing through a repair can lead to mistakes and potentially make the problem worse. It’s also a good idea to have a backup plan or alternative solution in case your initial repair attempt doesn’t work out. Finally, always prioritize safety by wearing protective gear and taking precautions to prevent injury.
By following these tips and being cautious throughout the repair process, you can increase your chances of a successful repair.
Precautions to consider
Precautions to consider when it comes to taking care of your health are essential for maintaining well-being. Making smart choices and being aware of potential risks can help prevent illness and promote a healthy lifestyle. One of the most important precautions to take is to regularly wash your hands with soap and water.
This simple act can help kill germs and prevent the spread of diseases. Another precaution to keep in mind is to maintain a balanced diet and exercise regularly. Eating nutritious foods and staying active can help strengthen your immune system and reduce the risk of chronic diseases.
It’s also important to stay hydrated by drinking plenty of water throughout the day. Additionally, getting enough sleep is crucial for your overall health. Lack of sleep can weaken your immune system and make you more susceptible to illnesses.
Lastly, practicing proper hygiene and cleanliness can help prevent the spread of germs. It’s important to keep your surroundings clean, sanitize frequently-touched objects, and avoid close contact with individuals who are sick. By following these precautions, you can take control of your health and reduce the risk of illness.
Conclusion
In conclusion, repairing a loose windshield trim is as easy as a summer breeze and will save you from the winds of frustration and potential flying trim pieces. All it takes is a bit of time, some adhesive magic, and a touch of finesse. So, next time you see that trim dangling on your windshield, don’t panic! Just remember this guide and become the superhero of your car.
Because, let’s face it, few things in life are as satisfying as solving a problem with a clever DIY fix. So go forth, fearless fixers, and conquer that loose windshield trim like the resourceful automotive ninja you are!”
Summary of the repair process
Summary of the repair process. When it comes to repairing something, whether it’s a broken appliance or a leaky faucet, it’s important to have a clear understanding of the process before diving in. This will not only save you time but also prevent any further damage.
The first step in the repair process is to identify the problem. Is it a simple fix or something more complex? Once you have pinpointed the issue, gather all the necessary tools and equipment before starting the repair. It’s always a good idea to have a backup plan in case things go awry.
Next, follow the instructions carefully and take your time. Rushing through the repair could lead to mistakes or even injuries. If you’re not confident in your skills, don’t hesitate to call a professional.
Finally, once the repair is complete, test the item to ensure that it is working properly. This will give you peace of mind and the satisfaction of a job well done. Remember, patience and attention to detail are key in the repair process.
Importance of fixing loose windshield trim
“loose windshield trim” The windshield trim may seem like a small and insignificant part of your vehicle, but it plays a crucial role in maintaining the integrity of your windshield. When the trim becomes loose or damaged, it can lead to a variety of issues that can compromise the safety and functionality of your vehicle. One of the main reasons why it is important to fix loose windshield trim is that it helps to keep water and debris out of your vehicle.
When the trim is loose, it can create gaps where water and dirt can seep in, causing damage to the interior of your car. This can lead to water leaks, mold and mildew growth, and even electrical problems if the water reaches sensitive components. Another reason why fixing loose windshield trim is important is that it helps to keep your windshield in place.
The trim acts as a seal that holds the windshield securely in place, protecting it from vibrations and impacts. When the trim is loose, it can allow the windshield to shift or vibrate, increasing the risk of cracks or shattering. This not only compromises the safety of the occupants but also leads to costly repairs or replacements.
Moreover, loose windshield trim can also affect the aerodynamics of your vehicle. The trim is designed to create a smooth and seamless transition between the windshield and the vehicle’s body. When it is loose or damaged, it can disrupt the airflow around the windshield, creating drag and reducing fuel efficiency.
By fixing loose windshield trim, you can ensure that your vehicle operates at its optimal performance and saves you money on fuel costs. In conclusion, fixing loose windshield trim is not just about aesthetics; it is essential for maintaining the safety, functionality, and efficiency of your vehicle. By addressing this issue promptly and seeking professional help if needed, you can ensure that your windshield remains intact, your interior stays dry, and your vehicle performs at its best.
So, next time you notice loose trim around your windshield, don’t ignore it – take action and prioritize the well-being of your vehicle and those inside it.
FAQs
Why is my windshield trim loose?
Your windshield trim may be loose due to age, wear and tear, or improper installation.
Can I repair the loose windshield trim myself?
Yes, you can repair the loose windshield trim yourself using a few simple tools and adhesive.
What tools do I need to repair loose windshield trim?
To repair loose windshield trim, you will need a trim removal tool or a flathead screwdriver, a clean rag or paper towel, and a high-quality adhesive suitable for automotive use.
How do I remove the loose windshield trim?
To remove the loose windshield trim, gently insert the trim removal tool or flathead screwdriver underneath the trim and pry it away from the windshield.
How do I clean the area before reattaching the trim?
Before reattaching the trim, clean the area using a clean rag or paper towel to remove any dirt, debris, or old adhesive.
What adhesive should I use to reattach the windshield trim?
It is recommended to use a high-quality automotive adhesive specifically designed for trim and weatherstripping.
How do I reattach the windshield trim?
Apply a thin, even layer of adhesive to the back of the windshield trim and press it firmly into place. Hold it in place for a few minutes to allow the adhesive to set.
How long does the adhesive take to dry? A8. The drying time of the adhesive may vary depending on the specific product used. It is recommended to follow the manufacturer’s instructions for drying time.
Can I use adhesive tape instead of adhesive?
While adhesive tape may provide temporary support, it is not recommended for a long-term solution. It is best to use a high-quality adhesive for a secure and lasting repair.
How often should I check the windshield trim for potential issues?
It is a good practice to regularly inspect your windshield trim for any signs of looseness, cracking, or damage. Checking once every few months should be sufficient.
Is it necessary to replace the windshield trim if it is loose?
In some cases, simply reattaching the loose trim may solve the issue. However, if the trim is heavily damaged or worn out, it may be necessary to replace it for a proper repair.
Can a loose windshield trim impact the performance of the windshield?
While a loose trim may not directly impact the performance of the windshield, it can lead to further damage or water leaks if not addressed promptly. It is important to repair or replace the trim as needed.