
Are you tired of seeing that annoying rock chip in your windshield every time you get in your car? You know, the one that seems to catch your eye every time the sunlight hits it just right. It’s frustrating, especially knowing that it could potentially turn into a much larger crack if left untreated. But fear not, because repairing a rock chip in your windshield is easier than you might think.
In this blog post, we’ll cover everything you need to know about fixing that pesky chip so you can get back on the road with crystal clear vision. So grab your tools and let’s get started!
Table of Contents
Introduction
Today, we’re going to talk about a common problem that many people face: rock chips in windshields. It’s a frustrating situation that can happen to anyone, whether you’re driving on the highway or parked on the street. A rock chip in your windshield may seem like a minor issue, but if left untreated, it can quickly turn into a major problem.
Not only does it obstruct your view of the road, but it can also weaken the structural integrity of your windshield, making it more susceptible to cracking or shattering. So, what can you do to repair a rock chip in your windshield and prevent further damage? Don’t worry, we’ve got you covered. In this blog post, we’ll walk you through the step-by-step process of repairing a rock chip in your windshield, so you can get back on the road safely and with peace of mind.
Let’s dive in!
What is a Rock Chip?
rock chip, windshield, spider web, auto glass repair, windshield replacement, road debris, impact, repairing a rock chip, preventing further damage, auto insurance Introduction: Have you ever been driving down the road, minding your own business, only to hear the loud crack of something hitting your windshield? If so, you may have experienced a rock chip. A rock chip is a small, circular mark or break in your windshield caused by road debris such as rocks or gravel. These chips can vary in size, from a tiny dot to a larger spider web pattern.
While they may seem like a minor inconvenience, rock chips can actually lead to more serious issues if left untreated. In this blog post, we will discuss what causes rock chips, the risks they pose, and what you can do to repair them and prevent further damage to your windshield. Plus, we’ll also touch on how auto insurance can help cover the cost of repairing or replacing your windshield if it becomes necessary.
So buckle up and let’s dive in!

Why Should You Repair a Rock Chip?
rock chip repair, repairing a rock chip, fix a rock chip, windshield repair Introduction: Have you ever been driving along and suddenly, a rock hits your windshield, leaving behind an unsightly chip? It’s a frustrating experience that many drivers have had to deal with at some point. However, what you may not realize is that ignoring that rock chip can lead to more serious issues down the road. Getting your rock chip repaired as soon as possible is not only beneficial for the aesthetics of your windshield, but it can also save you time and money in the long run.
In this blog post, we will explore the reasons why you should repair a rock chip and the benefits it can bring to your windshield. So, let’s dive in and discover why it’s important to fix that rock chip before it becomes a bigger problem.
Materials Needed
If you’ve noticed a rock chip in your windshield, it’s important to address it as soon as possible to prevent further damage. Fortunately, repairing a rock chip is a fairly simple process that can save you time and money in the long run. To get started, you’ll need a few materials.
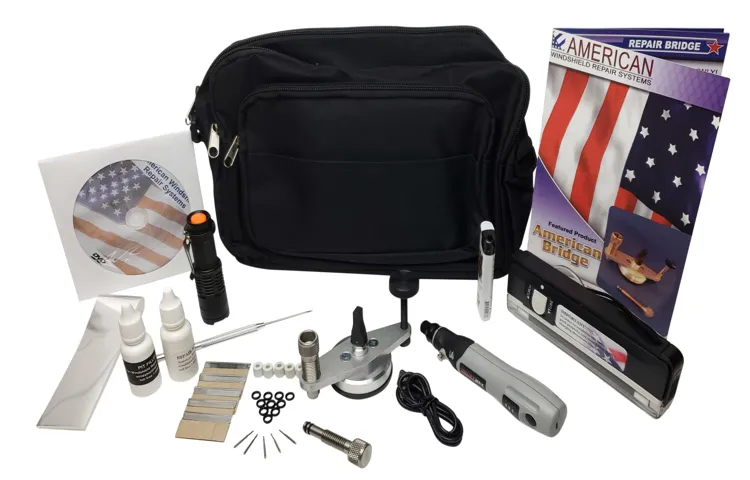
First, you’ll need a windshield repair kit, which typically includes a bridge tool, resin, curing strips, and a razor blade. You’ll also need a clean cloth, rubbing alcohol, and a pair of gloves to protect your hands. Having these materials on hand will allow you to effectively repair your rock chip and restore the integrity of your windshield.
Windshield Repair Kit
windshield repair kit
Protective Gear
When it comes to protective gear, it’s important to have the right materials to keep yourself safe. One essential material is a strong and durable fabric. You’ll want something that can stand up to wear and tear, like nylon or Kevlar.
These fabrics are known for their strength and can withstand even the toughest of conditions. Another material you’ll need is padding. This can help cushion your body from impact and provide additional protection.
Foam and gel pads are commonly used for this purpose, as they offer both comfort and protection. Additionally, you’ll want to make sure you have the right fastenings and closures. This includes things like Velcro, buckles, and zippers, which can help secure your protective gear in place and ensure a snug fit.
Lastly, don’t forget about reinforcement materials. These can be used to strengthen specific areas of your gear that may be more prone to wear and tear. Overall, having the right materials is crucial for creating effective and reliable protective gear.
So whether you’re gearing up for a motorcycle ride or getting ready for a contact sport, make sure to choose the right materials to keep yourself protected.
Step-by-Step Process
Have you recently noticed a rock chip in your windshield? Don’t worry; repairing it yourself is easier than you might think. Follow these simple steps to fix that annoying chip and avoid the cost and inconvenience of a full windshield replacement. First, gather the necessary materials, including a windshield repair kit, which can be found at most automotive stores or online.
Make sure the tools and materials are clean and free of any dirt or debris. Next, park your car in a shaded area, as direct sunlight can interfere with the repair process. Use a clean cloth to wipe down the damaged area and remove any loose glass or debris.
Now it’s time to apply the repair resin. Carefully follow the instructions on the repair kit to ensure proper application. After applying the resin, cover the area with a piece of clear plastic, included in the repair kit, and press it firmly onto the windshield.
Finally, use a UV light to cure the resin and bond it to the glass. Move the light back and forth over the repair area for a few minutes until the resin hardens completely. Once the resin is cured, remove the plastic cover and use a single-edge razor blade to scrape off any excess resin.
Gently polish the repaired area with a microfiber cloth to restore the windshield’s clarity. That’s it! With just a few simple steps, you can repair a rock chip in your windshield and prevent it from spreading into a larger crack. Just remember to exercise caution and follow the instructions carefully.
Clean the Windshield
clean the windshield, step-by-step process Hey there! Ever looked out of your windshield and realized it’s all smudged up and dirty? It can be quite frustrating, especially when it affects your visibility while driving. But worry not, because I’m here to share with you a simple step-by-step process to clean your windshield and get it sparkling clean! First things first, gather your cleaning supplies. You’ll need a microfiber cloth, glass cleaner, and a bucket of warm water.
Once you have everything you need, park your car in a shady area to avoid the cleaning solution from drying too quickly and leaving streaks. Now, it’s time to start cleaning. Start by wetting the microfiber cloth with the warm water from the bucket.
This step is essential as it helps loosen up any debris or dirt on the windshield. Next, spray the glass cleaner directly onto the windshield. Make sure to cover the entire surface, paying extra attention to any areas that are particularly dirty or stained.
Allow the glass cleaner to sit on the windshield for a minute or two to ensure it has enough time to penetrate and dissolve any stubborn stains. Now comes the fun part – scrubbing! Take the wet microfiber cloth and gently scrub the windshield, using circular motions. Be careful not to apply too much pressure, as this can scratch the glass.
Instead, let the cleaning solution do most of the work. Once you’re done scrubbing, it’s time to rinse off the cleaning solution. Grab another clean microfiber cloth or sponge and dip it in the warm water.
Wipe away the glass cleaner from the windshield, making sure to remove all traces of the cleaning solution. Last but not least, give your windshield a final wipe down to ensure a streak-free finish. Take a fresh, dry microfiber cloth and buff the windshield in straight lines.
Apply the Repair Resin
repair resin Applying repair resin is a crucial step in fixing windshield cracks or chips. Let’s walk through the step-by-step process of how to use repair resin effectively. First, clean the damaged area thoroughly.
Make sure there is no dirt, debris, or moisture in the crack or chip. This will ensure that the repair resin adheres properly and provides a strong bond. Next, apply the repair resin to the damaged area.
Use a syringe or applicator tool to carefully inject the resin into the crack or chip. Make sure to fill the entire damaged area with the resin. After applying the resin, cover it with a curing film or tape and use a UV light to cure it.
The UV light will harden the resin and make it strong and durable. Once the resin is fully cured, remove the curing film or tape and scrape off any excess resin using a razor blade. Finally, polish the repaired area to give it a smooth finish.
By following these steps, you can effectively apply repair resin and restore the integrity of your windshield.
Cure the Resin
curing resin Curing resin is an important step in the resin crafting process, as it ensures that your creation is durable and long-lasting. Curing is the process of hardening the resin, making it strong and stable. This step-by-step process will guide you through the curing process, so you can achieve perfect results every time.
First, make sure you are working in a clean and well-ventilated area. Resin releases fumes as it cures, so it’s important to have good airflow to avoid any safety risks. Next, carefully measure out the resin and the hardener according to the instructions provided by the manufacturer.
It’s important to follow these instructions to achieve the correct ratio of resin to hardener. Once the resin and hardener are mixed together thoroughly, pour the mixture into your mold or onto your desired surface. Take your time with this step to avoid any air bubbles or unevenness in the resin.
After pouring, use a heat gun or a torch to remove any air bubbles that may have formed during the pouring process. Move the heat source back and forth over the surface of the resin, being careful not to hold it too close or for too long, as this can cause the resin to become overheated. Now, it’s time to let the resin cure.
This process can take anywhere from a few hours to a few days, depending on the type of resin you are using. It’s important to be patient and allow the resin to fully cure before moving on to the next step. Once the resin has cured, you can remove it from the mold or continue with any additional layers or embellishments you may want to add.
Remember to handle the cured resin with care, as it can be brittle and prone to breakage if not properly handled. By following these step-by-step instructions, you can ensure that your resin projects turn out beautifully and withstand the test of time. Curing resin is an essential part of the crafting process and with a little patience and attention to detail, you’ll be able to create stunning resin pieces that will last for years to come.
Scrape off Excess Resin
scraping off excess resin” Scraping off excess resin is an important step in the resin craft process. After pouring resin onto a surface, it’s common for some excess resin to pool or drip off the edges. This excess resin can be messy and can affect the overall finish of your resin project.
That’s where scraping off excess resin comes in. This step ensures that you achieve a smooth and clean look for your resin creations. To scrape off excess resin, you’ll need a few tools.
The most common tool used for this purpose is a plastic scraper or a putty knife. These tools have a flat, wide surface that allows you to remove the excess resin easily. You can also use a plastic card, like an old credit card or gift card, as an alternative.
The key is to use something that is not sharp or abrasive, as you don’t want to scratch or damage your resin project. To begin the scraping process, start by gently running the plastic scraper along the edges of your resin piece. If you notice any excess resin pooling, gently push it towards the center of the piece.
Be careful not to apply too much pressure or scrape too aggressively, as this can cause uneven surfaces or remove too much resin. Instead, use gentle and controlled movements to ensure a smooth finish. As you scrape off the excess resin, periodically wipe the scraper clean with a paper towel or a cloth.
This will help prevent any resin build-up on the scraper, which can make it less effective. Continue scraping and wiping until you have removed all the excess resin from the edges of your project. Once you have scraped off the excess resin, it’s important to let your project cure according to the resin’s instructions.
Tips and Precautions
If you find yourself with a rock chip in your windshield, it’s important to address it as soon as possible to prevent further damage. Here are some tips and precautions to help you successfully repair the rock chip yourself. First, make sure the windshield is clean and dry before beginning the repair process.
Next, use a windshield repair kit, which typically includes a resin and applicator, to fill the chip. Follow the instructions carefully and apply the resin evenly, making sure to avoid air bubbles. Once the resin has dried, use a razor blade or sharp tool to carefully remove any excess resin and level it with the surface of the windshield.
Finally, use a windshield repair polish to restore the clarity of the glass. It’s important to note that while DIY repairs can be effective, they may not be as durable as professional repairs. If the rock chip is large or if you’re unsure about your ability to repair it yourself, it’s best to seek the help of a professional.
Remember, a small investment in repairing a rock chip now can save you from having to replace the entire windshield later.
Work in a Well-Lit Area
“work in a well-lit area” When it comes to getting work done, whether it’s studying, working on a project, or even just reading a book, it’s important to have a well-lit area. Why is that? Well, let’s think about it. Have you ever tried to read a book in a dark room? It’s nearly impossible, right? The same goes for any kind of work.
If you can’t see what you’re doing, it’s going to be difficult to be productive. That’s why having a well-lit area is key. So, what are some tips and precautions when it comes to setting up a well-lit workspace? First and foremost, make sure you have the right kind of lighting.
Natural light is always the best option, so if you have a window, try to position your workspace near it. If natural light isn’t an option, opt for a bright, white LED light. This type of light closely resembles natural light and is less likely to strain your eyes.
Another important aspect of a well-lit area is proper placement of your light source. Avoid placing your light directly above or behind you, as this can cast unwanted shadows on your workspace. Instead, position the light source at an angle to provide even illumination without causing glare.
You may also want to consider investing in a desk lamp with an adjustable arm and rotating head, so you can easily direct the light where you need it most. Finally, it’s essential to take precautions to protect your eyes. Even with proper lighting, it’s still important to take breaks and rest your eyes regularly.
Staring at a screen or reading for long periods can cause eye strain, so make sure to give your eyes a break every 20 minutes or so. Additionally, consider using an anti-glare screen protector on your computer or wearing blue light-blocking glasses to reduce eye fatigue. In conclusion, working in a well-lit area is crucial for productivity and overall well-being.
Avoid Repairing in Extreme Temperatures
Avoid Repairing in Extreme Temperatures, Tips and Precautions When it comes to any kind of repair work, it’s important to take precautions and consider the weather conditions. Extreme temperatures can have a detrimental effect on the repair process and may even cause further damage. Whether you’re fixing a leaky faucet, repairing a car engine, or working on a home improvement project, it’s essential to be mindful of the temperature outside.
Extreme heat can make materials expand and become misshapen, affecting how they fit together. For instance, if you’re repairing a window frame on a scorching hot day, the frame may expand, making it difficult to properly align the hinges or secure the glass. On the other hand, extreme cold can lead to the contraction of materials, causing joints to shrink and potentially weaken.
This could compromise the integrity of the repair and result in unforeseen problems down the line. Additionally, extreme temperatures can also impact the performance of certain tools and equipment. For example, working with electrical appliances in high heat can cause them to overheat and even pose a safety hazard.
Similarly, using power tools in freezing temperatures may affect their efficiency and durability. It’s important to read the instructions and specifications of your tools and ensure they are suitable for the temperature range you’ll be working in. Moreover, extreme weather conditions can also have an impact on your own well-being.
Whether it’s blistering heat or freezing cold, working in such conditions can be physically and mentally exhausting. It can affect your concentration, dexterity, and overall productivity. It’s vital to take breaks, stay hydrated, and dress appropriately for the weather when working on repairs in extreme temperatures.
To avoid these potential pitfalls, it’s best to plan your repair work carefully and consider the temperature forecast. If possible, choose days with milder weather to ensure optimal conditions for a successful repair. If you find yourself needing to make repairs in extreme temperatures, take extra care, be patient, and make adjustments as necessary.
Be Gentle When Scraping Off Excess Resin
resin scraping, excess resin, tips, precautions When working with resin, it’s not uncommon to have excess resin on your project once it has dried. While it can be tempting to scrape off the excess quickly, it’s important to be gentle to avoid damaging your piece. Here are some tips and precautions to keep in mind when scraping off excess resin.
Firstly, it’s important to wait until the resin is fully cured before attempting to scrape off any excess. This is typically around 24 to 48 hours, depending on the brand and type of resin you are using. Trying to scrape off resin that hasn’t fully cured can result in a messy and uneven finish.
Once the resin is fully cured, you can begin the scraping process. Start by using a plastic scraper or a silicone spatula to gently remove any visible excess resin. It’s important to use a tool that won’t scratch or damage the surface of your project.
When scraping, be sure to apply even pressure and work in small, controlled motions. Avoid using excessive force, as this can cause the resin to chip or crack. If you encounter any particularly stubborn areas of excess resin, you can use a fine-grit sandpaper to gently sand them down.
It’s also important to be mindful of your own safety when scraping off excess resin. Wear gloves to protect your hands from any sharp edges or splinters that may be present on your project. Additionally, work in a well-ventilated area to avoid inhaling any resin dust or fumes.
Lastly, take your time and be patient. Scraping off excess resin can be a tedious process, but rushing through it can lead to mistakes or damage. Remember, it’s better to take your time and do it right the first time.
Conclusion
In conclusion, repairing a rock chip in your windshield is like giving therapy to your car’s soul. Just like a skilled therapist, we need to carefully address the emotional trauma inflicted upon our beloved windshield. By applying a specialized resin, we are essentially providing a “spa day” for our vehicles, giving them the pampering treatment they deserve.
So, the next time your windshield suffers from a pesky rock chip, remember that you hold the power to heal its wounds and restore its vision. Trust me, your car will thank you for this much-needed therapy session. And hey, who knows, maybe your car will become the envy of the road with its newfound confidence and sparkling, chip-free windshield.
So go forth, my fellow car enthusiasts, and let us embark on this journey of windshield repair, one rock chip at a time. Happy repairing!
FAQs
What causes rock chips in windshields?
Rock chips in windshields are typically caused by small rocks or debris being propelled at high speeds and impacting the glass. This can happen while driving on gravel roads, during construction or roadwork, or even from other vehicles kicking up rocks.
Can a rock chip in a windshield be repaired?
Yes, small rock chips in windshields can often be repaired using a special resin injection technique. However, the size, location, and severity of the chip will determine if it can be repaired or if a windshield replacement is necessary.
How much does it cost to repair a rock chip in a windshield?
The cost of repairing a rock chip in a windshield can vary depending on factors such as the size and severity of the chip, the location of the chip, and the type of vehicle. On average, the cost can range from $50 to $150 for a single chip repair.
What are the consequences of not repairing a rock chip in a windshield?
If a rock chip is not repaired promptly, it can lead to further damage and compromise the integrity of the windshield. The chip can expand into a crack, especially with temperature changes or stress on the glass, potentially requiring a full windshield replacement.
How long does it take to repair a rock chip in a windshield?
The time it takes to repair a rock chip in a windshield can vary depending on the size and severity of the chip, as well as the skill of the technician performing the repair. Generally, it can take anywhere from 30 minutes to an hour.
Can I repair a rock chip in my windshield myself?
While there are DIY windshield repair kits available on the market, it is generally recommended to have a professional repair the rock chip. They have the necessary tools and expertise to properly repair the chip and ensure a quality repair.
Will a repaired rock chip in a windshield still be visible?
In most cases, a properly repaired rock chip in a windshield will be significantly less visible. However, it is unlikely that the repair will be completely invisible. The goal of the repair is to restore the structural integrity of the glass and minimize the appearance of the chip.
Can I drive my car immediately after getting a rock chip repaired? A8. In most cases, you can drive your car immediately after getting a rock chip repaired. However, it is important to follow any specific instructions provided by the technician who performed the repair. They may recommend avoiding excessive vibrations or water exposure for a certain period of time.
Are rock chip repairs covered by insurance?
Many insurance policies cover rock chip repairs as part of their comprehensive coverage. However, it is important to check with your insurance provider to confirm coverage and any applicable deductibles.
How long does a rock chip repair typically last?
A properly repaired rock chip in a windshield should last for the remaining lifespan of the windshield. However, it is important to note that cracks or further damage to the glass in the surrounding area of the repair may compromise its effectiveness. Regular inspections and maintenance are recommended.