
Are you noticing signs of rust around the front windshield of your car? Rust can not only be unsightly but also potentially damaging to the structural integrity of your vehicle. Don’t worry, though, because there are steps you can take to repair and prevent further rusting. In this blog, we will guide you through the process of repairing rust around your front windshield, ensuring that your car looks great and stays in top condition.
So, let’s dive in and discover how to tackle this common problem!
Table of Contents
Introduction
Are you starting to notice rust forming around the front windshield of your car? Don’t stress, because I’m here to help you with a step-by-step guide on how to repair rust around your windshield. Rust can be a common issue on older vehicles, especially if they have been exposed to moisture or salt. Thankfully, you don’t have to live with unsightly rust spots on your car.
With a little bit of time and effort, you can restore your windshield area to its former glory. So let’s dive into the process of repairing rust around your front windshield and get your car looking as good as new again.
What causes rust around the front windshield?
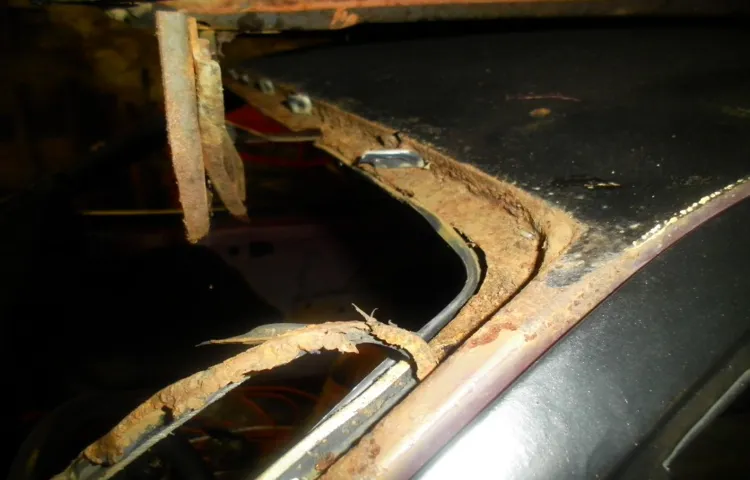
rust around the front windshield, causes of rust, why does rust occur near the front windshield Introduction: If you’ve ever noticed rust around the front windshield of your car, you’re not alone. Rust is a common issue that many drivers face, and it can be not only unsightly but also potentially damaging to your vehicle. But what causes this rust to form in the first place? In this article, we will explore the possible reasons behind the occurrence of rust around the front windshield, so you can better understand how to prevent and address this problem.
So let’s dive in and uncover the secrets of rust around the front windshield!
Why is it important to repair rust around the front windshield?
front windshield, rust, repair, important
Tools and Materials Needed
When it comes to repairing rust around the front windshield, having the right tools and materials is essential. You’ll need a few key items to get the job done properly. First and foremost, you’ll need a rust repair kit, which typically includes items such as a rust converter, primer, and paint.
These kits are designed to remove rust and prevent it from spreading further. You’ll also need sandpaper or a sanding block to smooth out the area and remove any loose rust particles. Additionally, you’ll need a wire brush or wire wheel attachment for your drill to remove any stubborn rust.
Finally, don’t forget to have masking tape and plastic sheeting on hand to protect the surrounding areas from damage during the repair process. With these tools and materials, you’ll be well equipped to tackle the rust around your front windshield and restore it to its former glory.
List of tools needed
“List of tools needed for a DIY project” When it comes to tackling a DIY project, having the right tools and materials can make all the difference. Whether you’re a seasoned DIY enthusiast or just starting out, it’s important to have a collection of tools that will help you get the job done efficiently and effectively. So, what tools do you need for your next DIY adventure? Firstly, a good set of basic hand tools is essential.
This includes a hammer, screwdrivers (both Phillips and flathead), pliers, and a tape measure. These tools will come in handy for a wide range of tasks, from hanging pictures to assembling furniture. Next, you’ll want to invest in some power tools.
A drill is a must-have for any DIYer, as it can be used for drilling holes and driving screws. A circular saw is another useful tool that can be used for cutting wood and other materials. If you’re planning on doing any painting, a paint sprayer or roller will also be necessary.
In addition to these basics, there are a few other tools that you may need depending on the specific project you’re working on. For example, if you’re installing new flooring, you’ll need a utility knife and a flooring installation kit. If you’re doing plumbing work, you’ll need a pipe wrench and plumber’s tape.
It’s always a good idea to research the tools needed for your specific project before getting started. Lastly, don’t forget about safety equipment. Safety glasses, gloves, and a dust mask are all essential for protecting yourself while working on a DIY project.
It’s also a good idea to have a first aid kit on hand in case of any accidents. Remember, having the right tools can make your DIY project go much smoother and be more enjoyable. So, before you dive into your next project, take the time to gather all the tools and materials you’ll need.
List of materials needed
List of tools and materials needed for any DIY project can vary depending on the specific task at hand, but there are some essentials that every DIY enthusiast should have in their arsenal. First and foremost, a good set of hand tools is a must. This includes a set of screwdrivers, both Phillips and flathead, a set of wrenches in various sizes, a hammer, pliers, and a utility knife.
These tools will come in handy for a wide range of tasks, from putting together furniture to fixing a leaky faucet. Additionally, a power drill is a versatile tool that can be used for everything from drilling holes to driving screws. A tape measure is also essential for ensuring accurate measurements, and a level is crucial for hanging things straight on the wall.
Other useful tools include a saw, a pair of safety goggles, a pair of gloves, and a set of allen wrenches. And don’t forget about the materials needed for your specific project, such as wood, paint, nails, and screws. With the right tools and materials, you’ll be well-equipped to take on any DIY project.
Step-by-Step Guide
Are you noticing some rust around the front windshield of your car? Rust can be unsightly and can also cause further damage if left untreated. Luckily, repairing rust around the front windshield is a task that can be done at home with a few simple steps. First, you will need to gather the necessary supplies, such as a sanding block, sandpaper, rust converter, and touch-up paint.
Start by gently sanding the rusted area to remove any loose rust or debris. Once the surface is smooth, apply a rust converter to the affected area according to the manufacturer’s instructions. This will help to stop the rust from spreading.
Once the converter has dried, use touch-up paint that matches the color of your car to seal and protect the area. Apply the paint in thin layers, allowing each layer to dry before applying the next. And voila! Your front windshield area will be free of rust and looking as good as new.
Remember, it’s important to repair rust as soon as possible to prevent further damage and to keep your car looking its best.
Step 1: Preparation
preparation, guide, step-by-step, burstiness
Step 2: Removing the rust
Now that you’ve gathered all your tools and materials, it’s time to tackle the next step in removing rust from your metal surface – actually getting rid of the rust! This step is crucial to ensure a clean and smooth surface when you’re done. Here’s a step-by-step guide on how to remove rust from metal surfaces. Start by using a wire brush or sandpaper to scrub away the surface rust.
Make sure to use long, sweeping motions to cover the entire rusted area. This will help loosen the rust and remove the flakes. It’s important to be thorough during this step, as any remaining rust can cause the surface to re-rust in the future.
Next, use a rust dissolver or rust remover product to treat the affected area. These products are designed to chemically break down the rust and make it easier to remove. Follow the instructions on the product carefully, as each one may have different application methods and wait times.
Typically, you’ll need to apply the product to the rusted area and let it sit for a specified amount of time before scrubbing it away. Once the rust dissolver has done its job, you’ll need to thoroughly rinse the metal surface with water. This will remove any residue from the rust remover and ensure a clean surface.
After rinsing, use a clean cloth or towel to dry the metal completely. Moisture can lead to future rust formation, so it’s important to make sure the surface is completely dry. For stubborn rust spots that may not have been fully removed, you can use a rust converter.
This product chemically converts the rust into a protective coating that prevents further rusting. Apply the rust converter according to the instructions, making sure to cover the entire rusted area. Once the rust has been removed, you’ll want to prime and paint the metal surface to prevent future rusting.
Step 3: Repairing the surface
surface repair, step-by-step guide, repairing the surface So you’ve identified the damage on your surface and now it’s time to repair it. Don’t worry, it’s not as daunting as it seems! In this step-by-step guide, we’ll walk you through the process of repairing the surface and making it as good as new. First, you’ll need to prepare the surface.
This means cleaning it thoroughly to remove any dirt, grime, or loose debris. Use a mixture of warm water and mild detergent, and scrub the surface with a soft brush or sponge. Rinse it off with clean water and allow it to dry completely before proceeding to the next step.
Next, you’ll need to assess the damage and determine the best method of repair. This will depend on the type of surface and the extent of the damage. For minor scratches or chips, you may be able to use a filler or putty to smooth out the surface.
For larger areas of damage, such as cracks or holes, you may need to use a patching compound or epoxy resin. Once you’ve chosen the appropriate repair method, it’s time to apply the product to the damaged area. Follow the manufacturer’s instructions carefully, as different products may have different application techniques.
Use a putty knife or trowel to spread the filler or patching compound evenly over the damaged area, making sure to feather the edges for a seamless finish. After applying the product, allow it to dry or cure according to the manufacturer’s instructions. This could take anywhere from a few hours to several days, depending on the product and the temperature.
Once the repair has dried or cured, you’ll need to smooth the surface. Use sandpaper or a sanding block to gently sand down any rough patches or high spots. Start with a coarse grit sandpaper and gradually work your way up to a finer grit for a smoother finish.
Step 4: Priming the area
“priming the area” Once you’ve gathered all the necessary tools and materials for your painting project, it’s time to move on to the next step: priming the area. Priming is an essential step in any painting job, as it prepares the surface for the paint to adhere to and helps to achieve a smoother and more uniform finish. Before you start priming, make sure to clean the area thoroughly to remove any dirt, dust, or grime.
This will ensure that the primer sticks well to the surface and provides a solid base for the paint. Once the area is clean, apply the primer using a roller or brush, making sure to cover the surface evenly. Allow the primer to dry completely before moving on to the next step.
The drying time will depend on the type of primer you are using, so be sure to read the manufacturer’s instructions for guidance. Once the primer is dry, you’re ready to move on to the exciting part – applying the paint!
Step 5: Painting and finishing
Once you have finished preparing the surface of your project and priming it, it’s time to move on to the fun part: painting and finishing! This step is where you get to add color and personality to your project. Start by choosing the right type of paint for your project. A good rule of thumb is to use acrylic paint for most crafts, as it is easy to work with and dries quickly.
Make sure to select high-quality paint that will provide good coverage and durability. Before you begin painting, make sure to protect your work area by laying down a drop cloth or newspapers. This will catch any drips or spills and make cleanup easier.
Now it’s time to start painting! Use a brush or sponge applicator to apply the paint evenly to the surface of your project. Start with a light coat and let it dry completely before adding additional coats. This will help prevent drips and ensure a smooth finish.
Once you have finished painting, let your project dry completely before moving on to the next step. This is important to ensure that the paint adheres properly and doesn’t smudge or smudge. After the paint is dry, it’s time to add any additional finishing touches.
This could include adding a coat of varnish or sealant to protect the paint and give it a glossy finish, or adding any additional decorations or embellishments. Finally, step back and admire your finished project! Painting and finishing is the final step in bringing your project to life and showcasing your creativity. So take your time, enjoy the process, and have fun making your project truly unique.
Tips and Precautions
Having rust around the front windshield of your car can not only be unsightly but also lead to serious structural damage if left untreated. Fortunately, there are a few steps you can take to repair the rust and prevent it from spreading further. Firstly, you’ll want to clean the affected area thoroughly using a rust remover or a mixture of vinegar and water.
Once the rust has been removed, you can then sand the area using fine-grit sandpaper to smooth out any rough spots. Next, apply a rust primer to the area to prevent further corrosion, followed by a layer of automotive paint that matches your vehicle’s color. Finally, to ensure long-lasting results, be sure to keep your car clean and regularly inspect for any signs of rust around the windshield.
By taking these precautions and addressing the issue promptly, you can keep your car looking great and protect its structural integrity.
Tip 1: Use safety goggles and gloves
Tips and Precautions When Using Safety Goggles and Gloves When it comes to protecting your eyes and hands during various tasks, using safety goggles and gloves is absolutely essential. These simple yet effective pieces of protective equipment can prevent serious injury and keep you safe while you work. Whether you’re working in a construction site, a laboratory, or simply doing some household chores, it’s important to follow these tips and precautions when using safety goggles and gloves.
First and foremost, always make sure to wear safety goggles that are specifically designed for the task at hand. Different tasks may require different levels of protection, so it’s crucial to choose goggles that provide adequate coverage and fit securely on your face. Wearing goggles that are too loose or too tight can affect your vision and comfort, which can ultimately compromise your safety.
Similarly, it’s important to choose the right type of gloves for the task you are undertaking. There are different types of gloves available, each designed for specific purposes. For example, if you’re working with chemicals, you should opt for chemical-resistant gloves that can provide a barrier between your skin and hazardous substances.
On the other hand, if you’re working with sharp objects, such as knives or glass, cut-resistant gloves are the way to go. Once you have the appropriate goggles and gloves, it’s crucial to wear them correctly. Make sure the goggles fit snugly on your face and cover your eyes completely.
Adjust the straps if necessary to ensure a secure and comfortable fit. When it comes to gloves, always make sure they fit properly and allow for ease of movement. Gloves that are too tight can restrict your dexterity, while gloves that are too loose may pose a safety risk.
It’s also important to keep your goggles and gloves in good condition. Inspect them before each use to ensure they are free from any damage or wear. Replace any damaged or worn-out equipment immediately, as they may no longer provide adequate protection.
Tip 2: Cover the surrounding areas
In addition to covering the primary subject matter, it’s crucial to consider the surrounding areas when creating content. This means thinking about related topics, similar industries, and adjacent niches that can complement and support your main topic. By covering the surrounding areas, you not only provide a more comprehensive and in-depth understanding of the subject, but you also open up new avenues for potential readers and customers.
For example, if you’re writing a blog post about healthy eating, you could also cover topics like exercise, meal planning, and cooking tips. By doing so, you are not only appealing to a wider audience but also providing them with valuable information that they may not have considered before. So, the next time you’re creating content, don’t forget to cover the surrounding areas to truly give your readers a well-rounded and engaging experience.
Tip 3: Take your time and be patient
In today’s fast-paced world, it’s easy to get caught up in the idea of instant gratification. We want things to happen quickly, and we often don’t have the patience to wait for them. However, when it comes to certain aspects of life, such as achieving goals or making major decisions, it’s important to take your time and be patient.
Rushing into things can lead to mistakes or missed opportunities. One area where taking your time and being patient is crucial is in relationships. Whether it’s a romantic relationship or a friendship, it’s important to give things time to develop naturally.
Rushing into a relationship or forcing a friendship can lead to disappointment or heartbreak. By allowing things to progress at their own pace, you can build a solid foundation and ensure that your connections are built on mutual trust and understanding. Another area where patience is key is in career planning.
It can be tempting to jump into the first job opportunity that comes along, especially if you’re eager to start earning money or make a change in your career. However, taking the time to research and explore your options can lead to a more satisfying and fulfilling career in the long run. By being patient and considering all your options, you can make informed decisions that align with your passions and goals.
In addition, it’s important to be patient with yourself. We all have dreams and aspirations, but achieving them takes time and effort. It’s easy to get discouraged or give up when things don’t happen as quickly as we’d like, but it’s important to remember that success seldom happens overnight.
By being patient and persevering, you can overcome obstacles and achieve your goals. So, the next time you find yourself feeling impatient or rushed, take a step back and remind yourself to take your time and be patient. Whether it’s in relationships, career planning, or personal growth, allowing things to develop naturally will lead to better outcomes in the long run.
Precaution: Avoid working in direct sunlight
Working outside in the sunshine can be a pleasant experience, but it’s important to take precautions to avoid any harmful effects on your health. One precaution to keep in mind is to avoid working in direct sunlight for extended periods of time. The sun’s rays can be quite powerful, especially during the peak hours of the day, and can lead to sunburn, heatstroke, and other heat-related illnesses.
To protect yourself, try to find a shady spot to work in or set up a sun umbrella. Wearing lightweight and breathable clothing is also important, as it helps to keep your body temperature regulated. Don’t forget to stay hydrated by drinking plenty of water throughout the day.
Taking breaks in a shaded area and using sunscreen with a high SPF can also help to protect your skin from sun damage. By following these precautions, you can enjoy the outdoors while staying safe and healthy.
Conclusion
In conclusion, tackling rust around the front windshield is no easy task, but with a little know-how and some handy tools, you can be the hero your car deserves. Remember, rust is a sneaky villain that likes to make mischief when we least expect it, so it’s important to stay one step ahead. By following these steps, you’ll not only repair the damage but also prevent it from spreading like a wild rumor at a cocktail party.
So grab your cape, take out your toolbox, and let’s embrace this battle against rust head-on. Your car will thank you, and you’ll be a legend among the automotive community. Get ready to conquer rust with style, because your ride deserves the best.
“
Summary of the repair process
When it comes to repairing electronic devices, there are a few tips and precautions that you should keep in mind. First and foremost, it is important to make sure that you have the necessary knowledge and skills to attempt the repair. If you are unsure or inexperienced, it may be best to leave it to the professionals to avoid causing further damage.
Additionally, it is crucial to always turn off and unplug the device before attempting any repairs. This will ensure your safety and prevent any potential accidents. Another tip is to use the correct tools and equipment for the job.
Using improper tools can lead to damage or injury, so it is important to have the right tools on hand. Lastly, it is always a good idea to consult the user manual or seek guidance from experts or online resources if you are unsure about any steps or procedures. Taking these precautions and following these tips will help you navigate the repair process smoothly and efficiently.
Importance of regular maintenance to prevent rust
rust prevention, regular maintenance, tips and precautions, importance of regular maintenance Regular maintenance is crucial in preventing rust and extending the lifespan of your belongings. Whether it’s your car, bike, or household appliances, rust can cause significant damage and decrease their performance over time. To ensure that rust doesn’t take hold, there are a few tips and precautions you can take.
Firstly, keep your belongings clean and dry. Moisture is one of the main culprits in rust formation, so wiping down surfaces and storing items in a dry environment can go a long way in preventing rust. Secondly, apply a protective coating.
Many products on the market are designed specifically to protect against rust, such as rust-resistant paints and sealants. These coatings create a barrier between the metal surface and the environment, reducing the chances of rust forming. Additionally, make sure to inspect and repair any scratches or chips on the surface.
These imperfections provide entry points for moisture and can accelerate rusting. Lastly, consider using rust inhibitors and desiccants. Rust inhibitors can be applied directly to surfaces and help to stop the spread of rust, while desiccants absorb moisture and keep the environment dry.
By implementing these tips and taking proper precautions, you can significantly reduce the risk of rust damage and prolong the lifespan of your belongings.
Final thoughts
Final thoughts In conclusion, if you’re planning to start a blog, there are a few tips and precautions to keep in mind. Firstly, make sure to choose a niche that you are passionate about and have knowledge in. This will help you create content that is engaging and valuable to your readers.
Secondly, be consistent in posting new content. Regular updates will keep your audience coming back for more. Thirdly, interact with your readers through comments and social media.
This will help you build a community and establish a loyal following. Lastly, be cautious when monetizing your blog. While it’s important to monetize your efforts, be mindful of not sacrificing the quality of your content or overwhelming your readers with ads.
Balance is key. Overall, starting and maintaining a blog can be a rewarding experience if done with the right intent and approach. So go ahead, follow your passion, and share your voice with the world.
Happy blogging!
FAQs
How does rust form around a front windshield?
Rust around a front windshield typically forms due to exposure to moisture and salt, which leads to corrosion of the metal surface.
Can rust around the front windshield affect the structural integrity of the vehicle?
Yes, rust around the front windshield can weaken the metal frame and compromise the structural integrity of the vehicle.
What are the signs of rust around the front windshield?
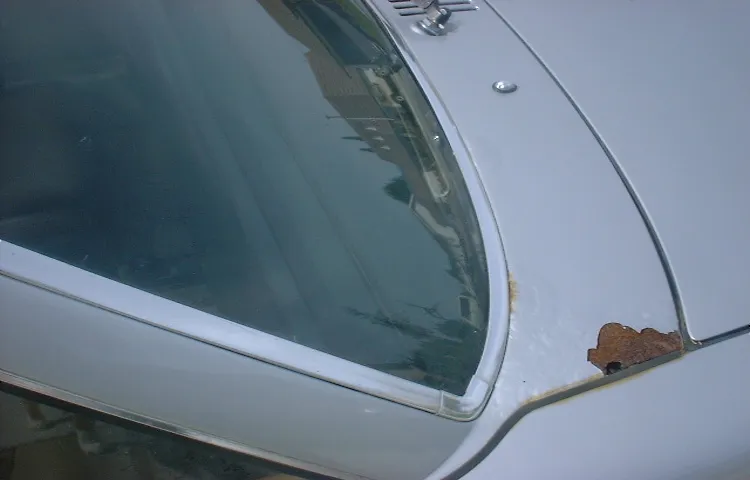
Signs of rust around the front windshield can include bubbling or blistering paint, discoloration or staining, and visible rust spots.
Can rust around the front windshield be prevented?
Yes, regular maintenance and care such as keeping the windshield seal intact, eliminating moisture, and rust-proofing the area can help prevent rust around the front windshield.
How can I repair rust around the front windshield?
To repair rust around the front windshield, you can start by removing the affected areas, treating the rust with a rust converter, sanding and priming the surface, and then applying a fresh coat of paint.
Can I repair rust around the front windshield on my own, or should I seek professional help?
While minor rust repairs can be done on your own, more extensive rust damage around the front windshield may require professional help to ensure proper repair and preservation of the vehicle.
How much does it cost to repair rust around the front windshield?
The cost of repairing rust around the front windshield can vary depending on the extent of the damage, the type of vehicle, and whether you choose to repair it yourself or hire a professional. It is best to get estimates from trusted repair shops to determine the cost for your specific situation.