
Hey there! Have you ever noticed those pesky little orange spots on your car’s windshield? Well, chances are, you’re dealing with a common nuisance called rust. Rust can have a huge impact on the functionality and aesthetics of your windshield, and if left untreated, it can even lead to serious damage. But what exactly is rust and how does it form? Rust is a reddish-brown corrosion that occurs when iron or steel is exposed to moisture and oxygen for an extended period of time.
Imagine your windshield as a superhero shield, protecting you from all the harsh elements of the outside world. But just like any superhero, even windshields have their weaknesses, and rust happens to be one of them. When rust starts to form on your windshield, it not only creates an unsightly blotch, but it can also eat away at the structural integrity of the glass.
This means that your windshield becomes weaker and more vulnerable to cracks and chips, which can compromise your safety while driving. It’s like a tiny crack in the dam – if left unchecked, it can eventually lead to a catastrophic failure. So why should you care about rust on your windshield? Well, apart from the obvious aesthetic concerns, it’s important to remember that your windshield plays a crucial role in the overall safety of your vehicle.
It acts as a protective barrier against flying debris, inclement weather, and even rollovers. Without a sturdy and intact windshield, you’re putting yourself at a greater risk of injury in the event of an accident. Luckily, there are ways to prevent and treat rust on your windshield.
Regular cleaning and maintenance can go a long way in keeping rust at bay. Additionally, applying a protective coating or utilizing rust-resistant materials can provide an extra layer of defense against this nuisance. In this blog series, we’ll dive deeper into the world of rust and its impact on windshields.
We’ll explore the causes of rust formation, the signs and symptoms to look out for, and the best methods to tackle and prevent this issue. Join us as we uncover the secrets to preserving the longevity and functionality of your windshield, rust-free!
Table of Contents
What Causes Rust Around the Windshield?
If your car has rust around the windshield, it’s important to understand what causes it and how to repair it. Rust is typically caused by a combination of moisture and oxygen coming into contact with metal surfaces. In the case of the windshield, the rust could be a result of water getting trapped between the glass and the metal frame.
This can occur if the sealant around the windshield is damaged or if there is a small crack or chip in the glass. Over time, the moisture can cause the metal to corrode and rust. To repair the rust, you will need to remove the damaged metal and apply a rust converter or primer to prevent further corrosion.
Then, you can either replace the affected metal or use a filler to repair the area. It’s important to address rust around the windshield promptly to prevent it from spreading and causing further damage.
Moisture and Condensation
rust around the windshield, moisture, condensation, causes of rust, windshield maintenance. Rust, we all know it’s not a good sign. And when you see it starting to form around your windshield, it can be a cause for concern.
But what exactly causes this pesky rust to appear? Well, one of the main culprits is moisture. When water gets trapped between the windshield and the metal frame, it creates the perfect environment for rust to grow. This can happen when there are leaks or gaps in the sealant around the windshield, allowing water to seep in.
Over time, this moisture can cause the metal to corrode and rust to form. Another factor that can contribute to rust around the windshield is condensation. In colder weather, the difference in temperature between the inside and outside of the car can cause condensation to form on the windshield.
If this condensation isn’t properly dried or wiped away, it can lead to moisture buildup and eventually rust. So what can you do to prevent rust from forming around your windshield? Regularly inspect the sealant and weatherstripping around your windshield for any signs of wear or damage. If you notice any leaks or gaps, have them repaired as soon as possible.
Additionally, be sure to keep your windshield clean and dry to prevent moisture buildup. Taking these simple steps can help keep rust at bay and ensure that your windshield stays in top condition.
Road Salt and De-icing Chemicals
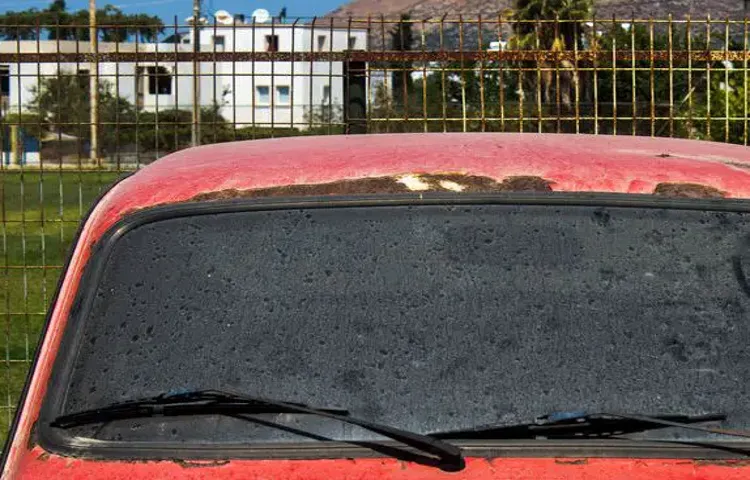
Road salt and de-icing chemicals play a crucial role in keeping our roads safe during the winter months. However, they can also have an unintended consequence: rust around the windshield. When these chemicals are sprayed onto the roads, they mix with the water and create a slushy mixture.
As vehicles drive over this slush, the salty water is thrown up into the air and onto the windshield. Over time, the salty residue can build up on the glass, leading to the formation of rust. Rust around the windshield not only affects the appearance of the vehicle but can also impact its structural integrity.
It’s important to regularly clean the windshield and remove any salt residue to prevent rust from forming. Additionally, using rust inhibitors or protective coatings on the windshield can help to minimize the damage caused by road salt and de-icing chemicals. So, the next time you’re driving on winter roads, remember to take care of your windshield to keep rust at bay!
Scratches and Chips
rust, windshield, scratches, chips
Inspecting the Rust Damage
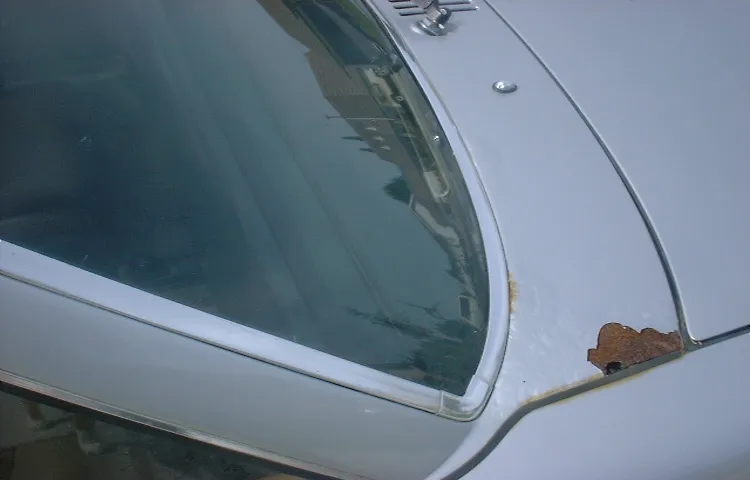
If you’ve noticed rust forming around your windshield, it’s important to address it promptly to prevent further damage. Rust can weaken the structural integrity of your windshield and lead to leaks or even windshield detachment. The first step in repairing rust around your windshield is to thoroughly inspect the damage.
Look for any signs of rust, such as brownish discoloration or bubbling paint, on the frame surrounding your windshield. Use a flashlight to inspect hard-to-reach areas. Once you’ve identified the areas of rust, you can start the repair process.
Identifying Rust Spots
rust spots, inspecting rust damage. So you’ve noticed some rust spots on your car, and you’re wondering what to do next. Well, the first step is to inspect the rust damage and determine the extent of the problem.
This may seem daunting at first, but with a little knowledge and observation, you can easily identify the areas that are affected. Start by visually examining the affected areas. Rust spots often appear as small patches of reddish-brown discoloration on the surface of the metal.
They may also be accompanied by bubbling or flaking paint. Take a close look at the edges of the rust spots, as this can give you an idea of how far the rust has spread. Next, use your sense of touch to feel the affected areas.
Rust spots are typically rough to the touch, unlike the smooth surface of undamaged metal. You may also notice that the metal feels weak or brittle in the areas where rust is present. If you’re still unsure about the extent of the rust damage, you can use a tool like a screwdriver or a wire brush to gently probe the affected areas.
If the metal is easily punctured or flakes away, it’s a sign that the rust has penetrated deep into the metal and requires immediate attention. Keep in mind that rust is not always visible on the surface. It can also occur underneath the paint, especially in hard-to-reach areas like the underside of your car.
In such cases, you may need to consult a professional who can use specialized tools to detect hidden rust damage. Remember, early detection and treatment of rust spots can help prevent further damage and extend the lifespan of your car. So don’t ignore those seemingly harmless little spots – take the time to inspect them closely and take appropriate action to keep your car looking and performing its best.
Assessing the Extent of the Damage
rust damage, car inspection Inspecting the extent of rust damage on a car is crucial to determine the condition of the vehicle and whether it is worth repairing. Rust can eat away at the metal components of a car, compromising its structural integrity and safety. When inspecting a car for rust damage, there are a few key areas to pay attention to.
The first is the exterior of the car, looking for any visible signs of rust on the body panels, doors, and fenders. Rust spots that are bubbling or peeling indicate that the damage is more severe and may require immediate attention. Moving to the undercarriage of the car, inspect the frame, floor pans, and suspension components for any signs of rust.
These areas are particularly vulnerable to rust as they are exposed to moisture, dirt, and road salt. Lastly, it’s important to open the hood and inspect the engine bay for any signs of rust on the metal components. Rust on the engine can lead to mechanical issues and decrease the lifespan of the vehicle.
Overall, thorough inspection of rust damage is essential in determining the value and safety of a car.
Determining the Repairability
When inspecting rust damage on a vehicle, it is important to determine the repairability of the affected areas. Rust can be a common problem, especially in older vehicles or those that have been exposed to harsh environmental conditions. The first step in the inspection process is to thoroughly examine the rusted areas and assess the extent of the damage.
This can involve checking for any holes or weakened areas where the rust has eaten away at the metal. Small areas of surface rust may be easier to repair, while larger areas of rust or structural damage may require more extensive repairs. Additionally, it is important to consider the location of the rust damage.
Rust in critical areas such as the frame or suspension components may be more difficult and costly to repair. By conducting a comprehensive inspection and accurately assessing the rust damage, you can determine the feasibility and cost of repair to ensure the longevity and safety of your vehicle.
Preparing for the Repair
If you’ve noticed rust around your windshield, it’s important to take action quickly to prevent further damage. Rust can spread and weaken the structure of your car, leading to more severe problems down the line. So, how can you repair rust around your windshield? First, you’ll need to gather the necessary tools and materials, such as sandpaper, rust converter, and paint.
Then, start by removing any loose rust with sandpaper, being careful not to scratch the glass. Next, apply the rust converter to the affected area, following the manufacturer’s instructions. This will chemically change the rust into a stable compound that can be painted over.
Finally, use touch-up paint to cover the repaired area, matching the color of your car. By taking these steps, you can effectively repair the rust around your windshield and maintain the integrity of your vehicle.
Gathering the Necessary Tools and Materials
“To successfully repair a broken object, it’s important to gather the necessary tools and materials beforehand. This will ensure that you have everything you need to complete the repair efficiently and effectively. So, what tools and materials should you have on hand? Well, it largely depends on the specific object you are repairing, but there are some common items that can come in handy for many repairs.
A basic toolkit is a must-have, which should include items like screwdrivers, wrenches, pliers, and a hammer. Additionally, it’s a good idea to have some adhesive, such as glue or tape, as well as any replacement parts that may be needed. This could include items like screws, bolts, or even a new piece of fabric.
By preparing for the repair in advance and having all the necessary tools and materials at your disposal, you’ll save yourself time and frustration in the long run. So, take the time to gather what you need and ensure a smooth and successful repair process.”
Cleaning the Affected Area
cleaning, affected area, repair, preparing
Repairing the Rust
Are you noticing some rust forming around your windshield? Don’t worry, it’s a common issue that many car owners face. Rust can occur due to moisture, harsh weather conditions, or simply the age of your vehicle. But the good news is, you can repair it yourself! First, you’ll need to gather some materials including rust remover, sandpaper, primer, and paint that matches your car’s color.
Start by cleaning the affected area with the rust remover to remove any loose rust. Then, use sandpaper to sand down the rust until you reach bare metal. Once the area is smooth, apply a layer of primer to prevent further rusting.
Let it dry, and then finish off with a coat of paint. Voila! Your windshield rust will be as good as new. Just remember, it’s important to address rust as soon as you notice it to prevent it from spreading and causing further damage to your windshield.
Using Rust Converters and Neutralizers
Rust on metal surfaces is an unsightly and potentially damaging problem. But fear not, because there are ways to repair and prevent rust from spreading. One effective method is to use rust converters and neutralizers.
These products work by chemically reacting with rust and converting it into a stable compound that can be painted over. Think of it as a superhero swooping in to save the day and give your metal surfaces a fresh lease on life. By neutralizing rust, you not only repair the damage but also prevent it from coming back.
It’s like putting up a force field to keep rust at bay. So, next time you encounter rust on your metal surfaces, don’t panic. Arm yourself with a rust converter or neutralizer, and restore your surfaces to their former glory.
Applying Filler or Bondo
Applying Filler or Bondo to Repair Rust on Your Car So you’ve discovered some rust on your car, and you’re wondering what to do next. Well, one option is to apply filler or bondo to repair the rust. But what exactly is filler or bondo? It’s a type of body filler that is used to fill in small imperfections and dents on the car’s surface.
It’s made of a mixture of polyester resin and a hardening agent, which creates a thick paste-like substance. This substance is then applied to the rusted area and smoothed out to create a smooth surface. But why is it important to repair the rust? Well, rust can eat away at the metal on your car and cause further damage if left untreated.
By applying filler or bondo, you’re not only repairing the rust, but you’re also protecting your car from further damage. So the next time you spot some rust on your car, don’t panic. Just grab some filler or bondo and get to work repairing that rust.
Your car will thank you for it!
Sanding and Smoothing the Surface
rust repair, sanding, smoothing
Priming and Painting
If you notice rust around your windshield, it’s important to repair it as soon as possible to prevent further damage. Here’s a step-by-step guide on how to repair rust around your windshield. First, start by removing any loose rust and paint using a wire brush or sandpaper.
Make sure to clean the area thoroughly to remove any dirt or debris. After cleaning, apply a rust converter to the affected area. This will stop the rust from spreading and form a protective seal over the metal.
Once the rust converter has dried, it’s time to prime the area. Use a rust-resistant primer and apply it evenly over the rusted area. Let the primer dry completely before moving on to the next step.
Finally, it’s time to paint. Choose a high-quality automotive paint that matches your car’s color and apply it in thin, even coats. Allow each coat to dry before applying the next one.
Once you’ve finished painting, let the paint cure for a few days before exposing it to the elements. With these simple steps, you can repair rust around your windshield and ensure that your car looks as good as new.
Choosing the Right Primer
When it comes to painting a surface, priming is a crucial step that should not be overlooked. Choosing the right primer is just as important as choosing the right paint color. The purpose of primer is to create a smooth and even surface for the paint to adhere to, as well as to seal and protect the underlying material.
There are different types of primers available, each designed for specific surfaces and situations. For example, if you’re painting a wall with stains or discoloration, a stain-blocking primer would be the best choice. If you’re painting a metal surface, a metal primer would be ideal to prevent rust and corrosion.
It’s also important to consider whether you need an oil-based or water-based primer, depending on the type of paint you plan to use. The right primer can make a big difference in the final outcome of your paint job, so be sure to choose wisely.
Applying the Primer
primer, painting, applying, surface, coverage, prep, smooth, coat, brush, roller, technique, even, bubbles, professional, finish, topcoat, adhesion, durability, sanded, porous, absorbent, protection, wood, metal, drywall, concrete, plastic, adhesion, penetration, sealing, quality, result. In order to achieve a professional-looking paint job, it is crucial to properly prepare the surface by applying a primer. A primer is a specially formulated paint that helps provide a smooth and even coat for the topcoat.
It acts as a barrier between the surface and the paint, ensuring better adhesion and durability. Whether you are painting wood, metal, drywall, concrete, or plastic, using a primer is essential for optimal results. Before applying the primer, make sure the surface is clean, dry, and free of any loose particles.
If the surface is already painted, it is recommended to lightly sand it to improve adhesion. To apply the primer, you can use a brush or a roller depending on the size and texture of the surface. Start by cutting in the edges with a brush and then use a roller to cover the rest of the surface.
Make sure to use even strokes and apply the primer in thin coats to avoid any bubbles or drips. It is important to follow the manufacturer’s instructions for drying time between coats. One advantage of using a primer is that it helps seal porous and absorbent surfaces, preventing the paint from soaking in and requiring more coats.
It also helps with color coverage, allowing you to use less paint for the topcoat. Additionally, a primer provides an extra layer of protection for the surface, enhancing its longevity. In conclusion, applying a primer before painting is a crucial step in achieving a professional and long-lasting finish.
It improves adhesion, coverage, and durability, ensuring that your paint job will stand the test of time. So don’t skip this important step and make sure to use a high-quality primer for the best results.
Painting the Repaired Area
Priming and painting are the final steps in repairing a damaged area on a wall. Once the patch has been sanded and smoothed, it’s important to prime the area before painting. Priming helps the paint adhere better and ensures a more even finish.
You can use a primer specifically designed for walls, or a multi-purpose primer that works on different surfaces. Before applying the primer, make sure the area is clean and free of dust or debris. Use a paintbrush to cut-in the edges of the repaired area, then use a roller to apply the primer to the larger surface.
Allow the primer to dry completely before moving on to the next step. After the primer has dried, it’s time to paint. Choose a paint color that matches the rest of the wall, or a color that complements the existing decor.
Start by cutting-in the edges of the repaired area with a paintbrush. This will help create a crisp line where the new paint meets the old. Once the edges are painted, use a roller to apply paint to the rest of the wall.
Work in small sections, using even strokes to avoid streaks or brushmarks. It’s important to apply multiple coats of paint, allowing each coat to dry before applying the next. This will ensure a more even and professional finish.
Once the final coat of paint is applied and dried, step back and admire your freshly repaired and painted wall. It’s amazing how a little primer and paint can make a damaged area look brand new again. So don’t be intimidated by the thought of painting, just take your time and follow these steps for a successful outcome.
Regular Maintenance to Prevent Future Rust
If you’ve noticed rust forming around your windshield, it’s important to address it as soon as possible to prevent further damage. One of the easiest ways to repair rust around your windshield is to use a rust converter. This product chemically converts the rust into a stable compound, preventing it from spreading and causing more damage.
Before applying the converter, it’s important to clean the rusted area thoroughly and remove any loose paint. Once the surface is clean, you can apply the rust converter with a brush or spray it on. After the converter has dried, you can then paint over the area to match the rest of your vehicle.
Remember, regular maintenance is key to preventing future rust. This includes keeping your windshield clean and dry, as well as inspecting it regularly for any chips or cracks. By taking these preventive measures, you can keep rust at bay and maintain the integrity of your windshield for years to come.
Keeping the Windshield Clean and Dry
A crucial aspect of maintaining your vehicle’s windshield is ensuring it stays clean and dry. A dirty windshield can affect your visibility while driving and pose a safety risk. To keep your windshield in pristine condition, regular maintenance is key.
Start by regularly cleaning the exterior of your windshield using a high-quality glass cleaner or a vinegar-water solution. Use a soft cloth or a microfiber towel to avoid scratching the glass. Additionally, check your windshield wipers frequently and replace them when they show signs of wear.
Worn-out wipers can leave streaks and smudges on your windshield, making it harder to see clearly. Lastly, don’t forget to inspect the weatherstripping around your windshield. Cracked or damaged weatherstripping can allow water to seep in, potentially leading to rust.
By taking these preventive measures, you can keep your windshield clean and dry, ensuring optimal visibility and extending its lifespan.
Applying Rust Inhibitors and Sealants
rust inhibitors, sealants, regular maintenance, future rust
Regularly Inspecting for Rust
rust prevention, inspecting for rust, regular maintenance, future rust prevention One of the best ways to prevent future rust on your belongings is by regularly inspecting for any signs of corrosion. Rust is not only unsightly, but it can also damage your items and diminish their value. By taking the time to inspect and maintain your belongings, you can save yourself a lot of time and money in the long run.
During your inspections, be sure to look for any discolored or chipping paint, as this can be a sign that rust is forming underneath. Additionally, check for any signs of moisture or dampness, as these can contribute to the development of rust. If you do come across any areas of rust, it’s important to address them right away.
Sanding down the affected area and applying a rust inhibitor or primer can help to prevent further corrosion. Regular maintenance and inspections may seem like a hassle, but they are essential for keeping your belongings in top condition and preventing future rust. So, take the time to give your items some TLC and enjoy them for years to come.
Conclusion
In conclusion, repairing rust around your windshield is no small task, but with the right tools and a whole lot of elbow grease, it can be done. Just like removing a stubborn stain from your favorite shirt or getting rid of that pesky ex who won’t stop texting you, rust repair requires some finesse and a clever strategy. So grab your trusty sandpaper, rust converter, and a can-do attitude, because it’s time to give that rust the ultimate smackdown.
Remember, a clean and rust-free windshield not only improves your visibility on the road, but also sends a message to the world that you don’t mess around when it comes to your car. So go forth, my fellow rusty warriors, and may your windshield be forever gleaming and rust-free!”
FAQs
Can rust around a windshield be repaired?
Yes, rust around a windshield can be repaired by following a few steps. First, clean the rusted area with a mild detergent and water. Then, sand the rusted area to remove any loose rust particles. Next, apply a rust converter product to the affected area to stop the rust from spreading. Finally, apply a rust-proof paint or primer to prevent further rusting and restore the appearance of the windshield area.
How much does it cost to repair rust around a windshield?
The cost of repairing rust around a windshield can vary depending on the severity of the rust damage and the type of repair needed. In general, minor rust repairs can range from $50 to $200, while more extensive repairs that require windshield replacement can cost anywhere from $200 to $600 or more.
What causes rust around windshields?
Rust around windshields is often caused by moisture exposure, especially if the windshield seal has become damaged or worn out. Rainwater, snow, and condensation can seep into the area around the windshield, leading to rust formation over time. Additionally, road salt and other corrosive chemicals can also contribute to rust development.
Can rust around a windshield be prevented?
Yes, there are steps you can take to prevent rust around a windshield. Regularly inspect the windshield seal for any signs of damage or wear, and promptly repair or replace it if needed. Keep the windshield area clean and free of debris that can trap moisture and accelerate rusting. Applying a wax or sealant to the windshield edges can also help protect against rust formation.
Can I repair rust around a windshield myself, or should I hire a professional?
While it is possible to repair rust around a windshield yourself, it is often recommended to hire a professional for more complex repairs or when windshield replacement is needed. Professionals have the expertise and tools to properly diagnose and address rust issues, ensuring a thorough and long-lasting repair.
Is rust around a windshield a safety concern?
Yes, rust around a windshield can pose safety concerns. Rust can weaken the metal structure, compromising the integrity of the windshield area. This can increase the risk of the windshield detaching or cracking during an accident or impact, potentially causing injury to the occupants of the vehicle.
How long does it take to repair rust around a windshield?
The time required to repair rust around a windshield can vary depending on the extent of the rust damage and the repair method chosen. Minor rust repairs may only take a few hours or a day to complete, while more extensive repairs that involve windshield replacement can take several days. It is best to consult with a professional to get a more accurate estimate of the repair timeline.