
Have you ever had a small chip appear on your windshield seemingly out of nowhere? It’s a common occurrence that can leave you wondering how to repair it and if it’s even necessary. Well, the truth is that even a small chip in your windshield can lead to bigger problems if left untreated. The good news is that repairing a small chip in your windshield can be a simple and cost-effective solution.
In this blog, we’ll explore the step-by-step process of repairing a small chip in your windshield, so you can save time and money while ensuring the longevity of your windshield. So, let’s dive in and discover how you can easily repair that annoying chip in your windshield!
Table of Contents
Introduction
So, you’re driving down the road and suddenly you hear that dreaded sound – a small rock hits your windshield and leaves a chip. It may seem like a minor inconvenience, but ignoring a small chip in your windshield can lead to bigger problems down the road. Not only can it obstruct your view, but it can also weaken the integrity of the glass and lead to a bigger crack.
The good news is, repairing a small chip in your windshield is a fairly simple process that you can do yourself. With just a few tools and a little patience, you can have your windshield looking as good as new in no time. So, let’s dive in and learn how to repair that small chip in your windshield.
Understanding the Importance of Repairing a Chip
Understanding the Importance of Repairing a Chip Introduction: Picture this scenario: You’re driving down the road, enjoying the breeze and the open road, when suddenly, a small stone gets kicked up by the car in front of you and hits your windshield. It leaves a tiny chip, hardly noticeable at first. You may be tempted to brush it off and think, “Oh, it’s just a small chip, no big deal.
” But here’s the thing: that tiny chip can have big consequences if left unrepaired. In this blog post, we’re going to delve into the importance of repairing a chip and why it’s crucial to take care of it sooner rather than later.
Safety Precautions
safety precautions, safety measures, prevent accidents, reduce risks, protect yourself Introduction: When it comes to staying safe, it’s important to take the necessary safety precautions to prevent accidents and reduce risks. Whether you’re at home, at work, or out and about, there are simple steps you can take to protect yourself and those around you. By being aware of potential hazards and taking proactive measures, you can create a safer environment for everyone.
In this blog section, we will explore different safety precautions and measures you can implement in various aspects of your life. So, let’s dive in and discover how we can stay safe in our daily lives.
Assessing the Damage
Introduction: When disaster strikes, assessing the damage is crucial in order to understand the extent of the impact and determine the necessary steps for recovery. Whether it is a natural disaster like a hurricane or an earthquake, or a man-made disaster such as a fire or a terrorist attack, the aftermath can be devastating. Assessing the damage involves evaluating the physical, emotional, and economic impact on individuals, communities, and infrastructure.
By understanding the scale of the damage, authorities can allocate resources appropriately, provide immediate relief to those affected, and work towards long-term recovery and rebuilding efforts. In this article, we will explore the importance of assessing the damage after a disaster, the methods used to gather information, and the challenges faced in the process.
Repairing the Chip
So you’re driving down the road and all of a sudden, you hear a loud “ping!” A small chip in your windshield. It may seem like a minor issue, but ignoring it can lead to bigger problems down the road. Luckily, repairing a small chip in your windshield is a relatively simple task that you can do yourself.
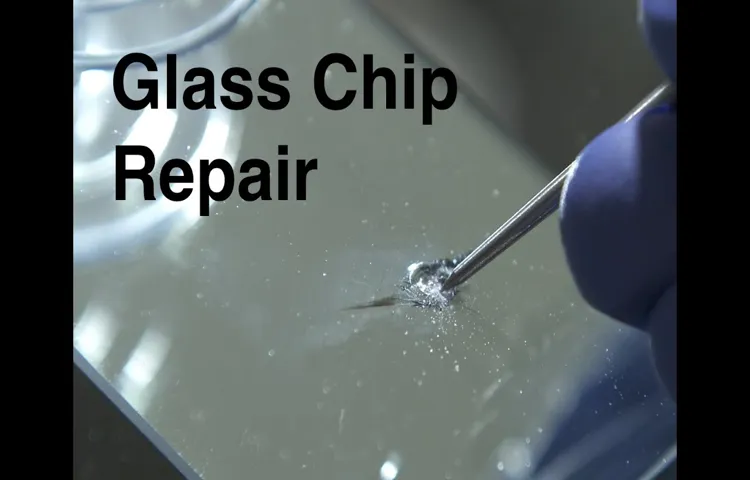
First, start by cleaning the area around the chip with a mild detergent and water. Then, use a windshield repair kit, which can be found at most auto supply stores. The kit will come with a specialized resin that you will apply to the chip.
Make sure to follow the instructions carefully and apply the resin evenly. After applying the resin, cover it with a piece of clear plastic and use a curing light to harden the resin. Finally, remove the plastic and use a razor blade to remove any excess resin.
And just like that, your windshield is good as new!
Gather the Necessary Tools
“car windshield chip repair tools” Are you tired of staring at that annoying chip on your car windshield? Well, don’t worry, because with the right tools, you can easily repair it yourself! The first thing you’ll need is a windshield repair kit, which typically includes a resin and a syringe. This resin is specifically designed to fill in the chip and prevent it from spreading further. The syringe is used to inject the resin into the chip, allowing it to bond with the glass.
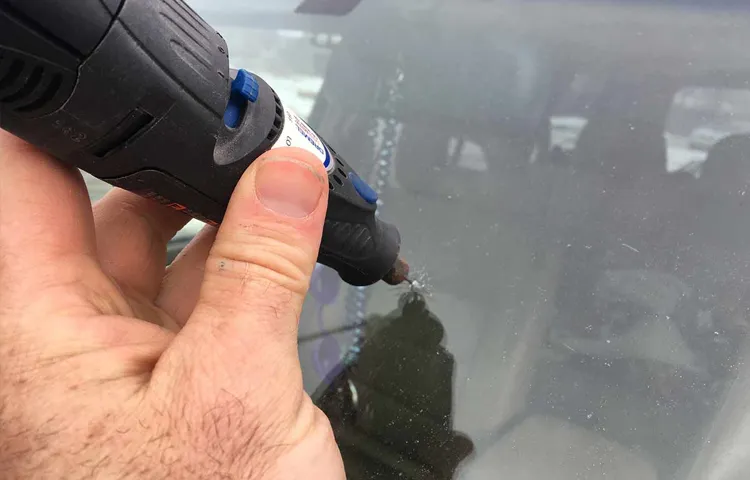
Next, you’ll need a few other tools to help with the repair. A razor blade or a small drill bit can be used to remove any loose glass or debris from the chip, making it easier for the resin to fill in the gap. You’ll also need a clean cloth or microfiber towel to wipe away any excess resin during the repair process.
Finally, it’s important to have a UV light or sunlight available for the final step of the repair. The resin needs to be exposed to UV light in order to harden and create a strong bond with the glass. This step is crucial for ensuring a lasting repair.
Now that you have all the necessary tools, you’re ready to start repairing that chip on your car windshield. It’s a simple process that can save you time and money, and most importantly, improve your visibility on the road. So why wait? Grab those tools and get started on your windshield repair today!
Cleaning the Chip
repairing the chip. The process of repairing a chip in a computer chip is like performing surgery on a microscopic level. Just like a doctor carefully removes and fixes a damaged organ, a technician uses precision tools to clean and repair the chip.
The first step in repairing a chip is to identify the problem. This can be done by examining the chip visually or using specialized diagnostic equipment. Once the problem has been identified, the technician carefully cleans the area around the chip to remove any dirt or debris.
This is important because even tiny particles can interfere with the chip’s performance. After the cleaning process is complete, the technician uses a microscope and specialized tools to repair the chip. This may involve replacing damaged components, soldering connections, or even removing and reattaching the chip to the motherboard.
The goal is to restore the chip to its original working condition so that the computer can function properly. Overall, repairing a chip is a delicate and intricate process that requires skill, precision, and attention to detail.
Applying the Repair Kit
“Applying the Repair Kit: Repairing the Chip” So, you’ve discovered a chip in your favorite dish or precious collectible. Don’t worry, because with the help of a reliable repair kit, you can fix it right up! Repairing a chip doesn’t have to be complicated or expensive, and with a little bit of time and effort, you can restore your item to its former glory. Before you get started, make sure you have all the necessary tools from your repair kit.
This typically includes a filler material, a scraper or knife, sandpaper or a sanding block, and any special adhesive required for the specific material you’re working with. Once you have everything ready, begin by cleaning the chip and the surrounding area to remove any dirt or debris. This will ensure a better bond when you apply the filler material later on.
Next, use the scraper or knife to gently remove any loose or flaking material from the chip. Be careful not to dig too deep, as you don’t want to damage the item further. Once you’ve cleaned out the chip, it’s time to apply the filler material.
Follow the instructions provided in your repair kit, making sure to fill the chip evenly and smoothly. Allow the filler to dry completely before moving on to the next step. After the filler has dried, use the sandpaper or sanding block to gently smooth out the surface of the chip.
This will help blend the repaired area with the rest of the item and create a seamless finish. Take your time and be patient as you sand the surface, checking periodically to ensure that you’re achieving the desired result. Once you’re satisfied with the smoothness of the repaired chip, it’s time to apply any necessary adhesive or sealant.
This will help protect the repair and ensure its longevity. Again, follow the instructions provided in your repair kit for the best results. Apply the adhesive or sealant in a thin, even layer, making sure to cover the entire repaired area.
Finishing Touches
So you’re driving down the road when suddenly a pebble comes flying towards your windshield and leaves behind a small chip. It may seem like a minor inconvenience, but ignoring that chip in your windshield could lead to bigger problems down the road. Not only can it impair your visibility, but it can also compromise the overall strength of your windshield.
Thankfully, repairing a small chip in your windshield is a fairly simple process that you can do on your own. By following a few steps, you can restore your windshield and prevent that chip from turning into a full-blown crack.
Removing Excess Resin
resin, excess resin, finishing touches
Polishing the Area
Polishing the Area – Finishing Touches Once the construction work is completed, it’s time to give the area some final touches to make it shine. The finishing touches are like the icing on the cake, adding that extra element of perfection to the space. From cleaning up any leftover debris to installing the final fixtures and fittings, attention to detail is key during this stage.
One of the first things to do during the finishing touches is to thoroughly clean the area. This includes getting rid of any dust, dirt, or grime that may have accumulated during construction. The area should be ready for use and look presentable, so make sure to sweep, mop, and wipe down all surfaces.
Next, it’s time to install the final fixtures and fittings. This can include things like light fixtures, faucets, door handles, and any other accessories that are part of the design. It’s important to make sure everything is installed correctly and functions properly.
Double-checking and testing each item will ensure that there are no issues later on. Another important aspect of the finishing touches is making sure all the details are taken care of. This includes things like painting or touch-ups, repairing any minor damages, and ensuring that all the necessary permits and inspections have been completed.
It’s also a good time to check for any missing or misplaced items and make sure everything is accounted for. The goal of the finishing touches is to create a space that is not only functional but visually appealing as well. This is the part where the space starts to come together and really reflect the design and vision.
By paying attention to the smallest of details, the area will truly shine and be ready for use. So, as the construction work wraps up, don’t forget about the importance of the finishing touches. Take the time to clean, install, and perfect the space, ensuring that it is ready to be enjoyed.
Additional Tips
If you have a small chip in your windshield, don’t panic! Fortunately, there are a few simple steps you can take to repair it yourself and avoid the hassle and expense of getting it professionally fixed. First, clean the area around the chip with glass cleaner to remove any dirt or debris that could interfere with the repair process. Next, apply a small amount of clear nail polish or windshield repair resin to the chip, filling it completely.
Then, place a small piece of clear tape over the repair to hold the resin in place while it sets. Leave the tape in place for about a day, allowing the resin to fully harden. Finally, carefully remove the tape and use a razor blade to gently scrape away any excess resin.
Voila! Your windshield chip should now be practically invisible. Keep in mind that while this method can be effective for small chips, larger cracks or damage near the edge of the windshield may require professional attention.
Avoiding DIY if the Damage is Extensive
When it comes to home repairs, it’s important to know your limitations. If you’re facing extensive damage that requires a professional touch, it’s best to avoid the temptation of DIY and call in the experts. Attempting to fix complex issues yourself can lead to further damage or costly mistakes.
Additionally, certain repairs may require specialized tools or knowledge that you may not have access to. It’s always better to invest in professional help rather than risking more harm to your home. Remember, the safety and wellbeing of your family should be the top priority.
So, don’t hesitate to reach out to a qualified contractor or repair person to get the job done right. It may seem like an added expense, but it’s worth it in the long run to have peace of mind and a properly repaired home.
Seeking Professional Help
seeking professional help, mental health, therapy, counseling, support, difficulties, guidance, wellbeing, emotional, challenges, mental illness, treatment, mental health professionals, coping strategies, resources, self-care, stigma In addition to the previous tips mentioned, there are a few more things to keep in mind when seeking professional help for your mental health. First and foremost, it’s essential to remember that there is no shame in reaching out for support. Seeking therapy or counseling is a sign of strength and a proactive step towards taking care of your emotional wellbeing.
You don’t have to face your difficulties alone, and mental health professionals are there to provide guidance and support. They have the expertise to help you navigate the challenges you’re facing and develop coping strategies that work for you. Another important aspect to consider is finding the right therapist or counselor for you.
It’s crucial to find someone you feel comfortable with and who understands your unique needs. Don’t be afraid to ask questions or seek recommendations from trusted sources. Remember, therapy is a personal journey, and finding the right fit can make a significant difference in your treatment.
In addition to seeking professional help, it’s also essential to explore other resources and practices that can support your mental health. This can include engaging in self-care activities, such as exercise, mindfulness, and hobbies that bring you joy. It’s also essential to educate yourself about mental health and learn about different techniques and coping strategies that resonate with you.
There are numerous books, podcasts, and online resources available that can provide valuable insights and tools for managing mental health challenges. Lastly, it’s important to address the stigma surrounding mental health. Seeking professional help is often met with unnecessary judgment or misconceptions.
Remember that your mental health is just as important as your physical health, and there is nothing wrong with seeking treatment. By speaking openly about your experiences and advocating for mental health, you can help reduce the stigma and create a more supportive environment for yourself and others. Seeking professional help for your mental health is a brave and important step towards your overall wellbeing.
Preventing Future Chips
“Preventing Future Chips: Additional Tips” Now that you know the common causes of chip failure and how to prevent them, here are a few additional tips to keep in mind. First and foremost, regular maintenance is key. Just like any other piece of technology, chips require upkeep to ensure they are working optimally.
This includes regularly cleaning the chip, checking for any loose connections or wires, and keeping an eye out for any signs of wear and tear. Additionally, be mindful of the environment in which your chip is operating. Extreme temperatures, humidity levels, or exposure to excessive dust or debris can all contribute to chip failure.
By keeping your chip in a clean and controlled environment, you can help prolong its lifespan. Lastly, it’s always a good idea to have a backup plan in place. In the event that your chip does fail, having a spare or backup chip on hand can minimize downtime and ensure that you can quickly get back up and running.
By following these additional tips, you can be proactive in preventing future chip failures and ensure that your technology continues to work seamlessly.
Conclusion
In conclusion, repairing a small chip in your windshield is as easy as ABC – Address the problem, Bolster your materials, and Carry out the repair. By following these simple steps, you’ll be able to banish that annoying chip in no time and restore your windshield to its former glory. So why wait? Don’t let that chip go on an extended vacation on your windshield, take matters into your own hands and show it who’s boss.
Remember, a little bit of effort goes a long way when it comes to keeping your windshield shipshape. Now, go forth and conquer those chips like the windshield warrior you were born to be!”
FAQs
What causes small chips in a windshield?
Small chips in windshields can be caused by a variety of factors, including rocks or debris hitting the glass, extreme temperature changes, or manufacturing defects.
Can a small chip in a windshield be repaired?
Yes, small chips in windshields can often be repaired using a special resin that fills in the chip and prevents it from spreading further.
How long does it take to repair a small chip in a windshield?
The length of time it takes to repair a small chip in a windshield can vary depending on the specific repair process, but it typically takes anywhere from 30 minutes to an hour.
Is it necessary to repair a small chip in a windshield?
It is recommended to repair a small chip in a windshield as soon as possible to prevent it from spreading and causing further damage. Additionally, some states have laws requiring windshield damage to be repaired.
Can I repair a small chip in my windshield myself?
While DIY windshield repair kits are available, it is generally recommended to have a professional handle the repair to ensure it is done properly and effectively.
How much does it cost to repair a small chip in a windshield?
The cost of repairing a small chip in a windshield can vary depending on factors such as the extent of the damage, the type of vehicle, and the location of the repair service. On average, it can range from $50 to $150.
Will my insurance cover the cost of repairing a small chip in my windshield?
Many insurance policies cover windshield repairs, often with no deductible or out-of-pocket expense. It is recommended to check with your insurance provider to determine the specifics of your coverage.