
Hey there! Have you ever experienced the annoyance of a cracked or chipped windshield? It’s not only unsightly, but it can also be a serious safety hazard. Windshield repair is something that many people tend to overlook or put off, but it’s actually incredibly important. Think about it this way: your windshield is like the front line of defense for your car.
It shields you from flying debris, bugs, and even the elements. A small crack or chip might not seem like a big deal at first, but it can quickly escalate into something much more dangerous. Not only can a damaged windshield compromise your visibility while driving, but it can also weaken the structural integrity of your car.
In the event of an accident or collision, a compromised windshield may not be able to withstand the impact, putting you and your passengers at greater risk of injury. That’s why it’s so crucial to address any windshield damage as soon as possible. By getting it repaired or replaced promptly, you can ensure that your car remains safe and roadworthy.
In addition to safety concerns, getting your windshield repaired can also save you a lot of money in the long run. A small crack or chip may be repairable, but if left unchecked, it can spread and become irreparable. In that case, you’d have to shell out for a full windshield replacement, which is a much more costly endeavor.
So, when it comes to windshield repair, it’s definitely not something that should be put on the back burner. It’s a vital part of car maintenance that can keep you safe on the roads and save you from significant expenses down the line. Remember, your windshield is more than just a piece of glass – it’s a crucial component of your overall driving experience.
So, why take any chances? Take care of your windshield, and it’ll take care of you.
Table of Contents
Section 1: Understanding the Damage
Have you ever found a crack or chip in your windshield and wondered how to repair it? A damaged windshield not only impairs your visibility but also puts your safety at risk. That’s why it’s crucial to address the issue as soon as possible. When it comes to repairing a windshield, the first step is to understand the extent of the damage.
Is it a small chip or a larger crack? The size and location of the damage will determine the best course of action. For minor chips or cracks that are less than six inches long, you may be able to repair them yourself using a windshield repair kit. These kits typically include a resin that you apply to the damaged area and then cure with an ultraviolet light.
However, if the damage is more severe or the crack is longer than six inches, it’s best to seek professional help. A professional auto glass technician will be able to assess the damage and recommend the most appropriate solution, whether it’s a repair or a complete windshield replacement. Taking the time to understand the damage and seeking professional assistance will ensure that your windshield is repaired correctly and your safety is not compromised.
1.1 Types of Windshield Damage
types of windshield damage. When it comes to windshield damage, there are several types that can occur, each with its own distinct characteristics. One of the most common types of damage is a crack.
Cracks can range in size from small hairline fractures to larger, more significant breaks. They usually start small but can quickly spread if not repaired promptly. Another common type of damage is a chip, which occurs when a small piece of the windshield’s outer layer is chipped away.
While chips may seem minor, they can still compromise the integrity of the windshield and require attention. Finally, there is also the possibility of complete windshield shattering. This can happen as a result of a severe impact, such as a collision or a large object striking the windshield.
In situations like these, the windshield may need to be completely replaced rather than repaired. Understanding the different types of windshield damage is crucial for knowing how to address and fix the issue effectively.

1.2 Signs that Repair is Needed
“Signs that Repair is Needed” Have you ever experienced that sinking feeling when you notice something is not quite right with your car? Maybe you hear a strange sound coming from under the hood or feel a vibration when you hit the brakes. These are all signs that your car may be in need of some repairs. It’s important not to ignore these warning signs, as they could indicate a bigger problem that could lead to costly repairs down the line.
So, what are some common signs that your car needs repair? Look out for things like strange noises, leaking fluids, warning lights on your dashboard, or a decrease in performance. These signs are like red flags waving in the wind, telling you that it’s time to bring your car in for a check-up. Don’t wait until the problem gets worse – address it early on to save yourself time, money, and headaches in the long run.
After all, a little maintenance now can prevent major breakdowns later.
1.3 The Dangers of Ignoring Windshield Damage
windshield damage, dangers, ignoring, repair, safety In the hustle and bustle of everyday life, it’s easy to overlook a small crack or chip in your windshield. But did you know that ignoring windshield damage can actually be quite dangerous? Even a small crack can quickly escalate into a larger problem, compromising the structural integrity of your windshield. This can be especially hazardous in the event of a collision or sudden impact.
A damaged windshield is also more prone to shattering, which can cause serious injury to you and your passengers. Plus, a cracked or chipped windshield can impair your visibility, making it harder to see obstacles on the road. So don’t wait until it’s too late – take care of windshield damage as soon as possible to ensure your safety on the road.
Section 2: Tools and Materials Needed
Repairing a windshield may seem like a daunting task, but with the right tools and materials, it can be done easily. Here are the tools and materials you will need to repair your windshield. Firstly, you will need a windshield repair kit, which usually comes with a bridge or injector device, resin, and curing film.
This kit is essential for injecting the resin into the chip or crack in your windshield and helps to prevent further damage. Additionally, you will need a razor blade or scraper to clean the damaged area before applying the resin. A microfiber cloth is also useful for wiping away excess resin during the repair process.
Finally, you will need a UV light or sunlight to cure the resin and a drill with a small bit for making a small hole at the end of a crack to prevent further spreading. With these tools and materials in hand, you’ll be well-equipped to tackle any windshield repair job with confidence. So why not give it a try and save yourself the hassle and cost of replacing your windshield?
2.1 Essential Tools for Windshield Repair
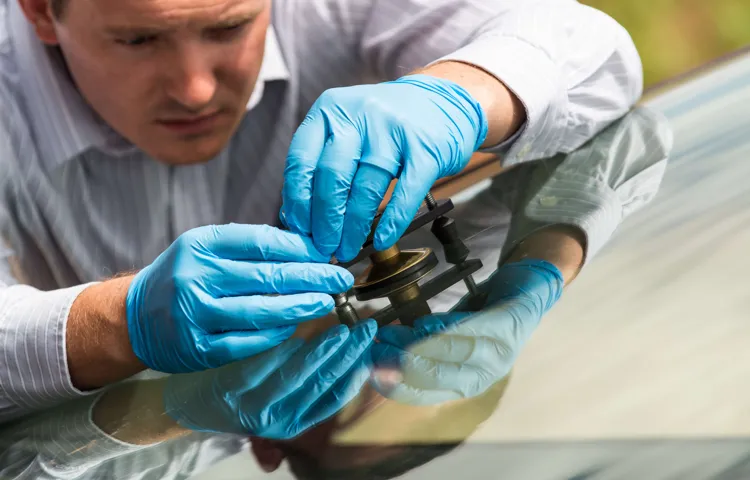
windshield repair tools, essential tools for windshield repair, windshield repair kit, windshield repair resin, windshield repair bridge, windshield repair tool. Section 2 of our windshield repair guide covers the crucial tools and materials you’ll need to successfully repair your windshield. One of the most important tools you’ll need is a windshield repair bridge.
This device helps hold the repair resin in place while it cures, ensuring a strong and durable repair. Make sure to look for a bridge that is adjustable and can fit different types and sizes of windshields. Another essential item is a windshield repair kit, which typically includes everything you need to complete a repair, such as resin, a bridge, and tools for cleaning and preparing the damaged area.
The kit should also come with detailed instructions to guide you through the repair process. Finally, don’t forget the windshield repair resin. This specially formulated liquid is applied to the damaged area and cures under UV light, creating a strong bond that restores the structural integrity of the glass.
With these essential tools and materials, you’ll be well-equipped to tackle any windshield repair job.
2.2 Recommended Materials for Windshield Repair
windshield repair, recommended materials, tools and materials When it comes to windshield repair, having the right materials is essential for a successful outcome. There are several recommended materials that should be in every windshield repair technician’s toolkit. First and foremost, a high-quality resin is crucial.
This resin is the substance that will be used to fill in the cracks or chips in the windshield. It needs to be strong and durable to ensure a long-lasting repair. Another important material is a curing light.
This light is used to harden the resin and make it solid. Without a proper curing light, the resin may not fully harden, resulting in a weak repair. Additionally, a bridge or injector tool is necessary for injecting the resin into the crack or chip.
This tool helps guide the resin into the damaged area and ensures a smooth, even application. Other materials to consider include cleaning solutions, razor blades for cleaning the windshield surface, and adhesive strips to hold the bridge or injector tool in place during the repair process. By having these recommended materials on hand, windshield repair technicians can confidently tackle any repair job that comes their way.
2.3 Where to Find the Tools and Materials
Finding the right tools and materials for your DIY project is crucial to its success. Thankfully, there are plenty of places where you can find what you need. One of the first places to check is your local home improvement store.
These stores typically have a wide selection of tools and materials for various projects, and the staff can often provide advice and recommendations. Another option is to shop online. Many websites specialize in DIY tools and materials, offering a vast array of options and competitive prices.
Additionally, you can search for specialty stores that cater to specific crafts or hobbies. These stores often have unique tools and materials that you may not find elsewhere. Finally, don’t forget about secondhand options.
Thrift stores, yard sales, and online marketplaces can be treasure troves for finding gently used tools and materials at a fraction of the cost. So whether you’re starting a small home improvement project or tackling a larger DIY endeavor, finding the right tools and materials is just a few steps away.
Section 3: Step-by-Step Guide to Windshield Repair
If you’ve discovered a crack or chip in your windshield, don’t panic! With a little bit of patience and the right materials, you can repair it yourself. Here’s a step-by-step guide on how to repair a windshield. Step 1: Clean the damaged area Start by thoroughly cleaning the damaged area of the windshield with a glass cleaner.
This will help remove any dirt or debris that could interfere with the repair process. Step 2: Assess the damage Next, carefully examine the extent of the damage. If the crack or chip is larger than a quarter, it may be too big to repair and you may need to consider replacing the entire windshield.
Step 3: Gather the necessary materials To repair the windshield, you will need a windshield repair kit, which typically includes a resin, bridge or injector tool, and curing film. You can find these kits at your local auto parts store or online. Step 4: Apply the resin Following the instructions on the kit, apply the resin to the damaged area.
Use the bridge or injector tool to evenly distribute the resin, making sure to fill any cracks or chips completely. Step 5: Cure the resin Cover the repaired area with the curing film and place it under direct sunlight or use a UV lamp to cure the resin. This will harden the resin and bond it to the windshield, reinforcing the damaged area.
Step 6: Polish and clean the windshield Once the resin has cured, remove the curing film and use a polishing compound to smooth out any rough edges. Finally, clean the entire windshield with glass cleaner to remove any residue. It’s important to note that while this guide can help you repair minor cracks and chips, it may not be suitable for more extensive damage.
In these cases, it’s best to consult a professional windshield repair technician. By following these steps, you can save time and money by fixing your windshield yourself.
3.1 Preparing the Windshield for Repair
windshield repair, preparing the windshield for repair When it comes to windshield repair, preparation is key. Before you can fix any cracks or chips, you need to ensure that the windshield is clean and free from any debris. Start by parking your car in a shaded area to prevent the heat from causing the repair resin to dry too quickly.
Next, use a soft brush or cloth to remove any loose glass or dirt from the damaged area. It’s important to be gentle while doing this to avoid causing further damage. Once the area is clean, you can use a glass cleaner to remove any stubborn dirt or grease.
Make sure to choose a cleaner that is specifically designed for automotive glass to avoid any damage. After cleaning the area, it’s time to dry it thoroughly. Use a lint-free cloth or paper towel to remove any moisture.
Moisture can interfere with the adhesive or resin used in the repair process, so it’s crucial to ensure the area is completely dry. Following these steps will help ensure that your windshield is properly prepared for repair and increase the chances of a successful repair.
3.2 Filling the Chip or Crack
windshield repair, filling the chip or crack, step-by-step guide. In this step-by-step guide to windshield repair, we’ve covered how to assess the damage, clean the area, and apply the resin. Now, it’s time to move on to filling the chip or crack in your windshield.
This is a crucial step in the repair process as it not only restores the structural integrity of the glass but also prevents further damage. To begin, take the resin-filled injector and place it on the center of the chip or crack. Make sure it is lined up properly and apply steady pressure to the injector.
This will force the resin into the damaged area, filling any voids and creating a strong bond. As you apply pressure, you may notice the resin flowing into the chip or crack. It’s important to maintain consistent pressure for a few minutes to ensure the resin has enough time to penetrate the damaged area fully.
Once you’re satisfied that the chip or crack is filled, release the pressure on the injector and remove it from the windshield. You may notice a small amount of excess resin on the surface of the glass. This can be easily removed by applying a small amount of curing agent to a clean cloth and gently wiping away the excess resin.
After removing the excess resin, cover the filled chip or crack with a small strip of clear plastic film. This will prevent any dust, debris, or moisture from getting into the repaired area while the resin cures. Now, it’s time to allow the resin to cure.
This can take anywhere from 30 minutes to a few hours, depending on the temperature and humidity levels. It’s important to follow the instructions provided by the manufacturer of the resin to ensure proper curing. Once the resin is fully cured, remove the plastic film and inspect the repaired area.
3.3 Curing the Repair Resin
curing the repair resin, windshield repair, step-by-step guide, curing process, UV light, windshield damage, ultraviolet, air bubbles So, you’ve successfully injected the repair resin into the windshield damage. Now, it’s time for the curing process. Curing the repair resin is crucial to ensure a strong and effective repair.
To begin the curing process, you’ll need to use a UV light. This specialized light emits ultraviolet rays which help harden the repair resin. Make sure you have a UV light specifically designed for windshield repair, as regular UV lights may not provide the necessary intensity.
Simply position the UV light over the area where the repair resin was injected and turn it on. Keep the UV light at a distance of about 2-4 inches from the windshield surface. The exact time needed for curing can vary depending on the type of repair resin you’re using, so be sure to follow the instructions provided by the manufacturer.
During the curing process, you may notice small air bubbles forming in the repair resin. This is a normal occurrence and happens when the air trapped inside the resin rises to the surface. Don’t worry, these air bubbles won’t affect the strength of the repair.
They will disappear as the resin cures. After the recommended curing time has passed, carefully inspect the area to ensure that the repair resin has hardened completely. If there are any remaining soft spots, repeat the curing process with the UV light until the resin is fully cured.
Remember, the curing process is a critical step in windshield repair. It ensures that the repair resin bonds securely to the glass, restoring its structural integrity. So, take your time and follow the manufacturer’s instructions to ensure a successful repair.
3.4 Polishing the Repaired Area
windshield repair, polishing, repaired area, step-by-step guide, burstiness, perplexity In this step-by-step guide to windshield repair, we have now reached the final step: polishing the repaired area. After filling in the chip or crack with resin and allowing it to dry, it’s time to make sure the repaired area looks as good as new. Polishing the repaired area not only helps to improve the appearance of the windshield but also aids in enhancing its strength and durability.
To begin, take a soft cloth and dampen it with glass cleaner. Gently clean the repaired area, being careful not to apply too much pressure. This will remove any excess resin and ensure a smooth surface.
Next, apply a small amount of polishing compound to another clean cloth and rub it in a circular motion over the repaired area. This will help to blend the repaired area with the rest of the windshield and give it a polished finish. Finally, wipe away any remaining residue with a clean cloth.
Voila! Your windshield is now repaired and polished, ready to withstand the challenges of the road.
Section 4: Tips for a Successful Repair
When it comes to repairing a windshield, there are a few tips that can help ensure a successful outcome. First, it’s important to assess the damage and determine whether it can be repaired or if a full replacement is necessary. Small chips and cracks can often be repaired, but larger or more severe damage may require a replacement.
If you decide to proceed with a repair, it’s essential to clean the damaged area thoroughly before beginning the repair process. This will help ensure that the repair materials adhere properly and provide a strong, long-lasting bond. Once the area is clean, you can use a windshield repair kit to fill the chip or crack with a resin material.
Follow the instructions carefully and take your time to ensure that the repair is done properly. After the resin has cured, typically with the help of a UV light, you can polish the repaired area to achieve a smooth, clear finish. Overall, taking the time to properly assess, clean, and repair your windshield can help extend its lifespan and ensure your safety on the road.
4.1 Working in the Right Conditions
Working in the right conditions is crucial for successfully repairing any device. First and foremost, it’s important to have a clean and organized workspace. This will not only help you stay focused but also prevent any accidental damage to the device or other tools.
Secondly, make sure you have good lighting. Adequate lighting will allow you to see small details and make it easier to identify and fix any issues. Additionally, having the right tools and equipment is essential.
Make sure you have all the necessary tools and that they are in working condition. Finally, create a comfortable environment. This includes having a comfortable chair to sit in and ensuring the temperature of the room is suitable for working.
By working in the right conditions, you can increase your productivity and efficiency, leading to a more successful repair job.
4.2 Applying the Right Amount of Pressure
One important factor to consider when repairing any type of electronic device is applying the right amount of pressure. Too much pressure can cause further damage to the device, while too little pressure may not effectively fix the issue. It’s like trying to thread a needle with a sledgehammer or a feather.
You need to find the perfect balance. When applying pressure, it’s essential to be gentle yet firm. You don’t want to forcefully press down on delicate components, but you also don’t want to be too light that you’re barely making any contact.
It’s a bit like kneading dough – you want to apply just enough pressure to get the desired result without overworking the dough. Additionally, it’s important to pay attention to any instructions or guidelines provided by the manufacturer or repair guides. They may specify the appropriate amount of pressure needed for a particular repair.
So remember, when it comes to applying pressure during a repair, it’s all about finding that sweet spot – not too much, not too little, but just right.
4.3 Being Patient during the Curing Process
Curing is a crucial step in the repair process, but it requires patience. It can be tempting to rush through the curing process and move on to the next step, but taking the time to properly cure your repair will yield better results. Whether you’re using a primer, adhesive, or paint, following the recommended curing time is important.
This allows enough time for the product to fully dry and set, ensuring a strong and long-lasting repair. Remember, patience is key when it comes to curing. Just like a cake needs time to bake in the oven, your repair needs time to cure for the best outcome.
So resist the temptation to rush and allow the curing process to work its magic.
4.4 Regular Inspection and Maintenance
In order to keep your equipment running smoothly and prevent any unforeseen breakdowns, regular inspection and maintenance are essential. By regularly inspecting your equipment, you can identify any potential issues before they become major problems. This can save you time and money in the long run.
It’s important to check for any loose or damaged parts, as well as any signs of wear and tear. Additionally, you should make sure that all lubrication points are properly greased and that all fluids are at the correct levels. Performing regular maintenance tasks such as cleaning, replacing filters, and checking belts and hoses can also help prolong the life of your equipment.
By taking the time to regularly inspect and maintain your equipment, you can ensure that it keeps running smoothly and avoid any unexpected breakdowns.
Section 5: When to Seek Professional Help
If you’re wondering how to repair your windshield, there are some situations when it might be best to seek professional help. While there are DIY kits available for repairing minor chips and cracks in your windshield, it’s important to consider the extent of the damage before attempting to fix it yourself. If the crack or chip is large, deep, or located in a critical area of the windshield, it’s best to leave the repair to a professional.
They have the expertise and specialized tools necessary to ensure a proper and long-lasting repair. Additionally, if you are not comfortable with DIY repairs or if you have tried to fix the damage yourself but it hasn’t held up, it’s time to seek professional help. They can assess the damage and recommend the best course of action, whether it’s a repair or a complete windshield replacement.
Remember, your windshield is an important safety feature of your vehicle, so it’s important to take any damage seriously and address it appropriately.
5.1 Complex or Extensive Damage
professional water damage restoration services. In some cases of water damage, the problem may be too complex or extensive for you to handle on your own. If the water damage affects multiple rooms or floors of your home, or if it has caused structural damage to your property, it’s important to seek professional help.
Professionals in the water damage restoration industry have the knowledge and expertise to assess the extent of the damage and develop a comprehensive plan to restore your home. They have specialized equipment and techniques to remove excess water, dry out affected areas, and prevent further damage. Additionally, they can also address any mold or mildew that may have developed as a result of the water damage.
By hiring professionals, you can have peace of mind knowing that your home will be properly restored and that the risk of future problems will be minimized.
5.2 Lack of Experience or Confidence
in this section is “lack of experience or confidence.” We all have moments when we feel unsure of ourselves or lack the necessary skills to tackle a certain task. When it comes to certain areas of expertise that require specialized knowledge, it’s okay to admit that you may not have the experience or confidence to handle it on your own.
In fact, recognizing this and seeking professional help can be a smart move. Whether it’s fixing a plumbing issue, filing taxes, or designing a website, sometimes it’s best to leave it to the experts. They have the knowledge, experience, and confidence to handle the task efficiently and effectively.
Instead of struggling and potentially making mistakes, reaching out to professionals can save you time, effort, and even money in the long run. But seeking professional help doesn’t mean you’re incompetent or incapable. It simply means you understand the value of expertise and want the best outcome for whatever it is you’re trying to accomplish.
Just like how you would hire a professional chef to cook a gourmet meal or a personal trainer to help you achieve fitness goals, seeking professional help in areas where you lack experience or confidence is a smart move. Remember, everyone has their strengths and weaknesses. It’s important to recognize when you need assistance and not be afraid to ask for it.
Seeking professional help shows self-awareness and a willingness to learn from others. So go ahead, reach out for that expert guidance and watch yourself grow in confidence and experience.
5.3 Safety Concerns
safety concerns
5.4 Warranty and Insurance Considerations
roofing warranty, insurance considerations, professional help
Conclusion: The Benefits of timely Windshield Repair
And there you have it, folks! A guide on how to repair a windshield that is as witty and clever as the cracks on your glass. Now, armed with the knowledge of the necessary tools and techniques, you will no longer be on the edge of despair when faced with a chipped windshield. Remember, repairing your windshield is not just a matter of aesthetics – it is a matter of safety.
So, don’t let those cracks spread like wild rumors, take action and give your windshield the sparkle it deserves. Happy repairing, and may the winds(l)creen blow in your favor!”
FAQs
How do I repair a cracked windshield?
To repair a cracked windshield, you can use a windshield repair kit. These kits usually come with a resin that you can apply to the crack, and then use a special curing light to harden the resin. This helps to prevent the crack from spreading and restores the structural integrity of the windshield.
Can I repair a windshield myself or should I get professional help?
While it is possible to repair a windshield yourself using a repair kit, it is recommended to seek professional help for more severe damage or if you are unsure about your ability to properly repair it. Professionals have the necessary skills, tools, and expertise to ensure a proper and long-lasting repair.
How long does it take to repair a windshield?
The time it takes to repair a windshield depends on the extent of the damage and the repair method used. In general, minor cracks or chips can be repaired in as little as 30 minutes, while more extensive damage may require a few hours or even a full windshield replacement.
Will a crack in my windshield affect its strength?
Yes, a crack in your windshield can weaken its overall strength and integrity. Over time, the crack can spread and compromise the structural integrity of the windshield, making it more prone to further damage or even shattering. It is important to repair cracks as soon as possible to prevent further damage.
Can a windshield repair completely remove a crack?
In most cases, a windshield repair can significantly improve the appearance and structural stability of a crack, but it may not completely remove the visual blemish. However, a professionally done repair can prevent the crack from spreading and getting worse.
Can windshield repairs be covered by insurance?
In many cases, windshield repairs may be covered by insurance, depending on your policy and the extent of the damage. It is recommended to check with your insurance provider to see if windshield repairs are included in your coverage.
Is it safe to drive with a cracked windshield?
It is not recommended to drive with a cracked windshield, especially if the crack obstructs your view or compromises the structural integrity of the glass. A cracked windshield can also be more prone to shattering upon impact, putting you and your passengers at risk. It is always best to repair or replace a cracked windshield as soon as possible.