
We’ve all been there before, standing on the side of the road with a flat tire, cursing our luck. Whether it’s a nail or a pothole that caused the puncture, the next step is putting the tire back on the rim. It might seem like a daunting task, but fear not, it’s easier than you think.
In this blog post, we’ll walk you through the steps of putting a tire back on the rim, so you can hit the road with confidence once again. So sit back, grab a cup of coffee, and let’s get to it!
Table of Contents
Prepare the Tools and Equipment
Before you begin putting a tire back on the rim, it’s important to prepare all the necessary tools and equipment. You’ll need a lug wrench, valve stem tool, tire irons, a lubricant, and a tire gauge. The lug wrench is used to remove the lug nuts that attach the wheel to the vehicle.
The valve stem tool removes the valve stem to deflate the tire, which makes it easier to remove from the rim. The tire irons are used to pry the stubborn tire from the rim, while the lubricant aids in the replacement process. Lastly, a tire gauge is crucial for ensuring the tire is properly inflated to the manufacturer’s recommended PSI.
Having these tools and equipment on hand before starting the process will make it easier and safer to put a tire back on the rim.
Gather the Necessary Tools and Equipment
When it comes to any DIY project, having the right tools and equipment is essential to getting the job done right. Before starting any project, it’s important to gather all the necessary tools and prepare them for use. This means checking to make sure they’re in good working order and have all the necessary parts and accessories.
It’s also a good idea to have a well-organized workspace with enough room to move around comfortably. Depending on the project, you may need power tools such as a drill, saw, or sander, or basic tools such as a hammer, screwdriver, or tape measure. Don’t forget safety equipment such as goggles, gloves, and a dust mask if needed.
Remember, having the right tools and equipment will not only make the task easier but also ensure a successful outcome. So take some time to prepare before starting any project, and you’ll be on your way to creating something amazing!
Place the Tire and the Rim in a Stable Position
Before you can start changing a tire, you need to make sure you have the right tools and equipment on hand. First and foremost, you’ll need a jack and a lug wrench. These are essential for lifting the car off the ground and loosening and tightening the bolts that hold the tire in place.
You may also want to have gloves or a rag on hand to protect your hands and keep them clean. Once you have your tools, it’s time to get started. The first step is to find a stable surface to place the tire and the rim on.
It’s important to make sure the tire and rim are in a stable position so you can work on them safely and efficiently. You may want to use blocks or chocks to prevent the wheel from moving while you work on it. With the tire and rim in a stable position, you’ll be able to change your tire with confidence and ease.
Remove the Flat Tire from the Rim
When it comes to fixing a flat tire, removing it from the rim can be a tricky process. The first step is to deflate the tire completely and carefully pry it off the rim with a tire lever or flathead screwdriver. It’s important to be cautious during this process as you don’t want to damage the rim.
Once you’ve successfully removed the tire from the rim, inspect both the tire and the rim for any damage or wear and tear. It’s also a good idea to clean the rim and check the valve stem before putting the tire back on. Remember to always use proper tools and techniques when working on your tires to avoid injury or further damage to your vehicle.
With these tips in mind, you’ll be able to confidently put the tire back on the rim and get back on the road.
Release the Air from the Tire
“tire removal” When it comes to changing a flat tire, one of the first steps is to release the air from the tire before removing it from the rim. This step is important because it makes it easier to work with the tire and ensures that no unnecessary pressure is placed on the rim. To do this, you’ll need to locate the valve stem on the tire and use a valve stem tool or some other pointed object to depress the valve and let the air out.
Once the air has been released, use a lug wrench to loosen the lug nuts on the tire. It’s important to loosen them before jacking up the car, as the weight of the car can make it difficult to loosen them later on. With the lug nuts loosened, it’s time to jack up the car and remove the flat tire from the rim.
Make sure to place the jack in a safe location such as the provided reinforced section indicated on the frame. Once the flat tire has been removed, it’s time to replace it with your spare tire and continue on your way. Remember to regularly check your spare tire for proper inflation, as you never know when you may need it.
Detach the Tire from the Rim
To remove the flat tire from the rim, you need to detach the tire. This process can seem daunting at first, but with just a few steps, you can get it done easily. First, you need to remove the valve stem cap and deflate the tire by pressing the pin inside the valve stem.
After that, pry the tire away from the rim using tire levers. Start at one edge of the tire and work your way around the wheel, using the levers to separate the tire from the rim. Be careful to avoid damaging the rim or puncturing the tire.
Once you’ve gone all the way around the tire, you should be able to remove it from the rim. This step is important because it allows you to inspect the tire for any damage or wear that may have caused the flat. Don’t forget to examine the rim as well for any cracks, dents, or other issues.
By taking the time to properly detach the tire from the rim, you can ensure that you’ll be able to replace the tire and get back on the road safely and securely.
Clean the Rim to Ensure Tight Contact with the New Tire
When it comes to changing a flat tire, it’s important to clean the rim before installing the new tire to ensure a tight and secure fit. This means removing the old flat tire from the rim, which can be a bit of a challenge. First, you’ll need to loosen the lug nuts with a tire iron, but don’t remove them just yet.
Next, use a car jack to raise the car off the ground and finish removing the lug nuts. With the old tire off, take a few minutes to clean the rim thoroughly with a wire brush or sandpaper to remove any debris or rust that might interfere with the installation of the new tire. Once the rim is clean, you can slide the new tire onto the rim, starting at the valve stem and working your way around.
Use a tire iron to tighten the lug nuts, following a star pattern to ensure even tightening. And there you have it – a new tire that’s securely fastened to your car’s rim.
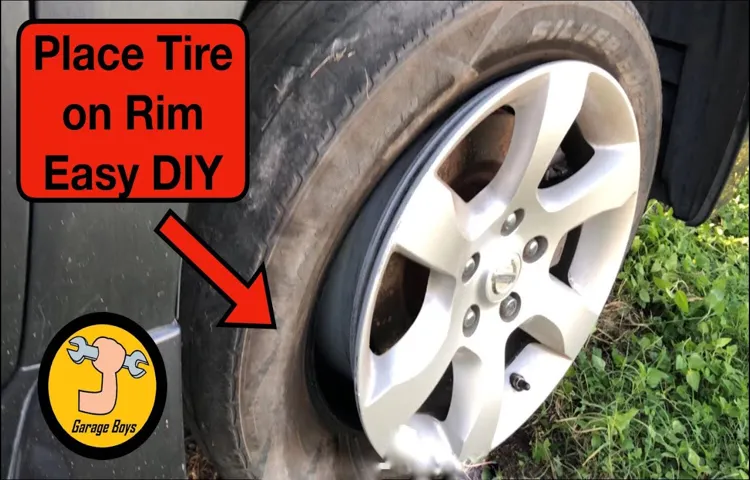
Place the New Tire on the Rim
When it comes to changing a flat tire, putting the new tire back on the rim can seem like a daunting task. The first step is ensuring the tire is properly aligned with the rim. Then, use your hands to stretch the tire over the rim, starting at the valve stem.
Once the tire is partially on, use a tire iron to work the rest of the tire onto the rim. Be sure to use caution and avoid pinching the inner tube while you work. If the tire seems resistant to going onto the rim, try applying lubricant to the tire bead or the rim’s sidewall.
With some patience and a bit of effort, you should be able to successfully mount the tire. Just remember to finish the job by adding air to the tube and tightening the valve stem nut.
Lubricate the Rim with Soap Solution
When it comes to changing a tire, one crucial step is to lubricate the rim with soap solution. This helps make it easier to insert the new tire onto the rim, especially if it’s a tight fit. First, you can mix some soap and water in a spray bottle and shake it well to get a soapy solution.
Then, spray this solution generously on the inside of the tire bead and the rim flange. This will help reduce friction and create a slick surface that will allow the tire to slip onto the rim more easily. Be sure to apply the solution evenly around the circumference of the rim.
By taking this simple step, you’ll save yourself a lot of hassle and frustration trying to wrangle a new tire onto a dry, uncooperative rim. Just remember to wipe away any excess solution before inflating the tire, as it may cause the bead to slip off the rim during inflation.
Align the Tire and the Rim
When it comes to replacing a tire, it’s important to know how to properly align the tire and the rim. This is an essential step in the process, as an improperly aligned tire can lead to various problems down the road. To begin the process, place the new tire on the rim, making sure it’s properly seated.
Then, locate the valve stem and align it with the recessed area on the rim. This will allow you to properly seat the tire bead onto the rim. Next, use a tire machine or bead breaker to apply pressure to the tire and seat the bead onto the rim.
This process may take a bit of force, so make sure you’re using the right tools and equipment for the job. Once the tire is properly seated, you can begin inflating it to the recommended pressure level for your vehicle. By taking the time to properly align the tire and rim, you can ensure a safer and smoother drive on the road.
Use a Tire Iron to Push the Tire over the Rim
When it comes to replacing a tire, one of the crucial parts is getting it onto the rim properly. To do this, you’ll need to use a tire iron to push the tire over the rim. Start by getting the tire in the right position on the rim, making sure the valve stem is centered.
Then, push one side of the tire onto the rim using the tire iron. Work your way around the tire, pushing it onto the rim bit by bit. It can be a bit tricky, so don’t be afraid to use some force.
Keep pushing until the entire tire is on the rim, and make sure it’s seated evenly all the way around. Once the tire is on the rim, you’ll need to inflate it to the manufacturer’s recommended pressure before getting back on the road. Remember, always be careful when working with tires – they can be dangerous if not handled properly.
By following these steps and taking your time, you can get your new tire onto the rim safely and effectively.
Ensure the Tire is Evenly Spread on the Rim
When mounting a new tire on the rim, it’s important to ensure that the tire is evenly spread across the rim. To do this, start by placing the tire onto the rim, making sure that the valve stem is aligned with the valve hole in the rim. Next, you’ll want to use a tire iron to work the beads of the tire onto the rim, being careful not to damage the tire or the rim in the process.
Once the tire is fully seated onto the rim, it’s time to inflate it to the recommended pressure level. This will help to ensure that the tire is properly seated and will give you a better idea of how evenly the tire is spread across the rim. If you notice any areas where the tire seems to be bulging or unevenly spread, use a tire iron to carefully adjust the tire until it sits evenly on the rim.
By taking the time to properly mount your new tire, you can help to ensure a safer and more comfortable ride.
Inflate the Tire to the Correct Pressure
Putting a tire back on the rim can be a bit challenging, but with the right tools and techniques, you can do it properly. Once you’ve successfully seated the tire onto the rim, it’s time to inflate it to the correct pressure. Make sure to use a tire pressure gauge to determine the recommended pressure for your specific tire model.
Overinflating your tire can cause it to burst, while underinflating it can lead to reduced handling and fuel efficiency. When inflating the tire, be sure to use a high-quality air compressor that is capable of delivering the right amount of pressure. Start by fitting the nozzle onto the valve stem, and then gradually add air while checking the pressure regularly with your gauge.
Once you’ve reached the recommended pressure, quickly remove the nozzle and tightly reseal the valve stem cap. Double-check the pressure before driving on the newly installed tire to ensure optimum performance, safety, and efficiency. Overall, inflating the tire to the correct pressure is crucial for maintaining the longevity and all-around functionality of your vehicle’s tires.
Check the Recommended Tire Pressure
Tire Pressure Maintaining the correct tire pressure is crucial, not only for safe driving but also for fuel efficiency and tire longevity. Every vehicle has a recommended tire pressure, and it’s essential to inflate your tires to that exact pressure. Overinflated tires can cause a harsh ride and decrease traction due to less contact with the road.
On the other hand, underinflated tires will lead to poor fuel economy and cause the tire’s sidewalls to flex, generating excessive heat and reducing tire life. So, make sure to check your tire pressure at least once a month, especially before a long trip, and inflate it to the recommended PSI for your vehicle. It may seem like a minor detail, but it can make a big difference in your driving experience and save you money in the long run.
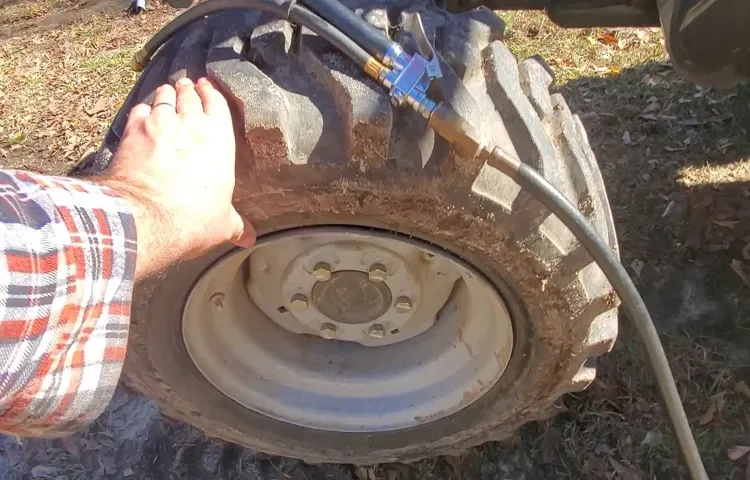
Use an Air Pump to Inflate the Tire
When it comes to inflating your tires, using an air pump is essential. The first step is to identify the correct pressure for your specific tire, which can usually be found on the sidewall or in your vehicle’s manual. Once you’ve located the proper pressure, connect the air pump nozzle to the valve stem on your tire.
Be sure to check that the nozzle is properly seated to avoid any air leaks. Begin pumping air into the tire, periodically pausing to check the pressure with a tire gauge. It’s important to avoid overinflating your tire, as this can lead to reduced traction and a higher risk of a blowout.
Additionally, underinflated tires can reduce fuel efficiency and cause excessive wear and tear. Inflating your tires to the correct pressure not only keeps you safe on the road but can also save you money in the long run.
Check the Pressure and Adjust if Necessary
In order to ensure maximum safety and performance while driving, it’s crucial to check the pressure of your vehicle’s tires regularly. Proper tire pressure not only improves handling but also enhances fuel efficiency and prolongs the life of your tires. To inflate your tires correctly, first, locate the recommended tire pressure, which can usually be found on the inside of the driver’s side door or in the owner’s manual.
Then, use a tire pressure gauge to measure the pressure in each tire individually. If the pressure is too low, add air until it reaches the recommended level. On the other hand, if the pressure is too high, release air until it reaches the recommended level.
Remember that correctly inflating your car’s tires is essential for your safety and the safety of others on the road, so make sure you do it regularly!
Conclusion
Congratulations, you’ve successfully navigated the treacherous terrain of tire repair! Putting a tire back on the rim can be a real challenge, but with a little know-how and some elbow grease, you can get the job done. Whether you’re stranded on the side of the road or just want to show off your mechanical prowess, these tire mounting techniques will have you back on the road in no time. So get out there, grab a tire iron, and don’t be afraid to get your hands dirty – you never know when you might need to save the day (and your wallet) with a little tire wizardry.
“
FAQs
What tools do I need to put a tire back on the rim?
You will need a tire lever, a valve stem tool, and an air compressor or pump.
How do I remove the old tire from the rim?
Use a tire lever to remove the tire from the rim, starting at the valve stem and working your way around the tire.
How do I clean the rim before putting a new tire on it?
Use a wire brush to remove any rust or debris from the rim, then wipe it clean with a cloth and some soapy water.
How do I align the tire on the rim before inflating it?
Start by seating one side of the tire on the rim, making sure it is centered. Then, work the other side of the tire onto the rim, being careful not to pinch the inner tube.
How much air pressure should I put in the tire?
Check the recommended pressure level for your specific tire on the sidewall, and inflate the tire to that level using a gauge.
What should I do if the tire won’t seat properly on the rim?
Check for any debris or obstructions between the tire and rim, and make sure the tire is properly aligned. You may need to deflate the tire and start over if it won’t seat.
How do I test the tire to make sure it is properly seated and inflated?
Spin the tire and look for any wobbling or uneven movement. Check the air pressure with a gauge to ensure it is at the recommended level.