
Have you ever experienced the frustration of discovering a chip in your windshield? It may seem like a small issue, but if left unattended, it can quickly turn into a large crack and compromise your safety on the road. Luckily, there’s a simple and effective solution to repair windshield chips – Rain-X. This innovative product not only repels rain and improves visibility, but it can also repair minor chips in your windshield, saving you time and money.
In this blog post, we’ll walk you through the steps to repair a windshield chip with Rain-X, so you can get back on the road with confidence.
Table of Contents
Introduction
If you have a chip in your windshield, you may be wondering how to repair it yourself. One option is to use RainX, a popular windshield treatment that can also be used to repair small chips and cracks. To begin, thoroughly clean the area around the chip with a glass cleaner to remove any dirt or debris.
Once the area is clean, apply a small amount of RainX to the chip, being careful not to smear it onto the surrounding glass. Use a soft cloth or applicator to gently rub the RainX into the chip, filling in any cracks or gaps. After the RainX has dried, use a clean cloth to buff away any excess.
This process may need to be repeated several times for best results. While RainX can be effective for small repairs, it is important to note that it may not be suitable for larger or more severe damage. In these cases, it is best to consult a professional for repair or replacement.
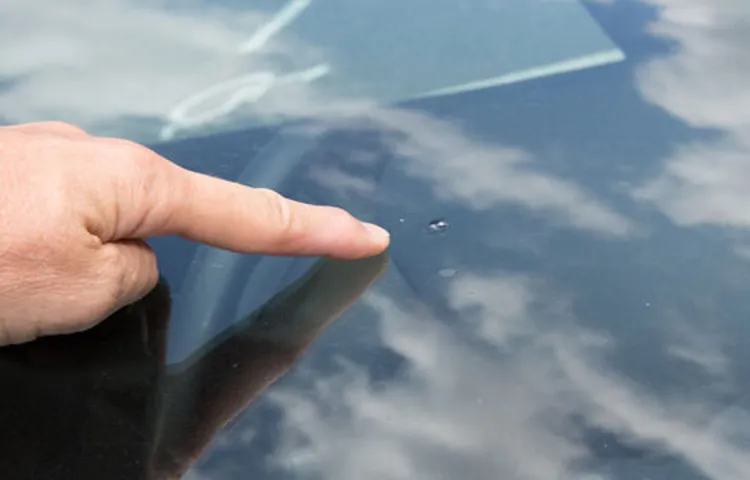
Overview of repairing windshield chips
windshield chip repair

Benefits of using Rain-X for windshield chip repairs
Rain-X, a popular automotive product, offers many benefits when it comes to repairing windshield chips. Whether you have a small chip or a larger crack, using Rain-X can help to prevent further damage and improve visibility while driving. This product works by filling in the chip or crack with a clear resin that hardens over time, creating a strong and durable repair.
Not only does Rain-X provide a quick and easy solution, but it also helps to save you money in the long run by preventing the need for a costly windshield replacement. So why not give Rain-X a try and see the difference it can make in repairing your windshield chips?
Materials Needed
If you have a windshield chip and are looking for an easy and effective way to repair it, look no further than Rain-X. This popular brand offers a windshield repair kit that can help fix those annoying chips, preventing them from spreading and potentially causing further damage. The Rain-X windshield repair kit comes with everything you need to complete the repair, including a syringe, resin, curing strips, and a razor blade.
The first step is to clean the chip with the provided alcohol wipe and then apply the resin using the syringe. After that, you place a curing strip on top and let it dry in the sun or under a UV lamp. Once it’s completely dry, you can remove the strip and scrape off any excess resin with the razor blade.
With Rain-X, you can save time and money by repairing your windshield chip yourself, without having to go to a professional.
Rain-X Windshield Repair Kit
In order to use the Rain-X Windshield Repair Kit effectively, there are a few materials you will need to have on hand. First and foremost, you will need the kit itself, which includes a resin formula, repair device, and curing strips. Additionally, you will need some masking tape to protect the surrounding area of the windshield during the repair process.
A clean microfiber cloth is also essential for applying the resin and polishing the repaired area. Lastly, it is recommended to have a small needle or safety pin on hand to remove any air bubbles that may form during the repair. With these materials ready, you will be well-prepared to restore the clarity and strength of your windshield with the Rain-X Windshield Repair Kit.
Clean cloth
clean cloth
Rubbing alcohol
rubbing alcohol, materials needed, disinfectant, cleaning solution, household supplies, first aid kit, medical use, isopropyl alcohol, chemical compound, bottle, cotton balls, swabs, cleaning cloth, spray bottle Blog Section: When it comes to keeping your surroundings clean and germ-free, rubbing alcohol is a must-have household supply. Also known as isopropyl alcohol, this chemical compound is not only effective as a disinfectant but also has numerous other uses. Whether you’re looking to clean your countertops or sterilize your first aid supplies, rubbing alcohol is a versatile cleaning solution that can come in handy in many situations.
To make the most of rubbing alcohol, a few materials are needed. First and foremost, you’ll need a bottle of rubbing alcohol. You can easily find this at your local drugstore or supermarket.
Look for a high percentage of isopropyl alcohol, preferably 70% or higher, as this is the most effective concentration for disinfection purposes. To apply the rubbing alcohol, you’ll need some cotton balls or swabs. These allow for precise application and ensure that the solution reaches all the nooks and crannies you need to clean or disinfect.
Additionally, having a cleaning cloth on hand is useful for larger surfaces or for wiping away any excess liquid. For added convenience, you can also transfer the rubbing alcohol into a spray bottle. This makes it easier to apply the solution in a fine mist, especially when cleaning larger areas or objects.
Just be sure to label the spray bottle clearly, so you don’t confuse it with other cleaning solutions. Whether you’re using rubbing alcohol for household cleaning or for medical purposes, having these materials readily available will ensure that you can tackle any cleaning task effectively. From wiping down surfaces to sterilizing your first aid kit, rubbing alcohol is a versatile and indispensable cleaning solution that should have a place in every home.
Step-by-Step Guide
If you have a chip in your windshield, it’s important to repair it as soon as possible to prevent further damage and ensure your safety on the road. One popular method for repairing windshield chips is using Rain-X windshield repair kit. This step-by-step guide will walk you through the process of how to repair a windshield chip with Rain-X.
Before you begin, make sure you have all the necessary materials: Rain-X windshield repair kit, rubbing alcohol, and a clean cloth. Start by cleaning the chip and the surrounding area with rubbing alcohol to remove any dirt or debris. This will ensure a clean surface for the repair.
Next, apply one drop of the resin from the Rain-X kit onto the center of the chip, making sure to cover the entire area. Use the provided adhesive tab to cover the resin, pressing it down firmly to remove any air bubbles. Let the resin cure for at least 10 minutes under direct sunlight or a UV lamp.
After the resin has cured, remove the adhesive tab by pulling it straight up. Use the razor blade included in the kit to carefully scrape off any excess resin, keeping the blade at a 90-degree angle to the windshield. Be gentle to avoid scratching the glass.
Once you have removed the excess resin, clean the windshield with rubbing alcohol and a clean cloth to remove any residue. This will ensure a clear and smooth finish. Finally, inspect the repair to ensure it is level with the windshield surface.
If there are any imperfections, repeat the process until you are satisfied with the result. Repairing a windshield chip with Rain-X is a simple and effective method that can save you time and money. By following this step-by-step guide, you can easily repair minor chips and prevent them from spreading into larger cracks.
Step 1: Clean the damaged area
water damage, clean, damaged area
Step 2: Prepare the Rain-X Repair Kit
rain-x repair kit Now that you’ve gathered all the necessary supplies, it’s time to prepare the Rain-X Repair Kit. This step-by-step guide will walk you through the process. First, open the Rain-X Repair Kit and carefully read the instructions provided.
It’s important to familiarize yourself with the steps before you begin. Next, locate the syringe and remove the cap. This syringe will be used to apply the repair resin to the damaged area on your windshield.
Take the time to examine the syringe and ensure it is clean and free from any debris. You don’t want anything interfering with the repair process. Once you’ve inspected the syringe, it’s time to attach the repair bridge.
The repair bridge is a small device that will hold the syringe in place as you apply the resin. It should easily slide onto the syringe and click into place. Make sure it is securely attached before moving on to the next step.
Now that the syringe and repair bridge are properly prepared, you can move on to the final step. In the next section, we’ll discuss how to clean and prepare the damaged area on your windshield before applying the resin.
Step 3: Apply the resin to the chip
Applying resin to a chip is a crucial step in the process of repairing or filling a windshield chip. It helps to reinforce the damaged area and prevent further spreading of the crack. To successfully apply the resin, follow these step-by-step instructions.
First, ensure that the repair area is clean and dry. Use a razor blade or a windshield repair kit to remove any loose glass or debris from the chip. Then, carefully follow the instructions on the resin bottle to mix the resin and hardener together.
Once the resin is mixed, apply it to the chip using a syringe or an applicator provided in the repair kit. Gently push the resin into the chip, filling it completely. Make sure to cover the entire chip and any cracks radiating from it.
Use a small brush to spread the resin evenly over the entire area. If necessary, add additional resin to fill any gaps or depressions. Once the chip is completely filled, cover it with a curing film or a piece of clear plastic to protect it from dust and debris.
Allow the resin to cure and harden according to the manufacturer’s instructions. This usually involves exposing the repair to sunlight or using a UV curing lamp. After the resin has cured, remove the curing film and use a razor blade to carefully scrape off any excess resin.
Polish the repaired area with a glass cleaner and a soft cloth to restore its clarity. By following these steps, you can successfully apply resin to a windshield chip and prevent further damage.
Step 4: Insert the curing strip
curing strip Once you’ve prepared your tire for patching, it’s time to move on to the next step: inserting the curing strip. This small but important strip of rubber is what will ultimately seal the puncture and ensure a proper repair. To begin, take your patch and locate the small hole in the center.
This is where the strip will be inserted. Next, take the curing strip and carefully thread it through the hole, making sure it is inserted all the way to the center of the patch. It’s important to be gentle during this process to avoid damaging the strip or the patch.
Once the strip is in place, you can then press down on the patch to secure it, ensuring a tight bond with the tire. The curing strip is a crucial component in the repair process, providing strength and stability to the patch and ensuring a lasting repair. So, make sure to take your time and follow these steps carefully to ensure that your tire is properly repaired and ready to hit the road again.
Step 5: Let the resin cure
resin cure
Step 6: Scrape away excess resin
In this step of the resin scraping process, we reach the point where we need to remove any excess resin from our project. After pouring the resin and letting it cure, you may find that there are some rough edges or drips of resin that need to be taken care of. To do this, you’ll need a scraper or a piece of sandpaper.
Using gentle strokes, scrape away any uneven areas or elevated drips of resin. Be careful not to apply too much pressure, as you don’t want to damage the surface of your project. Take your time and work methodically, making sure to smooth out any imperfections.
It’s like giving your project a final touch-up, ensuring that it looks its best. Once you’re satisfied with the smoothness of your project, you can move on to the final step in the resin scraping process.
Step 7: Clean and polish the repaired area
Step 7: Clean and polish the repaired area Once you have successfully repaired the damaged area, the next step is to clean and polish it to achieve a seamless finish. Start by wiping away any dust or debris with a soft, damp cloth or sponge. Be gentle to avoid scratching the surface.
Next, use a mild detergent or soap and water solution to clean the area thoroughly. This will help remove any grease, dirt, or grime that may be present. After cleaning, dry the area completely with a clean, dry cloth.
Once the area is dry, you can proceed to the polishing stage. Use a polishing compound or a specialized automotive polish to restore the shine and luster to the repaired area. Apply a small amount of the polish to a clean, soft cloth and gently rub it onto the repaired surface in circular motions.
Continue polishing until you achieve a smooth, glossy finish. Finally, wipe away any excess polish and admire your handiwork.
Tips and Precautions
If you find a chip on your car’s windshield, it’s important to address it as soon as possible to prevent further damage. Luckily, you can use Rain-X windshield repair kit to fix small chips and cracks yourself. Here are some tips and precautions to keep in mind when attempting to repair a windshield chip with Rain-X.
First, make sure to clean the damaged area thoroughly before applying the repair resin. Use a glass cleaner to remove any dirt or debris from the chip. This will ensure that the resin bonds properly and fills the chip completely.
Next, apply the resin from the Rain-X repair kit according to the instructions provided. It’s important to follow the directions carefully to ensure a proper repair. Usually, you will need to apply the resin to the chip and then place a curing strip over it.
This strip will help the resin to cure and harden. Once the resin has cured, use a razor blade or similar tool to scrape away any excess resin on the surface of the windshield. Be careful not to scratch the glass during this process.
After removing the excess resin, use a glass cleaner again to clean the windshield. While using Rain-X to repair a windshield chip is relatively easy, there are some precautions you should take. First, only attempt to repair small chips and cracks.
If the damage is larger or extends beyond the initial chip, it’s best to consult a professional. Additionally, keep in mind that the repair may not be completely invisible. While Rain-X can greatly improve the appearance of a chip, there may still be a slight mark or distortion on the windshield.
Work in a shaded area
Work in a shaded area
Avoid repairing chips in extreme temperatures
repairing chips, extreme temperatures, tips and precautions In order to ensure the best results when repairing chips in your car’s windshield, it’s important to take certain precautions. One of the most important tips to keep in mind is to avoid repairing chips in extreme temperatures. This is because extreme temperatures can have a negative impact on the resin used to repair the chip.
In very cold temperatures, the resin may take longer to cure and may not adhere properly to the glass. On the other hand, in very hot temperatures, the resin may cure too quickly, leading to a weaker bond and a less effective repair. To avoid these issues, it’s best to repair chips in more moderate temperatures, ideally between 50 and 75 degrees Fahrenheit.
By following this simple tip, you can ensure that your chip repairs are done correctly and effectively, giving you the peace of mind you need on the road.
Follow instructions carefully
When it comes to following instructions, it’s important to pay attention and take things step by step. Whether it’s following a recipe, assembling furniture, or putting together a piece of equipment, carefully following the instructions can make all the difference. One small mistake or missed step can lead to big problems down the line.
It’s like trying to build a puzzle without looking at the picture on the box – you might end up with a completely different outcome than what you were aiming for. So take your time, read the instructions thoroughly, and double-check each step before moving on. It may seem tedious, but it will save you a lot of time and frustration in the long run.
Remember, the instructions are there for a reason, and by following them carefully, you’ll ensure that you achieve the desired result.
Do a test on a small chip first
When it comes to testing a new chip, it’s always a good idea to start small. Doing a test on a small chip before moving on to larger ones can help you identify any potential issues or bugs early on. This allows you to make necessary adjustments and improvements without wasting time and resources on a full-scale production run.
Starting with a small chip also gives you the opportunity to experiment and fine-tune your design, ensuring that it meets all the necessary specifications and requirements. So, before you go ahead and invest in mass production, take the time to do a test on a small chip first. Trust me, it will save you a lot of headaches in the long run.
Conclusion
And there you have it, the foolproof guide to repairing a windshield chip with Rain-X. Now you can confidently conquer those pesky chips and say goodbye to the unsightly cracks on your windshield. It’s like giving your car a facelift, but without the expensive plastic surgery bills.
So next time you find yourself faced with a chip, don’t panic, just grab your Rain-X and get to work. Remember, you have the power to make your windshield shine like it’s fresh out of the showroom. Who knew that a little rain could be the key to restoring your car’s beauty? So go forth and conquer, my friends.
And let the rain be your guide to a flawless windshield once again.”
The convenience and effectiveness of using Rain-X for windshield chip repairs
convenience and effectiveness, Rain-X, windshield chip repairs, Tips and Precautions
FAQs
How can I repair a windshield chip with Rain-X?
To repair a windshield chip with Rain-X, start by cleaning the area around the chip with a glass cleaner. Then, apply a small amount of Rain-X windshield repair kit resin to the chip and cover it with a curing strip. Follow the instructions provided with the kit for the specific curing time. Once cured, remove the strip and polish the area with a soft cloth.
Is it possible to fix a small chip on my windshield using Rain-X?
Yes, Rain-X offers a windshield repair kit that can be used to fix small chips on the windshield. The kit contains all the necessary materials and instructions to complete the repair process. It is important to follow the instructions carefully for the best results.
Does repairing a windshield chip with Rain-X prevent further damage?
Yes, repairing a windshield chip with Rain-X can help prevent further damage. The resin used in the Rain-X windshield repair kit is designed to seal the chip and prevent it from spreading. By repairing the chip promptly, you can avoid the need for a full windshield replacement in the future.
How long does it take to repair a windshield chip with Rain-X?
The time it takes to repair a windshield chip with Rain-X can vary depending on the size and severity of the chip, as well as the specific instructions provided with the Rain-X windshield repair kit. Generally, it can take anywhere from 30 minutes to an hour to complete the repair process.
Can I use Rain-X windshield repair kit on my own or should I seek professional help?
The Rain-X windshield repair kit is designed to be used by individuals without professional training. However, if you are unsure or uncomfortable with performing the repair yourself, it is always recommended to seek professional help. Professional windshield repair services can ensure the chip is properly repaired, maximizing the chances of a successful repair.
Will Rain-X windshield repair kit make the chip invisible?
While Rain-X windshield repair kit can improve the appearance of a chip, it may not make it completely invisible. The primary purpose of the kit is to repair the chip and prevent it from spreading, rather than completely eliminating the visible mark. The result of the repair may vary depending on the size and severity of the chip.
Can Rain-X windshield repair kit fix multiple chips on the windshield?
Yes, Rain-X windshield repair kit can be used to fix multiple chips on the windshield. However, it is important to note that the kit is designed for small chips and may not be suitable for larger or more severe damage. In case of extensive damage, it is advisable to consult a professional for proper assessment and repair.