
Welcome to our blog! Today, we are diving into the exciting world of “Introduction.” We all know that introductions play a crucial role in capturing attention and setting the stage for what’s to come. Whether it’s meeting someone for the first time or starting a new book, a good introduction can make all the difference.
Think about it – have you ever been captivated by the opening scene of a movie? Or found yourself engrossed in the first chapter of a novel? That’s the power of a well-crafted introduction. It hooks you in, grabs your interest, and leaves you wanting more. But what makes a good introduction? Is it the words chosen? The way they are arranged? Or is it something deeper, something that taps into our primal need for connection and curiosity? We believe it’s a combination of all these elements and more.
Imagine walking into a party and being greeted by a charismatic host. They introduce themselves, make you feel welcome, and spark a conversation that instantly makes you feel at ease. That’s the kind of introduction we aim to create in our blog – one that captivates and engages you from the very beginning.
So, whether you’re here to learn something new, find inspiration, or simply enjoy some thought-provoking content, we invite you to join us on this journey of exploration and discovery. Together, let’s dive into the world of introductions and unravel the secrets behind captivating openings. Get ready to be inspired, intrigued, and maybe even surprised as we delve into the art of introductions and uncover what makes them so powerful.
We hope you’ll enjoy this blog as much as we enjoy creating it. So grab a cup of coffee, sit back, and let’s embark on this adventure together. Remember, a good introduction is just the beginning.
It sets the stage for what’s to come and leaves you eager for more. So, without further ado, let’s jump right in and discover the magic of introductions – they might just change the way you see the world.
Table of Contents
Understanding Windshield Cracks
Have you ever found yourself with a small crack in your windshield and wondered if you could repair it yourself? Well, the good news is that in some cases, you may be able to fix a windshield crack yourself. However, it’s important to understand the severity of the crack and whether it can be safely repaired. If the crack is less than six inches long and not in the driver’s direct line of vision, there is a chance it can be fixed.
There are DIY windshield repair kits available that contain all the necessary tools and materials you will need. These kits typically come with a resin that is injected into the cracked area, helping to fill and seal the crack. However, it’s important to note that while DIY repair kits can be effective for small cracks, they may not provide a long-lasting solution.
If you have a larger or more severe crack, it’s best to leave the repair to the professionals to ensure your safety on the road.
Types of Windshield Cracks
Understanding Windshield Cracks A crack in your windshield can be a frustrating and inconvenient problem. It not only affects your visibility while driving but can also compromise the structural integrity of the glass. There are different types of windshield cracks, and understanding them can help you determine the best course of action for repair or replacement.
One common type of windshield crack is a simple linear crack. This occurs when debris or a small object hits the windshield and creates a single line of damage. These cracks are usually straightforward to repair if they are small and do not extend all the way across the glass.
Another type of windshield crack is a bullseye crack. This type of crack is characterized by a circular or semi-circular shape, almost like a target. It is typically caused by a direct impact from a larger object, like a rock or a baseball.
Bullseye cracks can vary in size and may have an outer ring of cracks surrounding the main area of damage. A star crack is another common type of windshield damage. It is named for its resemblance to a star, with multiple lines radiating from a central point of impact.
Star cracks are often caused by a heavy impact from an object like a hammer or a large stone. Finally, there are also combination cracks, which are a combination of two or more types of cracks. For example, you may have a linear crack that intersects with a bullseye or a star crack.
Combination cracks can be more challenging to repair, depending on the extent and location of the damage. In conclusion, understanding the different types of windshield cracks can help you better assess the severity of the damage and determine the most appropriate solution. Whether it’s a simple linear crack, a bullseye crack, a star crack, or a combination of cracks, it’s essential to address the issue promptly to ensure your safety on the road.
Causes of Windshield Cracks
causes of windshield cracks Understanding the causes of windshield cracks is crucial for every car owner. No one wants a cracked windshield, as it not only obstructs our vision but also compromises the structural integrity of the vehicle. So, what are the main culprits behind windshield cracks? One common cause is temperature fluctuations.
When the weather goes from extremely cold to hot or vice versa, the glass expands and contracts, creating stress points that can lead to cracks. Another factor is flying debris, such as rocks and gravel, which can chip or crack the windshield upon impact. Other causes include road vibrations, improper installation, and even a minor accident.
It’s essential to take preventive measures, such as maintaining a safe distance from other vehicles, avoiding rough roads, and regularly inspecting the windshield for any signs of damage. Additionally, promptly addressing small chips can prevent them from turning into large cracks. By understanding the causes of windshield cracks and taking the necessary precautions, we can ensure the safety and longevity of our vehicle’s windshield.
Assessing the Crack
If you’ve ever had a crack in your windshield, you know how frustrating it can be. Not only does it impair your visibility while driving, but it can also be a safety hazard. Luckily, there are ways to repair a windshield crack yourself without having to take it to a professional.
First, you’ll need to assess the crack to determine if it’s something you can fix on your own. Take a close look at the size and location of the crack. If it’s smaller than a dollar bill and not in your line of sight, it’s likely something you can repair yourself.
However, if the crack is larger or directly in your line of sight, it’s best to leave the repairs to the professionals to ensure your safety on the road.
Determining if the Crack is Repairable
Determining if the Crack is Repairable When assessing a crack, it is important to carefully consider a few key factors before determining if it is repairable. One of the first things to look at is the size and length of the crack. Generally, smaller cracks that are less than a quarter inch in width are more easily repairable.
Additionally, the location of the crack plays a role in its repairability. If the crack is in a particularly vulnerable area, such as near a load-bearing wall or in a foundation, it may be more difficult to repair. It is also important to inspect the depth of the crack.
Shallow cracks that do not penetrate deeply into the material are generally easier to fix. On the other hand, deeper cracks may require more extensive repairs. Another factor to consider is the cause of the crack.
If the crack is the result of a structural issue or ongoing foundation problems, it may be necessary to fix the underlying issue before repairing the crack. By carefully assessing these factors, you can determine if a crack is repairable and what steps need to be taken to fix it properly.
Measuring the Size and Depth of the Crack
When it comes to assessing the size and depth of a crack, there are a few key factors to consider. First, it’s important to examine the crack itself. Is it small and superficial, or does it extend deep into the surface? By closely inspecting the crack, you can get a better understanding of its size and determine whether it requires immediate attention.
Additionally, it’s important to consider the context in which the crack appears. Is it located in a high-stress area, such as a load-bearing wall, or is it in a less critical location? Understanding the potential consequences of a crack can help determine the urgency of repairs. Finally, it’s useful to measure the crack using precise instruments.
This can provide valuable information about the crack’s width and depth, allowing for a more accurate assessment. By taking these factors into account, you can effectively measure the size and depth of a crack and make informed decisions about the necessary repairs.
Gathering the Necessary Tools
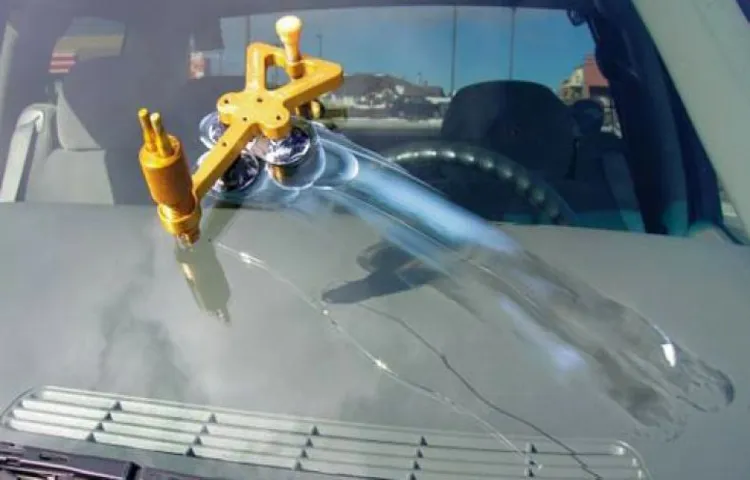
If you notice a crack in your windshield, don’t panic! With the right tools, you can actually repair it yourself. Gathering the necessary tools is the first step in this DIY project. To effectively repair a windshield crack, you will need a windshield repair kit, which typically includes a bridge assembly, resin, curing film, and a razor blade.
The bridge assembly is used to create a vacuum seal over the crack, allowing the resin to be injected into the damaged area. The resin is then used to fill the crack and strengthen the glass. The curing film is used to cover the repair and prevent dust or dirt from contaminating the resin as it dries.
Finally, a razor blade is used to remove any excess resin and ensure a smooth finish. With these tools in hand, you will be well-prepared to tackle the task of repairing your windshield crack yourself.
List of Tools
As you venture into the world of DIY projects, it’s important to gather the necessary tools to tackle any task you come across. Whether you’re a seasoned DIYer or just starting out, having the right tools can make all the difference in the success of your project. So, what exactly do you need? Well, it depends on the type of projects you plan on taking on.
Some essential tools that every DIY enthusiast should have in their arsenal include a hammer, screwdriver set, tape measure, pliers, and a level. A hammer will come in handy for a variety of tasks, from hanging pictures to assembling furniture. A screwdriver set is a must-have for any DIY project that involves screws, whether it’s fixing a loose doorknob or assembling a bookshelf.
A tape measure will ensure that your projects are precise and accurate, whether you’re cutting wood or hanging curtains. Pliers are versatile tools that can be used for everything from gripping and twisting wires to removing nails. And last but not least, a level will ensure that your projects are straight and level, whether it’s hanging shelves or installing a new light fixture.
So gather these essential tools and get ready to tackle any DIY project that comes your way!
Preparing the Windshield
So, you’ve noticed a crack on your windshield, and you’re wondering if you can fix it yourself. Well, the good news is that you can! Repairing a windshield crack may seem daunting at first, but with the right tools and a little bit of patience, you can save yourself a trip to the auto shop and some money too. Before you start repairing the crack, it’s important to prepare the windshield.
Firstly, clean the area around the crack with a mild detergent and water. Make sure to remove any dirt or debris that may be stuck in the crack. Next, dry the area thoroughly using a clean cloth or paper towel.
This is essential as any moisture on the windshield can interfere with the repair process. Additionally, you may want to cover the crack with tape to prevent dirt or other particles from entering the crack while you’re repairing it. Once you’ve prepared the windshield, you’re ready to move on to the next step in fixing that crack!
Cleaning the Windshield
windshield cleaning, preparing windshield
Protecting Surrounding Areas
windshield preparation When it comes to protecting the surrounding areas while working on your windshield, preparation is key. One important step is to make sure you properly prepare the windshield itself. This involves removing any dirt, dust, or debris that may be on the surface.
You can do this by using a soft cloth or sponge and a mild detergent. By thoroughly cleaning the windshield before beginning any repairs or replacements, you can ensure that the surrounding areas won’t be damaged by loose particles or residue. This step may seem small, but it can make a big difference in preventing any potential harm to the surrounding areas during the windshield repair or replacement process.
Taking just a few minutes to prepare the windshield can save you a lot of time and effort in the long run. So, don’t forget to give your windshield a good cleaning before getting started.
Repairing the Crack
If you’ve noticed a crack in your windshield, don’t panic. With a little patience and a steady hand, you can repair it yourself. The first step is to assess the size and depth of the crack.
If it’s less than six inches long and not obstructing your vision, it’s a good candidate for a DIY fix. To start, gather the necessary materials: a windshield repair kit, which typically includes a resin and an applicator, and a clean cloth for wiping away excess resin. Begin by cleaning the area around the crack with a glass cleaner and a lint-free cloth.
This will ensure that the resin adheres properly. Next, follow the instructions provided with the repair kit to apply the resin. Generally, this involves placing the supplied adhesive strip over the crack, squeezing the resin into the applicator, and then inserting it into the strip.
Apply pressure to force the resin into the crack, and remove any air bubbles or excess resin with a razor blade or the edge of a credit card. After allowing the resin to cure (this can take anywhere from a few minutes to a few hours, depending on the brand), gently remove the adhesive strip and wipe away any remaining residue with a clean cloth. Finally, use a glass cleaner to clean the entire windshield, making sure to remove any smudges or streaks left behind by the repair process.
By taking the time to repair a windshield crack yourself, you can save money and ensure that your windshield remains in good condition. However, it’s important to note that DIY repairs are not always permanent and may not be suitable for larger or more severe cracks. If you’re unsure about your ability to repair the crack yourself, it’s best to consult a professional.
Injecting Resin into the Crack
“resin injection crack repair” Injecting resin into the crack is a crucial step in the process of repairing it. Resin acts as a strong adhesive and filler that helps to stabilize and seal the crack, preventing further damage or water penetration. The first step is to clean and prepare the crack by removing any loose or damaged material.
This ensures that the resin can bond effectively to the surfaces of the crack. Once the crack is clean, a specialized injection kit is used to apply the resin. The kit typically includes a cartridge of liquid resin and a syringe or injection gun.
The resin is slowly injected into the crack, starting from the lowest point and working upwards. This allows the resin to fill the entire length of the crack, effectively sealing it. As the resin is injected, it penetrates deep into the crack, bonding to the walls and forming a strong bond.
The injection process may need to be repeated several times to ensure that the crack is completely filled. Once the resin has cured and hardened, the crack is effectively repaired, restoring the structural integrity of the material.
Curing the Resin
cure resin, repairing the crack
Finishing Touches
Have you noticed a crack in your windshield and are wondering if you can repair it yourself? Well, you’re in luck! With the right tools and a bit of patience, you can fix that crack and save yourself some money. The first step is to assess the size and depth of the crack. If it is less than six inches long and not too deep, you can attempt a DIY repair.
Next, gather the necessary supplies, including a windshield repair kit and a clean, dry cloth. Follow the instructions carefully, applying the repair resin to the crack and using a curing strip to help the resin dry. Once the resin is dry, remove the strip and polish the repaired area with a glass cleaner.
It’s important to note that DIY repairs are not a long-term solution and may not be as effective as professional repairs. For larger or more severe cracks, it’s best to seek the help of a professional.
Removing Excess Resin
Removing excess resin is an essential step to achieve a professional and polished finish on your resin project. After allowing the resin to cure fully, you may notice some unevenness or rough edges on the surface. This is where removing excess resin comes into play.
One of the easiest and most effective ways to do this is by using sandpaper. Start with a low grit sandpaper, such as 80 or 120, and gently sand the surface of the resin. This will help smooth out any imperfections and create a uniform texture.
As you sand, be sure to remove any dust or particles that may accumulate. Once you have achieved the desired smoothness, move on to a finer sandpaper, such as 220 or 320, to further refine the finish. Remember to take your time and use light pressure to avoid damaging the resin.
Another method to remove excess resin is by using a handheld rotary tool with a sanding attachment. This tool allows for more precision and control compared to sandpaper, especially when working on intricate or small areas. Simply attach the sanding bit to the rotary tool and gently sand the resin surface.
Make sure to move the tool in smooth, even strokes to avoid creating uneven patches. As with the sandpaper method, be sure to clean off any debris or dust particles regularly to maintain a clean working surface. Additionally, using a heat gun or butane torch can help remove surface imperfections and bubbles in the resin.
The heat melts the resin, allowing it to self-level and create a smooth finish. However, it is important to exercise caution when using heat tools, as excessive heat can cause the resin to bubble or become charred. Always keep the heat tool moving to prevent overheating in one spot, and never hold the heat source too close to the resin surface.
Polishing the Windshield
car detailing Imagine driving down the road in your shiny, newly washed car. The sun is shining, and everything is perfect until you notice a few smudges on your windshield. Suddenly, your perfect drive is marred by these small imperfections.
That’s where the finishing touches of car detailing come into play. Just like polishing the windshield to perfection, car detailing is the process of making your vehicle look its absolute best. It involves not only washing the exterior but also cleaning and restoring the interior to ensure a complete transformation.
It’s like giving your car a spa day, where every nook and cranny is cleaned and pampered. From vacuuming to waxing, car detailing leaves no stone unturned, giving your vehicle the TLC it deserves. So, whether your car needs some love after a long winter or you simply want to treat yourself to a fresh, clean ride, car detailing is the way to go.
Preventing Future Cracks
So you’ve noticed a crack on your windshield, and you’re wondering if you can repair it yourself. Well, the good news is that you can! With the right tools and a little bit of patience, you can save yourself the hassle and expense of taking your car to a professional. One of the best methods for repairing a windshield crack yourself is to use a windshield repair kit.
These kits typically include a resin and a bridge device, which allows you to inject the resin into the crack and create a seal. Once the resin has cured, the crack should be filled in and the structural integrity of your windshield restored. It’s important to note, however, that not all cracks can be repaired successfully.
If the crack is too large or if it extends into the driver’s line of sight, it may be necessary to replace the windshield altogether. It’s also worth mentioning that this DIY method is not a permanent fix, but rather a temporary solution to prevent the crack from spreading. So if you notice a crack on your windshield, don’t panic! With the right tools and a little know-how, you can repair it yourself and prevent further damage.
Driving Safely
There’s nothing worse than spotting a crack in your windshield. Not only can it ruin the aesthetics of your car, but it also poses a safety risk. A cracked windshield is more prone to shattering upon impact, which could cause serious injury to you and your passengers.
So how can you prevent future cracks and keep yourself safe on the road? One simple solution is to drive safely. By following a few basic guidelines, you can minimize the risk of debris hitting your windshield and causing damage. First and foremost, maintain a safe following distance from the vehicle in front of you.
This will give you more time to react if something falls off their vehicle and avoid flying debris. Another important tip is to avoid driving behind large trucks or construction vehicles as they are more likely to kick up rocks and debris. Additionally, be cautious when driving on gravel roads or areas with loose gravel, as this can cause rocks to become airborne.
By being proactive and mindful of your surroundings, you can greatly reduce the likelihood of future cracks in your windshield.
Maintenance Tips
Maintaining your home’s foundation is essential to prevent cracks and other structural issues in the future. One of the best ways to avoid future cracks is by taking proactive measures to protect your foundation. Start by addressing any existing drainage issues around your home.
Properly directing water away from your foundation will help prevent excess moisture from seeping into the soil and causing the foundation to shift and crack. Regularly inspecting and maintaining your gutters and downspouts is also crucial. Clear away any debris that could cause water to overflow and seep into the ground near your foundation.
Additionally, ensure that the soil around your home is properly graded to slope away from the foundation. This will help prevent water from pooling near the base of your home and potentially causing cracks. Remember, taking these preventive measures now can save you from costly repairs and headaches down the road.
So, be proactive and protect the foundation of your home.
Conclusion
In conclusion, fixing a windshield crack is as simple as following these steps, just like Operation: Operation Operation, if you catch my drift. By treating your windshield with the care and attention it deserves, you can easily avoid the costly hassle of professional repairs. So grab your superhero cape and put on your DIY hat, because you’ve just become the ultimate windshield crack expert.
Remember, with a little time and effort, you’ll be cruising down the road with a clear view, and a newfound sense of accomplishment. Happy crack repairing!”
FAQs
Can I repair a windshield crack myself?
Yes, you can repair a windshield crack yourself. There are DIY repair kits available that provide step-by-step instructions on how to fix the crack.
How long does it take to repair a windshield crack myself?
The time it takes to repair a windshield crack yourself can vary depending on the size and severity of the crack. On average, it can take anywhere from 30 minutes to an hour.
What tools do I need to repair a windshield crack myself?
To repair a windshield crack yourself, you will generally need a repair kit that includes a repair resin, an applicator, curing strips, and a razor blade or drill. The specific tools required may vary depending on the kit you choose.
Are DIY repair kits effective in fixing windshield cracks?
DIY repair kits can be effective in fixing windshield cracks, especially if the crack is small and hasn’t spread extensively. However, it’s important to note that the results may not be as perfect as professional repairs.
What types of cracks can I repair myself?
You can typically repair small cracks, such as bullseye cracks, star-shaped cracks, and combination cracks, yourself using a DIY repair kit. Larger cracks and those that have spread extensively may require professional repair.
Can I drive my car immediately after repairing a windshield crack myself?
It is generally recommended to wait for the repair to fully cure before driving your car. The curing time can vary depending on the repair kit you use, but it is typically around 24 hours.
Is it cheaper to repair a windshield crack myself or have it professionally repaired?
Repairing a windshield crack yourself with a DIY kit is typically cheaper than having it professionally repaired. However, if the crack is extensive or if you are unsure about your DIY skills, it’s best to consult a professional for an assessment.