
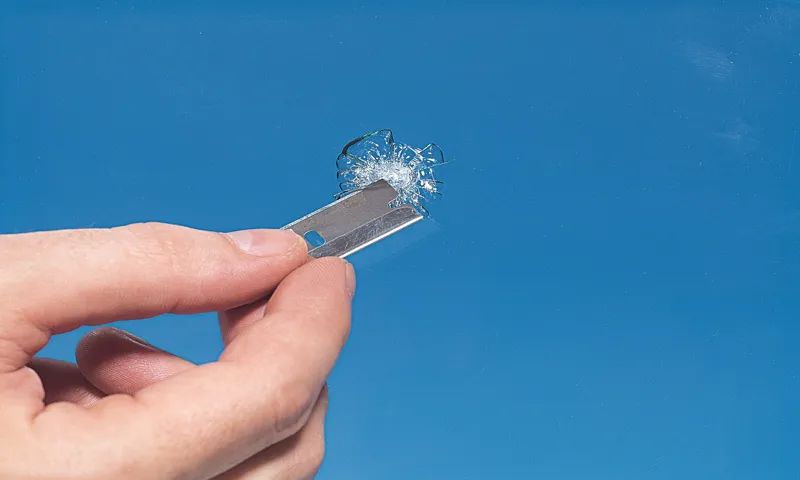
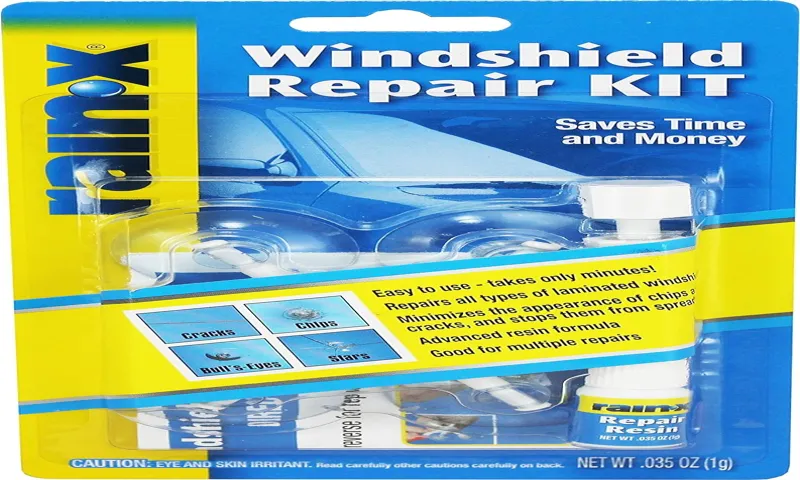
Are you tired of looking through your windshield and seeing those annoying little chips and cracks? They can be a real eyesore and also a safety hazard. But before you rush to replace your windshield, there’s a simple and affordable solution – the Rain-X Windshield Repair Kit. This kit is like a magic wand for your windshield, allowing you to fix those pesky chips and cracks in no time.
It uses a special resin that is injected into the damaged area, filling it up and making it virtually invisible. And the best part? You can do it yourself, right at home, without any professional help. Using the Rain-X Windshield Repair Kit is incredibly easy.
First, clean the damaged area with the provided alcohol wipe, ensuring that it is free from any dirt or debris. Then, apply the adhesive pad to the center of the chip or crack, making sure it sticks securely. Next, place the resin chamber over the adhesive pad and inject the resin by screwing in the plunger.
Give it a few minutes to cure, depending on the temperature and size of the damage. Finally, remove the resin chamber, scrape off any excess resin with the included razor blade, and polish the area with the provided buffing pad. Not only does the Rain-X Windshield Repair Kit save you time and money, but it also helps prevent further damage.
By repairing chips and cracks early on, you can avoid the need for a costly windshield replacement down the line. Plus, having a clear and unobstructed view of the road is essential for your safety while driving. So, why put up with those unsightly chips and cracks any longer? Get yourself a Rain-X Windshield Repair Kit and easily fix them yourself.
It’s a quick and simple solution that will leave your windshield looking as good as new. Say goodbye to those distractions on your windshield and hello to a clear and safe driving experience.
Table of Contents
Section 1: Introduction
Have you ever had a cracked or chipped windshield and worried about the cost and hassle of getting it repaired? Well, fear not, because the Rain-X Windshield Repair Kit is here to save the day! This innovative kit allows you to fix your windshield yourself, without the need for expensive professional repairs. So, how does it work? The process is surprisingly simple. First, you’ll want to clean the damaged area with the provided alcohol wipe.
This step is important for ensuring a strong bond between the repair resin and the windshield. Once the area is clean and dry, you’ll need to apply the repair resin. The kit includes a syringe filled with the resin, which you’ll want to carefully insert into the damaged area.
Gently squeeze the syringe to dispense the resin, making sure to fill the entire crack or chip. After that, you’ll want to cover the area with the provided curing strip, which helps to create a smooth and even surface. Leave the strip in place for about 10 minutes to allow the resin to cure.
Finally, remove the strip and use the enclosed razor blade to remove any excess resin. Voila! Your windshield is good as new. The Rain-X Windshield Repair Kit is a convenient and cost-effective solution for minor windshield damage.
Not only does it save you time and money, but it also helps to prevent further damage by stabilizing the crack or chip. So, the next time you find yourself with a small crack or chip in your windshield, remember to grab your Rain-X Repair Kit and fix it yourself in no time.
Explanation of the Rain-X Windshield Repair Kit
Rain-X Windshield Repair Kit Rain-X Windshield Repair Kit is a handy tool that allows you to fix small chips and cracks on your windshield quickly and effectively. Whether it’s caused by a small rock or a flying pebble, these minor damages can become a major headache if not addressed promptly. That’s where the Rain-X Windshield Repair Kit comes in.
It provides an easy and affordable solution to repair those small damages before they turn into large cracks that will require a full windshield replacement. This kit is designed for DIY enthusiasts and anyone who wants to save money on costly repairs. With just a few simple steps, you can restore the clarity and integrity of your windshield in no time.
So, let’s dive in and learn how this amazing kit works and how it can benefit you.
Benefits of using the Rain-X Windshield Repair Kit
Rain-X Windshield Repair Kit
Section 2: Preparing the Windshield
When it comes to using a Rain-X windshield repair kit, the first step is to properly prepare the windshield. Before applying the repair solution, the windshield needs to be clean and free of any dirt, debris, or residue. Start by thoroughly washing the windshield with a mild detergent and water.
Make sure to remove any bugs, bird droppings, or tree sap. Once the windshield is clean, it’s important to dry it completely with a clean, lint-free cloth. Any moisture left on the windshield can affect the adhesion of the repair solution.
After drying, it’s recommended to use the Rain-X glass cleaner that comes with the kit to remove any remaining residue and provide a clean surface for the repair solution to adhere to. By following these steps and properly preparing the windshield, you will ensure that the Rain-X windshield repair kit works effectively and provides a clear and durable repair.
Cleaning the damaged area
Cleaning the damaged area of a windshield is an essential step in preparing it for repair or replacement. Before anything else, it’s important to remove any debris or loose glass from the damaged area. This can be done by gently brushing away any loose particles with a soft brush or cloth.
Then, it’s time to clean the area thoroughly to ensure a smooth and secure repair. Start by washing the damaged area with a mild soap and water mixture. This will help remove any dirt or grime that may have accumulated on the surface.
Be sure to rinse the area thoroughly to remove any soap residue. Next, use a glass cleaner specifically designed for auto glass to clean the damaged area. Spray the cleaner directly onto the glass and use a clean, lint-free cloth to wipe away any dirt or smudges.
This will not only improve the appearance of the damaged area but will also help ensure a proper seal when it comes time to repair or replace the windshield. Additionally, it’s important to avoid using any abrasive materials or harsh chemicals that may damage the glass further. By taking the time to properly clean the damaged area, you’ll be setting the stage for a successful repair or replacement of your windshield.
Drying the windshield
drying the windshield After cleaning the windshield, it is essential to give it a good dry to ensure a streak-free finish. You don’t want to be driving with a foggy or blurry windshield, especially during rainy or snowy conditions. So, how can you effectively dry your windshield? One simple and effective method is to use a microfiber cloth.
These soft and absorbent cloths are perfect for wiping away any remaining moisture on the glass. They won’t scratch or leave lint behind, ensuring a clear view of the road ahead. Gently wipe the cloth across the windshield in a back-and-forth motion until it’s completely dry.
Remember to pay attention to the edges and corners, as water tends to pool there. If you have difficulty reaching certain areas, such as the lower corners near the dashboard, you can use a squeegee to remove the water. Just make sure it’s clean and free of any debris that could scratch the glass.
With a little bit of effort, you can have a crystal clear windshield in no time!
Section 3: Applying the Repair Solution
So, you’ve decided to take matters into your own hands and fix that pesky windshield chip using a Rain-X windshield repair kit. Great choice! This kit is designed to provide a quick and easy way to repair small chips and cracks in your windshield. But how exactly do you use it? Don’t worry, I’ve got you covered.
First, make sure the surface you’re working on is clean and dry. Use a microfiber cloth to wipe away any dirt or debris from the damaged area. Next, take a look at the instructions provided with the kit.
They will guide you through the process step by step. Typically, the kit will include a syringe filled with a specialized resin, a curing strip, and a small suction cup device. Start by attaching the suction cup device to the center of the damaged area on your windshield.
This will help create a seal and hold everything in place during the repair process. Next, use the syringe to carefully inject the resin into the damaged area. Be sure to follow the instructions on the exact amount of resin to use.
Once the resin is in place, cover it with the curing strip. This strip helps to create pressure on the resin and ensures it fills the entire chip or crack. Now, it’s time to let the kit do its magic.
Leave the curing strip in place for the recommended amount of time, usually around 10-15 minutes. During this time, the resin will bond with the glass, filling in the damaged area and preventing further spreading. After the recommended time has passed, carefully remove the curing strip.
Applying the Repair Solution to the damaged area
Applying the Repair Solution to the damaged area is the next step in fixing the problem. Once you’ve identified the damaged part and gathered the necessary tools and materials, it’s time to get to work. Start by cleaning the area thoroughly to ensure a proper bond between the repair solution and the surface.
Depending on the type of damage, you may need to sand down the surrounding area to create a smooth and even surface. This will help the repair solution adhere better and ensure a seamless finish. Next, mix the repair solution according to the manufacturer’s instructions.
Apply the solution evenly to the damaged area using a brush or a sponge. Make sure to spread it out in thin layers to avoid any lumps or bumps. Allow the repair solution to dry completely before moving on to the next step.
Once it’s dry, you can sand down any rough patches and apply a second layer if necessary. Remember to follow the instructions provided with the repair solution and take your time to ensure a high-quality repair. With proper application, the damaged area will soon be as good as new.
Using the Repair Resin
repair resin Section 3: Applying the Repair Solution Now that you have prepared the damaged area and cleaned it thoroughly, it’s time to apply the repair resin. This is a crucial step in the repair process, as it will help to restore the strength and integrity of the damaged material. To begin, take your repair resin and carefully pour it into the provided applicator.
Make sure to follow the instructions on the packaging, as different repair resins may have different application methods. Once the resin is in the applicator, you can start applying it to the damaged area. Using the applicator, carefully spread the repair resin over the damaged area.
Be sure to cover the entire damaged section, as this will help to ensure a strong and effective repair. It’s important to work quickly but carefully, as the repair resin may start to harden once it is exposed to air. Once the repair resin is applied, use a scraper or a similar tool to smooth out the surface.
This will help to ensure a flush repair and a seamless finish. Make sure to remove any excess resin around the edges of the repair area, as this can create an uneven surface. After applying the repair resin, it’s important to allow it to cure.
This process can take several hours or even overnight, depending on the type of repair resin you are using. Follow the instructions on the packaging for the recommended curing time. Once the repair resin is fully cured, you can sand it down to create a smooth finish.
Start with a coarse grit sandpaper and gradually move to a finer grit to achieve the desired result. Finally, apply a coat of paint or finish to match the surrounding area, and your repair is complete.
Applying pressure to fill the cracks
“Cracks in the foundation of our homes can be a major concern, but luckily there are solutions available to fix them. One effective method is applying pressure to the cracks to fill them and reinforce the structure. Think of it like filling a pothole in the road – if it’s left unfilled, it will only get worse over time.
By applying pressure to the cracks, whether it’s through epoxy injection or using hydraulic jacks, we can ensure that the repair solution penetrates deep into the cracks and creates a strong bond. This not only helps to stabilize the foundation but also prevents any further damage from occurring. So, next time you notice a crack in your home’s foundation, don’t panic! Just remember that by applying pressure to fill the cracks, you’re taking the necessary steps to protect your home and keep it safe for years to come.
“
Section 4: Curing and Buffing
After applying Rain-X Windshield Repair Kit to the damaged area and allowing it to dry, it is time to move onto the next step: curing and buffing. This step is crucial for ensuring a seamless repair and restoring the clarity of your windshield. To cure the resin, you will need to expose it to direct sunlight for at least 5-10 minutes.
This process helps to harden and strengthen the resin, making it more durable and long-lasting. After curing, you can proceed to buff the repaired area with a clean microfiber cloth. This step helps to remove any excess resin and leaves a smooth, clear surface.
Be sure to use gentle, circular motions while buffing to avoid scratching the glass. Once you have completed the curing and buffing process, stand back and admire your handiwork. Your windshield should now be repaired and free from any visible damage.
Waiting for the repair solution to cure
In the final stage of the repair process, we have to wait for the solution to cure. It’s like waiting for a cake to bake in the oven – you know it will turn out delicious, but you can’t rush the process. Curing is crucial because it allows the repair solution to fully bond and harden, ensuring a strong and durable finish.
Just like how patience is key for a perfect cake, patience is also essential here. We want to make sure the repair solution has enough time to dry and cure completely, so it can withstand everyday wear and tear. Once the solution is fully cured, it’s time to move on to the final step – buffing.
This step helps to blend the repair with the surrounding area, giving it a seamless and professional appearance. So, while waiting for the repair solution to cure may seem like a slow and tedious process, it’s a necessary one that ensures a long-lasting and beautiful result.
Buffing the repaired area
How to fix a dent in a car bumper Once the repair work is complete and the filler has dried, it’s time to move on to the next step: buffing the repaired area. This is an important step because it helps to blend the repaired area with the surrounding paint and make it look seamless. To start, you’ll need some sandpaper with a fine grit, such as 2000 grit.
Gently sand the repaired area until it is smooth and level with the surrounding paint. Be careful not to sand too aggressively, as this can damage the surrounding paint. Once the area is smooth, wipe away any dust and apply a polishing compound using a clean cloth.
Buff the repaired area using circular motions until it is shiny and matches the rest of the bumper. This will give the repaired area a professional finish and make it virtually invisible.
Section 5: Final Steps and Tips
Alright, so you’ve got your Rain-X windshield repair kit and you’re ready to tackle those pesky cracks or chips in your windshield. Well, let me walk you through how to use this handy kit to get your windshield looking as good as new. First, make sure the area you’ll be working on is clean and dry.
This will ensure that the repair resin adheres properly to the damaged area. Next, place the provided suction cups around the damaged area, ensuring a tight seal to prevent any leaks. Now, it’s time to apply the repair resin.
Take the syringe that’s included in the kit and remove the cap. Attach it to the suction cup assembly and start twisting it clockwise to dispense the resin into the damaged area. Keep twisting until the syringe is empty, and be sure to apply steady pressure to ensure the resin fills all the cracks and chips.
Once the resin is in place, cover the damaged area with the provided curing strips. These will help protect the resin and prevent any dust or debris from interfering with the repair process. Leave the strips in place for at least an hour to allow the resin to cure.
After the curing time is up, carefully remove the curing strips and clean off any excess resin with a razor blade. Use a clean cloth to wipe away any residue and give your windshield a final polish for a flawless finish. And there you have it – your Rain-X windshield repair kit has done its magic and your windshield is looking good as new.
Just remember, this kit is best suited for small cracks and chips. If you have a more severe or extensive damage, it’s always best to consult a professional. But for those minor fixes, Rain-X has you covered.
Cleaning the repaired area
cleaning, repaired area
Tips for maintaining the repair
In this final section, we will discuss some tips and tricks to help you maintain your repair and ensure its longevity. First off, it’s essential to regularly clean and inspect your repair. This will help you identify any potential issues or wear and tear that may require further attention.
Additionally, consider utilizing protective measures such as covering your repair with a protective case or applying a sealant to help prevent future damage. Another tip is to be mindful of your usage habits. Avoid placing excessive strain on the repaired area or subjecting it to harsh conditions.
Finally, stay proactive by keeping a watchful eye on your repair and addressing any minor issues before they escalate into more significant problems. Remember, maintenance is key to extending the lifespan of your repair.
Section 6: Conclusion
In conclusion, the Rain-X windshield repair kit is like a professional magician for your car’s windshield. With just a few simple steps, it can make those annoying little cracks and chips disappear faster than Houdini in a straightjacket. All you need to do is apply the magic potion provided, place the specially designed curing strip on top, and let the sorcery of time and UV light do their work.
It’s like giving your windshield a spa treatment, leaving it looking cleaner, clearer, and more enchanting than ever before. So wave your repair wand and banish those windshield woes with the Rain-X repair kit – because who needs a magic wand when you have science on your side?
Summary of the steps
Now that you have completed the initial steps of your project, it’s time to move on to the final stages. Section 5 will guide you through the last steps and provide you with some useful tips to ensure your success. Firstly, it’s important to review everything you have done so far and make any necessary adjustments or improvements.
Double-check your research, data, and calculations to ensure accuracy. Next, begin implementing your plan and executing the tasks you have outlined. Stay organized and keep track of your progress to stay on top of your project.
As you work, make sure to take breaks and recharge. Giving yourself time to rest and reset will help you maintain focus and productivity. It’s also essential to communicate with your team or stakeholders regularly, keeping them informed about your progress and addressing any concerns or questions they may have.
As you near the end of your project, take the time to evaluate your work. Reflect on what went well and what could be improved for future projects. Finally, celebrate your accomplishments and take pride in the work you have done.
Completing a project is no easy feat, so give yourself a pat on the back for a job well done!
Benefits of using the Rain-X Windshield Repair Kit
Rain-X Windshield Repair Kit, crack, damage, repair, clarity, visibility Section 5: Final Steps and Tips Now that you’ve followed all the necessary steps to repair the crack in your windshield using the Rain-X Windshield Repair Kit, there are just a few final things to keep in mind. Firstly, it’s important to allow ample time for the resin to dry and harden completely. This will ensure a strong and durable repair that will last.
Typically, it is recommended to let the repair sit for at least an hour in direct sunlight or under a UV lamp. After the resin has fully cured, it’s time to do a final clean-up. Use a clean, dry cloth to remove any excess resin from the surface of the windshield.
Be sure to be gentle and avoid scratching the glass. Once the excess resin is removed, you can use a glass cleaner to clean the entire windshield, including the repaired area. This will help restore clarity and visibility to your windshield, ensuring a safer driving experience.
Another important tip is to avoid washing your car for at least 24 hours after completing the repair. Washing the car too soon can disrupt the drying process of the resin. Additionally, avoid parking your car outdoors during this time, especially in extreme weather conditions.
Both hot and cold temperatures can affect the curing process of the resin and compromise the repair. To maintain the longevity of the repair, it is also recommended to avoid using abrasive cleaners or scrubbing the repaired area excessively. Treat the repaired area with the same care as the rest of your windshield to ensure its durability.
In conclusion, the Rain-X Windshield Repair Kit is a convenient and effective solution for repairing cracks and damage to your windshield. By following the proper steps and taking care of the final details, you can restore clarity and visibility to your windshield, ensuring a safer and more enjoyable driving experience. So why wait? Get your Rain-X Windshield Repair Kit today and say goodbye to those unsightly cracks on your windshield.
FAQs
How do I use Rain-X windshield repair kit?
To use the Rain-X windshield repair kit, first clean the damaged area with a glass cleaner and dry it thoroughly. Then, apply the repair resin onto the damaged area in a circular motion. Use the included curing strip to level the resin and remove any excess. Finally, let it dry for about 30 minutes in direct sunlight.
Can I use Rain-X windshield repair kit on all types of cracks?
Yes, the Rain-X windshield repair kit is suitable for repairing most types of cracks on your windshield, including bullseye, star, and combination cracks up to 1.25 inches in diameter.
How long does it take for the repaired windshield to become fully cured?
The repaired windshield using the Rain-X windshield repair kit typically takes about 24 hours to fully cure. It is recommended to avoid washing the windshield or exposing it to any moisture during this curing period.
Can I use the Rain-X windshield repair kit in extreme temperatures?
It is not recommended to use the Rain-X windshield repair kit in extreme temperatures, such as below freezing or above 90 degrees Fahrenheit. The optimal temperature for application and curing is between 50 and 75 degrees Fahrenheit.
Will Rain-X windshield repair kit make the crack invisible?
The Rain-X windshield repair kit is designed to minimize the appearance of the crack and restore structural integrity to the windshield. While it may not make the crack completely invisible, it should significantly improve the visibility of the damage.
Is the Rain-X windshield repair kit a permanent fix?
The Rain-X windshield repair kit is a temporary solution to prevent further spreading of the crack and improve clarity. While it provides a durable repair, it may eventually require professional attention or windshield replacement for a permanent fix.
Can I apply Rain-X windshield repair kit on a heavily damaged windshield?
The Rain-X windshield repair kit is best suited for repairing small to moderate cracks. If your windshield is heavily damaged or has multiple cracks, it is advisable to consult a professional auto glass repair technician for proper evaluation and repair.