
Are you tired of dealing with a windshield wiper that just won’t work properly? Whether it’s skipping across the glass, making an annoying squeaking sound, or simply not moving at all, a malfunctioning wiper can be a major inconvenience and a safety hazard. But before you head to the auto shop and spend a small fortune on repairs, why not try fixing the problem yourself? In this blog post, we will guide you through the steps of repairing your windshield wiper linkage – the mechanism responsible for the movement of the wiper blades. By following our DIY instructions, you can save money and get your wipers working like new again.
So grab your tools and let’s get started!
Table of Contents
Introduction
If you’ve noticed that your windshield wipers are not working properly, it could be due to a problem with the wiper linkage. The wiper linkage is the mechanism that connects the wiper motor to the wiper arms, allowing them to move back and forth across the windshield. Over time, the linkage can become worn or damaged, causing the wipers to malfunction.
Repairing the wiper linkage is a relatively simple process that can be done at home with a few basic tools. In this guide, we will walk you through the steps to repair your windshield wiper linkage and get your wipers working like new again.
Explanation of windshield wiper linkage
windshield wiper linkage Introduction: Have you ever wondered how your windshield wipers in your car work together so seamlessly to keep your windshield clean and clear? Well, it all comes down to a crucial component called the windshield wiper linkage. This ingenious mechanism connects the wiper motor to the wiper arms and ensures that they move in sync to sweep away rain, snow, and debris from your windshield. Understanding how the windshield wiper linkage works can help you appreciate the intricate engineering that goes into creating a simple yet essential feature in your car.
So, let’s dive into the world of windshield wiper linkages and discover what makes them tick.
Importance of a functioning windshield wiper linkage
windshield wiper linkage
Tools and Materials
One common issue that car owners may face is a faulty windshield wiper linkage. This is the mechanism that connects the windshield wiper arms to the motor, allowing them to move back and forth across the windshield. If this linkage becomes damaged or worn out, it can prevent the wipers from functioning properly.
Luckily, repairing a windshield wiper linkage is a relatively straightforward task that can be done at home with a few basic tools and materials. To begin, you will need a socket wrench, pliers, a screwdriver, and a replacement linkage assembly (if necessary). Start by removing the wiper arms from the windshield, then detach the old linkage assembly from the motor.
Install the new linkage assembly, ensuring that it is securely fastened. Finally, reattach the wiper arms and test the wipers to make sure they are working correctly. By following these simple steps, you can easily repair your windshield wiper linkage and get your wipers back in working order.
List of required tools
“essential tools for DIY projects” When taking on a DIY project, having the right tools and materials can make all the difference in the world. Before getting started, it’s important to gather everything you’ll need to ensure a successful and efficient project. Some common tools that are often required include a hammer, screwdriver set, measuring tape, level, utility knife, pliers, and a power drill.
These tools will come in handy for a variety of tasks, from hanging pictures to assembling furniture. Additionally, it’s a good idea to have a selection of nails, screws, and wall anchors on hand, as well as sandpaper, paint brushes, and paint rollers if you plan on doing any painting. By having these essential tools and materials ready to go, you’ll be well-prepared to tackle any DIY project that comes your way.
List of required materials
The tools and materials needed for a project can vary depending on its complexity, but there are some basic items that are commonly required. These include a measuring tape, a pencil, a utility knife, a hammer, and a screwdriver. Additionally, you may need other tools such as a drill, a level, or a saw, depending on the specifics of your project.
It’s also important to have the right materials on hand, such as screws, nails, sandpaper, paint, or adhesive. By having the necessary tools and materials ready before starting a project, you can work more efficiently and avoid unnecessary trips to the hardware store. So, before you start that next DIY project, make sure you have the right tools and materials to get the job done right.
Step-by-Step Guide
Are you tired of the annoying squeaking sound your windshield wipers make every time you use them? If so, you may need to repair your windshield wiper linkage. Don’t worry, it’s not as difficult as it may seem. In this step-by-step guide, we’ll walk you through the process of fixing your windshield wiper linkage so you can get back to a smooth and quiet windshield wiping experience.
First, you’ll need to locate the wiper linkage under the hood of your car. It’s usually located near the base of the windshield. Once you’ve found it, you’ll need to remove the wiper arms from the linkage.
This can usually be done by gently prying them off with a flathead screwdriver. Next, you’ll need to remove the wiper motor and any other components that are blocking access to the wiper linkage. Once these are removed, you’ll be able to see the linkage more clearly.
Inspect it for any signs of damage or wear, such as broken or bent arms. If you notice any issues, you’ll need to replace the damaged parts. You can usually purchase replacement parts at an auto parts store or online.
Once you have the new parts, simply attach them to the linkage and reassemble everything. Test the wipers to make sure they’re working properly, and you’re done! With just a few simple steps, you can repair your windshield wiper linkage and enjoy a smoother and quieter wiping experience.
Step 1: Remove the wiper blades
In this step-by-step guide, we will walk you through how to remove your wiper blades. This is an essential task for maintaining your vehicle’s windshield wipers and ensuring clear visibility during rainy or snowy weather. Removing the wiper blades is generally a straightforward process, requiring only a few simple tools and a bit of patience.
To begin, locate the retaining clip or tab on the wiper arm, which holds the blade in place. Using a small flathead screwdriver, gently pry up the clip or tab to release the wiper blade. Be careful not to apply too much pressure, as you don’t want to damage the clip or the arm.
Once the clip or tab is released, you can carefully pull the wiper blade away from the windshield. Be mindful of the spring tension, as the arm may snap back if not held securely. Repeat this process for the other wiper blade, and remember to keep the blades in a safe place until you are ready to reinstall them.
By following these simple steps, you can easily remove your wiper blades and ensure that they are in top-notch working condition.
Step 2: Remove the wiper arm
Step 2 in removing a wiper arm is to actually remove the arm itself. Now, you might be thinking, “How do I do that?” Well, it’s actually quite simple! First, locate the small tab or lever at the base of the wiper arm. This is usually located where the arm connects to the wiper motor.
Once you find it, gently push or pull on the lever to release the arm from its locked position. It may take a little bit of force, but don’t worry, you won’t break anything! Once the lever is released, you can then carefully lift the wiper arm off of the windshield.
Step 3: Remove the motor assembly
In this step-by-step guide, we will walk you through the process of removing the motor assembly from your appliance. Removing the motor assembly can be a daunting task, but with the right tools and a little bit of patience, it can be done. The first thing you will need to do is unplug the appliance from the power source to ensure your safety.
Once you have done that, you can start by removing any screws or fasteners that are holding the motor assembly in place. Be sure to keep track of these screws as you will need them later. Once the screws are removed, you can gently lift the motor assembly out of its housing.
Be careful not to force anything or yank on any wires, as this may cause damage to the motor or other components. It may be helpful to refer to the appliance’s manual for specific instructions on how to remove the motor assembly. With a little bit of patience and care, you will have the motor assembly removed in no time.
Step 4: Remove the old linkage
When it comes to removing the old linkage from your project, it’s important to approach it with precision and care. In this step-by-step guide, we’ll walk you through the process so you can confidently move forward. The first thing you’ll want to do is locate the old linkage and assess its condition.
Look for any signs of wear or damage that may require additional steps or precautions. Once you have a clear understanding of what you’re working with, you’ll need to gently pry the old linkage away from its connection points. Be mindful not to apply too much force or you could risk causing further damage.
Take your time and work slowly to ensure a smooth and successful removal. Once the old linkage is free, inspect the areas where it was attached for any remaining debris or residue. Cleaning these areas thoroughly will prepare them for the installation of the new linkage in the next step.
Remember, this process requires patience and attention to detail, so take your time and don’t rush.
Step 5: Install the new linkage
install new linkage In this step-by-step guide, we will walk you through the process of installing a new linkage for your project. Once you have removed the old linkage, it’s time to install the new one. Start by aligning the holes on the new linkage with the holes on the frame or component that it will attach to.
Make sure everything is lined up properly before you begin tightening any screws or bolts. Once the holes are aligned, insert the screws or bolts into place and tighten them down using the appropriate tools. Be careful not to overtighten, as this could strip the threads or damage the new linkage.
Once all the screws or bolts are securely tightened, give the linkage a wiggle to ensure it is properly attached. If everything feels secure, you have successfully installed the new linkage! This is an important step in ensuring the functionality and longevity of your project, so take your time and double-check your work.
Step 6: Reassemble the wiper system
windshield wiper system, reassemble the wiper system, step-by-step guide.
Step 7: Test the wiper system
wiper system, testing the wiper system, troubleshooting wiper system, car wiper system, how to test wiper system, car maintenance, car repair, wiper blades, wiper fluid So you’ve successfully installed your new wiper blades, but how do you know if your wiper system is functioning properly? Testing the wiper system is an essential step in car maintenance and can help you avoid potential hazards on the road. But where do you start? Don’t worry, we’ve got you covered with this step-by-step guide on how to test the wiper system. First, make sure your car is parked in a safe place and turn on the ignition.
Activate the wiper system by turning on the wiper switch, usually located on the steering column or the dashboard. Listen for the distinctive sound of the wiper motor engaging and check to see if the wiper arms are moving smoothly across the windshield. If you notice any grinding noises or jerky movements, it could be a sign of a malfunctioning wiper motor or worn-out wiper arms.
Next, test the wiper fluid system. This is important for maintaining clear visibility, especially during rainy or dirty conditions. Press the wiper fluid button or pull the wiper stalk towards you to spray the fluid onto the windshield.
Check if the fluid is being evenly distributed and if there is enough fluid in the reservoir. If the fluid is not spraying properly or there is no fluid in the reservoir, it may indicate a clogged nozzle or a low wiper fluid level. Another aspect to test is the wiper speed settings.
Most cars have multiple speed settings for the wiper system, allowing you to adjust the speed according to the intensity of the rain or snowfall. Switch between different speed settings and observe if the wiper arms move accordingly. If the wiper blades are not moving at the selected speed or are moving too slowly, it could indicate a problem with the wiper motor or a worn-out wiper linkage.
Lastly, don’t forget to examine the condition of your wiper blades. Over time, wiper blades can become worn out and lose their effectiveness. Check for any signs of damage, such as cracks or tears on the blade, as this can impair their ability to clear rain or debris from the windshield.
Preventive Maintenance
If you’ve ever experienced the frustration of a broken windshield wiper linkage, you’re not alone. This essential component connects the wiper motor to the wiper arms, allowing them to sweep back and forth across your windshield. When the linkage becomes damaged or worn out, it can cause your wipers to malfunction or stop working altogether.
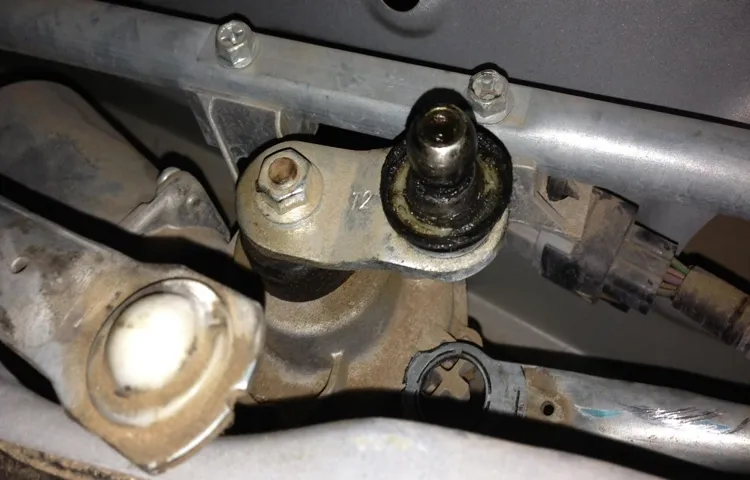
Fortunately, repairing a windshield wiper linkage is a relatively straightforward process that can be done at home with just a few tools. First, you’ll need to locate the linkage under the hood of your car. It’s typically located near the base of the windshield on the driver’s side.
Once you’ve found it, you can begin the repair process by removing any necessary parts or panels to access the linkage. Next, you’ll want to inspect the linkage for any signs of damage or wear. This may include bent or broken arms, loose or missing bolts, or worn-out bushings.
If you notice any issues, you’ll need to replace the damaged components. You can find replacement parts at your local auto parts store or online. Once you have the replacement parts, you can begin the installation process.
This typically involves removing the old linkage and installing the new one in its place. Be sure to follow any specific instructions provided with the replacement parts to ensure proper installation. Once the new linkage is installed, you can test your wipers to ensure they’re working correctly.
If everything looks good, you can reassemble any parts or panels that were removed to access the linkage. And that’s it – you’ve successfully repaired your windshield wiper linkage and restored full functionality to your wiper system. Regular preventive maintenance, such as checking the wiper blades for wear and cleaning the windshield regularly can help prevent future issues with the wiper linkage.
Tips for maintaining a healthy windshield wiper linkage
windshield wiper linkage, preventive maintenance, healthy windshield wiper linkage Keeping your windshield wiper linkage in good condition is essential for maintaining clear visibility on the road, especially during inclement weather conditions. Implementing some preventive maintenance measures can help prolong the life of your windshield wiper linkage and ensure it functions properly when you need it most. Firstly, it is crucial to regularly inspect your wiper linkage for any signs of wear and tear.
Look out for loose connections, rust, or any damage that may affect its performance. If you notice any issues, it is best to address them promptly to prevent further damage. Secondly, make it a habit to clean your windshield wiper blades and linkage regularly.
Over time, dirt, debris, and grime can accumulate, causing the wipers to work less efficiently. Gently wipe down the blades with a damp cloth, and use a soft brush to remove any debris from the linkage. Thirdly, ensure that your wiper linkage is properly lubricated.
Regularly apply a silicone-based lubricant to the pivot points of the linkage to keep it moving smoothly. This will help reduce friction and prevent any potential damage. Additionally, during the winter months, it is important to take extra care of your windshield wiper linkage.
Snow and ice can put a strain on the linkage and cause it to freeze. Before using your wipers in such conditions, clear away any snow or ice buildup to prevent damage. By implementing these preventive maintenance tips, you can ensure that your windshield wiper linkage remains in good health and functions effectively when you need it.
Taking care of your wiper linkage not only improves its longevity but also enhances your overall driving safety.
Conclusion
In conclusion, repairing a windshield wiper linkage is like performing a delicate dance with your car. It requires both finesse and determination to bring those wipers back to their smooth, swaying glory. Think of it as a wiper waltz – first, you must diagnose the issue with grace and precision, identifying the exact problem in the linkage.
Then, armed with your trusty tools, you embark on a tango of tinkering and adjusting, ensuring that each component is in perfect harmony. But, just like any skilled dancer, it’s not just about the technical steps. It’s about understanding the rhythm and flow of your wipers, finding the delicate balance between power and subtlety.
A truly skilled mechanic knows how to coax those wipers into graceful movements, restoring them to their former windshield-clearing glory. So, the next time you find yourself caught in a rainstorm with malfunctioning wipers, don’t fret! With a little know-how and a touch of finesse, you can repair your windshield wiper linkage and become the Fred Astaire of automotive maintenance. Just remember, it’s not just a repair – it’s a dance between man and machine.
“
FAQs
What can cause windshield wiper linkage damage?
Windshield wiper linkage damage can be caused by wear and tear, rust, corrosion, or excessive force applied to the wipers.
How can I tell if my windshield wiper linkage is damaged?
Signs of a damaged windshield wiper linkage include the wipers not moving or functioning properly, unusual sounds, or visible damage to the linkage components.
Can I repair a damaged windshield wiper linkage myself?
Repairing a damaged windshield wiper linkage can be a complex task and requires some mechanical knowledge. It is recommended to consult a professional or refer to the vehicle’s manual for guidance.
Are there any temporary fixes for a damaged windshield wiper linkage?
In some cases, a temporary fix for a damaged windshield wiper linkage can be done by securing the linkage with zip ties or replacing a broken linkage arm temporarily. However, it is essential to have the linkage properly repaired to ensure the wipers function correctly.
How much does it cost to repair a windshield wiper linkage?
The cost of repairing a windshield wiper linkage can vary depending on the extent of the damage and labor costs. On average, it can range from $100 to $300, including parts and labor.
Can a damaged windshield wiper linkage affect the performance of the wipers?
Yes, a damaged windshield wiper linkage can affect the performance of the wipers. It may cause the wipers to move unevenly, chatter, skip, or not move at all.
How long does it take to repair a windshield wiper linkage?
The time required to repair a windshield wiper linkage can vary depending on the extent of the damage, the availability of parts, and the experience of the technician. On average, it can take about 1 to 3 hours to complete the repair.