
Welcome to our blog! In today’s post, we’re diving into the fascinating topic of introduction. You might be wondering, what exactly does introduction mean? Well, let me break it down for you. An introduction is like the opening act of a captivating performance.
It’s the first impression, the initial handshake, the moment that piques your curiosity and draws you in. Think about it – when you meet someone for the first time, you introduce yourself to establish a connection. Similarly, in writing, an introduction sets the stage for what’s to come.
It grabs your attention, provides a glimpse into the subject matter, and entices you to keep reading. But an introduction is more than just a brief overview. It’s an art form in itself.
A well-crafted introduction not only captures your interest but also creates a sense of anticipation. It leaves you wanting more, eager to delve deeper into the topic at hand. In this blog, we’re going to explore different types of introductions and learn how to create compelling ones that captivate your audience.
We’ll discuss the importance of a strong opening, the elements that make an introduction impactful, and techniques that can elevate your writing from mundane to memorable. So, whether you’re a student working on an essay, a blogger crafting a post, or a professional presenting a report, understanding the art of introduction is vital to engaging your readers and making a lasting impression. Get ready to unlock the secrets of captivating introductions and take your writing to the next level.
Let’s dive in!
Table of Contents
- 1 What is a Power Inverter?
- 2 Benefits of Using a Power Inverter
- 3 Choose the Right Inverter
- 4 Check the Power Requirements
- 5 Prepare the Battery
- 6 Choose the Right Location
- 7 Mount the Power Inverter
- 8 Connect the Inverter to the Battery
- 9 Connect the Inverter to the AC Load
- 10 Test the Inverter
- 11 Check for Faults or Warning Lights
- 12 Troubleshoot Common Issues
- 13 Conclusion
- 14 FAQs
What is a Power Inverter?
Setting up a power inverter may seem like a daunting task, but it’s actually quite simple. A power inverter is a device that converts DC power from your car’s battery into AC power, which can be used to power various electronic devices. To set up a power inverter, first, choose an appropriate location to install it.
Ideally, it should be securely mounted and easily accessible. Next, connect the positive and negative terminals of the power inverter to the corresponding terminals on your car’s battery. Make sure to use the appropriate gauge wires to handle the power load.
Once the connections are secure, you can then plug in your electronic devices into the AC outlets on the power inverter. It’s important to remember to use the appropriate wattage and voltage for your devices to prevent any damage. With a properly set up power inverter, you can easily power your electronic devices on the go, whether it’s for camping trips or road trips.
So why wait? Get your power inverter set up today and stay connected wherever you go.
Benefits of Using a Power Inverter
So you’ve decided to set up a power inverter, but you’re not quite sure where to start. Well, let me break it down for you. A power inverter is a handy device that converts DC power from your battery into AC power that can be used to run appliances or charge electronic devices.
The first step in setting up a power inverter is to determine the wattage requirements of the devices you plan to power. This will help you choose the right size inverter for your needs. Once you have your inverter, you’ll need to connect it to your battery.
This typically involves connecting the positive and negative cables to the corresponding terminals on your battery. It’s important to make sure the connections are secure and free of any corrosion. Finally, you’ll need to connect your devices to the inverter using the appropriate cables.
Once everything is connected, you can start enjoying the benefits of using a power inverter, such as being able to power your appliances and devices while on the go. So go ahead and give it a try!
Are you ready to take your home improvement skills to the next level? Installing new fixtures or appliances can be a rewarding and cost-effective way to upgrade your living space. But before you dive headfirst into any installation project, it’s important to take the time to properly prepare. Just like a chef preps ingredients before cooking a delicious meal, preparing for installation is the key to a successful outcome.
In this blog post, we’ll explore the essential steps you need to take before getting started. So grab your toolbox and let’s get ready to transform your home!
Choose the Right Inverter
When setting up a power inverter, it’s important to choose the right one for your specific needs. An inverter is essentially a device that converts DC power from your vehicle’s battery into AC power that can be used to run household appliances and electronics. There are several factors to consider when selecting an inverter, including the power output, input voltage, and wave type.
First, you’ll want to determine the power output you require. This will depend on the types of devices you plan on running with the inverter. You’ll need to calculate the total wattage of all the devices you want to power and choose an inverter with a suitable power rating.
It’s always better to choose an inverter with a higher power output than you think you’ll need, as this will provide you with some extra capacity and prevent overloading. Next, you’ll need to consider the input voltage of the inverter. This is the voltage that your vehicle’s battery operates on, typically 12 volts or 24 volts.
Make sure the inverter you choose is compatible with your vehicle’s voltage. Lastly, you’ll need to decide on the wave type of the inverter. There are three main types of waves: modified sine wave, pure sine wave, and square wave.
Modified sine wave inverters are the most common and affordable option, but they may not be suitable for sensitive electronics like laptops and certain medical devices. Pure sine wave inverters produce a cleaner and more stable wave output, making them a better choice for these types of devices. However, they tend to be more expensive.
Square wave inverters are the least common and provide a lower quality wave output. By considering these factors and choosing the right inverter for your needs, you can ensure that your power inverter setup will work effectively and safely. Remember to always follow the manufacturer’s instructions and consult with a professional if you have any doubts or questions.
Check the Power Requirements
One of the most important things to consider when setting up a power inverter is to check the power requirements of the devices you plan to use with it. Power inverters come in different sizes and capacities, so it’s crucial to choose one that can handle the power needs of your devices. To determine the power requirements, you will need to look at the wattage of each device you plan to use.
This information can usually be found on the device itself or in the user manual. Once you have the wattage, you can calculate the total power requirements by adding up the wattage of all the devices. It’s also a good idea to add a little extra power capacity to account for any surges or fluctuations in power.
By checking the power requirements and choosing the right size power inverter, you can ensure that your devices will be powered safely and efficiently.
Prepare the Battery
When setting up a power inverter, it is crucial to prepare the battery properly. The first step is to choose the right battery for your needs. Look for a deep cycle battery, as it is designed to withstand repeated discharging and recharging, which is necessary for running an inverter.
Make sure the battery is fully charged before connecting it to the inverter. This will ensure that you get the most efficient power output. Next, connect the battery cables to the inverter, following the manufacturer’s instructions.
Double-check all connections to ensure they are secure and tight. Once everything is connected, turn on the inverter and test it with a small load. It’s important to monitor the battery’s voltage levels regularly and recharge it when necessary.
By properly preparing the battery, you can ensure that your power inverter operates smoothly and efficiently.
So you’ve finally decided to take on the project of installing a power inverter in your vehicle. Congratulations! This decision is a great step towards ensuring you have a reliable and convenient power source while on the go. But before you dive into the installation process, it’s essential to familiarize yourself with the necessary steps and precautions involved.
In this blog post, we’ll guide you through the process of installing a power inverter, from selecting the right one for your needs to safely connecting and mounting it in your vehicle. So grab your tools and let’s get started on this electrifying journey!
Choose the Right Location
When setting up a power inverter, choosing the right location is crucial for optimum performance. First, you need to ensure that the location you choose is well-ventilated to prevent overheating. Power inverters generate heat during operation, so placing them in a confined space can lead to a decrease in efficiency and even potential damage.
It’s also important to consider the proximity to the battery source. Ideally, your power inverter should be installed as close to the battery as possible to minimize voltage drop and maximize efficiency. Additionally, installing the inverter in a location that is easily accessible for maintenance and troubleshooting is essential.
You don’t want to be crawling through cramped and difficult spaces every time you need to check on or fix your power inverter. So, when setting up your power inverter, take the time to carefully choose the right location to ensure optimal performance and ease of maintenance.
Mount the Power Inverter
Mounting the power inverter is a critical step in setting up your power system, whether you’re using it for camping, van life, or emergency backup. To mount the power inverter, you’ll need to find a suitable location that is secure and easily accessible. An ideal location would be inside your vehicle or close by, such as under a seat or in the trunk.
Once you have chosen the location, you’ll need to secure the inverter using screws or brackets. Make sure to follow the manufacturer’s instructions for proper installation. It’s important to mount the inverter securely to prevent it from moving or vibrating during use, which could potentially damage the unit or cause a safety hazard.
So, take your time to find the perfect spot and ensure a hassle-free experience with your power inverter.
Connect the Inverter to the Battery
If you’re wondering how to set up a power inverter, one of the most important steps is connecting the inverter to the battery. This connection is crucial because it allows the inverter to draw power directly from the battery and convert it into usable electricity for your devices. To make this connection, you’ll need to use a set of heavy-duty cables that are specifically designed for high-amperage applications.
These cables should be connected to the positive and negative terminals of the battery, ensuring a secure and tight connection. It’s important to follow the manufacturer’s instructions and ensure that the cables are properly sized for the power requirements of your inverter. By connecting the inverter to the battery correctly, you’ll be well on your way to having a reliable source of power wherever you go.
So, grab those cables and get ready to enjoy the convenience of a power inverter!
Connect the Inverter to the AC Load
Now that you have successfully connected the power inverter to the battery, it’s time to connect the inverter to the AC load. This is the final step in setting up your power inverter and will allow you to start using it to power your devices. To do this, you will need to locate the AC outlet on the inverter and plug in the device you want to power.
Make sure the device is compatible with the voltage and wattage of your inverter. Once the device is plugged in, you can turn on the inverter and start enjoying the power it provides. Whether you’re camping, on a road trip, or experiencing a power outage, having a power inverter can be a lifesaver.
So go ahead, connect your inverter to the AC load and start enjoying the convenience and flexibility it offers.
Hey there! Have you ever encountered a technical issue that left you feeling frustrated and confused? Don’t worry, you’re not alone! Testing and troubleshooting play a crucial role in today’s technology-driven world. Whether it’s a glitchy app, a malfunctioning device, or a web page that just won’t load, the process of identifying and fixing issues is essential for maintaining a smooth and seamless user experience. In this blog, we’ll dive deep into the world of testing and troubleshooting, exploring the importance of these practices and providing valuable insights on how to effectively tackle common technical challenges.
So grab a cup of coffee, sit back, and get ready to unravel the mysteries behind testing and troubleshooting!
Test the Inverter
So you’ve got your shiny new power inverter, but now what? Well, the first step is to test it out and make sure everything is working as it should. To do this, you’ll need a few things: a car battery, a voltmeter, and a small electrical device like a laptop or phone charger. Start by connecting the positive (red) cable from the power inverter to the positive terminal on the car battery.
Then, connect the negative (black) cable from the inverter to the negative terminal on the battery. Make sure all connections are secure and tight. Next, plug your electrical device into one of the power outlets on the inverter.
It’s a good idea to start with something small, like a phone charger, before moving on to larger devices. Now, turn on the inverter using the switch or button provided. You should see the LED indicator light up, indicating that the inverter is on and ready to go.
At this point, take out your voltmeter and set it to the DC voltage scale. Touch the positive probe to the positive terminal on the inverter and the negative probe to the negative terminal. The voltmeter should give you a reading of around 12 volts, which is the standard voltage for most car batteries.
If everything looks good so far, it’s time to test the power output. Plug your device into the inverter and turn it on. If the device powers up and functions properly, then congratulations! Your power inverter is working like a charm.
If you encounter any issues, double-check all your connections and make sure everything is secure. If the problem persists, consult the user manual or contact the manufacturer for further assistance. Setting up a power inverter may seem daunting at first, but with a little testing and troubleshooting, you’ll be able to power all your devices on the go.
Check for Faults or Warning Lights
When setting up a power inverter, it is important to check for any faults or warning lights that may indicate a problem. This step is crucial in ensuring the safety and functionality of your inverter. Faults or warning lights can indicate issues such as a short circuit, overload, or overtemperature condition.
By checking for these faults or warning lights, you can address any potential issues before they become bigger problems. To do this, simply look for any lights on the inverter itself or consult the user manual for specific instructions on how to check for faults or warning lights. By taking the time to check for faults or warning lights, you can ensure that your power inverter is operating properly and avoid any potential hazards or malfunctions.
So, don’t skip this important step when setting up your power inverter!
Troubleshoot Common Issues
So, you’ve decided to set up a power inverter in your vehicle or home. That’s great! Power inverters are fantastic devices that allow you to convert DC power from your car battery or other power sources into AC power, so you can power up your appliances and devices on the go. But, like with any piece of technology, sometimes things don’t go as smoothly as we’d like.
Don’t worry, though! I’m here to help troubleshoot some common issues you may encounter while setting up your power inverter. One common issue that people face is a poor quality or weak power output. If you find that your power inverter is not providing enough power to run your devices, there could be a few reasons for this.
First, make sure that you have chosen an inverter with a high enough power rating to meet your needs. If you’re trying to power a large appliance, you may need a higher wattage inverter. Additionally, check for loose or corroded connections between the inverter and the battery or power source.
A loose connection can cause a drop in power output. Finally, if you’re using a long, thin extension cord to connect your inverter to your device, this can also cause a drop in power. Try using a shorter, thicker cord to see if that solves the problem.
Another issue you might encounter is a buzzing or humming noise coming from your inverter. This can be quite annoying, especially if you’re using your inverter in a quiet environment. The most common reason for this noise is a problem with the internal cooling fan.
Over time, dust and debris can accumulate on the fan blades, causing it to become unbalanced and noisy. To fix this issue, simply turn off the inverter, unplug it, and use a can of compressed air to clean the fan blades. If the problem persists, you may need to replace the fan altogether.
Conclusion is a word that marks the end of something. It is that final moment when all loose ends are tied up, and everything comes together. Much like the last chapter of a book or the final scene of a movie, the conclusion gives us a sense of closure and allows us to reflect on what we have just experienced.
But what makes a good conclusion? And why is it so important? In this blog post, we will explore the significance of conclusions and how to craft them effectively. So, buckle up and get ready to dive into the world of conclusions!
Conclusion
In conclusion, setting up a power inverter is like playing a strategic game of Tetris with your electrical devices. You need to find the perfect spot for your inverter, make sure it’s in a well-ventilated area, and connect it to the battery without any loose ends. Just like a master chess player, you have to plan your moves carefully, considering the wattage and voltage requirements of your gadgets.
And once everything is in place, you’ll feel the power surge through your veins, knowing that you’ve conquered the electrical world and can now charge your devices on the go. So go forth, my fellow inverters, and may your power be strong and your batteries always full!”
FAQs
How do I set up a power inverter in my car?
To set up a power inverter in your car, follow these steps:
1. Choose the right inverter: ensure it matches your power needs and car’s electrical system.
2. Locate a suitable spot: find a secure and well-ventilated area to mount the inverter.
3. Disconnect the battery: for safety, disconnect the negative terminal of the car battery.
4. Connect the inverter: using proper cables, connect the positive and negative terminals of the inverter to the battery.
5. Secure the inverter: mount the inverter securely using brackets or straps.
6. Test the connection: turn on the inverter and check if it powers the devices you intend to use.
7. Reconnect the battery: once everything is working correctly, reconnect the negative terminal of the car battery.
Can I use a power inverter to run my refrigerator during a power outage?
It is possible to use a power inverter to run a refrigerator during a power outage, but it requires careful consideration. Refrigerators tend to have high power requirements, so you’ll need an inverter with a high wattage rating and a battery with enough capacity to handle the load. It’s essential to calculate the power consumption of your refrigerator and choose equipment that can handle it. Additionally, ensure a stable power supply, as frequent surges or fluctuations may damage the refrigerator or the inverter.
How can I determine the appropriate size of a power inverter for my needs?
To determine the appropriate size of a power inverter for your needs, follow these steps:
1. Identify the devices you want to power: make a list of the devices you plan to use with the inverter.
2. Determine their power requirements: check the power rating (in watts) of each device, which is typically stated on the device or its manual.
3. Calculate the total power consumption: add up the power requirements of all the devices you plan to use simultaneously.
4. Choose an inverter with sufficient capacity: select an inverter with a power rating slightly higher than the total power consumption calculated.
5. Consider future needs: if you anticipate adding more devices or increasing your power needs in the future, opt for a slightly higher capacity inverter.
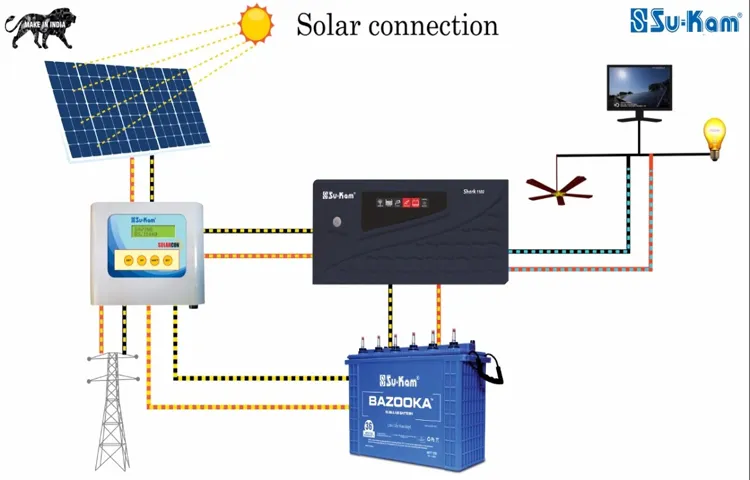
Is it possible to use a power inverter with solar panels?
Yes, it is possible to use a power inverter with solar panels. In fact, solar panels generate direct current (DC), which needs to be converted to alternating current (AC) to be used by most household electrical devices. A solar inverter, also known as a solar power inverter, performs this conversion. It converts the DC electricity generated by the solar panels into AC electricity that can power your home or be fed back into the grid. Solar inverters are available in various sizes and types, such as grid-tied, off-grid, and hybrid inverters.
Are there any safety considerations when using a power inverter?
Yes, there are several safety considerations to keep in mind when using a power inverter:
1. Ensure proper grounding: the inverter should be properly grounded to prevent electrical shock.
2. Use correct cable size: use cables with the appropriate size to handle the power load safely.
3. Avoid overloading: do not exceed the inverter’s power rating to prevent damage and potential fire hazards.
4. Keep it ventilated: power inverters generate heat, so ensure they have proper ventilation to avoid overheating.
5. Install a fuse: use a fuse or circuit breaker to protect the inverter and wiring from short circuits or overloads.
6. Follow manufacturer instructions: always read and follow the manufacturer’s instructions and safety guidelines provided with the inverter.
Can I use a power inverter to charge my laptop?
Yes, you can use a power inverter to charge your laptop. Most laptops come with an AC adapter that converts the AC power from the wall outlet to DC power required by the laptop. With a power inverter, you can reverse this process by converting the DC power from the battery or vehicle into AC power that the laptop’s AC adapter can utilize. Ensure that the inverter’s output voltage and laptop’s AC adapter compatibility match, and use the appropriate cables to connect the inverter to the laptop.
What are the different types of power inverters available in the market?
There are three main types of power inverters available in the market:
1. Modified sine wave inverters: these are the most common and affordable type. They produce a blocky or stepped waveform and are suitable for most electronic devices but may cause reduced efficiency or humming noise with sensitive equipment.
2. Pure sine wave inverters: these produce a smooth, high-quality waveform similar to the power grid’s pure sine wave. They are suitable for all types of devices, including sensitive electronics, and provide cleaner and more reliable power output but are usually more expensive.
3. Square wave inverters: these are the least common type and produce a waveform that consists of square-shaped peaks. They are primarily used for basic appliances and may cause buzzing or humming noise in audio and video devices. Square wave inverters are not recommended for delicate or sensitive electronics.