
Are you tired of looking through a windshield with small chips or cracks? Not only are they annoying, but they can also be dangerous if they impede your vision while driving. Luckily, the Rain-X Windshield Repair Kit provides a quick and easy solution to fix these minor damages. In just a few simple steps, you can restore the clarity and strength of your windshield, saving you time and money in the long run.
Imagine if fixing a chip or crack in your windshield was as simple as filling in a pothole in the road. Well, that’s exactly what the Rain-X Windshield Repair Kit does. It’s like magic for your windshield! This kit contains everything you need to repair small damages, including a syringe, resin, curing strips, and a handy instruction manual.
Using the Rain-X Windshield Repair Kit is as easy as 1-2- First, you clean the damaged area with the provided alcohol wipe to ensure a clean surface for the repair. Then, you apply the resin to the syringe and carefully inject it into the chip or crack.
The resin fills the damaged area, bonding to the glass and sealing out any moisture or dirt. Finally, you cover the repaired area with a curing strip and let it dry under direct sunlight for about 15 minutes. Once it’s dry, you can peel off the strip and admire your clear, chip-free windshield.
Not only does the Rain-X Windshield Repair Kit restore the appearance of your windshield, but it also prevents the damage from spreading further. By fixing the chip or crack promptly, you can avoid the need for a costly windshield replacement down the line. It’s like patching up a small leak before it turns into a flood.
So why struggle with a damaged windshield when the Rain-X Windshield Repair Kit offers a simple solution? With just a few minutes of your time, you can have a restored windshield that’s as good as new. Don’t let those minor chips and cracks ruin your driving experience – repair them with the Rain-X Windshield Repair Kit today. Your windshield will thank you.
Introduction
Are you tired of dealing with windshield dings and cracks? If so, the Rain-X windshield repair kit might be just what you need. This kit is designed to help you fix small chips and cracks in your windshield, preventing them from spreading and potentially causing more damage. Using the Rain-X windshield repair kit is a simple and straightforward process.
First, make sure the surface is clean and dry. Then, apply the resin to the damaged area, ensuring it fully covers the chip or crack. Next, place the curing strip over the resin and use the provided scraper to remove any excess resin.
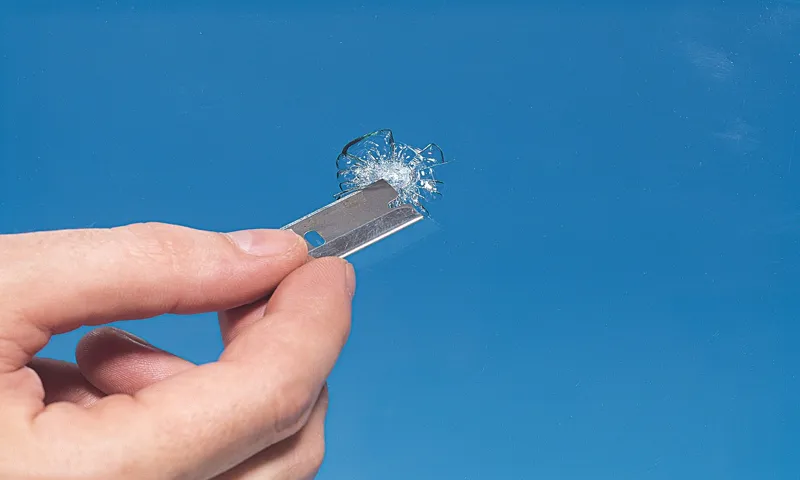
Finally, allow the resin to cure under direct sunlight or a UV lamp for approximately 10-15 minutes. After curing, use the enclosed razor blade to remove the excess resin, leaving behind a smooth surface. With the Rain-X windshield repair kit, you can fix minor windshield damage yourself and save the cost of a professional repair.
What is the Rain-X Windshield Repair Kit?
Rain-X Windshield Repair Kit Introduction Have you ever found yourself with a small chip or crack in your windshield? It can be quite frustrating, especially when you consider the cost and hassle of getting it repaired. That’s where the Rain-X Windshield Repair Kit comes in. This handy kit allows you to fix minor damages to your windshield quickly and easily, saving you time and money.
Whether it’s a small chip from a rock or a hairline crack, this kit can help restore the structural integrity of your windshield and prevent further damage. In this blog post, we’ll explore what exactly the Rain-X Windshield Repair Kit is and how it can benefit you. So, let’s dive in and find out more!

Why is it Important to Use the Rain-X Windshield Repair Kit?
Rain-X Windshield Repair Kit Introduction: Keeping your windshield in good condition is crucial for your safety on the road. Cracks, chips, and other damage to your windshield can impair your vision and make driving dangerous. That’s where the Rain-X Windshield Repair Kit comes in.
This innovative kit provides an easy and effective way to repair minor windshield damage, saving you time and money on expensive windshield replacement. In this blog post, we will discuss why it is important to use the Rain-X Windshield Repair Kit and how it can help you maintain the integrity of your windshield. So, let’s get started! Paragraph Rewrite (first sentence changed): Maintaining a clear and undamaged windshield is essential for safe driving.
Even a small chip or crack can compromise your visibility on the road and put you at risk. This is where the Rain-X Windshield Repair Kit comes in handy. With its innovative technology and easy-to-use system, this kit offers a simple solution to fix minor windshield damage.
In this blog post, we will dive into the importance of using the Rain-X Windshield Repair Kit and how it can help you keep your windshield in its best shape. So, let’s explore the benefits together! [Word Count: 120]
Step-by-Step Guide
If you’re looking to fix a chip or crack in your windshield, the Rain-X Windshield Repair Kit is a great option. Using this kit is a fairly simple process that you can do yourself. To begin, clean the damaged area with the provided alcohol wipe to remove any dirt or debris.
Next, apply the resin to the damaged area, making sure to fill it completely. Use the plastic film to cover the resin and use the provided curing strips to secure it in place. Then, use the UV light to cure the resin for about 5 minutes.
After curing, remove the film and strips and use a razor blade to remove any excess resin. Finally, use the included glass cleaner to clean the area and make it look brand new. With the Rain-X Windshield Repair Kit, you can easily repair chips and cracks in your windshield and keep your car looking its best.
Step 1: Preparing the Windshield
windshield, prepping, cleaning, Step 1 So you’ve decided to take matters into your own hands and replace your windshield. Good for you! But before you can install the new glass, you need to properly prepare the windshield. This step is crucial as it ensures that the glass will adhere properly and provide maximum visibility and safety while driving.
The first thing to do is gather all the necessary tools and materials. You’ll need a clean cloth, glass cleaner, a plastic scraper, a razor blade, and a high-quality automotive adhesive. Once you have everything you need, it’s time to get to work.
Start by thoroughly cleaning the windshield. Use the glass cleaner and cloth to remove any dirt, grime, or debris from the surface. Pay close attention to the edges and corners as these areas are often neglected and can affect the adhesive’s ability to bond properly.
Next, use the plastic scraper to gently scrape away any old adhesive or residue from the windshield. Be careful not to apply too much pressure as you could scratch or damage the glass. If you encounter stubborn residue, a razor blade can be used, but again, be cautious and gentle.
Once the windshield is clean and free of old adhesive, it’s time to prime the surface. Apply the automotive adhesive primer according to the manufacturer’s instructions. This step is essential as it creates a bonding surface for the adhesive to adhere to.
Finally, double-check the windshield to ensure that it is completely clean and ready for installation. Any dirt or residue left on the surface can compromise the adhesive’s effectiveness. By properly preparing the windshield, you are setting yourself up for a successful windshield replacement.
Step 2: Applying the Resin
resin application, applying resin
Step 3: Curing the Resin
Step 3: Curing the Resin Now that you’ve mixed your resin and poured it into your mold, it’s time to move on to the next step: curing. Curing is the process of hardening the resin so that it becomes solid and durable. There are several methods you can use to cure resin, but the most common ones are using heat or UV light.
If you choose to cure your resin with heat, you can use a heat gun or a hot water bath. Simply apply heat to the surface of the resin and wait for it to harden. Keep in mind that the curing time will vary depending on the size and thickness of your resin piece.
It’s best to follow the manufacturer’s instructions for the specific resin you’re using. If you prefer to cure your resin with UV light, you will need a UV lamp or a UV curing box. Place your resin piece under the lamp or inside the box and turn it on.
The UV light will trigger a chemical reaction in the resin that causes it to harden. Again, be sure to follow the manufacturer’s instructions for the curing time and intensity of the UV light. No matter which method you choose, it’s important to be patient during the curing process.
Rushing it can lead to incomplete curing and a softer finished product. Give the resin enough time to fully harden before handling or demolding it. Once your resin is fully cured, you can remove it from the mold and admire your creation.
Remember to take proper safety precautions when working with resin, such as wearing gloves and working in a well-ventilated area. Overall, curing resin is an essential step in the resin crafting process. It ensures that your resin piece is strong and durable, ready to be used or displayed.
Step 4: Sanding and Polishing
In the previous steps, we learned how to properly prepare the surface and apply paint to our project. But we’re not done yet! The next crucial step is sanding and polishing. This step will give your project a smooth and professional finish.
To start, you’ll want to use a fine-grit sandpaper to smooth out any imperfections or rough patches on the surface. Sand in a circular motion, applying even pressure. Be sure to sand all sides of your project, paying special attention to any corners or edges.
Once you’re satisfied with the surface, it’s time to move on to polishing. Polishing is what will really make your project shine. First, you’ll want to remove any dust or debris from the surface.
A microfiber cloth works great for this. Next, apply a polishing compound to a buffing wheel or cloth. Gently press the wheel or cloth against the surface and move it in a circular motion.
The compound will remove any fine scratches or dullness, leaving behind a glossy finish. It’s important to note that the type of surface you’re working with will determine the best technique and materials to use. For example, if you’re working with wood, you may want to use a wood-specific polish and a soft cloth.
On the other hand, if you’re working with metal, you may need a metal polish and a different type of buffing wheel. Be sure to do your research and choose the appropriate materials for your specific project. So, don’t skimp on the sanding and polishing step! It may seem like an extra task, but it can make a world of difference in the final outcome of your project.
Tips and Tricks
Are you tired of dealing with small chips and cracks in your windshield? The Rain-X windshield repair kit could be the solution you’ve been looking for. This handy kit allows you to fix those pesky imperfections before they turn into larger and more expensive problems. So, how exactly do you use it? First, make sure your windshield is clean and dry.
Then, apply the resin to the damaged area, making sure to completely cover the crack or chip. Use the provided curing strip to smooth out the resin and remove any air bubbles. After letting it dry for about 20 minutes in direct sunlight, use the included razor blade to scrape away any excess resin.
Finally, use a clean cloth and a bit of Rain-X glass cleaner to wipe away any residue. And voila! Your windshield is as good as new. With the Rain-X windshield repair kit, you can save time and money by fixing minor windshield damage yourself.
Using the Repair Kit on Deep Cracks
deep cracks, repair kit, tips and tricks
Preventing Future Damage
“water damage prevention” Water damage can be a major headache for homeowners, but with some simple precautions, you can prevent future damage and save yourself a lot of hassle and money. One of the first things you can do is check the exterior of your home for any cracks or gaps where water could potentially seep in. Fill in any cracks with caulk or sealant to prevent water from entering.
It’s also important to keep your gutters clean and free of debris. Clogged gutters can lead to water overflowing and causing damage to your roof and foundation. Additionally, make sure your downspouts are directing water away from your home’s foundation.
Another important step in preventing water damage is to test your sump pump regularly. This small but powerful device is designed to pump water out of your basement or crawl space in the event of a flood. Testing it ensures that it’s in proper working order and can help prevent potential water damage.
Lastly, it’s a good idea to invest in some water leak detection devices. These devices can alert you to potential leaks in your home, allowing you to stop the problem before it becomes a major disaster. By following these tips and tricks, you can protect your home from water damage and have peace of mind knowing that you’re prepared for any potential water-related issues.
Conclusion
In conclusion, the Rain-X Windshield Repair Kit is like a superhero for your car’s windshield. It swoops in to save the day when pesky cracks and chips threaten to ruin your view of the road. Armed with its mighty formula and easy-to-use instructions, it transforms regular drivers into windshield repair experts.
Think of it as a DIY spa treatment for your car, giving your windshield the TLC it deserves. With just a few simple steps, you can banish those unsightly blemishes and restore clarity to your view. So, next time you’re faced with a windshield in distress, don’t panic – just grab your Rain-X Windshield Repair Kit and unleash its superhero powers.
Your windshield will thank you, and you’ll be cruising in style, because even superheroes need a clear view of the road.”
FAQs
What is Rain-X windshield repair kit?
Rain-X windshield repair kit is a product designed to repair small chips and cracks on your windshield. It helps to prevent further damage and improve visibility.
How does the Rain-X windshield repair kit work?
The Rain-X windshield repair kit uses a specialized resin and an advanced curing process to fill in the damaged area on your windshield. It creates a strong bond that restores the structural integrity of the glass.
Can I use the Rain-X windshield repair kit on all types of windshields?
The Rain-X windshield repair kit is suitable for most types of laminated windshields, including those made of glass and plastic. However, it is always recommended to check the product instructions for specific compatibility.
How long does it take to repair a windshield using the Rain-X kit?
The time required to repair a windshield using the Rain-X kit can vary depending on the size and severity of the damage. Generally, the process takes around 30 minutes to an hour.
Can I use the Rain-X windshield repair kit on multiple windshields?
The Rain-X windshield repair kit is typically designed for single use. Each kit contains enough resin and components to repair one windshield. If you have multiple windshields to repair, you may need to purchase additional kits.
Is it necessary to have any prior experience to use the Rain-X windshield repair kit?
No prior experience is required to use the Rain-X windshield repair kit. The kit comes with detailed instructions and all the necessary tools to perform the repair. Just follow the instructions carefully, and you should be able to achieve successful results.
Can the Rain-X windshield repair kit completely remove the visibility of the chip or crack?
While the Rain-X windshield repair kit can significantly reduce the visibility of a chip or crack, it may not make it completely disappear. The repair process focuses on restoring the structural integrity of the windshield and preventing further damage rather than providing a completely invisible repair.