
Are you new to changing a flat bike tire? Feeling overwhelmed with the thought of having to use bicycle tire levers? Don’t fret, we’ve got you covered! In this beginner’s guide, we will take you through the process of using bike tire levers so that you can confidently fix a flat tire on your own. Think of tire levers as a helpful tool that aids in tire changing. Just like a wrench, tire levers are a valuable device that can save you time and effort.
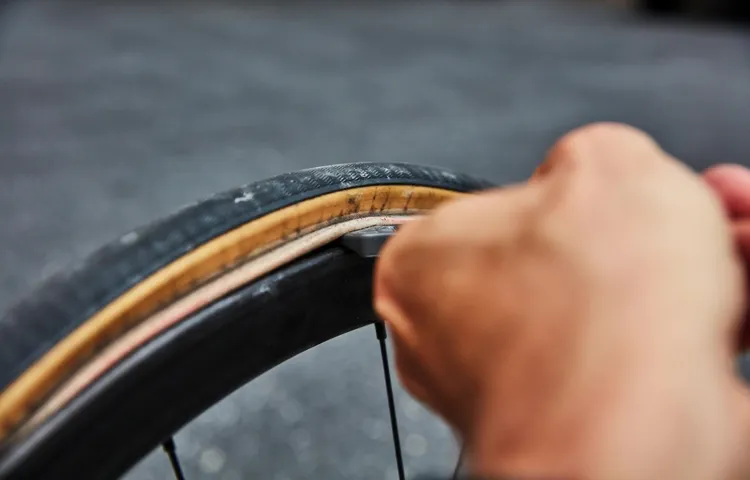
They are designed to wedge between the tire bead and rim, giving you the leverage you need to remove the tire. Before you start, make sure to have a set of tire levers and a spare tire on hand. Place the bike upside down and locate the flat tire.
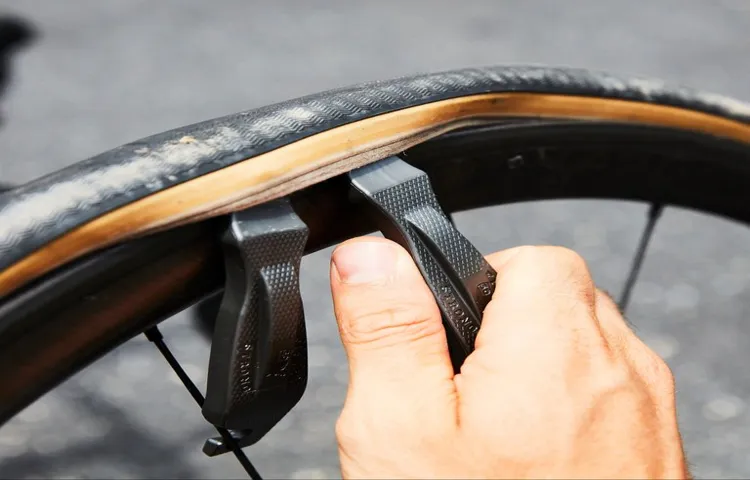
Remove the wheel from the bike by loosening the nuts and pulling the wheel down. Now comes the fun part- using the tire levers! Place the first lever between the tire bead and the rim, then slide it around the entire circumference of the wheel, prying the tire away from the rim as you go. Repeat this step with the second lever, then move the levers a few inches apart and repeat the process until the tire comes off completely.
Remember, practice makes perfect when it comes to using bicycle tire levers. Soon enough, you’ll be changing flat tires like a pro!
Table of Contents
What are Bicycle Tire Levers?
Bicycle tire levers are an essential tool for any cyclist looking to change a tire. These small, plastic or metal levers are designed to help you pry the tire away from the rim, making it easier to remove the deflated tube and replace it with a new one. To use them, start by deflating the tire and removing the wheel from your bike.
Then, wedge one of the levers between the tire and the rim and pry it up to create a gap. Insert a second lever and continue to work your way around the tire, gradually loosening it until you can remove it completely. Once the old tube is out, you can install the new one, making sure to tuck it neatly inside the tire before reinserting it onto the rim.
Finally, use your tire lever to carefully ease the tire back into place, making sure it is seated correctly before reinflating the tire. With a little practice, using bicycle tire levers can become second nature, allowing you to quickly and easily change a flat so you can get back on the road.
The Importance of Bicycle Tire Levers
Bicycle tire levers are an essential tool for any cyclist, whether you’re a beginner or an experienced rider. They are small, lightweight, and often come in a set of two or three, and they are designed to help you remove your bike tire from the rim without damaging either the tire or the rim. Essentially, they work by wedging themselves between the tire bead and the rim, allowing you to lever the tire off the rim.
This might sound easy, but it’s actually quite tricky to do without tire levers! Not only do they make the process quicker and easier, but they also reduce your risk of damaging your bike or incurring a puncture. In fact, using the right tire levers can be the difference between being stranded on the side of the road and getting back on your bike in no time. So if you’re a cyclist, invest in a good set of tire levers – your bike (and your sanity) will thank you!
Step-by-Step Guide to Using Bicycle Tire Levers
As a cyclist, knowing how to use bicycle tire levers is essential knowledge to have. Flat tires are a common occurrence when cycling, and tire levers can help you remove a tire from the rim quickly and without hassle. To start, make sure you have a set of tire levers and a spare inner tube with you on your ride.
Begin by deflating the tire completely and releasing the air pressure. Then, insert one lever between the tire and the rim, hooking it onto a spoke. Slide the lever around the rim to loosen the tire from the rim, and repeat the process with a second lever a few inches away.
Once you have two levers in place, gently slide both levers under the tire bead until you feel it start to come free from the rim. Using your fingers, work the rest of the tire away from the rim until you can fully remove the tire. With the tire removed, you can easily replace the inner tube and reattach the tire back onto the rim.
With a bit of practice, using bicycle tire levers will become second nature, and you’ll be back on the road in no time!
Step 1: Remove the Tube from the Tire
If you’re a cyclist, at some point, you will need to change a tire. Don’t worry; it’s not as intimidating as it may seem, especially with the help of a bicycle tire lever. The first step is to remove the tube from the tire.
First, it’s crucial to find a flat surface to place your bike on to ensure stability. Then, release the brakes to guarantee easy access and locate the wheel’s quick-release lever to remove it. Once you have the tire off, locate the valve stem and deflate the tube completely.
With the tire partially off, insert one of your bicycle tire levers between the tire and rim. Apply enough pressure to pop a section of the tire from the bead of the rim. And voila! You have begun the process!
Step 2: Insert the Lever Between the Tire and Rim
When it comes to fixing a flat tire on your bike, it’s important to have the right tools and know-how to do it properly. One of the essential tools you’ll need is a bicycle tire lever. These handy gadgets make it easy to remove and replace the tire on your bike’s rim.
To use a tire lever, start by deflating the tire completely. Then, insert the lever between the tire and the rim, hooking the curved end under the bead of the tire. Use the lever to pry the bead away from the rim, working your way around the tire until it’s completely loose.
With the tire off, you’ll be able to inspect the tube for damage and replace it if necessary. When it’s time to put the tire back on, simply reverse the process, starting at the valve stem and working your way around the tire until it’s securely in place. With a little practice, using a tire lever will become second nature and you’ll be back on the road in no time.
Step 3: Pry the Tire Off the Rim
Using bicycle tire levers can be an easy and straightforward way to change your bike’s tires. In step 3 of the process, you will need to pry the tire off the rim. Use the levers to work your way around the rim, pulling the tire away from it.
It might take a bit of force in some areas, but be careful not to damage the tire or the rim. Once you’ve worked your way around the tire, both sides should be detached from the rim. You can then remove the inner tube from the tire and make any necessary repairs or replacements.
Remember to inspect the tire for any signs of wear and tear before putting it back onto the rim. By following these simple steps and paying attention to detail, you can quickly and easily change your bike’s tires using tire levers.
Step 4: Remove the Tube
When it comes to fixing a flat tire on your bicycle, using tire levers can make the process much easier and efficient. After loosening the tire bead with the levers, it’s time to remove the tube. Start by carefully pulling the valve stem out of the rim and setting it aside.
Then, work your way around the rim and gently pry the tube away from the tire. Make sure to be cautious and avoid puncturing the tube or damaging the tire in the process. Once the tube is completely free from the tire, inspect it closely to determine the cause of the flat and either patch or replace it as needed.
Removing the tube is just one step of the flat-fixing process, but with the help of tire levers, it can be done with ease.
Tips and Tricks for Using Bicycle Tire Levers
Learning how to use bicycle tire levers can save you time and headaches when you have a flat tire on the road. First, remove the valve cap from the flat tire and deflate it completely. Next, use the hooked end of the tire lever to pry the edge of the tire away from the rim.
Insert the second lever a few inches away and wiggle it to separate more of the tire from the rim. Repeat this process until you can remove the tire completely from the rim. Once the tire is off, inspect it for any damage or foreign objects.
Replacing the tire requires reversing the removal process–starting at the valve stem, position one bead of the tire onto the rim and then use the levers to work the tire onto the rim. Finally, inflate the tire to the recommended PSI and replace the valve cap. Keep in mind that bicycle tires can be stubborn, so it may take some practice to get the hang of using tire levers.
Choosing the Right Tire Lever
Choosing the right tire lever is crucial for any cyclist, regardless of their skill level. Making the wrong choice can lead to frustration and wasted time during a tire change. One of the essential tips for using a tire lever is to gently work it around the rim to remove the tire, preventing damage to both the tire and the tube.
It’s also important to use a lever made of sturdy material that won’t crack or snap under pressure. A metal lever is ideal for tough tires, while a plastic lever is best suited for softer, more pliable tires. A key trick to remember is to keep the tire tight against the rim while inserting the tube and lever back into place.
Lastly, learning how to use a tire lever correctly can save you time and money in the long term, as it reduces the risk of replacing a tire or tube prematurely. By following these tips and tricks, you can ensure a smooth and easy tire change, giving you more time to enjoy the ride.
Lubricating the Tire Levers
Using bicycle tire levers can be a challenging task, particularly if you’re new to cycling. One tip to make the process more comfortable is lubricating the tire levers before use. This will reduce the friction between the lever and the tire, making it easier to remove and replace the tire.
You can use regular dish soap or any lubricant that you have on hand. Apply a small amount of lubricant to the lever’s head and slide it along the rim’s edge. This process will help distribute the lubricant evenly.
Then insert the lever where the tire is still attached to the rim and pry it out of the rim slowly. Repeat this process until the tire is entirely disconnected from the rim, then slide the lever around the rim to remove the tire entirely. Lubrication will help protect your tires and rims from any damage that may occur due to friction during the changing process.
Remember to remove any excess lubricant once you have completed the task. By lubricating your tire levers, you’ll make changing your bicycle tire more comfortable, maintain your bicycle’s health and ultimately ensure that your cycling experiences remain fun and stress-free.
Conclusion: Easy and Efficient Way to Change Bike Tires
In conclusion, using bicycle tire levers is like being a magician. With just a few simple flicks of your wrist, you can make a stubborn tire come off and a new one magically appear. Just remember to hold onto the lever tightly, don’t poke your eye out, and always wear a helmet – safety first, folks! With these tips in mind, you’ll be a tire-changing expert in no time.
Happy riding!”
FAQs
What are bicycle tire levers used for?
Bicycle tire levers are tools used to remove and install bicycle tires easily and efficiently.
How many tire levers do I need?
You usually need two levers to remove and install a tire. However, it’s advisable to carry an extra lever in case of an emergency.
Can I use any tire lever for my bicycle?
No, you should use a tire lever that’s appropriate for your bicycle’s tire size and type. Using a wrong-sized lever could damage your tire or rim.
How do I use a bicycle tire lever?
Insert a lever between the tire bead and the rim, then lift the lever toward the opposite side of the rim until the tire bead pops off the rim. Repeat this process around the tire until it’s completely removed or installed.
How do I fix a flat tire using tire levers?
Use the levers to remove the tire from the rim, then locate the puncture in the tube. Patch or replace the tube, then use the levers to reinstall the tire.
Do I need any other tools to use tire levers?
No, tire levers are designed to be used on their own. However, a hand pump or CO2 inflator can be helpful for reinflating the tire after repair.
Are there any safety precautions I should take when using tire levers?
Yes, be careful not to damage the tire or rim with the levers. Also, be sure to deflate the tire completely before removing it and reinflate it slowly and cautiously afterwards.