
If you’re a boat owner, you know the importance of keeping your trailer and wheel bearings in top condition. Bearing Buddy is a handy tool that can make this task easier by allowing you to quickly grease your bearings without disassembling them. However, if you’re not familiar with how to use it, you may be wondering where to start.
In this article, we’ll guide you through the steps of how to grease Bearing Buddy and ensure your bearings are well lubricated for a smooth and safe ride. So, grab your tools and let’s get started!
Table of Contents
What is a Bearing Buddy?
If you’re a boat owner, you may have heard of a Bearing Buddy. It’s a device that is used to grease the bearings on your trailer’s wheels. The Bearing Buddy is a small metal device that fits over the wheel’s hub and allows you to add grease directly to the bearings.
This is important because the bearings on a boat trailer are constantly exposed to moisture and saltwater, which can lead to corrosion and damage if not properly maintained. To use a Bearing Buddy, first, you’ll need to remove the dust cover on the wheel hub. Then, you’ll insert the Bearing Buddy and add grease until it oozes out of the sides.
This ensures that the bearings are fully lubricated and protected. Regularly greasing your Bearing Buddy will help extend the life of your trailer’s bearings and prevent costly repairs. So, if you’re a boat owner, be sure to invest in a Bearing Buddy and keep your trailer’s bearings well-lubricated.
Definition and Function
A Bearing Buddy is a device that is used to keep your trailer’s wheel bearings lubricated and prevent damage from wear and tear. It is essentially a grease fitting that is attached to the end of the wheel hub, which allows you to pump grease into the hub and conventional oil seal. This helps to push out old and dirty grease while filling it with fresh grease, which keeps the wheel bearings lubricated and protected from water damage.
The main function of a Bearing Buddy is to prevent the wheel bearings from heating up and suffering premature wear and tear. It also reduces the risk of bearing failure while on the road, which can lead to costly repairs and potential accidents. By using a Bearing Buddy, you can ensure that your trailer’s wheels operate smoothly and efficiently, giving you the peace of mind to enjoy your journey without worry.
Importance of Greasing Bearing Buddy
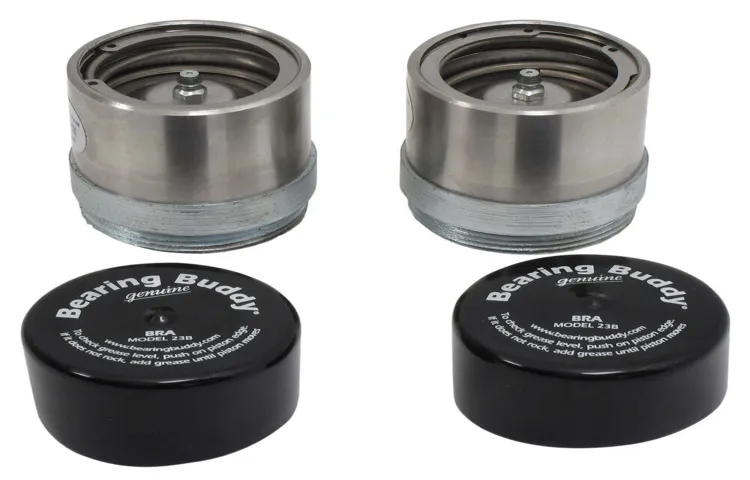
Bearing Buddy When it comes to trailering boats, it’s essential to keep your equipment in top condition. One of the most important components to maintain is your boat trailer’s bearings. Bearing Buddy is a popular brand of trailer bearing protectors designed to help you do just that.
These simple devices replace the dust cap on your trailer’s hubs and add a grease fitting that allows you to inject fresh grease into your bearings. Keeping your bearings well-lubricated is crucial to ensuring a smooth and safe ride for your boat, and the Bearing Buddy makes this task much easier. Regular greasing of the Bearing Buddy is essential for the longevity and effectiveness of your boat’s bearings.
Neglecting to grease your Bearing Buddy can lead to premature failure of the bearings, which can result in costly repairs and, in worst-case scenarios, accidents. So, don’t take any chances – make sure you’re greasing your Bearing Buddy regularly.
Tools and materials needed
If you have a boat trailer or other type of trailer with Bearing Buddies, it’s a good idea to know how to grease them to keep the wheels turning smoothly. To start, you’ll need a few tools and materials. First, you’ll need a grease gun with a small fitting (1/8″ or so) that can fit into the Bearing Buddy.
You’ll also need bearing grease, a rag, and some paper towels. Ideally, you’ll want to work in a clean, dry area, so if needed, sweep or wipe away any debris or dirt from the area around the Bearing Buddies. With these materials at the ready, you’re ready to learn how to grease your Bearing Buddies!
List of Materials
To start any DIY project, you’ll need a set of tools and materials before getting your hands dirty! The most basic tools include a hammer, screwdriver, pliers, measuring tape, level, and drill. You may also need a saw, sandpaper, paintbrushes, and a staple gun depending on the project. Don’t forget safety equipment like goggles, gloves, and a respirator if you are using chemicals or working with hazardous materials.
When it comes to materials, it all depends on the project you’re working on. Common materials include wood, paint, screws, nails, bolts, and adhesives. If you’re building something, you may need plywood, drywall, or cement blocks.
If you’re painting a room, you’ll need primer, paint, and brushes or rollers. Whatever the project, make sure you have all the tools and materials on hand before starting to avoid any trips to the hardware store in the middle of the project. Starting with the right tools and materials will make your DIY experience much more enjoyable and ensure that your final product is top-quality.
Tools Required
When it comes to building or fixing things around the house, having the right tools on hand is crucial. For this project, you will need a few essential items that can be found at any hardware or home improvement store. Firstly, a drill and drill bits are essential for making the necessary holes in the wall to mount the brackets.
A level is also required to ensure that the brackets are aligned correctly. Screws and anchors are essential for securely mounting the brackets and ensuring that they can support the weight of the shelves. A measuring tape will help you get precise measurements for the placement of the brackets and the shelves.
For the shelves themselves, you will need the appropriate size and material for the project, such as wooden planks or metal sheets. Additionally, sandpaper and paint or stain may be necessary for finishing the shelves to match your decor. With these tools and materials, you will be well-equipped to take on this project and create beautiful, functional shelves in your home.
Step by step process
If you’re a boat owner, you’ll need to maintain your trailer’s bearings in working order. Bearing Buddy is a system designed to make this process easier by lubricating bearings and preventing rust. Here are some steps on how to grease Bearing Buddy:
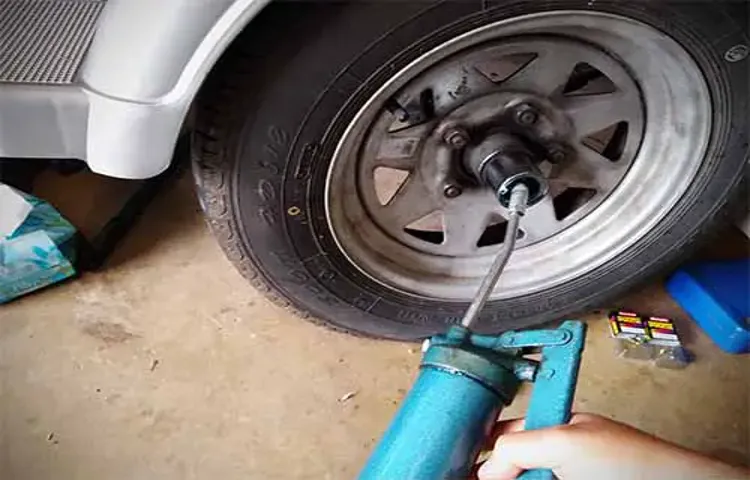
First, ensure you have removed the old grease and dirt by cleaning up the area. Take the dust cap off the Bearing Buddy, which can be done using a flat-head screwdriver.
Using a grease gun, attach it to the zerk fitting and fill the Bearing Buddy with grease. Be sure to note when the grease starts to bulge out of the Bearing Buddy.
Remove the grease gun and replace the dust cap by hitting it gently with a rubber mallet.
To distribute the lubricant inside the bearings, slowly move the wheel back and forth while rotating by hand. Make sure that the Bearing Buddy is pushed flush with the hub.
Check your wheel’s spinning ease to ensure that it moves correctly. If it doesn’t, either you’ve overfilled the Bearing Buddy or the hub is damaged. Following these steps regularly will keep your bearing system running smoothly and prevent rust and corrosion from harming your trailer’s wheels.
How to Remove Bearing Buddy
If you’re looking to remove your Bearing Buddy, it’s a relatively straightforward process that can be done with a few basic tools. Firstly, you’ll need to make sure to remove any excess grease from the Bearing Buddy and its surrounding area. Next, use a pair of pliers or a wrench to loosen and remove the cotter pin that’s holding the Bearing Buddy in place.
Once the cotter pin is removed, you’ll need to unscrew the outer cap using a spanner. This will allow you to remove the entire unit, including the spring and the seal. If you’re having trouble removing the Bearing Buddy, you may need to use a bearing puller or a hammer to gently tap it out of its housing.
Just remember to be patient and take your time to avoid damaging any components. With a bit of practice, you’ll be able to remove your Bearing Buddy like a pro in no time!
Clean Bearing Buddy
If you own a boat trailer, then you know how important it is to keep the wheel bearings well-maintained. A clean Bearing Buddy will help extend the life of your wheel bearings and keep them running smoothly. To clean your Bearing Buddy, you’ll need some paper towels or rags, some cleaning fluid, and a small brush.
First, remove the Bearing Buddy from the hub. Then, using a paper towel or rag, clean the exterior of the Bearing Buddy. Next, remove the cap and clean the interior of the Bearing Buddy.
Use a small brush to remove any excess dirt or debris. After cleaning, re-grease and re-install the Bearing Buddy. Make sure that everything is properly seated and that there is plenty of grease in the Bearing Buddy.
With a little bit of elbow grease, maintaining your Bearing Buddy will help keep your trailer running smoothly for years to come. So, make sure you keep your bearings clean and well-greased to avoid any costly repairs down the line.
How to Apply Grease
Applying grease to machinery and equipment is an essential step in maintaining their longevity and performance. Grease is a lubricant that prevents metal-to-metal contact and protects against rust and corrosion. However, applying grease correctly is crucial.
The following is a step-by-step process for applying grease properly to your equipment. First, clean the equipment and ensure that it is dry. Next, choose the appropriate grease for your equipment, as different machines require specific grades of grease.
Then, apply the grease to the designated areas, avoiding over-lubrication and under-lubrication. It’s best to use a grease gun to apply the grease, which ensures a precise application and a clean process. Finally, wipe off any excess grease and inspect the equipment to ensure that you didn’t miss any critical areas.
By following this simple process, you can ensure that your machine operates at its optimal level, minimizing downtime and expensive repairs.
When to Stop Applying Grease
Knowing when to stop applying grease is crucial to keeping your machinery running smoothly and efficiently. The general rule of thumb is to stop applying grease once you see fresh grease starting to come out of the fittings. This indicates that the grease has pushed out the old, dirty grease and has fully penetrated the bearings.
Over-greasing can lead to overheating, seal damage, and unnecessary waste of grease. On the flip side, under-greasing can cause increased friction, wear and tear, and premature component failure. It’s important to monitor and follow the manufacturer’s recommendations for your specific machine and application.
By taking the time to properly apply and monitor grease, you can extend the life of your equipment and save time and money in the long run. Remember, a little grease goes a long way, but too much can do more harm than good.
How to Reinstall Bearing Buddy
If your trailer’s Bearing Buddy needs to be reinstalled, don’t worry – it’s a fairly simple process. Firstly, remove the wheel hub and Bearing Buddy by unscrewing the protective cover. Use a wrench to loosen the retainer ring and slide it off to release the Bearing Buddy.
Next, clean the hub and bearings with solvent and dry them thoroughly to remove any remaining grease. Then, pack fresh grease into the bearings and install the Bearing Buddy back onto the spindle. Make sure it snaps into place by using a hammer and then replace the retainer ring and protective cover.
Finally, pump grease into the Bearing Buddy until fresh grease is oozing out from the edges. That’s it – your trailer’s Bearing Buddy is now reinstalled and ready for use!
In Summary
In summary, greasing your Bearing Buddy is essential to maintaining your trailer’s wheel bearings. The process is relatively simple, and you can do it with a grease gun and some basic tools. First, remove the Bearing Buddy dust cover and wipe away any dirt or debris.
Next, attach the grease gun to the fitting and slowly add the grease until the Bearing Buddy is full. Finally, wipe away any excess grease and replace the dust cover. It is recommended to grease your bearings every time you take your boat out, ensuring that they are well-lubricated and ready to perform.
Remember, neglecting your bearings can lead to costly repairs in the long run. So, be sure to follow these steps and keep your trailer rolling smoothly.
Conclusion
In conclusion, greasing your Bearing Buddy is as easy as pie with just a few simple steps. Don’t be afraid to get your hands dirty and give your bearings the TLC they deserve. After all, neglecting your bearings can lead to unnecessary wear and tear on your trailer and nobody wants to deal with that.
So, get your grease gun ready, spin those wheels, and show those bearings some love with a little bit of grease – you’ll be rolling smoothly in no time!”
FAQs
What is a Bearing Buddy and why use it?
A Bearing Buddy is a device that fits onto the hub of a boat trailer wheel and provides constant pressure to the wheel bearings, preventing water and dirt from entering. It makes it easier to grease the bearings and prolongs their life.
How often should Bearing Buddy be greased?
It is recommended to grease the Bearing Buddy after every use; however, if the trailer is used frequently, it should be greased every 2-3 months.
Can I reuse the old grease in my Bearing Buddy?
No, it is recommended to clean and wipe out the old grease from the Bearing Buddy before adding new grease.
What type of grease should I use to grease my Bearing Buddy?
Always use high-temperature wheel bearing grease with a NLGI Grade of 2 or higher to grease your Bearing Buddy.
How to replace a damaged Bearing Buddy?
To replace a damaged Bearing Buddy, first remove the old one by removing the retaining ring and then fit the new one. Make sure it is compatible with your trailer’s hub size and the spindle.
Can I install Bearing Buddy myself?
Yes, Bearing Buddy can be easily installed with the help of some basic hand tools if you follow the manufacturer’s instructions carefully.
What are the benefits of using a Bearing Buddy?
Using a Bearing Buddy reduces the likelihood of bearing failure, prolongs the life of the trailer’s wheel bearings and makes it easier for you to maintain your trailer.