
Looking to drain the coolant from your vehicle but not sure where to start? Don’t worry, we’ve got you covered with a step-by-step guide on how to do it properly. Proper maintenance of your vehicle’s cooling system is crucial to ensure optimal performance and prevent any potential damage to the engine. So, let’s dive right in and learn how to drain coolant like a pro!
Table of Contents
Introduction
Are you experiencing overheating issues with your car? It could be due to old or contaminated coolant. If that’s the case, it’s time to drain and replace the coolant. Knowing how to properly drain coolant is essential to keep your car’s engine cool and running smoothly.
Coolant, also known as antifreeze, helps regulate the temperature of your engine and prevent it from freezing or overheating. Over time, coolant can become dirty and lose its effectiveness, so it’s important to flush it out and replace it regularly. In this blog post, we will guide you through the steps to drain coolant from your car, ensuring a smooth and hassle-free process.
So, let’s get started and bring that engine temperature back down to normal!
Importance of draining coolant
Introduction Draining coolant is an essential maintenance task that is often overlooked by car owners. Coolant, also known as antifreeze, plays a crucial role in regulating the temperature of the engine and preventing it from overheating. Over time, coolant can become contaminated with dirt, rust, and other debris, which can hinder its ability to effectively cool the engine.
Therefore, it is important to regularly drain and replace the coolant to ensure optimal engine performance and prevent costly repairs. In this blog post, we will explore the importance of draining coolant and the benefits it provides for your vehicle.
Understanding the coolant system
coolant system, car engine cooling system
Step 1: Gather the necessary tools and materials
So, you’ve decided it’s time to drain the coolant from your car’s engine. But before you jump right in, you’ll need to gather a few tools and materials to make the process go smoothly. First, you’ll need a socket set or wrench to remove the drain plug from the radiator.
Make sure you have the correct size for your vehicle. You’ll also need a large container to catch the coolant as it drains out. A plastic bucket or drain pan works well for this.
It’s important to wear gloves and safety goggles to protect yourself from any spills or splashes. Lastly, don’t forget to have a fresh supply of coolant on hand for when you’re ready to refill the system. With these tools and materials at the ready, you’ll be well-prepared to drain the coolant from your car’s engine.
List of tools and materials needed
For this DIY project, you will need to gather a few tools and materials before you get started. Here is a list of everything you will need to complete this step. First, you will need a measuring tape to accurately measure the dimensions of the project.
Next, a pencil is essential for marking any measurements or lines on the materials. A straight edge or ruler will help ensure that your cuts are straight and precise. You will also need a power drill with various drill bits, as well as screws and nails to secure the materials together.
A level is important for making sure that your project is even and balanced. Lastly, you will need safety equipment such as safety goggles, gloves, and a dust mask to protect yourself while working. Additionally, you will need the necessary materials for the project, such as lumber, plywood, or any other specified materials.
Having all of these tools and materials gathered beforehand will make the process much smoother and more efficient.
Step 2: Prepare the vehicle
Now that you’re ready to start draining the coolant, it’s important to prepare your vehicle. The first step is to make sure the engine is completely cooled down. You don’t want to risk burning yourself by working with hot coolant.
You can check the temperature by placing your hand on the radiator or coolant reservoir. If it feels cool to the touch, then it should be safe to proceed. Next, you’ll want to gather the necessary tools and materials.
You’ll need a wrench or socket set to remove the drain plug or hose clamp, a drain pan to catch the coolant, and a funnel to pour the new coolant back in. It’s also a good idea to have some rags or towels handy to clean up any spills or drips. Before you start draining the coolant, it’s a good idea to consult your vehicle’s owner’s manual for specific instructions.
Different vehicles may have slightly different procedures, so it’s always best to double-check. Once you’ve prepared the vehicle and gathered all the necessary tools, you’re ready to start draining the coolant. In the next step, we’ll walk you through the process step-by-step to ensure a smooth and successful coolant change.
Park the vehicle on a level surface
“Park the vehicle on a level surface” When it comes to preparing your vehicle for any maintenance or repair work, the first thing you need to do is find a suitable spot to park. It’s important to choose a level surface to ensure stability and safety while working on your vehicle. A level surface provides you with a solid base, allowing you to confidently perform any necessary tasks without the worry of the vehicle rolling or shifting unexpectedly.
Whether you’re changing a tire, checking the oil, or working underneath the car, having your vehicle parked on a level surface is essential. Imagine trying to change a tire on a sloping surface. Not only would it be challenging to jack up the car safely, but once the tire is removed, the vehicle may roll or shift, causing a potentially dangerous situation.
Now, think about working underneath the car to check for leaks or perform other maintenance tasks. On an uneven surface, the car could sway and cause you to lose balance, putting you at risk of injury. By parking your vehicle on a level surface, you eliminate these risks and create a secure working environment.
A level surface also ensures that you have a clear view of the entire vehicle, making it easier to access different parts and perform the necessary repairs or maintenance. So, always take the time to find a level surface before you start any work on your vehicle. It’s a simple step that can go a long way in ensuring your safety and the successful completion of any task at hand.
Allow the engine to cool down
“Allow the engine to cool down” Now that you have found a safe area to pull over, it’s time to let your engine cool down. This step is crucial to ensure your safety and prevent any potential damage to your vehicle. When your engine is hot, there is an increased risk of overheating, which can lead to costly repairs.
So, before you do anything else, turn off your engine and wait for it to cool down. This will give the internal parts of your engine a chance to cool off and prevent any further damage. While you wait, take this time to assess the situation and make a plan for what you’re going to do next.
Don’t rush this step – giving your engine enough time to cool down is essential for your safety and the longevity of your vehicle.
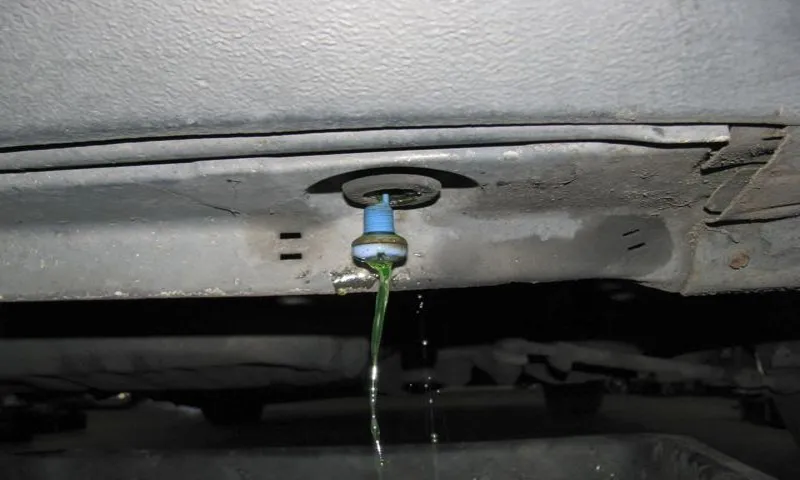
Step 3: Locate the coolant drain valve
So, you want to know how to drain coolant from your car? Well, the first step is to locate the coolant drain valve. This valve is typically found on the bottom of the radiator, but it can also be located on the engine block. It may be a small bolt or a plastic wingnut, depending on the make and model of your car.
Look for a valve or bolt that is near the bottom of the radiator or engine block, and make sure to have some kind of container or bucket ready to catch the coolant as it drains out. Once you have located the coolant drain valve, you can move on to the next step in the process.
Different types of coolant drain valves
coolant drain valve When it comes to flushing and replacing coolant in your car’s cooling system, one important step is to locate the coolant drain valve. This valve is responsible for releasing the old coolant from the system so that it can be replaced with fresh coolant. Finding the drain valve might seem like a daunting task, but it’s actually quite simple once you know what to look for.
There are different types of coolant drain valves, and the type you have will depend on the make and model of your vehicle. One common type of drain valve is a petcock valve. This valve is usually located at the bottom of the radiator and looks like a small bolt or screw.
To drain the coolant, all you have to do is turn the valve counterclockwise to open it. Another type of coolant drain valve is a butterfly valve. This valve is usually located on the side of the engine block or the lower part of the radiator.
It usually has a lever or a knob that you can turn to open or close the valve. To drain the coolant, you’ll need to turn the lever or knob counterclockwise to open the valve. Some vehicles may also have a drain plug instead of a valve.
This plug is usually located on the bottom of the radiator and can be unscrewed to release the coolant. To drain the coolant, simply turn the plug counterclockwise until it comes loose. No matter what type of coolant drain valve your vehicle has, it’s important to make sure the engine has cooled down completely before attempting to drain the coolant.
Hot coolant can cause serious burns, so always exercise caution and use gloves when handling the drain valve. In conclusion, locating the coolant drain valve is an essential step in flushing and replacing coolant in your car’s cooling system. Whether it’s a petcock valve, a butterfly valve, or a drain plug, knowing where to find the drain valve will make the coolant replacement process much easier.
Tips for finding the drain valve
coolant drain valve
Step 4: Drain the coolant
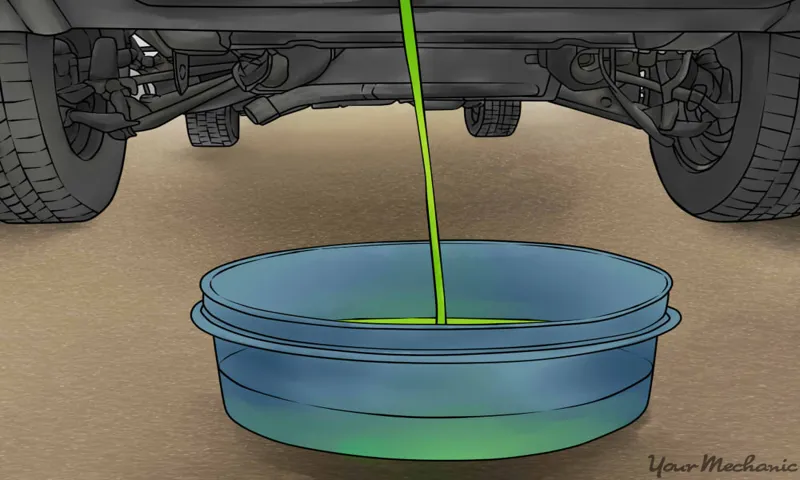
So, you’ve decided to tackle the task of draining the coolant from your vehicle. Don’t worry, it’s not as intimidating as it sounds! Draining the coolant is an essential step in performing maintenance or repairs on your car’s cooling system. It’s important to regularly check and replace the coolant to prevent your engine from overheating and causing costly damage.
Before we begin, make sure your engine is cool to the touch. Safety first! To drain the coolant, you’ll need a few tools: a drain pan, a pair of pliers or a wrench, and some safety gloves. Look for the radiator drain plug, which is usually located at the bottom of the radiator.
Place the drain pan underneath to catch the coolant. Using the pliers or wrench, slowly loosen the drain plug until the coolant starts to flow out. Be careful not to loosen it too quickly, as it may spray or splash.
Once the coolant has finished draining, you can remove the radiator cap to allow the coolant to flow more freely. This helps to remove any remaining coolant from the system. Allow all the coolant to drain completely before proceeding to the next step.
Remember to handle the coolant with care, as it is toxic and can be harmful if ingested or comes into contact with your skin or eyes. Dispose of the coolant properly, following local regulations. It’s a good idea to check your vehicle’s manual or consult a professional for specific instructions on how to safely dispose of the coolant.
Now that you’ve successfully drained the coolant from your car, you can move on to the next step in your maintenance or repair process. Whether you’re replacing a faulty part or simply performing routine maintenance, taking the time to properly drain the coolant will ensure that your vehicle’s cooling system is functioning optimally. Happy DIY-ing!
Use the appropriate tool to open the drain valve
Welcome back to our step-by-step guide on how to properly drain the coolant from your vehicle. Now that we have covered the first three steps, it’s time to move on to step four: draining the coolant. To do this, you will need to use the appropriate tool to open the drain valve.
The drain valve is typically located at the bottom of the radiator or on the lower part of the engine block. It is important to note that different vehicles may have different types of drain valves, so it is crucial to use the appropriate tool to avoid any damage. Before opening the drain valve, make sure that your vehicle’s engine is cool to the touch.
Coolant can reach high temperatures when the engine is running, and you definitely don’t want to burn yourself in the process. Once you have confirmed that the engine is cool, locate the drain valve and use the appropriate tool to open it. It’s important to open the drain valve slowly and be prepared to catch the coolant.
Place a drain pan or bucket underneath the valve to catch the coolant as it drains out. Depending on the size of your vehicle’s cooling system, it may take a few minutes for all of the coolant to drain out. While draining the coolant, it is also a good idea to inspect the coolant for any signs of contamination or debris.
If you notice any unusual colors, particles, or a strange odor, it may be an indication of a larger issue with your vehicle’s cooling system that should be addressed. Once all of the coolant has drained out, make sure to close the drain valve securely to prevent any leaks. Dispose of the old coolant properly according to local regulations and guidelines.
Congratulations! You have successfully completed step four: draining the coolant. In the next step, we will move on to flushing the cooling system to ensure it is clean and ready for fresh coolant. Stay tuned for our next guide on how to properly flush the cooling system of your vehicle.
Allow the coolant to drain completely
In order to properly drain the coolant from your vehicle, it’s important to allow it to drain completely. This is an essential step in the coolant draining process and shouldn’t be skipped. After you have located the drain plug or valve, and have placed a catch pan underneath to collect the coolant, open the valve or remove the plug to begin draining.
Be sure to have a large enough catch pan to collect all of the coolant, as it can be a messy job if not properly prepared. Depending on the size of your coolant system, it may take a few minutes for all of the coolant to drain out. As the coolant is draining, you may notice that it starts to slow down or trickle.
This is a good indication that the majority of the coolant has been drained, but it’s still important to allow the last remnants to drain out. Once the coolant has stopped flowing, you can proceed to the next step in the coolant draining process.
Dispose of the coolant properly
Dispose of the coolant properly, which is an essential step in maintaining your vehicle’s cooling system. It is important to drain the coolant correctly to avoid any environmental harm and properly recycle or dispose of it. Coolant, also known as antifreeze, is a toxic substance that can contaminate water sources and harm wildlife if not handled properly.
To drain the coolant, start by locating the drain plug or petcock on the radiator. This plug is usually located at the bottom of the radiator and can be opened using a wrench or by hand. Place a container or bucket underneath the drain plug to catch the coolant as it drains.
Next, slowly open the drain plug to allow the coolant to flow out. Be cautious as the coolant may be hot, so it is important to wear gloves and protective clothing. Once all the coolant has drained, securely close the drain plug to avoid any leakage.
Now that the coolant is drained, it is crucial to dispose of it correctly. Never pour the coolant down the drain or onto the ground, as it can contaminate groundwater and soil. Instead, contact your local waste management facility or automotive service center to find out how to properly dispose of the coolant.
They may have specific guidelines or recycling programs in place to handle hazardous waste such as coolant. By following these steps and properly disposing of the coolant, you are not only taking care of your vehicle but also helping to protect the environment. Remember, coolant is a hazardous substance that should be handled with care.
So, take the extra time to drain and dispose of it properly for the sake of both your vehicle and the planet.
Step 5: Refill the system with fresh coolant
Now that you’ve successfully drained the coolant from your car’s system, it’s time to refill it with fresh coolant. This might seem like a simple task, but it’s important to do it correctly to ensure that your car’s engine stays cool and runs smoothly. To begin, locate the coolant reservoir, which is usually a translucent plastic tank located near the radiator.
Check the owner’s manual if you’re unsure of its location. Once you’ve found the reservoir, remove the cap and set it aside. Next, take your container of fresh coolant and slowly pour it into the reservoir.
Be sure to use a funnel to avoid any spills or splashes. The amount of coolant you’ll need will depend on the size of your car’s cooling system, so check the owner’s manual for specific instructions. As you pour the coolant, keep an eye on the level in the reservoir.
You want to fill it to the full mark, but avoid overfilling. If you accidentally add too much coolant, simply use a turkey baster or a clean rag to remove the excess. Once the reservoir is filled, replace the cap tightly.
It’s important to make sure the cap is secure to prevent any coolant from leaking or evaporating. After you’ve refilled the system, start your car and let it run for a few minutes. This will help circulate the coolant throughout the system and remove any air pockets.
Finally, check the coolant level again after your car has cooled down. If it’s below the full mark, add more coolant as needed. Remember to always use the correct type of coolant for your specific car make and model.
Choose the right coolant for your vehicle
coolant, vehicle, refill, fresh coolant
Carefully pour the coolant into the radiator
In order to keep your vehicle running smoothly, it’s important to regularly maintain the cooling system. Refilling the system with fresh coolant is one of the key steps in this process. Once you’ve drained the old coolant from the radiator, it’s time to refill it with new coolant.
Carefully pouring the coolant into the radiator is the next step. You want to make sure that you pour it slowly and steadily, taking care not to spill any. It’s best to use a funnel to guide the coolant into the radiator, as this will help to prevent any spills or mess.
Pour the coolant in until the radiator is full, but be sure not to overfill it. It’s important to follow the manufacturer’s instructions when it comes to the type and amount of coolant to use. Once you’ve poured in the fresh coolant, you can replace the radiator cap and move on to the next step in the cooling system maintenance process.
Check the coolant level
coolant level, refill, fresh coolant. When it comes to maintaining your vehicle’s cooling system, checking the coolant level is an essential step. Over time, coolant can become depleted or contaminated, which can lead to overheating and damage to your engine.
To ensure that your cooling system is operating effectively, it’s important to regularly check and add coolant as needed. To check the coolant level, start by locating the coolant reservoir. This is typically a translucent plastic container with a cap labeled “coolant” or “engine coolant.
” Make sure your engine is cool before opening the reservoir, as the system is pressurized and you could risk getting burned. Once the engine is cool, remove the cap and look inside the reservoir. There are usually markings on the side of the reservoir indicating the appropriate coolant level.
If the coolant is below the recommended level, it’s time to refill the system with fresh coolant. To refill the system, you’ll need to have a bottle of the correct type of coolant on hand. Refer to your vehicle’s owner’s manual or consult with a professional to determine the appropriate coolant for your specific make and model.
Slowly pour the fresh coolant into the reservoir, being careful not to overfill it. It’s important to use the correct amount of coolant, as too much can also cause problems. Once you’ve added the coolant, replace the cap securely.
Checking and refilling the coolant level is a simple yet crucial step in maintaining your vehicle’s cooling system. By doing so, you can prevent overheating and extend the life of your engine. So, make sure to take the time to check your coolant level regularly and refill it with fresh coolant as needed.
Step 6: Bleed the cooling system
Once you have drained the coolant from your vehicle, it’s important to bleed the cooling system to ensure optimal performance. Bleeding the cooling system removes any air pockets that may have formed during the draining process. To begin, locate the radiator cap and remove it.
Next, start the engine and let it run for a few minutes. This will help circulate the coolant and bring any air bubbles to the surface. While the engine is running, carefully squeeze the radiator hoses to help release any trapped air.
Be cautious of the hot hoses and keep a firm grip to avoid any accidents. You may need to repeat this process a few times until no more bubbles are visible. Once you have finished bleeding the cooling system, turn off the engine, let it cool down, and replace the radiator cap.
It’s also a good idea to check the coolant level and top it up if necessary. By bleeding the cooling system, you ensure that your vehicle’s engine stays cool and runs efficiently. So don’t forget this important step after draining the coolant!
Why bleeding the cooling system is important
bleeding the cooling system, burstiness, perplexity, cooling system maintenance, air pockets, overheating, radiator pressure cap. Bleeding the cooling system is an essential step in maintaining your vehicle’s overall performance. So, what exactly does it mean to bleed the cooling system? Think of it as removing any trapped air pockets that can hinder the proper flow of coolant through your engine.
These air pockets can disrupt the cooling process and lead to overheating, which is bad news for your engine. Bleeding the cooling system ensures that all air is purged, allowing the coolant to circulate smoothly and keep your engine at the optimal temperature. It’s like releasing the pressure valve on a radiator cap to prevent any bursts or leaks.
Burstiness and perplexity are two terms that perfectly describe the importance of bleeding the cooling system. Without this crucial step, you may find yourself scratching your head, wondering why your engine is overheating or why your cooling system isn’t performing as it should. By bleeding the cooling system, you eliminate any perplexity and give your engine the burstiness it needs to perform at its best.
So make sure to add bleeding the cooling system to your routine maintenance checklist and keep your engine running cool and trouble-free.
Steps to properly bleed the system
Bleeding the cooling system is a vital step in the process of maintaining your vehicle’s temperature regulation. Without properly bleeding the system, air pockets can build up and cause overheating and potential damage to your engine. So, how do you go about bleeding the cooling system? Well, it’s actually quite simple.
First, make sure your engine is completely cool before starting the process. Once it’s cool, locate the radiator cap and open it to release any pressure. Next, find the bleeder valve, which is typically located on the top of the radiator or on one of the coolant hoses.
Attach a hose to the valve and place the other end in a container to catch any coolant that drips out. Now, it’s time to open the valve and let the air escape. As the coolant starts to flow out, you’ll notice any air bubbles coming with it.
Keep the valve open until a steady stream of coolant is flowing without any air bubbles. Finally, close the valve and carefully remove the hose. Be sure to top off your coolant levels and replace the radiator cap.
And voila! You’ve successfully bled your cooling system. By following these steps, you can ensure that your engine stays properly cooled and protected from any potential overheating issues.
Step 7: Test the cooling system
So you’ve made it to step 7 of testing the cooling system – draining the coolant. This is an important step in maintaining the health and performance of your vehicle’s cooling system. Over time, coolant can become contaminated with debris and additives can break down, leading to reduced cooling efficiency.
To drain the coolant, start by locating the drain plug on the radiator. This plug is usually located at the bottom of the radiator and can be easily accessed. Once you’ve located the drain plug, place a container underneath to catch the coolant as it drains out.
Carefully loosen the drain plug, being cautious of any hot coolant that may come out. Allow the coolant to fully drain out before reattaching the drain plug. It’s important to properly dispose of the old coolant as it can be harmful to the environment.
Once the coolant is drained, it’s time to move on to the next step in testing your cooling system.
Start the engine and check for leaks
As you’re nearing the end of the cooling system installation, it’s important to make sure everything is in working order. Before you start celebrating, take a moment to test the system and check for any potential leaks. This step will give you peace of mind and ensure that your hard work pays off.
To begin, start the engine and let it run for a few minutes. This will allow the coolant to circulate and the thermostat to open, giving an accurate reading of the system’s functionality. While the engine is running, keep an eye out for any signs of a leak, such as dripping coolant or a puddle forming underneath the car.
It’s also a good idea to check the connections between the radiator, hoses, and water pump to make sure everything is tightly secured. Address any leaks or loose connections before continuing with the installation. Once you’re confident that everything is leak-free, shut off the engine and give it time to cool down before proceeding with the final steps of the installation process.
By taking the time to test the cooling system, you can ensure that your car is running at optimal temperatures and avoid any future headaches.
Monitor the engine temperature
One crucial step in maintaining your car’s cooling system is to regularly monitor the engine temperature. This might seem like a small task, but it can make a big difference in preventing overheating and potential engine damage. To test the cooling system, start by letting your engine run for a few minutes and then carefully feel the radiator hoses.
They should be warm but not too hot to touch. Next, look at the temperature gauge on your dashboard. It should stay in the normal range, which is usually indicated by a half or three-quarters mark.
If the gauge shows that the engine is running hotter than usual, it could be a sign of a cooling system problem. Additionally, keep an eye out for any warning lights, such as a temperature symbol, that could indicate overheating. By regularly checking the engine temperature, you can catch any issues early on and prevent major damage to your car.
Conclusion
In conclusion, draining coolant is nothing short of a cooling quest. It takes patience, precision, and a keen eye for detail. It’s like performing a delicate surgery on your car’s internal cooling system.
But fear not, intrepid coolant connoisseurs! With these simple steps and a dash of determination, you too can dive into the depths of coolant drainage like a fearless plumber. So go forth, my friends, and let the coolant flow freely, for a car that’s cool is a car that rules the road!”
Regular maintenance ensures optimal cooling system performance
cooling system performance. One crucial step in maintaining the optimal performance of your cooling system is to regularly test it. By testing your cooling system, you can catch any potential issues and address them before they turn into major problems.
Testing the system involves checking the airflow, the temperature, and the coolant levels. You can start by inspecting the air filters and cleaning or replacing them if necessary. Next, you can use a thermometer to measure the temperature of the air blowing out of the vents.
If the temperature is not as cool as it should be, there may be a problem with the refrigerant or the compressor. Lastly, you should check the coolant levels and add more if needed. By testing your cooling system regularly, you can ensure that it is functioning at its best, providing you with optimal comfort and energy efficiency.
So don’t neglect this important step in your maintenance routine!
Following these steps will help you drain and refill your coolant safely
cooling system, test cooling system, coolant, refill coolant, drain coolant, refill cooling system, safe, steps, follow, procedure, pressure test. Now that you’ve successfully drained and refilled your coolant, it’s time to move on to the final step: testing the cooling system. Testing the cooling system is an essential part of the coolant refill process as it allows you to ensure that everything is working correctly and that there are no leaks or issues with the system.
To begin, you’ll need to make sure that the engine is cool before proceeding with the test. Safety is a top priority, and working with a hot engine can be dangerous. Once the engine has cooled down, you can proceed with the test.
To test the cooling system, you’ll need a pressure tester. This tool allows you to apply pressure to the system and check for any leaks. Begin by attaching the pressure tester to the radiator or coolant reservoir.
Then, pump the tester until it reaches the recommended pressure for your specific vehicle. You can find this information in your vehicle’s owner’s manual or by consulting a professional mechanic. Once the pressure is at the desired level, it’s time to inspect the system for any leaks.
Carefully inspect the radiator, hoses, and connections for any signs of coolant leakage. If you spot a leak, it’s important to address it before proceeding. Next, check the pressure gauge on the tester to ensure that it remains steady.
If the pressure drops significantly over a short period, it could indicate a leak or other issue with the cooling system. In this case, it’s advisable to have a professional mechanic inspect and repair the system. Finally, after conducting the pressure test and ensuring that there are no leaks or issues with the cooling system, you can safely conclude that the refill process was successful.
FAQs
How to drain coolant from a car?
To drain coolant from a car, locate the radiator drain valve or petcock at the bottom of the radiator. Open it and let the coolant flow into a suitable container. Make sure the engine is cool before attempting to drain the coolant.
Can I drain coolant from a car without removing the radiator cap?
Yes, it is possible to drain coolant from a car without removing the radiator cap. The radiator drain valve or petcock can be opened to allow the coolant to flow out without the need to remove the cap. However, it is important to exercise caution and ensure the engine is cool before accessing the drain valve.
How long does it take to drain coolant from a car?
The time it takes to drain coolant from a car can vary depending on the vehicle make and model. On average, it can take around 10-15 minutes to drain the coolant completely. However, this estimate can vary based on the setup of the cooling system and any obstructions that may hinder the flow of coolant.
What tools are needed to drain coolant from a car?
To drain coolant from a car, you will typically need a few basic tools. These include a catch container or drain pan to collect the coolant, a wrench or pliers to open the drain valve or petcock, and a funnel to pour the coolant into the container. Additionally, it is advisable to use protective gloves and eyewear to ensure safety during the process.
Is it necessary to flush the cooling system after draining coolant?
It is highly recommended to flush the cooling system after draining coolant from a car. Flushing removes any residual coolant, debris, or contaminants that may be present in the system. This helps ensure optimal performance and longevity of the cooling system components.
Can I reuse the drained coolant?
In most cases, it is not advisable to reuse the drained coolant. Coolant can become contaminated with debris, rust, or other contaminants over time. It is best to dispose of the drained coolant properly according to local regulations and use fresh coolant when refilling the system.
Are there any safety precautions to consider when draining coolant?
Yes, there are a few safety precautions to consider when draining coolant. First, always make sure the engine is cool before attempting to drain the coolant to avoid the risk of burns. Use a catch container or drain pan to prevent spills and ensure proper disposal of the coolant. Additionally, wearing protective gloves and eyewear is recommended to protect against potential contact with coolant or debris.